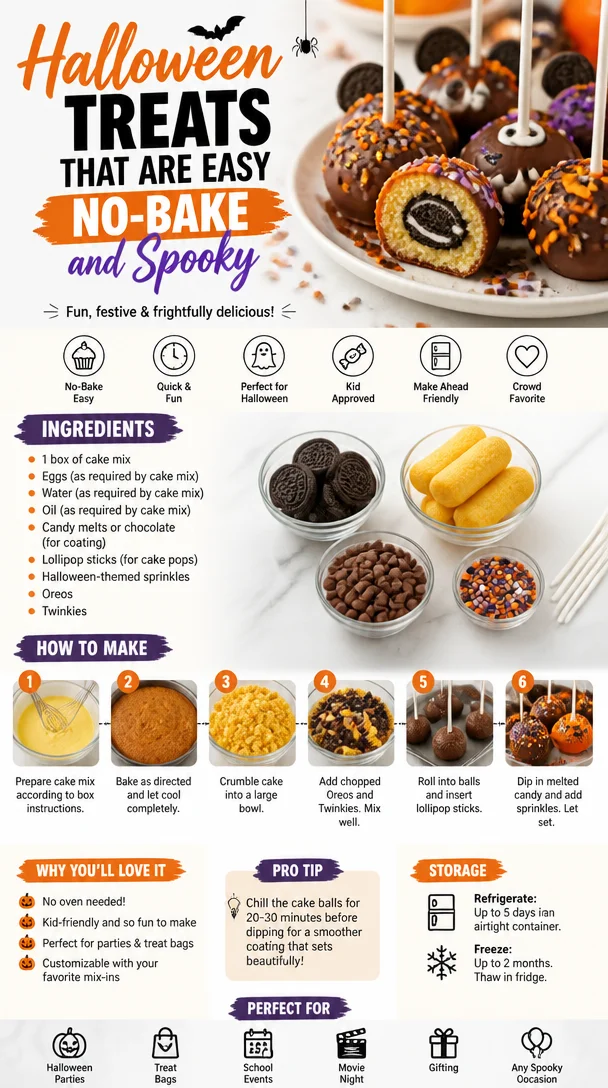
Spooktacular Halloween Treats: Cake Pops and More!
Ah, Halloween—the season of all things spooky, sweet, and undeniably fun! As the leaves turn vibrant shades of orange and gold, there’s something magical about the crisp autumn air that begs for festive treats. This time of year, it’s all about creativity in the kitchen, and I’m thrilled to share some easy and delightful Halloween treats that will charm both kids and adults alike.
Imagine this: children bustling around in costumes, laughter filling the air, and the aroma of baked goodies wafting through your home. Whether you’re hosting a Halloween party or just looking to indulge in sweet nostalgia, making Halloween treats can turn an ordinary day into a playful culinary adventure.
One of my all-time favorite Halloween activities is making cake pops! Here’s the twist: we’re using cake mix to simplify the process, along with some fun ingredients that amp up the seasonal spirit. Grab your apron, friends—we’re about to dive into a world of colorful candy, creative decor, and, most importantly, some deliciousness that’ll have everyone coming back for seconds!
A Nostalgic Kitchen Memory
Back when I was a kid, Halloween was a month-long celebration! My siblings and I would spend weeks designing our spooky costumes, but as soon as October hit, it was all about the treats. Every year, my mom would host a Halloween bake-off with our neighborhood friends. We’d whip up cakes, cookies, and all sorts of sweets, and I vividly remember one year when we decided to make cake pops for the first time.
In our excitement, we made a deliciously vibrant cake coated in swirls of colorful candy melts. The kitchen was an explosion of laughter, flour, and stray sprinkles that seemed to find their way everywhere! My favorite part was decorating them with jagged, chocolate-dipped Oreos as tombstones and fluffy Twinkies as ghosts. Each bite was a perfect blend of chocolatey cake goodness and sweet decorations, and the joy on the kids’ faces was priceless. Those memories taught me that baking is about so much more than the finished product—it’s about gathering with loved ones, crafting moments of joy, and fueling the imagination.
Ingredients
Let’s dive into what you’ll need for these delightful haunted Halloween treats! Here’s a brief rundown of our essentials:
-
1 box of cake mix
Choose your favorite flavor. Chocolate adds a rich depth, while vanilla can be a delightful canvas for the spooky decorations! If you’re feeling adventurous, consider a spice cake mix for an autumnal twist. -
Eggs (as required by cake mix)
Eggs help bind the cake and provide moisture. You can easily substitute with flax eggs (1 tablespoon flaxseed meal + 2.5 tablespoons water per egg) for a vegan version, or unsweetened applesauce (1/4 cup for each egg) which adds a hint of sweetness! -
Water (as required by cake mix)
The trusty liquid we often overlook! You could swap this for milk or even a flavored non-dairy milk to add a little extra creaminess or flavor to your cake. -
Oil (as required by cake mix)
Usually the vegetable or canola kind, oil keeps the cake moist. For a unique twist, try using melted coconut oil for a subtle tropical vibe! -
Candy melts or chocolate (for coating)
Candy melts come in vibrant colors that are perfect for Halloween! If you’re feeling fancy, you could use high-quality chocolate that you can temper yourself. -
Lollipop sticks (for cake pops)
This is what transforms your adorable little bites into fully-fledged cake pops! You can grab these easily at your local craft or party store. -
Halloween-themed sprinkles
The spooky decoration that adds a festive crunch! Look for ghost shapes, pumpkin sprinkles, and glittery options to make your cake pops pop! -
Oreos
Perfect for creating adorable gravestones or simply crumbling onto a treat for some added crunch! -
Twinkies
The perfect shortcut for adding something whimsical. Use them to build little ghost figures—simply add chocolate chips for eyes and a mouth!
Step-by-Step Instructions
Now, let’s get down to the fun part—making these treats!
-
Prepare the Cake
Start by preheating your oven according to the cake mix instructions (usually around 350°F/175°C). Grease and flour a baking pan or line it with parchment paper. In a mixing bowl, combine the cake mix, eggs, water, and oil per the cake mix instructions. Stir until well blended, but don’t overmix—let those lumps stay a little! -
Bake the Cake
Pour the batter into the prepared pan and bake for about 25-30 minutes, or until a toothpick inserted into the center comes out clean. While it’s baking, take a moment to relish that delightful cake smell filling your kitchen—it’s pure magic! -
Cool Down
Allow the cake to cool completely in the pan for about 15 minutes before transferring it to a wire rack. This is crucial—if the cake is warm, it won’t crumble nicely for our pops. -
Crumble the Cake
Once cooled, use your fingers or a fork to crumble the cake into a large mixing bowl. Get in there! The more fine the crumbs, the better your cake pops will hold together. -
Mix with Frosting
Here’s where the fun really starts! Add about 1/2 cup of frosting to the cake crumbs. You want a dough-like consistency that’s easy to mold. If it’s too crumbly, add a little more frosting; too wet? Toss in more cake crumbs! -
Form Cake Balls
Scoop out tablespoon-sized portions of the mixture and roll them into balls—about 1 to 1.5 inches in diameter. Place them on a baking sheet lined with parchment paper. -
Chill the Balls
Pop your formed cake balls in the fridge for about 30-45 minutes, or in the freezer for about 15. Chilling helps them firm up, making them easier to dip in chocolate. -
Melt the Coating
While the cake balls chill, melt your candy melts according to the package instructions. You can also do this in a microwave; just heat in 30-second intervals and stir until smooth. -
Dip the Sticks
To make the sticks stick, dip each lollipop stick into the melted coating, then insert it about halfway into a cake ball. This helps secure it and avoids the dreaded stick-slip! -
Coat the Cake Balls
Once the sticks are in, dip each cake ball fully into the melted candy melts, ensuring it’s nicely coated. Tap off any excess and place back on the lined baking sheet. -
Decorate with Sprinkles
Before the coating hardens, sprinkle Halloween-themed sprinkles on top—this is your moment to be creative! -
Final Chill
Let the coated cake pops chill again for about 15 minutes, allowing the coating to firm up nicely.
Serving Suggestions
Serve these delightful treats on a spooky platter lined with cobwebs made from spun sugar or just some simple parchment paper. You can even use a pumpkin or a festive bowl to display your cake pops in all their Halloween glory. Perfect for entertaining guests or sharing with little trick-or-treaters!
Recipe Variations
Feel free to mix things up a bit! Here are some creative twists you can explore:
- Ghostly Pops: After coating in white candy melts, use black frosting to add cute ghost faces.
- Pumpkin Spice Cake Pops: Use a pumpkin spice cake mix and top with orange candy melts for a seasonal palate.
- Brownie Pops: Swap out cake with brownie mix for an extra fudgy treat.
- Gluten-Free: Opt for a gluten-free cake mix and ensure your candy melts are gluten-free.
- Vegan Treats: Use a vegan cake mix, substitute eggs with applesauce, and choose vegan-friendly candy melts.
Chef’s Notes
This recipe has evolved a lot over the years, and I love seeing how versatile cake pops can be! They’re not just a delicious treat; they’re a canvas for your creativity, and with every Halloween season, I find new ways to decorate and enjoy them. One year, I even created a scarily delightful “witch’s brew” dip, serving the pops alongside colorful fruit and nuts that made an appearance in a spooky cauldron!
Remember, the kitchen is all about having fun, making a mess, and perhaps tasting some of the sweetness along the way.
FAQs and Troubleshooting
1. Why are my cake pops falling off the stick?
This usually happens when the cake ball is too heavy or the coating is too warm. Ensure your cake balls are firm enough after chilling, and let your candy coating cool slightly before dipping!
2. Can I use chocolate chips instead of candy melts?
Absolutely! Just remember that chocolate chips may require tempering to achieve a nice shine and ensure they adhere well.
3. How do I store my cake pops?
Store them in an airtight container in the fridge for up to a week, or at room temperature for a few days.
4. Help! My coating is cracking!
Cracked coatings can happen when your cake pops are too cold or if the coating was applied unevenly. Consider letting the cake pops come to room temperature before dipping and ensure an even coating.
Nutritional Info
(As a general guide, based on one cake pop, varies based on specific ingredients used)
- Calories: 150
- Total Fat: 7g
- Saturated Fat: 2g
- Carbohydrates: 20g
- Sugars: 15g
- Protein: 2g
Final Thoughts
Friends, Halloween is a time to revel in creativity and enjoy the sweeter things in life. These cake pops represent not only a fun recipe but a heartwarming tradition that brings joy through cooking and sharing. Grab your loved ones, let your imaginations run wild with decorations, and enjoy creating these delicious treats together. Until next time, happy haunting in the kitchen! 🍭🦇🎃
PrintSpooktacular Halloween Cake Pops
Delightful Halloween cake pops that are perfect for festive gatherings or trick-or-treaters.
- Prep Time: 30 minutes
- Cook Time: 30 minutes
- Total Time: 60 minutes
- Yield: 20 servings 1x
- Category: Dessert
- Method: Baking
- Cuisine: American
- Diet: Vegetarian
Ingredients
- 1 box of cake mix
- Eggs (as required by cake mix)
- Water (as required by cake mix)
- Oil (as required by cake mix)
- Candy melts or chocolate (for coating)
- Lollipop sticks (for cake pops)
- Halloween-themed sprinkles
- Oreos
- Twinkies
Instructions
- Prepare the Cake: Preheat your oven according to the cake mix instructions. Grease and flour a baking pan or line it with parchment paper. In a mixing bowl, combine the cake mix, eggs, water, and oil according to the instructions. Stir until blended.
- Bake the Cake: Pour the batter into the prepared pan and bake for about 25-30 minutes. Check with a toothpick.
- Cool Down: Allow the cake to cool in the pan for about 15 minutes before transferring it to a wire rack.
- Crumble the Cake: Once cooled, crumble the cake into a mixing bowl.
- Mix with Frosting: Add about 1/2 cup of frosting to the cake crumbs, mixing until a dough-like consistency forms.
- Form Cake Balls: Scoop out tablespoon-sized portions and roll them into balls.
- Chill the Balls: Refrigerate for about 30-45 minutes, or freeze for about 15.
- Melt the Coating: Melt your candy melts according to the package instructions.
- Dip the Sticks: Dip each lollipop stick into the melted coating and insert it into a cake ball.
- Coat the Cake Balls: Dip each ball into the melted candy melts and tap off excess.
- Decorate with Sprinkles: Sprinkle Halloween-themed decorations on top before the coating hardens.
- Final Chill: Let the cake pops chill for about 15 minutes.
Notes
Store in an airtight container in the fridge for up to a week.
Nutrition
- Serving Size: 1 cake pop
- Calories: 150
- Sugar: 15g
- Sodium: 150mg
- Fat: 7g
- Saturated Fat: 2g
- Unsaturated Fat: 3g
- Trans Fat: 0g
- Carbohydrates: 20g
- Fiber: 0g
- Protein: 2g
- Cholesterol: 30mg
Keywords: Halloween, Cake Pops, Desserts, Party Treats, Fun Recipes