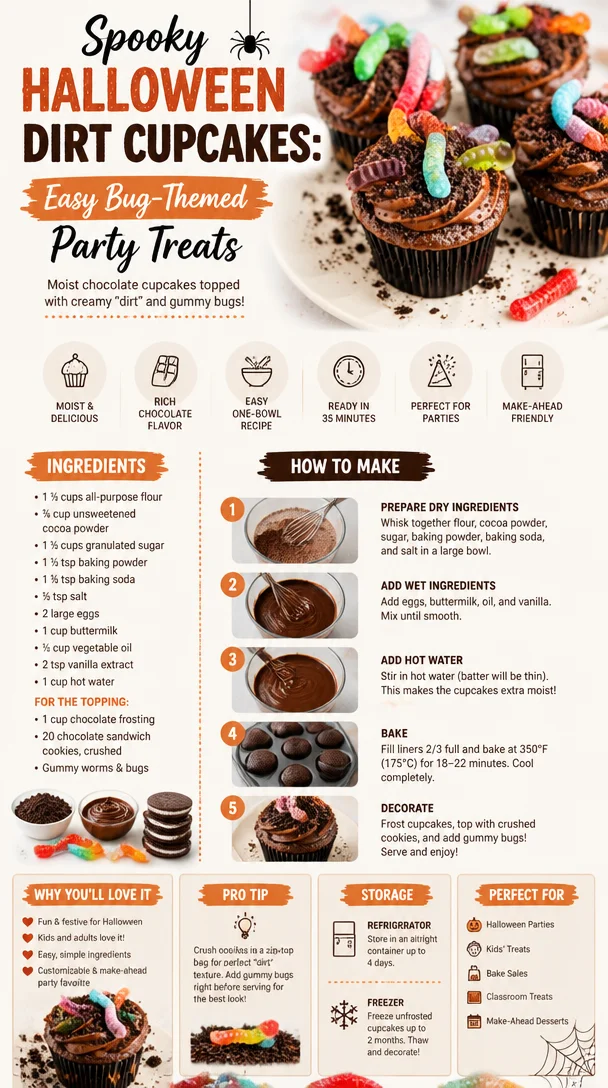
Dirt Cupcakes: A Delightfully Spooky Halloween Treat
Ah, Halloween! The time of year when ghouls and ghosts roam the streets, and our kitchens transform into cauldrons of creativity. Who doesn’t love the thrill of concocting spooky treats to celebrate this fun-filled holiday? One of my all-time favorites has to be dirt cupcakes. They’re not just any dessert; they’re a whimsical blend of cake, frosting, and crunchy treats that will have your little monsters squealing with delight. Whether you’re making these for a bug-themed birthday bash or just as a fun Halloween treat, dirt cupcakes are sure to steal the show!
As a keeper of kitchen stories and culinary magic, I believe that cooking should be joyful, and that includes making desserts. These dirt cupcakes combine nostalgia, creativity, and a dash of spookiness, making them the perfect addition to your festivity lineup. When I first discovered dirt cups as a child, it was at a friend’s birthday party, and I couldn’t believe how fun it was to eat something that looked just like dirt! I remember happily digging through the crunchy “soil” to uncover gummy worms and candy surprises hidden within. It’s the perfect blend of the creepy and the sweet, and honestly, who wouldn’t love that?
In this post, I’ll guide you step-by-step to make these adorable and charmingly messy dirt cupcakes—don’t worry, no real dirt involved! Grab your apron, and let’s get started on whipping up these deliciously spooky treats that’ll leave everyone buzzing with delight.
A Nostalgic Memory
I can still hear the laughter of my friends ringing in my ears as we gathered around the table, each of us eager to get our hands on those delightful little cups filled with chocolatey goodness! I was seven or maybe eight, and it was my best friend Emily’s birthday party. Her mom had set up a candy-making station in the kitchen, and amongst the chocolate pretzels and colored marshmallows, there they were—dirt cups topped with gummy worms. I can’t tell you how my eyes lit up when I saw them.
That birthday party was something special—a gathering of colorful balloons, silly games, and, of course, lots of treats. But the dirt cups? They were the stars of the show. I remember the playful chaos that ensued as we dove into those cups, our hands getting covered in chocolate, frosting, and sprinkles. It was pure bliss! This fun-filled memory inspired me to recreate those dirt cupcakes for my family—transforming them into an ooey-gooey cupcake version that you can customize and enjoy with your little ones at home.
Ingredients
Here’s what you’ll need to create these delightful dirt cupcakes. Each ingredient adds a whimsical touch to your baking adventure!
-
Chocolate Cake Mix (or homemade chocolate cake):
- The base of your cupcakes! You can use store-bought cake mix for convenience, but if you’re feeling ambitious, scratch-made chocolate cake is always a hit. Just remember, using high-quality cocoa powder will make a world of difference!
-
Eggs (3 large):
- Binding magic! If you’re vegan or looking for a substitute, consider using flax eggs or applesauce as alternatives.
-
Water (1 cup):
- Hydration for your batter! Swap in milk or a milk alternative for a richer flavor, if desired.
-
Vegetable Oil (½ cup):
- Oil helps keep your cupcakes moist and delicious. Coconut oil would be a great substitute, but be cautious as it can lend a subtle coconut flavor!
-
Chocolate Frosting (store-bought or homemade):
- The “dirt” on top! You can use any frosting you love, but a classic chocolate buttercream adds that special touch. Feel free to try flavored frosting (like peanut butter) for a twist!
-
Crushed Chocolate Cookies (like Oreos):
- For that classic dirt look! Simply crush up some Oreos or any chocolate wafer cookies in a ziplock bag.
-
Gummy Worms or Edible Insects:
- The fun decor that completes your dirt cupcakes! If you’re feeling adventurous, try using candy bugs for an authentic creepy-crawly experience!
-
Edible Flowers (optional):
- For a whimsical touch, top your cupcakes with edible flowers, giving a pop of color to the “dirt” effect!
Step-by-Step Instructions
Now that you have all your ingredients, let’s bake some magic! Follow these steps for dirt cupcakes that’ll enchant anyone who lays eyes on them.
Step 1: Preheat Your Oven
Start by preheating your oven to 350°F (175°C). This sets the stage for a perfectly baked cupcake! While the oven heats, line your muffin tin with cupcake liners. Choose fun Halloween designs for a festive flair!
Step 2: Prepare the Batter
In a large mixing bowl, combine the chocolate cake mix, eggs, water, and vegetable oil. Use a whisk or an electric mixer on medium speed to blend everything together until it’s smooth and lump-free. If you’re feeling adventurous, fold in some chocolate chips for extra decadence!
Step 3: Fill the Cupcake Liners
Using a scoop or a measuring cup, fill each liner about two-thirds full. This ensures your cupcakes have room to rise and avoid spilling over. Give each filled liner a gentle shake to remove any air bubbles. They’re ready for the oven!
Step 4: Bake Those Cupcakes!
Pop your muffin tin in the preheated oven and bake for 18-20 minutes or until a toothpick inserted into the center comes out clean. The glorious aroma will fill your kitchen, and you’ll be longing for a cupcake of your own! Once they’re baked, allow the cupcakes to cool in the tin for about 5 minutes before transferring them to a wire rack to cool completely.
Step 5: Frosting Time!
Once your cupcakes are completely cool, it’s time to spread on the chocolate frosting. You can either use a knife for a rustic look or a piping bag for a more polished finish! Don’t be shy with the frosting—it’s what makes the cupcakes truly delectable.
Step 6: Crumble the Cookies
Take your chocolate cookies and put them in a ziplock bag. Grab a rolling pin and crush them into fine crumbs (think dirt!). Sprinkle the cookie crumbles generously over the frosted cupcakes, creating a realistic dirt effect.
Step 7: Add the Worms and Decoration
Now for the fun part! Place gummy worms or edible insects atop the “dirt” and secure them slightly into the frosting. Let your creativity flow and arrange them as if they’re wriggling through the ground. For an extra dash of flair, add edible flowers around the edges or on top.
Serving Suggestions
To serve these cute dirt cupcakes, place them on a spooky-themed platter adorned with fake spiders and creepy cloth. You can use colorful napkins or dessert cups to give a more festive appeal. These delightful treats are perfect for a Halloween gathering, bug-themed birthday party, or just for a fun family night!
Recipe Variations
-
Pumpkin Spice Dirt Cupcakes: Swap out the chocolate cake mix for pumpkin spice cake mix for a seasonal twist.
-
Nut-Free Version: Keep the fun but make it nut-free by ensuring all ingredients are labeled and certified. Use alternatives for flour if necessary.
-
Gluten-Free Version: Use a gluten-free cake mix to cater to gluten-sensitive friends.
-
Rocky Road Variation: Sprinkle mini marshmallows and chopped nuts on top before adding gummy worms for a rocky road-inspired twist.
-
Chocolate Mousse Layer: For an indulgent upgrade, layer chocolate mousse between the cupcakes and frosting, creating a rich texture!
Chef’s Notes
These dirt cupcakes hold a special place in my heart. I love how adaptable they are! Over the years, I’ve experimented with various flavors and toppings. From adding a sprinkle of edible glitter for a magical touch to hosting cupcake-decorating parties for kids, these cupcakes have always brought smiles to my table. The memories associated with them remind me that cooking is as much about creating experiences as it is about sharing delicious food.
Each batch tells a story, whether it’s the giggles of tiny hands frosting cupcakes or the clinking of dessert plates after a fun dinner party. So don’t hesitate to let your creativity shine through when making these dirt cupcakes; the sillier, the better!
FAQs and Troubleshooting
Q: Why did my cupcakes sink?
A: Cupcakes can sink if they were underbaked or if the batter was overmixed. Be sure to check for doneness and avoid overmixing to maintain that fluffy texture!
Q: Can I make the cupcakes in advance?
A: Absolutely! You can bake them a day or two in advance and store them in an airtight container. Just frost them right before serving for maximum freshness.
Q: How do I store leftover dirt cupcakes?
A: Store them in an airtight container at room temperature for a couple of days. They can also be refrigerated, but be mindful that frosting and toppings may lose their texture.
Q: Can I use a different topping?
A: Definitely! You can get creative with toppings like chocolate sprinkles, cinnamon crumbles, or even edible glitter for an elegant twist.
Nutritional Info
*Calories: Approx. 320 per cupcake
*Fat: 16g
*Carbohydrates: 44g
*Protein: 4g
*Sugar: 25g (values may vary based on ingredients used)
Final Thoughts
Cooking is all about storytelling, and sharing these fun dirt cupcakes allows you to pass on sweet and spooky memories to your loved ones. They’re a hands-on treat that invites creativity, laughter, and the joy of baking into the kitchen. I can’t wait for you to try these dirt cupcakes and weave your own stories around them! So gather your family or friends, roll up your sleeves, and let’s create some Halloween magic together!
Happy baking—let the delicious adventures begin!
PrintDirt Cupcakes

Delightfully spooky dirt cupcakes combine cake, frosting, and crunchy treats for a whimsical Halloween treat!
- Prep Time: 15 minutes
- Cook Time: 20 minutes
- Total Time: 35 minutes
- Yield: 12 servings 1x
- Category: Dessert
- Method: Baking
- Cuisine: American
- Diet: Vegetarian
Ingredients
- 1 package Chocolate Cake Mix (or homemade chocolate cake)
- 3 large Eggs
- 1 cup Water
- ½ cup Vegetable Oil
- Chocolate Frosting (store-bought or homemade)
- Crushed Chocolate Cookies (like Oreos)
- Gummy Worms or Edible Insects
- Edible Flowers (optional)
Instructions
- Preheat your oven to 350°F (175°C).
- Prepare the batch by mixing chocolate cake mix, eggs, water, and vegetable oil in a large bowl.
- Fill each liner about two-thirds full with the batter.
- Bake for 18-20 minutes, or until a toothpick comes out clean.
- Cool the cupcakes for 5 minutes in the tin, then transfer to a wire rack to cool completely.
- Frost the cooled cupcakes with chocolate frosting.
- Crumble chocolate cookies into fine crumbs and sprinkle them over the frosted cupcakes.
- Add gummy worms or edible insects on top for decoration.
Notes
These cupcakes can be customized with various toppings and flavors. Great for Halloween or birthday parties!
Nutrition
- Serving Size: 1 cupcake
- Calories: 320
- Sugar: 25g
- Sodium: 300mg
- Fat: 16g
- Saturated Fat: 3g
- Unsaturated Fat: 10g
- Trans Fat: 0g
- Carbohydrates: 44g
- Fiber: 1g
- Protein: 4g
- Cholesterol: 30mg
Keywords: Halloween, spooky treats, dirt cupcakes, kids dessert, fun baking