***
Three-Ingredient Peanut Butter Cookies: Your New Go-To Miracle
Hey there, friend! Anna here. Can I let you in on a little secret? Some of the very best things in life – and in the kitchen – are also the simplest. I’m talking about those magical recipes that require zero fancy equipment, no last-minute grocery store sprints, and absolutely no stress. The ones that live in your back pocket for when a cookie craving hits hard, the kids announce they need to bring snacks for the entire class tomorrow, or you just need a warm, sweet hug from the oven at 9 PM on a Tuesday.
That’s exactly where these miraculous Three-Ingredient Peanut Butter Cookies come in. Yes, you read that right. Just three ingredients stand between you and a batch of cookies that are crispy on the outside, wonderfully soft and chewy on the inside, and packed with that rich, nutty flavor we all adore. If you’ve ever looked at a recipe and thought, “I can’t possibly make that,” this is your moment. This recipe is your victory lap. It’s proof that incredible food doesn’t have to be complicated to be utterly memorable and completely delicious. So, let’s ditch any baking anxiety, roll up our sleeves, and create some simple, sweet magic together.
A Cookie Jar Full of Memories
PrintThree-Ingredient Peanut Butter Cookies
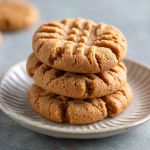
Simple, classic, and irresistibly good—these peanut butter cookies require just three pantry staples and deliver big on flavor. Crispy on the edges and soft in the center, they’re perfect for quick cravings or baking with kids. No flour, no fuss, just sweet, nutty perfection.
- Prep Time: 20 mins
- Cook Time: 10 mins
- Total Time: 30 mins
- Yield: 12 cookies 1x
Ingredients
1 cup peanut butter (smooth or crunchy)
1 cup white sugar
1 large egg
Instructions
Preheat oven to 350°F (175°C). Line a baking sheet with parchment paper.
In a mixing bowl, combine peanut butter, sugar, and egg. Stir until smooth and fully blended.
Scoop tablespoon-sized balls onto the baking sheet. Flatten each with a criss-cross pattern using a fork.
Bake for 8–10 minutes, or until edges are lightly golden.
Let cool on the sheet for 5 minutes before transferring to a wire rack.
Nutrition
- Calories: 180
- Fat: 10g
- Carbohydrates: 18g
- Protein: 4g
This recipe always takes me right back to my grandma’s linoleum-floored kitchen. I was maybe seven years old, and she was the queen of “making something out of nothing.” One rainy afternoon, I was desperate to bake, but we were out of butter, flour, and chocolate chips. I was on the verge of a full-scale melodramatic meltdown when she just winked, pulled out the peanut butter, sugar, and a single egg, and said, “Honey, we’ve got all we need.”
I watched, mesmerized, as she stirred that simple, sticky dough with her strong hands. She let me press the criss-cross pattern with a fork, teaching me how to make each one just so. The smell that filled her kitchen as they baked was pure magic – warm, toasty, and sweet. That day, she didn’t just teach me how to make a cookie; she taught me about kitchen resourcefulness, about joy in simplicity, and that the best memories are often whipped up with just a few humble ingredients and a whole lot of love. Every time I make these, I think of her, and I hope this recipe becomes a part of your story, too.
Gathering Your (Tiny) Troop of Ingredients
Here’s your beautifully short shopping list! The magic of this recipe is in the quality and character of these three stars, so let’s get to know them a little better.
- 1 cup (250g) Peanut Butter (smooth or crunchy): This is the heart and soul of the cookie! I highly recommend using a conventional brand like Jif or Skippy for this specific recipe. Their texture is consistently perfect, and they contain stabilizers that help the cookies hold their shape. “Natural” peanut butters (the kind with oil that separates) can make the cookies greasy and spread too much. Chef’s Insight: I adore crunchy peanut butter for the little pops of texture, but smooth gives you that classic, melt-in-your-mouth feel. The choice is yours!
- 1 cup (200g) White Sugar:
Don’t be tempted to swap this for all brown sugar! The white sugar is crucial for creating those delightfully crisp edges and that signature criss-cross pattern that doesn’t melt away. Substitution Tip: You can use a 50/50 blend of white and brown sugar if you prefer a deeper, caramel-like flavor and a slightly softer, chewier cookie throughout. - 1 Large Egg:
Our binding agent! It brings the dough together and provides structure. Make sure it’s at room temperature to ensure it incorporates smoothly and evenly into the dense peanut butter. Quick Tip: To quickly bring an egg to room temp, just place it in a bowl of warm water for 5-10 minutes before cracking.
Let’s Make Some Magic: Step-by-Step
Ready? This is going to be fast, fun, and so satisfying.
Step 1: Preheat and Prep
Preheat your oven to 350°F (175°C). Line a baking sheet with parchment paper. This is non-negotiable for me! It prevents sticking and makes cleanup an absolute dream. No parchment? A silicone baking mat works wonderfully too.
Step 2: The Big Mix
In a medium mixing bowl, combine the peanut butter, sugar, and the room-temperature egg. Now, roll up those sleeves and stir! You can use a sturdy spatula or a wooden spoon. It might seem a bit dry and crumbly at first, but keep faith and keep mixing. After a minute of good, old-fashioned elbow grease, it will suddenly come together into a thick, cohesive, and slightly sticky dough. Chef’s Hack: If you’re using a stand mixer, you can use the paddle attachment on low speed for about a minute. But honestly, this is so easy to do by hand, it’s almost not worth dirtying the mixer!
Step 3: Scoop and Shape
Using a tablespoon-sized cookie scoop or a regular spoon, portion out the dough and roll it into smooth, generous 1-inch balls. Place them on your prepared baking sheet, leaving about 2 inches between each one. They need a little room to spread! Pro Tip: If the dough is too sticky to roll, pop the whole bowl in the fridge for 15-20 minutes. This firms it up perfectly.
Step 4: The Signature Criss-Cross
This is the fun part! Take a fork and gently press down on each ball of dough to flatten it. Then, turn the fork 90 degrees and press again to create that classic grid pattern. Little Chef Secret: Dip the fork in a little extra sugar between presses. This gives the tops a delightful sparkle and a tiny bit of extra crunch, and it prevents the fork from sticking to the dough.
Step 5: Bake to Perfection
Slide your beautiful creations into the preheated oven and bake for 8-10 minutes. Now, listen closely! They won’t look “done” in the traditional sense when you pull them out. The edges should be just lightly golden, but the centers will still look very soft and puffy. This is perfect. They set up as they cool. Overbaking is the number one mistake here – it leads to crumbly, dry cookies. We want chewy!
Step 6: The Patient Wait
This is the hardest step: let the cookies cool on the hot baking sheet for at least 5 minutes. They are incredibly fragile right out of the oven. This resting time allows them to firm up enough to be moved. After 5 minutes, you can transfer them to a wire rack to cool completely… or, you know, eat one immediately while it’s still warm and blissfully soft.
How to Serve These Simple Beauties
These cookies are sublime all on their own, still slightly warm from the oven with a tall glass of cold milk. For a next-level experience, try sandwiching two cookies together with a dollop of chocolate hazelnut spread, a scoop of vanilla ice cream, or even a bit of strawberry jam. They also make a wonderful, humble addition to a holiday cookie plate – a little nostalgic nod amidst the more elaborate treats.
Get Creative! Fun Flavor Twists
Once you’ve mastered the classic, why not play around? Here are a few of my favorite riffs:
- Chocolate Chip Peanut Butter: Fold in ½ cup of semi-sweet chocolate chips into the dough before scooping.
- Peanut Butter & Jelly Thumbprints: Instead of the criss-cross, press your thumb into the center of each dough ball and fill the indent with your favorite jam before baking.
- Salty-Sweet Delight: Press a few flakes of sea salt on top of each cookie before baking.
- Double Peanut: Use crunchy peanut butter and add ¼ cup of chopped, salted peanuts to the dough.
- Sugar-Coated: Roll the dough balls in extra sugar before flattening for an extra-crispy, sparkly exterior.
Anna’s Chef Notes & Kitchen Stories
This recipe has been my kitchen security blanket for years. I’ve made it in a tiny apartment oven, in my mom’s kitchen during the holidays, and with a dozen tiny hands helping me press the forks. It has never, ever failed me. Over time, I’ve learned that a slightly under-baked cookie is far superior to an over-baked one, and that the brand of peanut butter truly does make a difference for the texture.
One of my favorite kitchen bloopers involved this very recipe. I once decided to “healthify” it by using a natural peanut butter and cutting the sugar in half. What emerged from the oven was a pan of delicious-tasting but completely flat, greasy puddles! We still ate them with a spoon, but it was a hilarious and valuable lesson in the beautiful, simple science of baking. Some classics are perfect just the way they are.
Your Questions, Answered!
Q: My cookies turned out super crumbly and dry. What happened?
A: This is almost always a case of overbaking! Remember, they continue to cook on the hot pan after you take them out of the oven. Pull them when the edges are just set and the centers look soft. Also, double-check that you used exactly 1 cup of peanut butter and not more, as too much PB can also lead to a drier, crumblier texture.
Q: Can I make these without eggs?
A: I haven’t found a reliable vegan substitute for this specific, ultra-simple recipe. The egg is the only binder. A “flax egg” can sometimes work in more complex recipes, but here it often results in a cookie that doesn’t hold together. This is one recipe where the egg is essential.
Q: Why did my cookies spread too much and become flat?
A: The most common culprit is using a “natural” peanut butter. These often have more oil and will cause excessive spreading. Stick to a conventional, no-stir brand for the best results. Also, ensure your oven is fully preheated before the cookies go in.
Q: Can I double this recipe?
A: Absolutely! It doubles beautifully. Just make sure you’re mixing everything thoroughly so the ingredients are evenly distributed.
Nutritional Information*
Makes: 12 cookies
Prep time: 10 mins
Bake time: 10 mins
Total time: 20 mins
*Per cookie (approx): 180 calories | 10g fat | 18g carbs | 4g protein
Please note: This is an estimate provided by an online nutrition calculator. It will vary based on the specific ingredients you use.

Final Thoughts: Sweet Simplicity at Its Best
These Three-Ingredient Peanut Butter Cookies are the kind of recipe that reminds us baking doesn’t have to be complicated to be magical. They’re quick enough for a Tuesday night craving, simple enough for kids to help make, and special enough to carry generations of memories forward.
Every time I press that criss-cross pattern into the dough, I’m right back in my grandma’s kitchen—learning that joy can come from the simplest of things. I hope these cookies bring that same comfort and delight into your home.
So whether you whip them up for a last-minute bake sale, tuck them into lunchboxes, or sneak one warm off the tray with a glass of milk, you’ll know that sometimes three ingredients are all it takes to create something unforgettable.