***
Easy Peanut Butter Pie: Your New Favorite No-Bake Dessert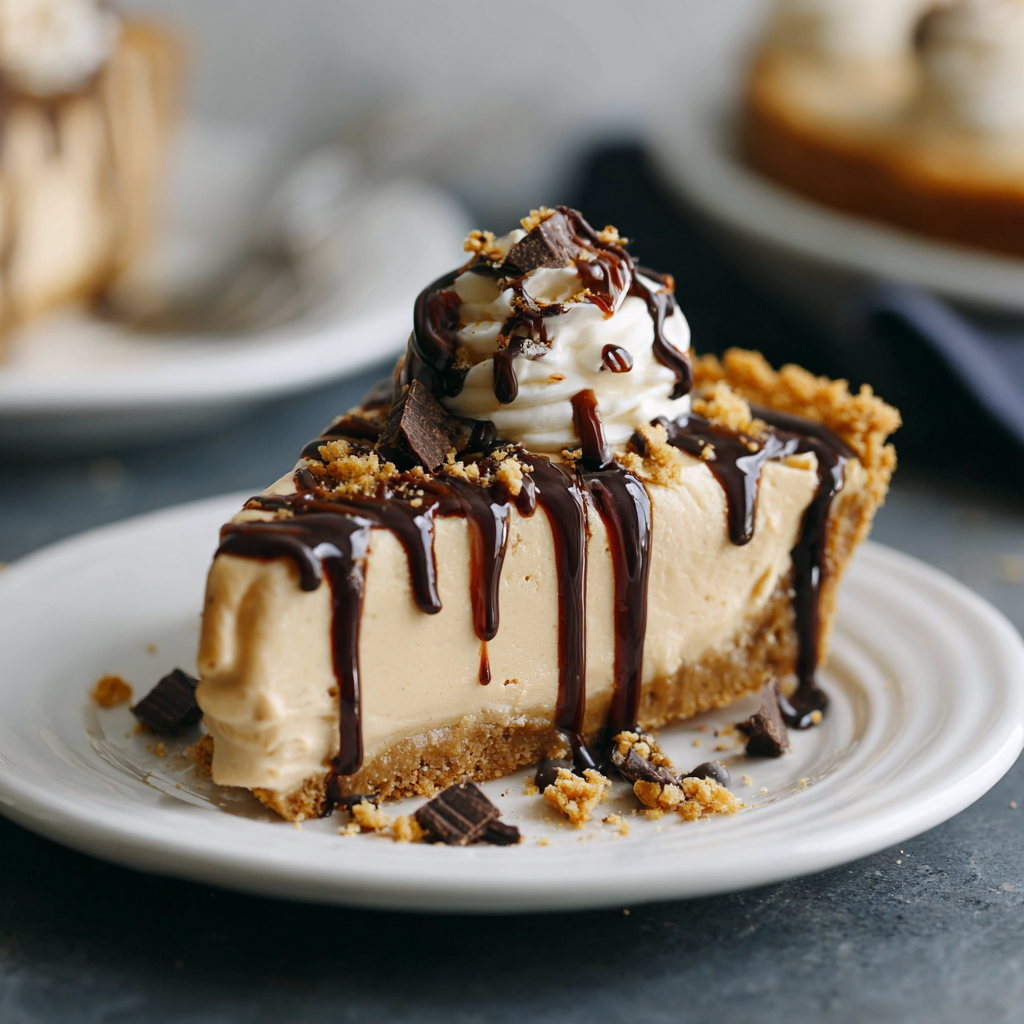
Hey there, friend! Anna here. Can we talk about dessert for a minute? Specifically, the kind of dessert that requires zero oven time, minimal effort, and delivers maximum, crowd-pleasing, soul-soothing joy? The kind of dessert that makes you feel like a kitchen rockstar without breaking a sweat? If you’re nodding your head (or your stomach is rumbling in agreement), then you, my friend, are in the absolute right place.
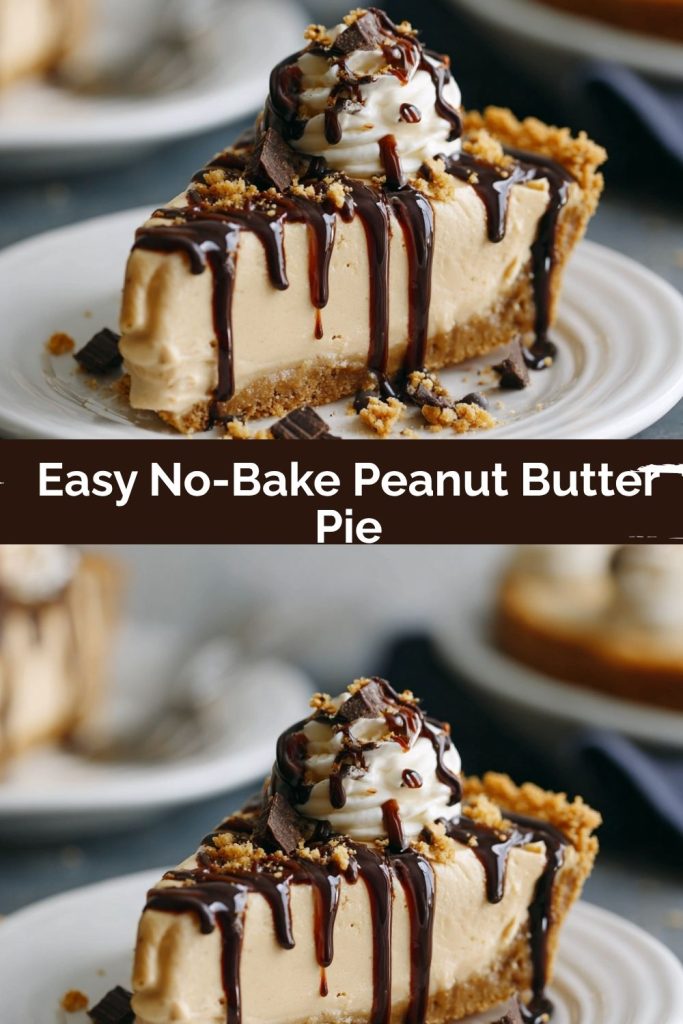
Today, we’re making my legendary Easy Peanut Butter Pie. This isn’t just a recipe; it’s a slice of creamy, dreamy, peanut-buttery heaven. Imagine a fluffy, cloud-like filling that’s rich with the salty-sweet goodness of peanut butter, all cradled in a crispy, buttery graham cracker crust. Then, we top it all off with a fluffy blanket of whipped cream and a generous scattering of mini peanut butter cups because, well, why on earth not?
This pie is my secret weapon for last-minute potlucks, birthday celebrations that sneak up on me, and those “I just need a little something sweet” Tuesday nights. It’s the dessert that has friends and family begging for the recipe, and I’m so excited to share it with you. So, let’s put that apron on, turn up some fun music, and cook up something amazing together. I promise, this one is going to become a staple in your recipe box.
A Slice of Summer and Grandma’s Kitchen
PrintEasy Peanut Butter Pie

Creamy, dreamy, and loaded with peanut butter goodness—this no-bake pie is pure dessert bliss. With a smooth, fluffy filling and a crunchy graham cracker crust, it’s simple to make and even easier to love. Top it with peanut butter cups for the ultimate finishing touch.
- Prep Time: 20 mins
- chill time: 2 hours
- Total Time: 2 hrs 20 mins
Ingredients
1 (8 oz) package cream cheese, softened
½ cup creamy peanut butter
½ cup confectioners’ sugar
1 (16 oz) container frozen whipped topping, thawed, divided
1 (9-inch) prepared graham cracker crust
15 mini chocolate-covered peanut butter cups, unwrapped
Instructions
In a large bowl, beat together cream cheese, peanut butter, and confectioners’ sugar until smooth and fluffy.
Fold in half of the whipped topping until fully combined.
Spoon mixture into the graham cracker crust and smooth the top.
Spread the remaining whipped topping over the filling.
Garnish with chopped or whole mini peanut butter cups.
Chill in the refrigerator for at least 2 hours before serving.
Nutrition
- Calories: 390
- Fat: 24g
- Carbohydrates: 35g
- Protein: 6g
This pie always takes me right back to my grandma’s kitchen on a hot summer afternoon. Her house didn’t have air conditioning, so baking was absolutely out of the question. But that never stopped her from creating magic. I can still see her, pulling out her big sunflower-yellow mixing bowl and declaring it was a “no-bake day.”
She’d let me crush the graham crackers for the crust with a rolling pin (a task I took very, very seriously), and then she’d hand me the beaters to whip up the filling. The best part, of course, was being the official taste-tester. I’d dip my finger into the creamy peanut butter mixture and she’d pretend not to notice. We’d slide the pie into the fridge and then spend the afternoon waiting—which felt like an eternity to little me—swinging on the porch swing until it was perfectly chilled and ready to slice. That first cool, creamy bite after a day in the sun was pure bliss. It wasn’t just a dessert; it was a moment of joy, a shared secret between us. Every time I make this pie, I feel a little bit of that summer magic right there in my kitchen with me.
Gathering Your Ingredients
One of the best things about this recipe is its beautiful simplicity. You probably have most of these ingredients in your pantry right now! Here’s what you’ll need:
- 1 (8 oz) package cream cheese, softened – This is the foundation of our creamy filling. Pro Chef Tip: Letting it soften on the counter for an hour is non-negotiable! It makes for the smoothest, silkiest filling without any pesky lumps. If you forget, you can place the sealed box in a bowl of warm water for 15 minutes.
- ½ cup creamy peanut butter – Use a standard, no-stir creamy peanut butter for the best consistency. The natural, oily kinds can sometimes separate and make the filling greasy. This is your flavor star, so use one you love to eat by the spoonful!
- ½ cup confectioners’ sugar – Also known as powdered sugar. Its fine texture dissolves instantly into our filling, sweetening it without any graininess. It also helps to thicken the mixture beautifully.
- 1 (16 oz) container frozen whipped topping, thawed, divided – This is our secret weapon for that incredible light and airy texture. Substitution Tip: You can absolutely use an equal amount of freshly whipped heavy cream for a from-scratch feel! Just whip 2 cups of heavy cream with 2 tablespoons of confectioners’ sugar until you get stiff peaks.
- 1 (9-inch) prepared graham cracker crust – The convenient, crispy vessel for our dreamy filling. I love the store-bought kind for ultimate ease, but if you’re feeling fancy, my homemade graham cracker crust recipe is just a click away and adds a wonderful buttery flavor.
- 15 mini chocolate-covered peanut butter cups, unwrapped – The grand finale! Chopping them up provides a perfect bite in every slice, but leaving them whole makes for a stunning, dramatic presentation. Your choice!
Let’s Make Some Magic: Step-by-Step Instructions
Ready to whip up this masterpiece? It comes together in about 20 minutes of active time. Let’s do this!
Step 1: The Creamy Base
In a large bowl, beat together the softened cream cheese, peanut butter, and confectioners’ sugar. Use a hand mixer or a stand mixer fitted with the paddle attachment on medium speed. Beat it for a good 2-3 minutes, stopping to scrape down the sides of the bowl, until the mixture is completely smooth, fluffy, and lump-free. This is the most important step—getting this base silky ensures a perfect pie! You shouldn’t see a single streak of cream cheese.
Step 2: Lighten It Up
Now, grab half of your thawed whipped topping (that’s about 2 cups). We’re going to fold this in. Why fold? Because we want to keep all that lovely air we just whipped into the cream cheese mixture. Switching to a spatula, gently add the whipped topping to the bowl. Use a motion where you cut through the center of the mixture, scoop around the side, and fold it over on top. Rotate the bowl as you go. Keep going until no white streaks remain and it’s one uniform, cloud-like mixture.
Step 3: Fill ‘Er Up
Take your prepared graham cracker crust and spoon this gorgeous peanut butter fluff right into it. Use your spatula to smooth the top into an even, beautiful layer. Give the pie plate a gentle tap on the counter to settle the filling and get rid of any air pockets.
Step 4: The Fluffy Blanket
Now, take the remaining half of the whipped topping and spread it evenly over the peanut butter filling. This creates a lovely creamy layer that makes the pie look extra beautiful when sliced. You can make pretty swirls with the back of your spoon if you’re feeling artistic!
Step 5: The Grand Finale
This is the fun part! Take your unwrapped mini peanut butter cups. You can chop them roughly with a knife, or simply scatter them whole over the top of the pie. I like to press them in slightly so they stick. Feel free to add a little drizzle of melted chocolate or a sprinkle of sea salt for a gourmet touch.
Step 6: The (Hardest Part) Wait
Carefully place your finished pie in the refrigerator. You must let it chill for at least 2 hours, but 4 hours or even overnight is even better. This waiting time is crucial—it allows the filling to firm up perfectly so you get clean, beautiful slices instead of a delicious puddle. I know it’s tempting, but trust me, it’s worth the wait!
How to Serve Your Masterpiece
When it’s finally time to serve, take a sharp knife and run it under hot water. Dry it off, and then slice your pie—the warm knife will glide through the creamy layers like a dream, giving you pristine slices. Wipe the knife clean and reheat it between slices for the cleanest cuts. Serve it on its own for a perfect bite, or go all out with a dollop of extra whipped cream, a drizzle of chocolate sauce, and maybe even a whole peanut butter cup on the side. It pairs wonderfully with a cold glass of milk, a hot coffee, or a drizzle of caramel sauce!
Make It Your Own: Delicious Variations
The beauty of this recipe is how easily you can adapt it! Here are a few of my favorite twists:
- Chocolate Lover’s Dream: Use a chocolate cookie crust (Oreo crust!) instead of graham cracker. You can also fold ½ cup of mini chocolate chips into the filling.
- Nutty Switch-Up: Not a peanut butter fan? Try this with almond butter or cashew butter for a different, but equally delicious, nutty flavor.
- PB&J Swirl: Before adding the final whipped topping layer, swirl in a few tablespoons of your favorite jam or raspberry preserves for a fantastic peanut butter and jelly flavor.
- Lighter Version: Use reduced-fat cream cheese and a light whipped topping. The texture will be slightly less rich but still utterly delicious.
- Elvis Special: For the ultimate tribute, layer sliced bananas on the bottom of the crust before adding the filling, and then garnish with crumbled cooked bacon on top. Sweet, salty, and incredible!
Anna’s Chef Notes & Kitchen Stories
This recipe has been with me for years, and it’s evolved in the silliest ways. I once accidentally used chunky peanut butter because it was all I had, and you know what? The little peanut bits added a fantastic texture! Now I sometimes do it on purpose. Another time, my nephew was “helping” me and added a whole cup of confectioners’ sugar instead of a half. It was incredibly sweet, but we just called it “Superhero Pie” and ate it anyway. The point is, don’t be afraid to play around.
Over time, I’ve learned that a longer chill time is your best friend. I now almost always make this the night before I need it. The flavors have time to really meld together, and the texture becomes absolute perfection—firm enough to hold a shape, but still melts in your mouth. It’s a forgiving, fun, and fabulous recipe. I hope it brings as much joy to your kitchen as it has to mine.
Your Questions, Answered!
Q: My filling is too runny! What did I do wrong?
A: The most common culprit is the cream cheese not being softened enough, leading to a lumpy mixture that doesn’t hold air. Another reason could be overmixing when you fold in the whipped topping, which deflates it. If it’s runny before you even add the whipped topping, your cream cheese was likely too warm. Don’t worry! Just pop the whole bowl into the fridge for 20-30 minutes to firm up a bit before continuing. It should still set after a long chill.
Q: Can I make this pie ahead of time?
A: Absolutely! In fact, I highly recommend it. You can make this pie up to 2 days in advance. Just keep it covered tightly in the refrigerator. The crust might soften slightly on the bottom after 2 days, but it will still be delicious.
Q: Can I freeze peanut butter pie?
A: You can! Wrap the chilled pie tightly in a few layers of plastic wrap and then aluminum foil. Freeze for up to 1 month. To serve, thaw it in the refrigerator overnight. The texture of the whipped topping may be slightly less airy after freezing, but it’s still a fantastic make-ahead option.
Q: I don’t have a hand mixer. Can I make this by hand?
A> You can, but it will take some elbow grease! Ensure your cream cheese is VERY soft. Use a sturdy whisk and really put some muscle into whisking the cream cheese, peanut butter, and sugar together until completely smooth. When folding in the whipped topping, be extra gentle.
Nutritional Information (Approximate)
Per slice (1 of 8 slices): 390 calories | 24g fat | 35g carbs | 6g protein
Please note: This is an estimate provided by an online nutrition calculator. It will vary based on specific ingredients and brands used.
Final Thoughts
At the end of the day, this Easy Peanut Butter Pie isn’t just a dessert—it’s a little slice of happiness you can whip up with almost no effort. It’s proof that sometimes the best recipes are the ones that don’t require a fancy technique or hours in the kitchen. Just a few simple ingredients, a little mixing, and a lot of love, and suddenly you’ve got a pie that feels both nostalgic and a little bit indulgent.
Whether you’re making it for a holiday, a birthday, or just a random Tuesday that could use a sweet pick-me-up, this pie is always a hit. Every bite reminds me of summer afternoons in Grandma’s kitchen, and I hope it brings that same joy and comfort to your table.
So go ahead—grab that mixing bowl, sneak a taste from the spatula, and let this pie work its no-bake magic. Trust me, you’ll be keeping this recipe tucked close for years to come.