***
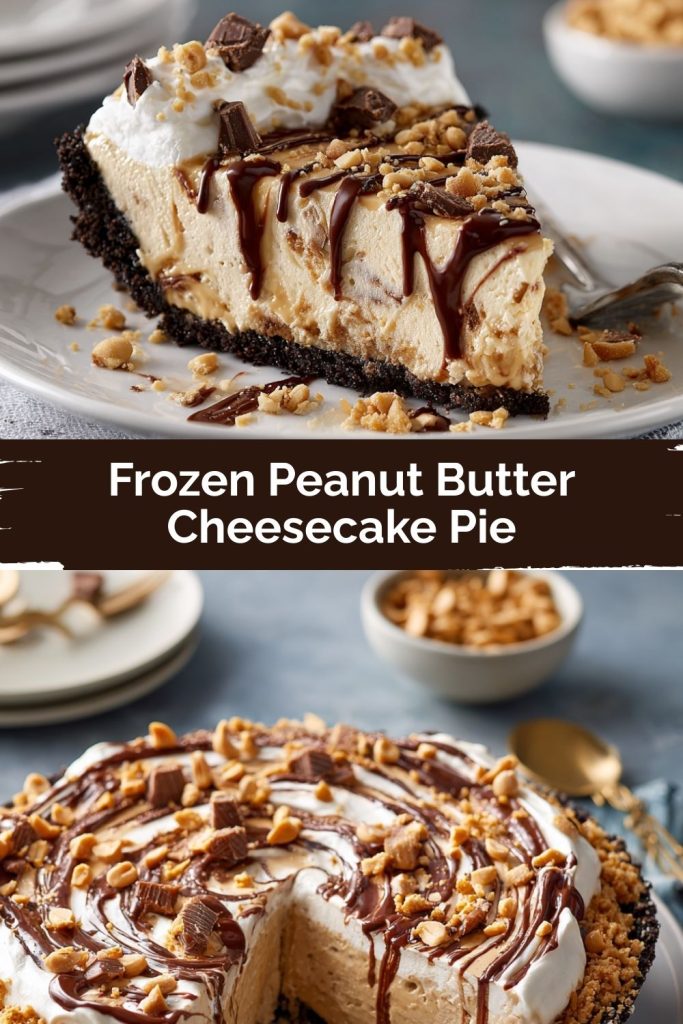
Your New Favorite No-Bake Dessert: Frozen Peanut Butter Cheesecake Pie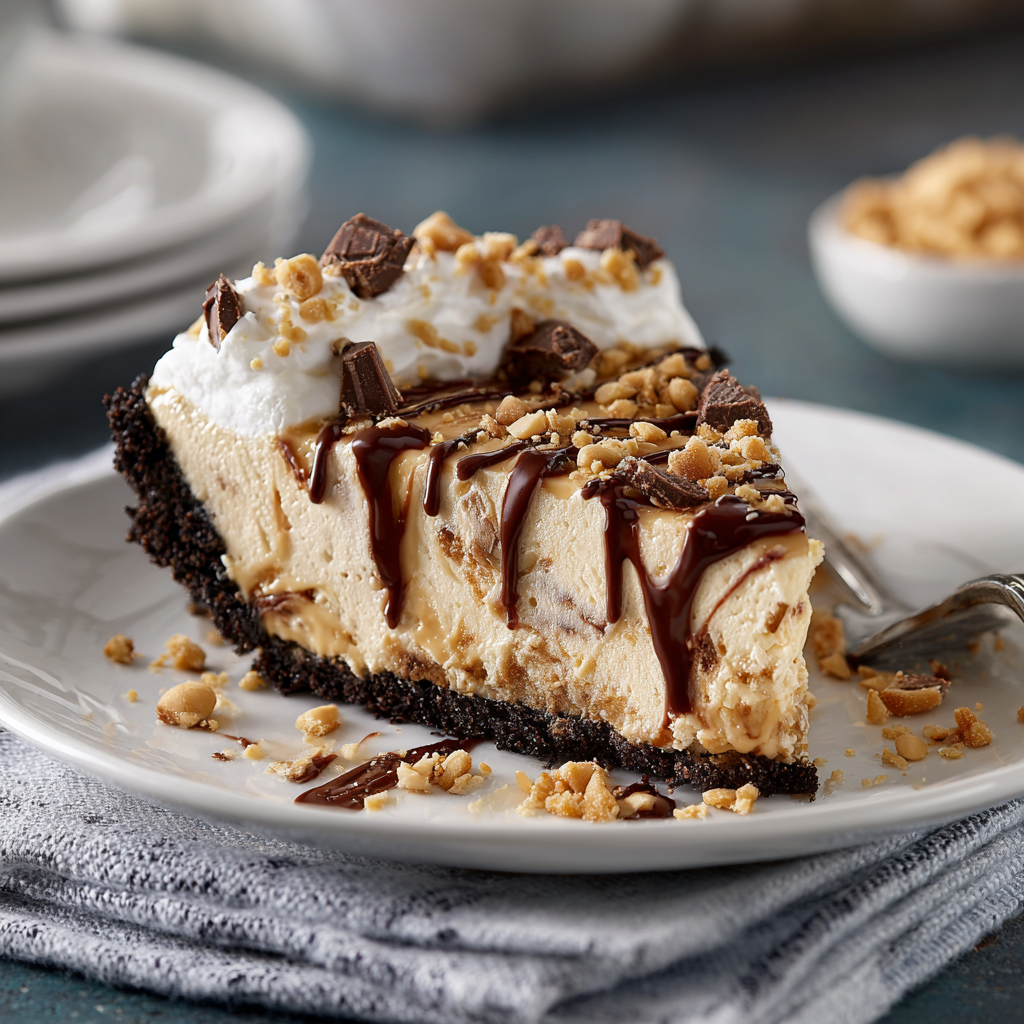
Hey there, friend! Let’s talk about something serious for a second: summer desserts. When the sun is blazing and the last thing you want to do is turn on your oven, what’s a dessert lover to do? You crave something cool, creamy, and utterly satisfying, but you don’t want to spend hours sweating over a hot stove. Sound familiar? I’ve been there more times than I can count, standing in front of the fridge, hoping something magical will appear.
Well, consider this your sign that something magical is about to happen in your kitchen. This Frozen Peanut Butter Cheesecake Pie is the answer to all your warm-weather dessert prayers. Imagine this: a crackly, chocolatey crust that gives way to an impossibly creamy, rich, and nutty peanut butter filling that’s frozen to perfect sliceability. It’s like the lovechild of a classic New York cheesecake and a frozen peanut butter cup, and it’s here to become your go-to superstar dessert.
Best of all? It’s a no-bake wonder. We’re talking about 20 minutes of active, fun kitchen time, and then you just let your freezer do the rest of the work. It’s the ultimate make-ahead dessert for parties, potlucks, or for those nights when you just deserve a fantastic treat. So, let’s ditch the oven, grab a bowl, and create a little slice of frozen heaven together. I promise, it’s going to be incredible.
The Pie That Started a Tradition
PrintFrozen Peanut Butter Cheesecake Pie

If you’re on the fence about cheesecake, this frozen peanut butter version just might change your mind. It’s creamy, nutty, and chilled to perfection—like a frozen peanut butter cup in pie form. With a crispy chocolate rice crust and a swirl of fudge, it’s indulgent without being over the top. Great for make-ahead desserts, hot days, or satisfying every peanut butter lover in the room.
- Prep Time: 10 min
- chill time: 4–6 hrs
- Cook Time: 10 min
- Total Time: 5 hrs
Ingredients
For the Crust:
⅔ cup butter
2 cups semisweet chocolate chips
5 cups crispy rice cereal
For the Filling:
2 (8 oz) packages cream cheese, softened
2 (10 oz) cans sweetened condensed milk
1½ cups peanut butter
4 tbsp lemon juice
2 tsp vanilla extract
2 cups whipped cream
For the Topping:
1 cup chocolate fudge sauce
Twist options: sprinkle with crushed peanuts, swirl in raspberry jam, or top with mini peanut butter cups
Instructions
Make the crust: Melt butter and chocolate chips in a saucepan. Stir in crispy rice cereal. Press into two 9-inch pie pans. Freeze for 10 minutes.
Make the filling: Beat cream cheese until fluffy. Add condensed milk, peanut butter, lemon juice, and vanilla. Fold in whipped cream until smooth.
Assemble: Pour filling into chilled crusts. Swirl in fudge sauce or drizzle over the top.
Freeze for at least 4–6 hours or overnight until firm.
Let sit at room temp for 10 minutes before slicing. Garnish with extra toppings if desired.
Nutrition
- Calories: 430
- Sugar: 26g
- Fat: 29g
- Carbohydrates: 35g
- Protein: 9g
This recipe holds a special place in my heart because it’s intrinsically linked to one of my favorite family traditions: our annual Fourth of July lake party. Picture it: kids splashing in the water, the smell of charcoal grills firing up, and a red, white, and blue dessert table groaning under the weight of various treats. One particularly scorching year, my classic baked cheesecake simply wilted on the picnic table. It was a dessert disaster!
The next year, determined to contribute something that could stand up to the summer heat, I started experimenting. I wanted all the richness of cheesecake but with the refreshing chill of ice cream. I tinkered with peanut butter and condensed milk, folded in whipped cream for airiness, and pressed it into a chocolate crust. That first frozen pie was an instant legend. It was the first dessert to disappear, with friends and family begging for the recipe. Now, I’m not allowed to show up to the lake without at least two of these pies in tow. It’s more than a recipe; it’s a delicious, frozen piece of our summer story.
Gathering Your Magical Ingredients
This recipe is a double batch, meaning it makes two gorgeous 9-inch pies! Why? Because one is never enough. You can easily halve it for a single deep-dish pie, but trust me, you’ll want the extra. Here’s what you’ll need, with a little chef’s insight for each.
For the Chocolate Crust:
- ⅔ cup butter: This is the base of our crust, providing richness and helping the cereal bind together. I use unsalted butter to control the salt level, but salted will work in a pinch and add a nice sweet-and-salty vibe.
- 2 cups semisweet chocolate chips: The star of the crust! Semisweet chocolate has the perfect balance of sweetness and cocoa depth. For a darker, richer crust, feel free to use dark chocolate chips.
- 5 cups crispy rice cereal: This gives our crust that fantastic, light crunch. I use the classic brand, but any crispy rice cereal will do the trick beautifully.
For the Peanut Butter Filling:
- 2 (8 oz) packages cream cheese, softened: This is the foundation of our filling, providing that iconic tangy, creamy cheesecake texture. Pro Tip: Let it sit on the counter for a good hour before you start. Soft cream cheese blends smoothly and prevents a lumpy filling.
- 2 (10 oz) cans sweetened condensed milk: This magical ingredient adds incredible sweetness and a smooth, fudgy body. There’s no real substitute here—it’s key to the texture!
- 1½ cups peanut butter: Use a standard creamy, shelf-stable peanut butter like Jif or Skippy for the best consistency and flavor. The oils in natural peanut butter can sometimes separate and make the filling greasy.
- 4 tbsp lemon juice: Don’t worry, you won’t taste lemon! This is our acid component that subtly cuts through the richness and helps thicken the filling, mimicking the tang of a baked cheesecake.
- 2 tsp vanilla extract: The flavor enhancer! Always use pure vanilla extract for the best, warmest flavor.
- 2 cups whipped cream: This is about one standard 8 oz tub of Cool Whip, thawed. You can also make your own by whipping 1 cup of heavy cream with 2 tablespoons of powdered sugar until stiff peaks form. This is what makes the filling so light and airy.
For the Topping & Swirl:
- 1 cup chocolate fudge sauce: I love using a good-quality jarred hot fudge sauce for ease. Its thicker consistency is perfect for swirling and holds up better when frozen compared to chocolate syrup.
Let’s Build This Dreamy Dessert!
Ready to make some magic? Put on your favorite playlist, clear some counter space, and let’s get to it. This process is simple, satisfying, and honestly, kind of fun.
Step 1: The No-Bake Chocolate Crust
First, grab a large saucepan and melt your butter and chocolate chips together over low heat. Stir it constantly with a spatula until it’s one smooth, glossy, chocolatey pool. Chef’s Hack: You can also do this in a microwave-safe bowl in 30-second bursts, stirring between each one. Once melted, take it off the heat and immediately pour in your crispy rice cereal. Gently fold the cereal into the chocolate until every single piece is thoroughly coated. It will look and smell amazing.
Divide this glorious mixture between two 9-inch pie plates. Use the back of a measuring cup or a flat-bottomed glass to press it firmly and evenly into the bottom and up the sides. A good, firm press now means clean slices later! Pop these crusts into the freezer for at least 10 minutes to set. This chills the chocolate, making it solid and ready for our filling.
Step 2: The Cloud-Like Peanut Butter Filling
While the crust is chilling, let’s make the filling. In a large bowl, use an electric hand mixer (or a stand mixer with the paddle attachment) to beat your softened cream cheese on medium speed until it’s completely smooth and fluffy. This should take about 2 minutes. Scrape down the sides of the bowl to make sure there are no lumps hiding.
Now, beat in the sweetened condensed milk, peanut butter, lemon juice, and vanilla extract. Mix on medium speed until everything is perfectly combined into a super thick, luscious, and smooth batter. Taste it (you have to, it’s a rule!). It’s going to be rich and delicious.
Here’s the key to a light texture: folding. Add your two cups of whipped cream to the bowl. Instead of using the mixer, switch to a spatula. Gently cut through the center of the mixture, bring the spatula up the side, and fold it over. Turn the bowl a quarter turn and repeat. This incorporates air and keeps the filling fluffy. Fold just until no white streaks remain.
Step 3: The Grand Assembly
Pull your rock-solid chocolate crusts out of the freezer. Divide the peanut butter filling evenly between the two crusts, spreading it out smoothly with your spatula.
Now for the artistic flourish! Warm your fudge sauce for just 10-15 seconds in the microwave to make it a bit more pourable. Drizzle it generously over the top of the pies. Use a knife or a toothpick to gently swirl the fudge into the peanut butter filling in a beautiful marbled pattern. Don’t over-swirl, or the colors will muddle. A few figure-eight motions do the trick.
Step 4: The Patient Wait
Carefully cover the pies with plastic wrap (I use toothpicks to keep the wrap from sticking to the topping) and freeze them for at least 4-6 hours, but ideally overnight. This is the hardest part—waiting! But this time is non-negotiable; it’s what transforms our creamy filling into a perfectly sliceable frozen pie.
Serving Your Masterpiece
When you’re ready to serve, take the pie out of the freezer and let it sit on the counter for about 10 minutes. This slight thaw makes it infinitely easier to slice cleanly with a sharp knife. For gorgeous slices, dip your knife in hot water and wipe it dry between each cut.
I love serving this on a chilled plate alongside a cup of hot coffee for a decadent dessert. For a real showstopper, garnish each slice with a dollop of extra whipped cream, a sprinkle of crushed salted peanuts, and a mini peanut butter cup. The contrast of temperatures and textures is absolutely divine.
Make It Your Own! Creative Twists
The beauty of this recipe is its versatility. Here are a few ways to play with the flavors:
- Cookie Crust: Swap the chocolate cereal crust for one made from crushed Oreos or chocolate wafer cookies mixed with butter.
- Berry Swirl: Instead of chocolate fudge, swirl in ½ cup of warmed seedless raspberry jam for a PB&J vibe.
- Chocolate-Peanut Butter: Add 1 cup of mini chocolate chips to the filling itself for extra bursts of chocolate.
- Nutty Crunch: Fold ½ cup of chopped, salted peanuts into the filling for a fantastic crunchy texture.
- Dairy-Free Delight: Use dairy-free cream cheese, sweetened condensed coconut milk, and coconut whipped cream to make a delicious vegan version.
Anna’s Chef Notes & Kitchen Stories
This recipe has evolved over the years from that first desperate attempt to avoid a melted dessert. I initially tried a graham cracker crust, but it got too hard in the freezer. The chocolate cereal crust was a happy accident—my son was helping me bake and left the box on the counter. Inspiration struck, and the rest is history! It’s now the only crust I use for this pie.
A funny kitchen story: I once ran out of lemon juice and, in a pinch, used the same amount of fresh lime juice. The filling turned out great, but it had this very subtle, almost tropical twist that had all my guests guessing the “secret ingredient.” It’s now a requested variation!
My biggest tip? Please, please ensure your cream cheese is truly soft. I’ve rushed this step before and ended up with a filling that had tiny little specks of cream cheese throughout. It still tasted fine, but it wasn’t the smooth, cloud-like texture we’re aiming for. Patience is a virtue, especially in cheesecake-making!
Your Questions, Answered!
Q: My filling is lumpy! What did I do wrong and can I fix it?
A: Lumps are almost always from cream cheese that wasn’t soft enough. To avoid this, let it sit out for a full hour. If you already have lumps, you can try to press the finished filling through a fine-mesh sieve—it’s a bit of a hassle but can save it. For next time, beat the cream cheese alone until it’s completely smooth before adding anything else.
Q: Can I make this ahead of time?
A: Absolutely! That’s one of its best features. This pie can be made up to 2 weeks in advance. Just wrap it tightly in plastic wrap and then a layer of aluminum foil to prevent freezer burn. It’s a lifesaver for entertaining.
Q: Why did my crust crack when I sliced the pie?
A: This usually means the pie was too frozen when you tried to slice it. That 10-minute rest on the counter is crucial to let it soften just enough. Also, using a sharp knife dipped in hot water ensures a clean cut through the frozen chocolate.
Q: Is there a substitute for the sweetened condensed milk?
A: This is a tough one, as it provides unique sweetness and texture. I don’t recommend substituting it in this particular recipe, as alternatives like coconut cream or regular milk will not set properly and will form ice crystals. This is one ingredient worth keeping!
Nutritional Information*
*This is an estimated nutritional breakdown per slice (based on 16 servings total from the double batch). For exact information, use a preferred online nutrition calculator with your specific ingredient brands.
Per Serving: Calories: ~430 | Fat: 29g | Saturated Fat: 15g | Carbohydrates: 35g | Sugar: 26g | Protein: 9g
Final Thoughts: A Slice of Summer Happiness
At the end of the day, this Frozen Peanut Butter Cheesecake Pie isn’t just dessert—it’s a mood. It’s that sigh of relief when the sun sets after a sweltering day, the laughter of kids running barefoot on the grass, and the quiet joy of pulling something from your freezer that you know will make everyone at the table smile.
It’s proof that summer sweets don’t need ovens or fuss—they just need a little love, some peanut butter magic, and a freezer to do the heavy lifting. Whether you serve it on the Fourth of July, bring it to a potluck, or sneak a late-night slice in your PJs, this pie is here to become a tradition in your kitchen too.
So go ahead—keep a pie tucked away in the freezer, just waiting for its moment to shine. Because nothing says “summer happiness” quite like a slice of this cool, creamy, chocolate-swirled dream.