***
Green Bean Casserole Bites: Your New Favorite Holiday Party Trick!
Hey there, friend! Anna here. Can we talk about the star of the holiday table for a hot second? I’m talking about that glorious, creamy, crunchy, sometimes-debated-but-always-loved icon: the green bean casserole. It’s a dish that screams celebration, the kind of comfort food that brings everyone together around the table. But what if I told you we could take all that cozy, nostalgic flavor and turn it into the most adorable, poppable, and downright irresistible party appetizer you’ve ever seen?
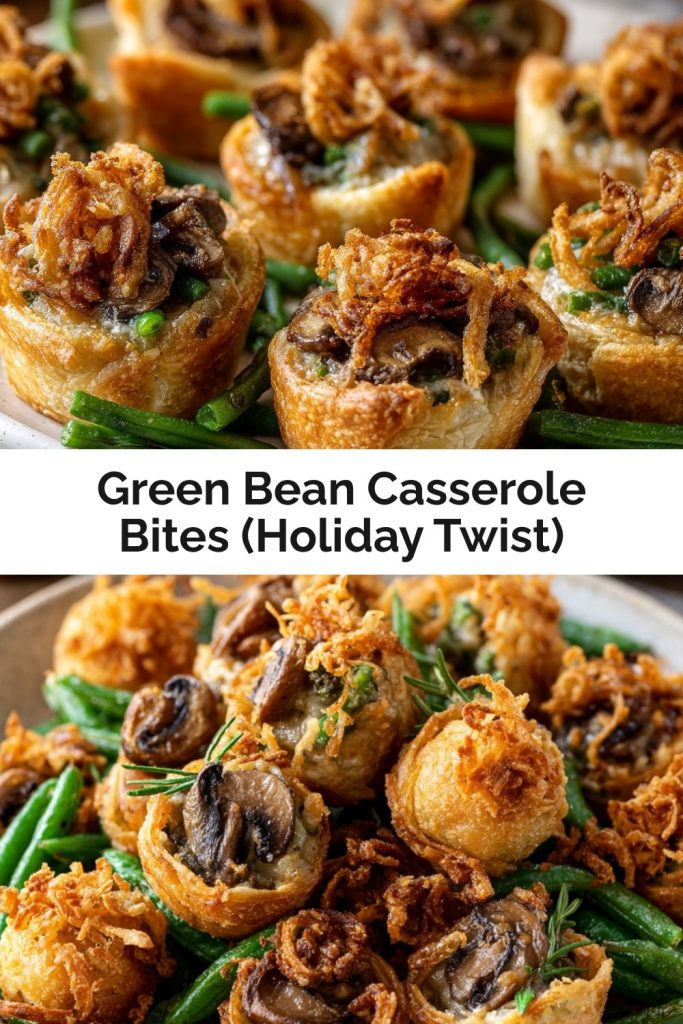
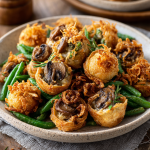
That’s exactly what we’re doing today with these Green Bean Casserole Bites. Imagine this: a flaky, golden crescent dough cup, filled with tender green beans and garlicky mushrooms swimming in a velvety, homemade creamy onion gravy. And then, the pièce de résistance—a crunchy, salty, perfect crown of crispy fried onions. They’re everything you love about the classic, but portable, elegant, and absolutely perfect for passing around at a party.
I created this recipe because I believe holiday cooking should be as much about joy as it is about flavor. Sometimes, that means ditching the casserole dish in favor of something a little more fun. These bites are a total game-changer for potlucks, pre-feast nibbles, or even a festive game-day spread. They’re beginner-friendly, they can be made ahead, and they free up precious oven space. So, let’s roll up our sleeves, put on our favorite festive apron, and cook up a little bit of magic together. Your guests are going to go absolutely wild for these!
A Casserole by Any Other Name… Just Isn’t the Same
PrintGreen Bean Casserole Bites (Holiday Twist)
Classic green bean casserole, but make it bite-sized—and irresistibly flaky. These Green Bean Casserole Bites wrap tender green beans, garlicky mushrooms, and creamy onion gravy in golden crescent dough, finished with a crunchy crown of crispy fried onions. Portable, poppable, and packed with holiday flavor—these bites bring the comfort without the casserole dish.
- Prep Time: 30 mins
- Cook Time: 15 mins
- Total Time: 45 minutes
Ingredients
• Kosher salt
• 1 lb (16 oz) green beans, trimmed
• 8 oz cremini mushrooms, sliced
• 10 Tbsp unsalted butter, divided
• 2 yellow onions, thinly sliced
• 6 cloves garlic, finely chopped
• 1/2 cup (60g) all-purpose flour
• 3 cups whole milk
• Freshly ground black pepper
• 4 (8-oz) cans crescent roll dough
• 2 cups crispy fried onions
• Optional twist: 1 tsp fresh thyme or rosemary, 1/4 tsp cayenne, 1/4 cup grated Parmesan
Instructions
Blanch beans: Boil salted water. Cook green beans 3–4 mins, then shock in ice water. Chop into bite-size pieces.
Sauté mushrooms: In 4 Tbsp butter, cook mushrooms with garlic and herbs (if using) until browned. Set aside.
Caramelize onions: In the same pan, melt remaining 6 Tbsp butter and cook onions low and slow for 15–20 mins until golden.
Make the sauce: Stir in flour, cook 1–2 mins, then whisk in milk until thickened. Season with salt, pepper, cayenne. Fold in green beans, mushrooms, and Parmesan. Cool slightly.
Assemble bites: Preheat oven to 375°F (190°C). Unroll crescent dough and cut into squares (about 2-inch pieces). Press into greased mini muffin tins. Fill each with spoonful of green bean mixture, top with crispy onions.
Bake: Bake for 12–15 mins or until golden and bubbling. Let cool slightly before removing from tin.
Nutrition
- Calories: 120 per bite
- Fat: 8g
- Carbohydrates: 10g
- Protein: 2g
My love affair with green bean casserole started not in a fancy kitchen, but at my Grandma Eleanor’s formica-topped table. Every Thanksgiving, without fail, she’d place her slightly battered ceramic dish right next to the turkey, a cloud of steam carrying that unmistakable savory scent into the air. It was the “from-a-can” version, a recipe she’d clipped from a magazine decades prior, and to me, it was pure perfection.
The best part was always the “crust”—the coveted edge pieces where the crispy onions met the creamy beans. My sister and I would launch a covert, fork-based operation to snag those prized bits before anyone else. We’d whisper-negotiate from across the table, a silent treaty of shared casserole love. It was more than a side dish; it was a taste of tradition, a symbol of togetherness, and the start of the holiday season. These Green Bean Casserole Bites are my way of capturing that magic. They’re my love letter to Grandma Eleanor’s table, reimagined so that every single bite is that perfect, crispy-edged, creamy-centered moment we all fought over. No forks required.
Gathering Your Flavor All-Stars (Let’s Talk Ingredients!)
This is where the fun begins! We’re building layers of flavor from scratch, and every single ingredient plays a starring role. Don’t worry—I’ve got plenty of substitution tips and chef-y insights to make you feel like a pro.
- Kosher Salt: Our flavor foundation. I prefer kosher salt for cooking because it’s less salty by volume than table salt, giving you more control.
- 1 lb (16 oz) Fresh Green Beans, trimmed: We’re using fresh beans for a brighter flavor and better texture. Chef’s Insight: Look for beans that are firm and snap when you bend them! If you’re in a pinch, you can use two (14.5 oz) cans of green beans, well-drained, but fresh really is best here.
- 8 oz Cremini Mushrooms, sliced: These “baby bellas” add a wonderful, earthy, savory depth (that “umami” magic!). You can swap them for white button mushrooms if that’s what you have.
- 10 Tbsp Unsalted Butter, divided: Yes, ten! We’re using it to sauté, caramelize, and build our roux. Using unsalted lets us control the seasoning perfectly.
- 2 Yellow Onions, thinly sliced: Half will be caramelized into sweet, jammy goodness for our filling, and the other half… well, that’s our little secret for an extra flavor boost.
- 6 Cloves Garlic, finely chopped: Because garlic makes everything better. No exceptions.
- 1/2 cup (60g) All-Purpose Flour: This is what we’ll use to make a roux, which is the secret to a lump-free, beautifully thickened gravy.
- 3 cups Whole Milk: Whole milk gives our sauce a luxurious richness that’s just *chef’s kiss*. For a lighter version, 2% will work, but avoid skim milk as the sauce can become thin.
- Freshly Ground Black Pepper: A must for seasoning. I always add a generous grind.
- 4 (8-oz) cans Crescent Roll Dough: Our magical, flaky vessel! This is the ultimate shortcut for buttery, golden pastry without any fuss.
- 2 cups Crispy Fried Onions: The iconic crunch! We’re using some in the filling and saving plenty for that gorgeous, golden topping.
- Optional Holiday Twist: 1 tsp fresh thyme or rosemary for a festive, herby note; 1/4 tsp cayenne for a subtle, warm kick (it won’t be spicy, I promise!); and 1/4 cup grated Parmesan for a salty, savory punch. Highly recommend!
Let’s Get Cooking: Building Our Bite-Sized Masterpieces
Ready to create some kitchen magic? Follow these steps, and you’ll have a tray of perfect little bites in no time. I’ve packed this section with all my favorite tips and hacks to ensure your success!
Step 1: Blanch the Green Beans. Bring a large pot of salted water to a rolling boil. While it heats, set up a bowl of ice water nearby—this is your “ice bath.” Cook the green beans in the boiling water for just 3-4 minutes. We want them bright green and tender-crisp, not mushy! Immediately use a slotted spoon to transfer them to the ice bath. This “shocks” them, stopping the cooking process and locking in that beautiful color and snap. Once cool, drain and chop them into bite-sized pieces. Chef’s Hack: Do this step first, and your beans will be ready to go by the time your filling is finished!
Step 2: Sauté the Mushrooms. In a large skillet, melt 4 tablespoons of the butter over medium-high heat. Add the sliced mushrooms (and the fresh herbs if you’re using them). Let them cook without stirring too much—this allows them to develop a beautiful brown, flavorful crust. Once they’re browned and have released their liquid, add the garlic and cook for one more minute until fragrant. Scoop the mushroom mixture into a bowl and set aside.
Step 3: Caramelize the Onions. This is where the magic happens! In the same skillet (no need to wash it—all those browned bits are flavor!), melt the remaining 6 tablespoons of butter over low heat. Add the thinly sliced onions and a pinch of salt. Now, be patient. Cook them low and slow for 15-20 minutes, stirring occasionally, until they’re soft, golden brown, and incredibly sweet. Chef’s Secret: Rushing this step will give you burnt, bitter onions. Low heat is the key to sweet, caramelized perfection!
Step 4: Create the Creamy Onion Gravy. You’ve just made a beautiful flavor base. Now, sprinkle the flour over the caramelized onions and butter. Stir constantly and cook for 1-2 minutes. This cooks out the raw flour taste and creates your roux. Now, slowly whisk in the milk, a little at a time at first, until you have a smooth, thick sauce. Keep whisking until it comes to a gentle simmer and thickens beautifully. Season generously with salt, black pepper, and that optional cayenne. Remove from the heat and stir in the Parmesan if using.
Step 5: Bring It All Together. Now, fold the chopped green beans and the sautéed mushroom mixture into your creamy onion gravy. Give it a good taste and adjust the seasoning if needed. Then, here’s another pro tip: let this filling cool for about 15-20 minutes. A warm filling is fine, but a hot filling will start to melt the delicate crescent dough before it even hits the oven, leading to soggy bottoms. We don’t want that!
Step 6: Assemble the Bites. Preheat your oven to 375°F (190°C). Grease two mini muffin tins well. Open your cans of crescent dough and unroll the sheets. Instead of keeping them as triangles, I like to press the perforated seams together to form a solid sheet of dough. Then, use a pizza cutter or sharp knife to cut it into roughly 2-inch squares. Gently press each square into a cup of the prepared muffin tin, forming a little dough cup. Spoon a heaping teaspoon of the filling into each cup, then top generously with the crispy fried onions.
Step 7: Bake to Golden Perfection. Pop those filled muffin tins into the preheated oven and bake for 12-15 minutes. You’re looking for the crescent dough to be puffed and a deep golden brown, and the filling should be bubbly. The smell in your kitchen will be absolutely incredible. Once done, let the bites cool in the tin for about 5 minutes before carefully removing them with a small offset spatula or a spoon. This rest time helps the dough set and makes them much easier to remove.
How to Serve These Little Beauties
Presentation is part of the fun! I love to arrange these warm bites on a beautiful wooden board or a elegant platter. Scatter a few extra crispy onions and maybe a few fresh thyme sprigs around them for a gorgeous, festive touch. They are fantastic straight from the oven when the pastry is at its flakiest, but they’re also wonderful at room temperature, making them the ultimate make-ahead party appetizer. Just set them out and watch them disappear!
Make It Your Own: Delicious Recipe Variations
Feel like playing? Here are a few fun ways to mix things up:
- Bacon Lover’s Dream: Stir 1/2 cup of cooked, crumbled bacon into the filling. Top with a little crispy bacon crumble along with the onions.
- Cheesy & Wonderful: Add a cube of mozzarella or a sprinkle of sharp cheddar cheese into each dough cup before adding the filling for a gooey, cheesy surprise.
- Hearty Meat Version: Brown 1/2 pound of ground sausage or beef with the mushrooms for a more substantial, meaty bite.
- Puff Pastry Upgrade: For an extra-flaky, more buttery crust, use one sheet of thawed puff pastry, cut into squares, instead of the crescent dough.
- Gluten-Free Friendly: Use a 1:1 gluten-free flour blend for the sauce and gluten-free crispy onions. For the dough, check your grocery store for gluten-free crescent roll alternatives or use squares of gluten-free puff pastry.
Anna’s Chef Notes & Kitchen Stories
This recipe has become a staple in my holiday rotation, but it didn’t start out perfect. The first time I tested it, I was so excited I spooned the piping hot filling right into the dough. The result? Let’s just say I had “green bean casserole soup in a sad, melted dough bowl.” It was a delicious mess, but a mess nonetheless! That’s how I learned the crucial step of letting the filling cool a bit.
Over the years, I’ve also learned that this filling is a superstar on its own. If you’re short on time, skip the dough cups and just bake it in a dish as a deconstructed, extra-creamy casserole! I also highly, highly recommend making a double batch of the filling and freezing half. Then, on a busy weeknight, you’re just a quick thaw and a can of crescent rolls away from a seriously impressive snack. It’s all about working smarter, not harder, and filling your home with joy—and the smell of caramelized onions.
Your Questions, Answered! (FAQs & Troubleshooting)
Q: Can I make these ahead of time?
A: Absolutely! You have two great options. 1) Assemble and refrigerate: Prepare the bites completely, cover the muffin tins tightly with plastic wrap, and refrigerate for up to 24 hours. Bake straight from the fridge, adding 1-2 minutes to the baking time. 2) Freeze before baking: Assemble the bites and freeze them solid in the muffin tin. Then, pop them out and store in a freezer bag for up to 2 months. Bake from frozen, adding 3-5 minutes to the baking time.
Q: My bites are soggy on the bottom. What happened?
A: The most common culprit is a filling that was too hot when it went into the dough. Remember to let it cool! Also, make sure your oven is fully preheated and that you’re using a light-colored metal muffin tin (dark pans can cause over-browning and soggy bottoms). A well-greased tin also helps create a barrier.
Q: I don’t have mini muffin tins. Can I still make these?
A: You sure can! Press the dough squares into a standard muffin tin to create fewer, larger bites. You’ll need to increase the bake time to about 15-18 minutes. Alternatively, you can simply place the filled dough squares on a parchment-lined baking sheet and bake them as free-form “casserole pinwheels” or tarts.
Q: My sauce is too thin / too thick. How can I fix it?
A: If it’s too thin, let it simmer a bit longer while whisking; the flour and butter (roux) will continue to thicken it as it cooks. If it’s too thick, simply whisk in a splash more milk until it reaches your desired, spoonable consistency.
A Quick Nutritional Note
While these are a celebratory treat, it’s always helpful to know what you’re enjoying! Please note, these are estimates and can vary based on specific ingredients used.
- Prep Time: 30 mins
- Cook Time: 15 mins
- Calories: ~120 per bite
- Fat: 8g
- Carbs: 10g
- Protein: 2g
Tip: These are great served warm or at room temp—perfect for potlucks or pre-dinner nibbling!