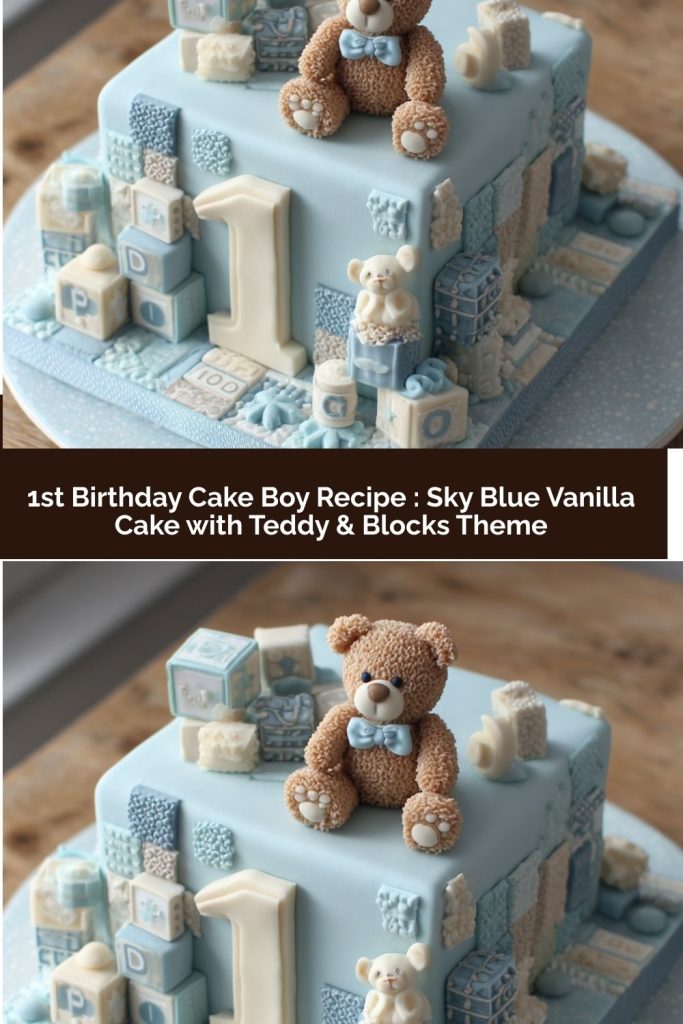
A First Birthday Cake to Remember: Sky Blue Vanilla Dream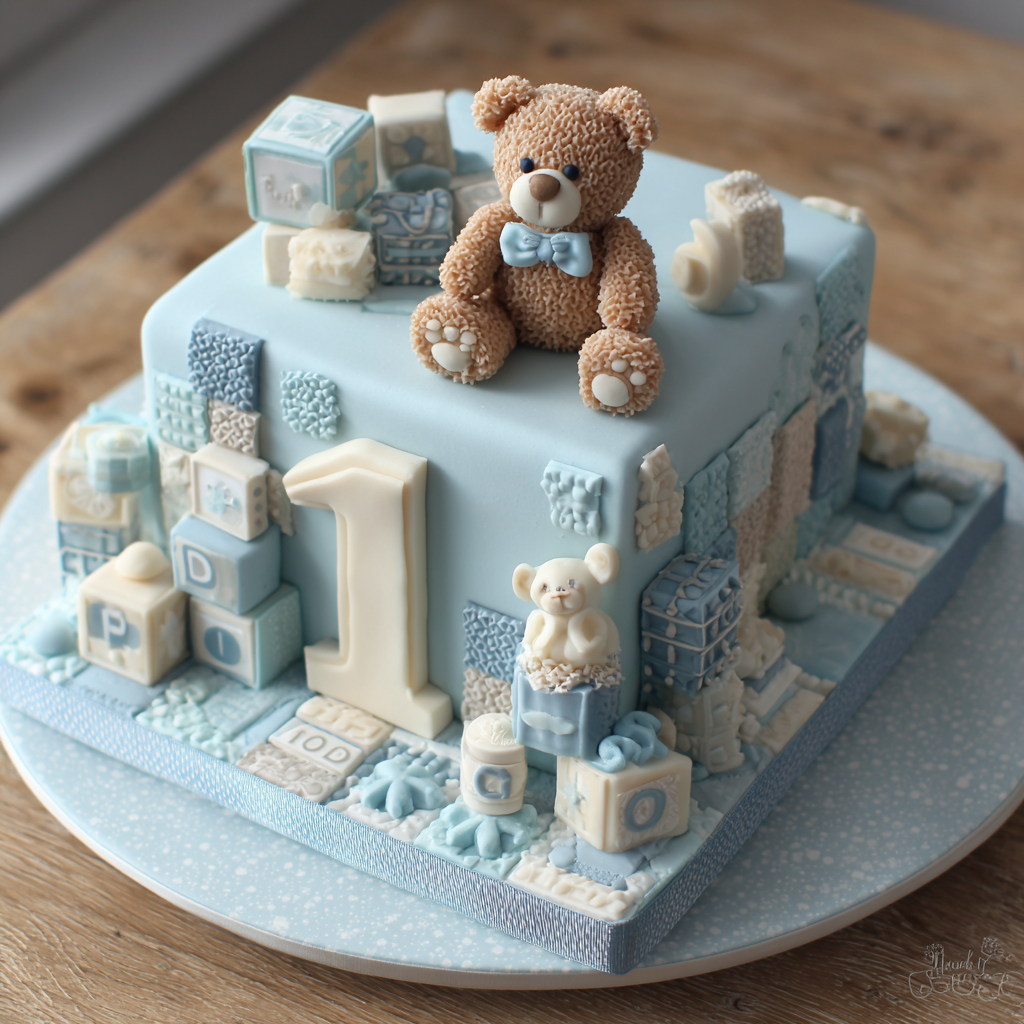
Hello, my lovely kitchen friends! Anna here. Can you believe it? We’re about to talk about a first birthday cake. That’s a big, beautiful, momentous milestone, and it deserves a show-stopping centerpiece. I know the pressure can feel real—you want it to be perfect, adorable, and, most importantly, delicious. But I’m here to let you in on a little secret: you can absolutely create a magical cake that wows the crowd without spending days in the kitchen or losing your mind.
Today, we’re making a Sky Blue Vanilla Cake with the sweetest Teddy & Blocks theme. It’s whimsical, it’s classic, and it’s packed with so much love. This isn’t just any cake; it’s a cloud-soft, tender vanilla cake swathed in the dreamiest sky-blue buttercream, decorated with a playful teddy bear and fondant building blocks. It’s the kind of cake that sparks a chorus of “oohs” and “aahs” and looks like it came from a professional bakery. But I promise, with my step-by-step guide, you’ve got this.
So, take a deep breath, tie on your favorite apron, and let’s turn this special day into a delicious memory you’ll cherish forever. We’re not just baking a cake; we’re building a moment. Let’s get started!
The Cake That Started It All: A Sweet Memory
Print1st Birthday Cake Boy Recipe : Sky Blue Vanilla Cake with Teddy & Blocks Theme

1st Birthday Cake Recipe – Sky Blue Vanilla Cake with Teddy & Blocks Theme
Ingredients
For the Vanilla Cake (3 layers, 8-inch)
3 cups all-purpose flour
1 tbsp baking powder
1/2 tsp salt
1 cup unsalted butter, room temperature
2 cups granulated sugar
5 large eggs, room temperature
1 tbsp pure vanilla extract
1 1/4 cups whole milk, room temperature
Optional Fruit Layer (for inside cake)
3/4 cup raspberry jam or puree (seedless preferred)
For Vanilla Buttercream
1 1/2 cups unsalted butter, room temperature
5–6 cups powdered sugar, sifted
3–4 tbsp milk or heavy cream
1 tbsp vanilla extract
Pinch of salt
Sky-blue gel food coloring (Wilton or AmeriColor recommended)
Fondant (white, sky-blue, pastel colors)
Silver or white “1” cake topper
Fondant teddy bear (buy or make ahead)
Fondant building blocks (A-B-C or with child’s name)
Small toy car (optional)
Cloud/star cutouts (fondant or piped royal icing)
Ribbon for cake board (optional)
Instructions
Preheat oven to 350°F (175°C). Grease and line three 8-inch round cake pans.
Whisk flour, baking powder, and salt together in a bowl.
In a stand mixer, beat butter and sugar on medium until light and fluffy, ~3–4 minutes.
Add eggs one at a time, mixing well after each. Stir in vanilla.
Alternate adding dry ingredients and milk, beginning and ending with dry. Mix until just combined.
Divide batter evenly into prepared pans. Bake 30–35 minutes or until a toothpick comes out clean.
Cool in pans 10 minutes, then transfer to wire racks to cool completely.
2. Make the Buttercream
Beat butter on medium speed until creamy. Gradually add powdered sugar, 1 cup at a time.
Add vanilla, salt, and milk/cream until smooth and fluffy.
Tint a portion with sky-blue gel food coloring; leave some white for accents if desired.
3. Assemble the Cake
Level cooled cake layers.
Spread buttercream between each layer. Optionally, add a thin raspberry jam layer.
Crumb coat the cake (thin layer of frosting), chill 30 minutes.
Apply final coat of sky-blue buttercream or fondant.
4. Decorate
Place the large “1” topper at the center.
Arrange fondant teddy bear, blocks (with initials or “1”), and toy elements around the base or top.
Add small stars, clouds, or pastel balloon shapes.
Wrap a satin ribbon around the bottom for polish.
Add name to cake board or a block.
Tips
Make-Ahead: Bake the cake layers the day before and chill; decorate on the day of the party.
Storage: Keeps well for 2–3 days in the fridge. Bring to room temp before serving.
Smash Cake: Use extra batter to bake a 4″ mini cake for baby to smash—same flavor, same theme.
Serving: Slice with a warm knife for cleaner cuts; serve with berries or milk for little ones.
Would you like a visual design sketch of the cake layout (teddy, blocks, topper, etc.)? I can create one for you.
This recipe takes me right back to my nephew Leo’s first birthday. My sister was overwhelmed with party planning, and I, the “foodie aunt,” proudly volunteered for cake duty. I had this grand vision of a towering, sky-blue masterpiece. Let’s just say the first attempt… well, let’s call it a “learning experience.” The cake layers were lopsided, my buttercream was a weird shade of gray-blue, and my handmade fondant teddy bear looked more like a sleepy potato with ears.
But you know what? When I brought that slightly wonky cake out, Leo’s eyes lit up like I’d just given him the moon. He didn’t see the imperfections; he saw a giant, exciting, blue delicious thing just for him. That’s the magic of a first birthday cake. It’s not about flawless perfection. It’s about the joy, the love, and the sweet, messy smash that follows. This recipe is the refined, tested, and foolproof version of that very cake—capturing all the magic without the potato-bear drama!
Gathering Your Magical Ingredients
Here’s your shopping and prepping list! Using room-temperature ingredients is our first pro chef hack—it creates a smoother, fluffier batter and prevents over-mixing. Take your butter, eggs, and milk out about an hour before you start.
For the Vanilla Cake (3 layers, 8-inch)
- 3 cups all-purpose flour: The sturdy foundation of our cake. For a slightly lighter crumb, you can swap 1 cup with cake flour.
- 1 tbsp baking powder: Our leavening hero! It gives the cake its beautiful rise. Make sure it’s fresh for the best lift.
- 1/2 tsp salt: A flavor enhancer! It balances the sweetness and makes the vanilla taste even more pronounced.
- 1 cup unsalted butter, room temperature: For rich flavor and that dreamy, tender texture. If you only have salted, just reduce the added salt to a pinch.
- 2 cups granulated sugar: Sweetness and, believe it or not, it also helps create a soft texture by creaming beautifully with the butter.
- 5 large eggs, room temperature: They bind everything together and add structure and richness. Room temp is key for proper emulsification!
- 1 tbsp pure vanilla extract: Don’t be shy! This is where the magic flavor lives. Use the real stuff for the best taste.
- 1 1/4 cups whole milk, room temperature: The fat content in whole milk makes for a supremely moist cake. 2% will work in a pinch, but whole is highly recommended.
For the Optional Fruit Layer
- 3/4 cup raspberry jam or puree (seedless preferred): A little hidden surprise! It adds a lovely tartness that cuts through the sweetness. You can use strawberry, apricot, or even a thin layer of lemon curd.
For the Vanilla Buttercream
- 1 1/2 cups unsalted butter, room temperature: We’re making a classic American buttercream—simple, sweet, and perfect for decorating.
- 5–6 cups powdered sugar, sifted: Sifting is non-negotiable! It prevents lumps and gives you the silkiest frosting. Start with 5 cups and add more if you need a stiffer consistency for piping.
- 3–4 tbsp milk or heavy cream: Heavy cream will make it extra rich and creamy. Add a little at a time until you reach your desired spreadable consistency.
- 1 tbsp vanilla extract: Yes, another full tablespoon! It makes the frosting taste incredible.
- Pinch of salt: Again, this is the secret to a frosting that isn’t cloyingly sweet.
- Sky-blue gel food coloring (Wilton or AmeriColor recommended): Gel is a must! Liquid food coloring will thin out your frosting and won’t give you that vibrant, beautiful sky color.
For Decorations
- Fondant (white, sky-blue, pastel colors): Perfect for creating clean blocks and decorations. You can buy pre-colored or color your own.
- Silver or white “1” cake topper: The star of the show! This instantly defines the theme.
- Fondant teddy bear (buy or make ahead): Save yourself time and stress by purchasing one, or have fun crafting your own a day or two before.
- Fondant building blocks (A-B-C or with child’s name): Such a personal touch! You can use alphabet cutters or hand-shape them.
- Small toy car (optional): Make sure it’s new and food-safe! This adds a playful element.
- Cloud/star cutouts (fondant or piped royal icing): To fill in the “sky” and make it look magical.
- Ribbon for cake board (optional): A satin ribbon around the base gives such a polished, finished look.
Let’s Bake! Your Step-by-Step Guide to Cake Magic
Ready? This is where the fun begins. Read through all the steps once before you start, and remember: baking is a science, but it’s also an act of love. You’re doing great!
Step 1: Make the Vanilla Cake Layers
- Preheat and Prep: Preheat your oven to 350°F (175°C). Now, let’s pamper our pans! Grease the bottoms and sides of three 8-inch round cake pans with butter or baking spray. Then, line the bottoms with parchment paper circles. This trio of actions (grease, line, grease a little on top of the paper) is your 100% insurance policy against stuck cakes. Trust me on this!
- Whisk the Dry Goods: In a medium bowl, whisk together the flour, baking powder, and salt. I love using a whisk for this because it simultaneously combines and aerates the flour, which contributes to a lighter cake. Set this bowl aside.
- Creaming is Key: In the bowl of your stand mixer fitted with the paddle attachment (a hand mixer works great too!), beat the room-temperature butter and sugar together on medium speed for a full 3-4 minutes. We’re not just mixing here; we’re “creaming.” This process beats tiny air bubbles into the butter, which is crucial for a light and fluffy cake. You’ll know it’s ready when the mixture is pale yellow and noticeably fluffier.
- Egg-cellent Addition: With the mixer on medium, add your eggs one at a time, letting each one fully incorporate before adding the next. This builds a stable emulsion. After the last egg is in, mix for another minute. Then, pour in that glorious tablespoon of vanilla and mix until just combined.
- The Grand Finale: Alternating Wet & Dry: Reduce your mixer speed to low. Here’s the plan: add one-third of the flour mixture, mix until *almost* combined, then half of the milk, mix, another third of flour, the rest of the milk, and finish with the final third of flour. Mix until the last streaks of flour disappear, then STOP! Over-mixing at this stage is the #1 cause of a tough, dense cake. A few tiny lumps are totally fine.
- Bake to Perfection: Divide the batter evenly between your three prepared pans. I like to use a kitchen scale for ultimate precision, but eyeballing it works too. Smooth the tops with a spatula and tap the pans on the counter a few times to release any large air bubbles. Bake for 30-35 minutes. The cakes are done when they are golden, spring back lightly when touched, and a toothpick inserted into the center comes out with a few moist crumbs (not wet batter).
- The Cool Down: Let the cakes cool in their pans on a wire rack for exactly 10 minutes. This allows them to set. Then, run a knife around the edge, invert them onto the rack, peel off the parchment paper, and let them cool completely before frosting. Pro-Tip: You can bake these layers a day ahead, wrap them tightly in plastic wrap, and store them at room temp. They’re actually easier to frost when they’re a little firmer!
Step 2: Whip Up the Dreamy Buttercream
- In your clean mixer bowl, beat the room-temperature butter on medium speed until it’s smooth, creamy, and almost white in color—about 3-4 minutes.
- With the mixer on low, gradually add your sifted powdered sugar, one cup at a time. I like to drape a clean kitchen towel over my mixer to avoid a sugar-dust storm! Once all the sugar is incorporated, scrape down the bowl and beat on medium-high for a full 2-3 minutes. This whips in air and makes it wonderfully fluffy.
- Add the vanilla, salt, and 3 tablespoons of milk/cream. Beat again until combined. If the frosting seems too thick, add the remaining milk/cream one tablespoon at a time until it’s spreadable. If it’s too thin, add a bit more powdered sugar.
- Now for the color! Scoop about two-thirds of your buttercream into a separate bowl. Using a toothpick, add a tiny bit of sky-blue gel food coloring and mix it in. Remember, you can always add more, but you can’t take it away! Mix until you achieve that perfect, dreamy sky blue. Cover both bowls with plastic wrap until you’re ready to assemble.
Step 3: Assemble & Crumb Coat Your Masterpiece
- Once your cakes are completely cool, use a serrated knife or a cake leveler to carefully slice off any domed tops so you have flat, even layers.
- Place your first layer on a cake board or serving plate. Spread a generous layer of white buttercream over it. If you’re using the raspberry jam, you can pipe a buttercream dam around the edge of the cake layer and then spread the jam inside it—this prevents it from squishing out!
- Place the second cake layer on top and repeat. Top with the third cake layer.
- Now for the crumb coat: Apply a very thin layer of your blue buttercream all over the entire cake. This doesn’t need to be pretty! Its job is to trap all the loose crumbs. Once done, pop the entire cake into the refrigerator for at least 30 minutes to let the frosting set firm. This is the secret to a flawless final coat with no pesky crumbs in sight.
Step 4: The Final Decoration – Let Your Creativity Shine!
- Once the crumb coat is set, apply a thick, beautiful, final coat of your sky-blue buttercream. Use an offset spatula and a bench scraper to get those smooth, clean sides. Don’t stress about it being perfectly smooth—a few “cloud-like” swirls are totally on theme!
- Now, the fun part! Gently press your large “1” topper into the center or side of the cake.
- Arrange your fondant teddy bear, the ABC blocks (spell out the birthday child’s name if you like!), and the toy car around the base of the cake.
- Use small dabs of buttercream to stick your cloud and star cutouts onto the sides of the cake.
- For the final professional touch, press a satin ribbon around the bottom of the cake to cover the edge of the cake board. And voilà! You’ve created a masterpiece.
How to Serve This Sweet Celebration
When it’s time for the big reveal, place your cake on the center of the dessert table. Use a warm, sharp knife to slice clean portions—just run the knife under hot water, wipe it dry, and slice. The heat glides through the buttercream and cake for a perfect piece every time. For the little guests, serve with a side of fresh berries and a small cup of cold milk. And don’t forget to have your camera ready for the star of the show: the birthday baby with their very own smash cake!
Make It Your Own: Fun Recipe Twists
- Flavor Swap: Not a vanilla fan? Substitute the vanilla extract with almond extract for a nutty flavor, or use lemon extract and add some zest to the batter for a bright, sunny cake.
- Color Change: This theme works with any color! Use pink, mint green, or soft yellow gel coloring to match your party’s palette.
- Dairy-Free Delight: Use vegan butter sticks and your favorite non-dairy milk (oat or soy work best) in both the cake and frosting.
- Fruit Filling Frenzy: Swap the raspberry jam for a layer of strawberry puree, lemon curd, or even a chocolate hazelnut spread for a surprise inside.
- “Naked Cake” Style: For a more rustic look, skip the final blue coat and do a “naked cake” with just the crumb coat showing. Decorate the same way—it’s stunning!
Anna’s Kitchen Notes & Stories
This cake has evolved so much since that first lopsided attempt for Leo! The biggest game-changer for me was learning the importance of the crumb coat. I used to skip it, thinking it was an extra, fussy step. I’d end up with a frustrated sigh and a crumb-filled final layer of frosting. Now, I never, ever skip the chill time. It’s my mandatory coffee break while the cake gets its act together in the fridge.
Another funny lesson? The first time I used gel coloring, I was so nervous I barely added any. My “sky blue” was more of a “cloudy white with a blueish hint.” My husband kindly called it “subtle.”