***
Sheet-Pan Nachos: Your New Go-To for the Easiest, Most Epic Party Snack
Why This Is The Only Nacho Recipe You’ll Ever Need
Hey there, friend! Let’s be real for a second. Is there anything more universally joyful than a giant platter of fully loaded, gloriously melty nachos? I’m talking about that perfect bite — a crispy chip holding a little bit of savory meat, a stretchy strand of cheese, a kick of jalapeño, and a cool dollop of sour cream. It’s a symphony of texture and flavor, and it’s meant to be shared (or not, I won’t judge!).
But here’s the thing that used to drive me crazy: building nachos for a crowd can be a logistical nightmare. You’re layering ingredients on a plate, microwaving in batches, and someone always ends up with a sad, chip-less pile of toppings. It’s stressful, and it takes the fun right out of taco Tuesday.
That’s why I’m a full-blown evangelist for the Sheet-Pan Nacho method. This isn’t just a recipe; it’s a game-changer. We’re taking everything you love about nachos and spreading the love evenly across a single baking sheet, then letting your oven work its melty, bubbly magic. It’s the ultimate one-pan wonder that guarantees every single chip gets its fair share of the good stuff. It’s fast, it’s foolproof, and it’s built for fun. So, grab your biggest sheet pan and let’s turn your kitchen into the most popular spot in the house!
A Nacho Night to Remember
PrintSheet-Pan Nachos: Loaded, Melty, and Party-Ready

Sheet-pan nachos are the ultimate crowd-pleasing snack — bold, cheesy, and loaded with flavor in every bite. This one-pan wonder layers crispy tortilla chips with seasoned ground beef, black beans, jalapeños, and plenty of melted cheese. Just out of the oven, it’s finished with fresh avocado and salsa for the perfect mix of heat, creaminess, and crunch. Fast, fun, and built for sharing.
- Prep Time: 10 minutes
- Cook Time: 10 minutes
- Total Time: 20 minutes
- Yield: 6 1x
Ingredients
1 bag (10 oz) tortilla chips
1 lb ground beef
1 tablespoon taco seasoning
1 cup black beans, drained
2 cups shredded cheddar or Mexican blend cheese
1–2 jalapeños, sliced
1 avocado, diced
½ cup salsa
Optional: sour cream, green onions, cilantro, lime wedges
Instructions
Optional: sour cream, green onions, cilantro, lime wedges
Directions
Preheat oven to 400°F (200°C). Line a sheet pan with parchment.
In a skillet, cook ground beef with taco seasoning until browned.
Spread chips in an even layer on the pan.
Top with cooked beef, black beans, jalapeños, and shredded cheese.
Bake for 8–10 minutes, or until cheese is fully melted.
Remove from oven and add avocado, salsa, and any optional toppings.
Serve immediately — straight from the pan.
Nutrition
- Calories: 350
- Fat: 22g
- Carbohydrates: 22g
- Protein: 18g
This recipe takes me right back to my college days. My roommates and I were perpetually broke, but we were rich in appetite. Our favorite weekly tradition was “Improvised Nacho Night.” We’d pool our resources—someone would find a half-used bag of tortilla chips in the back of the pantry, I’d dig out my secret stash of spices, and someone else would miraculously produce a block of cheese. We’d bake it all on a battered old cookie sheet we’d inherited from a previous tenant.
We’d slide that hot, cheesy masterpiece right onto the center of our lumpy second-hand couch, armed with a stack of paper plates that were never quite sturdy enough. For twenty glorious minutes, there was no talk of exams or drama, just the sound of crunching, laughing, and the collective, happy sigh of people sharing really, really good food. It was messy, unpretentious, and absolutely perfect. That’s the spirit I want to bring to your kitchen with this recipe. It’s not about perfection; it’s about connection, one perfectly loaded chip at a time.
Gathering Your Nacho Dream Team
Here’s your shopping list for maximum flavor and fun. I’ve included my favorite chef-y insights and substitutions to make this recipe your own!
- 1 bag (10 oz) Sturdy Tortilla Chips: This is your foundation, so don’t skimp! Look for a thick, restaurant-style chip. The sturdier they are, the better they’ll stand up to all those glorious toppings without turning into nacho soup. (No-stress swap: Use corn tortillas cut into quarters and lightly fried or baked for an extra-homemade touch!)
- 1 lb Ground Beef (80/20 blend): A little fat means a lot of flavor. You can absolutely use leaner beef, turkey, or chicken—just add a tablespoon of olive oil to the pan if it seems dry.
- 1 tablespoon Taco Seasoning: My little secret? I often use 1 ½ tablespoons because we love bold flavor! Homemade is fantastic (a mix of chili powder, cumin, paprika, garlic powder, and a pinch of cayenne), but a good-quality store-bought packet is a brilliant time-saver.
- 1 cup Black Beans, drained and rinsed: These add a wonderful, creamy texture and a boost of fiber. They’re my little healthy-ish hack. Don’t have black beans? Pinto beans or even kidney beans work beautifully.
- 2 cups Shredded Cheese: This is the glue that holds our masterpiece together! I’m a huge fan of a pre-shredded “Mexican blend” for its perfect meltability. For the *ultimate* stretch, use a combo of sharp cheddar for flavor and Monterey Jack for that epic cheese-pull.
- 1–2 Jalapeños, thinly sliced: Hello, heat! I keep the seeds in for a bigger kick, but you can scrape them out for a milder vibe. For a smoky twist, use pickled jalapeños instead.
- 1 Avocado, diced: Our fresh, creamy element. Adding it after baking keeps it bright green and perfect.
- ½ cup Salsa: This is your liquid gold. Use your favorite store-bought brand or a simple pico de gallo. The acidity cuts through the richness of the cheese and beef perfectly.
- The “Party Starters” (Optional, but highly encouraged): A dollop of sour cream or Greek yogurt, a sprinkle of chopped green onions, a handful of fresh cilantro, and a few lime wedges for squeezing over everything. This is where the magic happens!
Let’s Build Our Masterpiece: Step-by-Step
Okay, team! Aprons on, oven preheated. Let’s do this. The key to perfect sheet-pan nachos is all in the layering. Follow these steps, and you’ll be a nacho hero in no time.
- Preheat & Prep: First things first, get that oven roaring hot at 400°F (200°C). This high heat will melt the cheese quickly and evenly without over-toasting the chips. While it’s heating, line your sheet pan with parchment paper. (Chef’s Hack: This isn’t just for easy cleanup! It also prevents the cheese from fusing to the pan itself, so you get every last cheesy, delicious bit.)
- Brown that Beef: While the oven heats, grab a skillet and cook your ground beef over medium-high heat, breaking it up with a spoon until it’s beautifully browned and cooked through. Drain off any excess grease, then stir in your taco seasoning and a couple tablespoons of water. Let it simmer for a minute until fragrant. (Chef’s Insight: That splash of water helps the seasoning bloom and coat every little crumble of beef, creating a more cohesive flavor.)
- The Art of the Chip Layer: Now, for the foundation! Dump your bag of tortilla chips onto the prepared sheet pan and spread them into a single, even layer. Don’t be shy about creating a few small gaps—this allows the cheese to drip down and act as delicious “glue,” creating those amazing clusters of chips we all fight over.
- Strategic Topping Time: This is the most important step! We’re not just dumping everything on willy-nilly. Sprinkle the seasoned ground beef evenly over the chips. Follow with the black beans and sliced jalapeños. Now, for the star of the show: the cheese! Shower it over everything, making sure to get cheese in all the nooks and crannies. (Chef’s Secret: The order matters! Putting the cheese on top of the other toppings means it melts over and around them, locking everything into place.)
- Bake to Bubbly Perfection: Carefully slide your loaded pan into the hot oven. Bake for 8-10 minutes. You’re looking for the cheese to be completely melted, bubbly, and maybe just starting to get a few golden-brown spots. (Watchful Eye Tip: Ovens can vary, so start checking at the 8-minute mark. We want melty, not burnt!)
- The Grand Finale (The Cold Toppings): Pull that beautiful, cheesy masterpiece out of the oven! This is where we bring in the fresh, cool elements that make the flavors sing. Immediately scatter the diced avocado and spoonfuls of salsa across the top. Then, add your optional toppings—dollops of sour cream, a flurry of green onions, and a generous sprinkle of fresh cilantro. Serve it right away, straight from the pan for that ultimate “wow” factor!
How to Serve These Party-Ready Nachos
Presentation is part of the fun! I love placing the entire sheet pan right in the middle of the table on a thick trivet. Pile a stack of small plates or even just napkins next to it, and let everyone dig in family-style. It encourages conversation, laughter, and that wonderful, communal feeling of sharing a truly fantastic meal. For a more polished look, you can use a large spatula to transfer big, beautiful sections to a serving platter, but honestly? The rustic, straight-from-the-pan vibe is where it’s at.
Mix It Up! Endless Nacho Possibilities
The beauty of this recipe is its flexibility. Once you master the basic method, the flavor world is your oyster! Here are a few of my favorite twists:
- Buffalo Chicken: Swap the beef for 2 cups of shredded rotisserie chicken tossed in ½ cup of Buffalo sauce. Use a Monterey Jack and blue cheese crumble blend, and top with diced celery and a blue cheese or ranch drizzle.
- Fajita Veggie: A fantastic vegetarian option! Sauté sliced bell peppers and onions with fajita seasoning. Use these instead of the ground beef, and add a sprinkle of corn and cotija cheese.
- Fully Loaded Potato: Swap the chips for crispy tater tots! Par-bake the tots first, then top with crumbled cooked bacon, cheddar cheese, and after baking, finish with sour cream and chives.
- Breakfast Nachos: Yes, for breakfast! Use the chips, then top with scrambled eggs, cooked breakfast sausage, and cheddar cheese. After baking, finish with a drizzle of hot sauce.
Anna’s Extra Kitchen Confidence
This recipe has been a staple in my home for years, and it’s evolved in the best ways. I used to be so careful about placing each topping *just so*, but one chaotic family gathering taught me that the “dump and spread” method is not only faster, it creates more delicious, random bites! My biggest lesson? Let the nachos be a little messy. The clusters where the cheese has fused multiple chips together are the holy grail, and they only happen when you’re generous and a bit rustic with your toppings.
One of my favorite kitchen fails turned into a win: I once ran out of cheddar and had to use a mix of mozzarella and pepper jack. It was such a hit that it’s now our preferred combo! So please, use this recipe as a blueprint. Make it your own. That’s where the real magic is.
Your Nacho Questions, Answered!
Over the years, I’ve gotten a lot of questions about this recipe. Here are the answers to the most common head-scratchers to ensure your nacho success every single time.
Q: My nachos always get soggy. What am I doing wrong?
A: The Soggy Nacho is Public Enemy #1! It’s usually caused by two things: 1) Wet toppings added before baking (like salsa or fresh tomatoes) and 2) Overloading the chips. Remember our rule: only “dry” or “melty” toppings (meat, beans, cheese, jalapeños) go on before the oven. All “wet” or “cold” toppings (salsa, avocado, sour cream, lettuce) go on *after* it comes out of the oven. Also, make sure your beef is well-drained and your beans are rinsed.
Q: Can I make these ahead of time for a party?
A: You can do some prep to make assembly lightning-fast! Brown and season the meat ahead of time and store it in the fridge. Shred your cheese and slice your jalapeños. Keep everything separate. Then, when your guests arrive, just layer everything on the sheet pan and pop it in the oven. The actual baking time is so short that you can have a fresh, hot pan of nachos ready in minutes!
Q: My cheese isn’t melting evenly. Help!
A: This is almost always a shredding issue! Pre-shredded bagged cheese is coated with anti-caking agents like potato starch or cellulose to prevent clumping, which can also inhibit melting. For the absolute best, ooiest-gooiest melt, buy blocks of cheese and shred them yourself right before using. It’s a tiny bit more work, but the difference in meltability is truly night and day.
Q: Can I make a vegetarian or vegan version?
A> Absolutely! For vegetarian, just skip the beef and add more beans, corn, and sautéed veggies. For vegan, use your favorite plant-based ground “meat,” vegan cheese shreds, and vegan sour cream. The method is exactly the same!
Nutritional Information*
*This is a rough estimate per serving and can vary greatly based on your specific ingredients and toppings.
Prep Time: 10 minutes | Cook Time: 10 minutes | Total Time: 20 minutes | Serves: 6
Per serving (approximate): Calories: ~350 | Protein: 18g | Fat: 22g | Carbohydrates: 22g | Fiber: 5g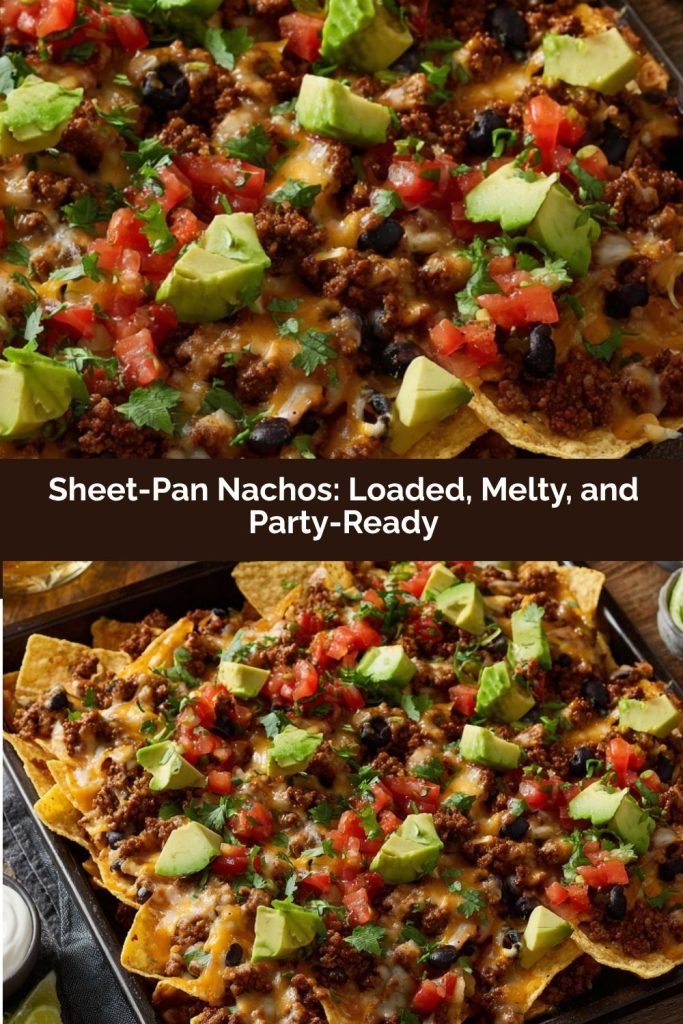
Final Thoughts
If there’s one dish that guarantees smiles, it’s a big, bubbling tray of nachos straight from the oven. There’s just something wonderfully communal about it—everyone leaning in, hands diving for that perfect, cheese-laden chip, the air filled with laughter and the sound of crunching. These sheet-pan nachos aren’t just food; they’re an instant good time.
I love how effortlessly they bring people together—whether it’s a casual weeknight, game day, or a last-minute “I’ll bring the snacks” situation. They’re fast, flexible, and endlessly customizable, which means you can always make them fit whatever you have on hand (or whatever craving hits).
So the next time you need a crowd-pleasing dish that’s as fun to eat as it is easy to make, grab your sheet pan and build yourself a masterpiece. Just be warned—once you start making nachos this way, there’s no going back to the microwave method. These are nachos the way they were meant to be: golden, gooey, shareable, and absolutely unforgettable.