***
Your New Go-To Party Hero: The Ultimate Loaded Taco Dip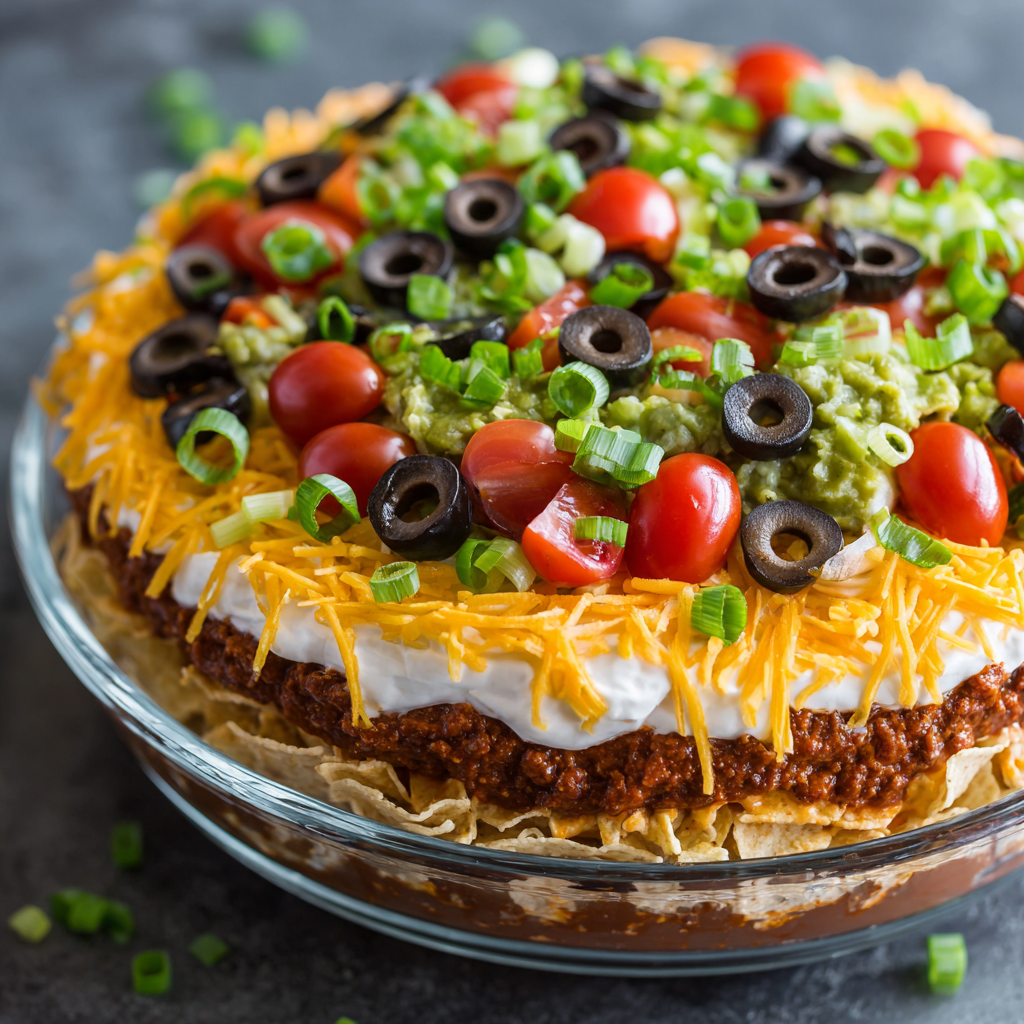
Hey there, friend! Anna here. Can we talk for a second about that moment at a party when you’re hovering near the snack table, and your eyes lock onto The One? The dish that has a permanent crowd around it, the one where the chips are diving in with reckless abandon, and the only thing left at the end is a beautifully scraped-clean platter and a whole lot of happy, satisfied smiles?
For me, that dish has always been a glorious, multi-layered, no-bake loaded taco dip.
This isn’t just a dip; it’s an experience. It’s a cool, creamy, zesty, and crunchy masterpiece that comes together in minutes flat, without ever turning on your oven. It’s the culinary equivalent of your favorite cozy sweater—comforting, reliable, and always a hit. I’m a firm believer that the best party food is the kind that lets you spend more time with your guests and less time stressing in the kitchen. This dip is the absolute embodiment of that philosophy.
Whether you’re prepping for game day, a potluck, a birthday bash, or just a Tuesday night that needs a little extra sparkle, this layered taco dip is your secret weapon. It’s a vibrant canvas of bold Tex-Mex flavors, each layer building on the last to create something truly magical. So, let’s ditch the stress and cook up some joy together. Grab your favorite serving platter, and let’s build the most legendary dip of your life!
A Dip That Tastes Like Sunshine and Laughter
PrintLoaded Taco Dip: No-Bake, Layered, and Party-Perfect

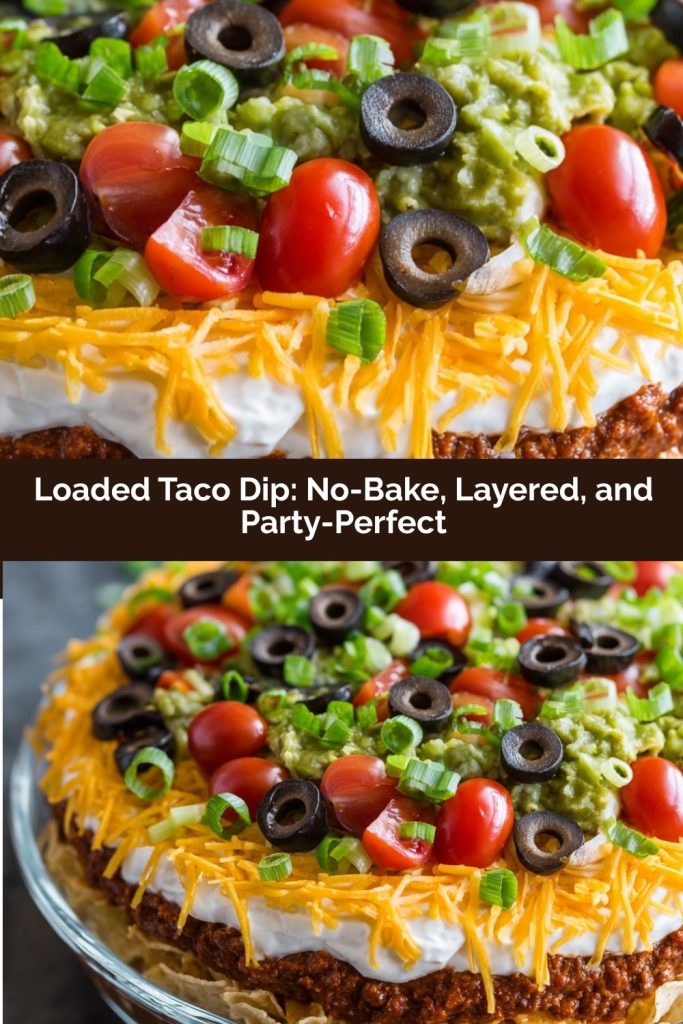
Loaded taco dip is a chilled, no-cook appetizer layered with bold Tex-Mex flavors — creamy, cheesy, zesty, and totally irresistible. With layers of refried beans, seasoned sour cream, guacamole, salsa, shredded cheese, olives, and green onions, this dip is a guaranteed crowd-pleaser. It’s fast, fresh, and made to scoop with tortilla chips at your next party or potluck.
- Prep Time: 15 minutes
- Total Time: 15 minutes
- Yield: 8–10 1x
Ingredients
1 can (16 oz) refried beans
1 cup sour cream
1 tablespoon taco seasoning
1 cup guacamole
1 cup salsa (drained slightly if watery)
1½ cups shredded cheddar or Mexican blend cheese
½ cup sliced black olives
½ cup chopped green onions
Optional: diced tomatoes, jalapeños, chopped cilantro
Tortilla chips, for serving
Instructions
In a bowl, mix sour cream with taco seasoning.
On a serving platter or in a shallow dish, layer in this order:
Refried beans
Seasoned sour cream
Guacamole
Salsa
Shredded cheese
Olives and green onions
Add optional toppings if desired.
Chill until ready to serve. Best enjoyed with sturdy tortilla chips.
Nutrition
- Calories: 200
- Fat: 14g
- Carbohydrates: 12g
- Protein: 5g |
This recipe takes me right back to my first real summer potluck after moving into our neighborhood. I was so nervous, wanting to make something that would be a hit but wouldn’t have me slaving away in a hot kitchen all afternoon. My mom, in her infinite wisdom, simply said, “Anna, bring the dip. The one with all the layers.”
I remember assembling it on my counter, the bright white sour cream, the vibrant green guacamole, the fiery red salsa—it looked like a edible piece of art. I carried it over, my heart doing a little pitter-patter, and set it on the table. Within minutes, it was the center of the universe. Neighbors I hadn’t properly met yet were laughing, scooping, and asking me for the recipe. It wasn’t just the delicious flavors that won them over; it was the sheer, joyful, shareable nature of it. That dip was my culinary handshake, and it sparked friendships that I still cherish today. It’s a reminder that the simplest food, made with love, can be the most powerful connector.
Gathering Your Flavor Dream Team
Here’s the beautiful part: this dip is all about simple, accessible ingredients. No fancy techniques here, just great flavors working in harmony. Let’s break it down.
- 1 can (16 oz) Refried Beans: This is our sturdy, flavorful base. I prefer the traditional kind, but feel free to use fat-free or black refried beans for a slightly different texture. Chef’s Insight: Give the can a good stir before spreading—it makes it much easier to get a smooth, even layer.
- 1 cup Sour Cream: Our cool, creamy second layer. For a tangier kick, Greek yogurt works wonderfully as a 1:1 substitute.
- 1 tablespoon Taco Seasoning: This is where the magic starts! We’re mixing it right into the sour cream to infuse every bite with that classic taco flavor. Use your favorite store-bought blend, or if you’re feeling ambitious, a homemade mix of chili powder, cumin, garlic powder, and a pinch of oregano is fantastic.
- 1 cup Guacamole: The star of the show for many! You can use store-bought to save time, or mash 2-3 ripe avocados with a squeeze of lime juice, a pinch of salt, and some chopped cilantro. Pro-Tip: Spreading the guacamole directly onto the sour cream layer creates a barrier that helps prevent the beans from discoloring it.
- 1 cup Salsa: This brings the zesty, juicy element. I recommend a thick and chunky-style salsa. If yours is a bit watery, give it a quick drain in a fine-mesh strainer for a minute or two. This prevents the dip from getting soggy.
- 1½ cups Shredded Cheddar or Mexican Blend Cheese: The cheesy blanket that holds it all together! I love the extra flavor of a sharp cheddar, but a pre-shredded Mexican blend is super convenient and delicious.
- ½ cup Sliced Black Olives: They add a lovely, briny saltiness and a great textural contrast.
- ½ cup Chopped Green Onions: A pop of fresh, sharp flavor and a gorgeous green garnish.
- Optional Toppings: This is your playground! Diced fresh tomatoes, sliced jalapeños for heat, or a big handful of chopped cilantro all make fabulous additions.
- Tortilla Chips, for serving: Go for the sturdy, restaurant-style chips! They’re the perfect little shovels for this hearty dip.
Let’s Build Our Masterpiece: A Step-by-Step Guide
Okay, friend, apron on? Let’s do this! The process is as fun as eating it, I promise. We’re building from the bottom up, creating a flavor story in every layer.
- Create Your Creamy Taco Layer. In a small bowl, take your sour cream and add that tablespoon of taco seasoning. Grab a whisk or a fork and mix, mix, mix until it’s completely smooth and beautifully speckled with spice. This step is crucial—it ensures every single layer after this gets a hint of that taco magic. Little Chef Hack: Taste it! Want a bit more kick? Add another half teaspoon of seasoning. You’re the boss of this dip.
- Spread the Bean Base. Grab your favorite serving platter or a shallow dish—I love using a clear glass pie plate or a rectangular platter so you can see all the gorgeous layers from the side. Open your can of refried beans and plop them right into the center. Now, using the back of a spoon or a small offset spatula, spread them into a smooth, even layer, leaving a little border around the edge. Don’t worry about it being perfect; rustic is charming!
- Blanket with Seasoned Cream. Now, carefully spoon your seasoned sour cream over the bean layer. Gently spread it to the edges, completely covering the beans. This creates a fantastic barrier and a cool, creamy contrast to the beans.
- Layer on the Guacamole. Here comes the green goodness! Dollop your guacamole over the sour cream and spread it out gently. You’ll notice how easily it glides over the creamy layer beneath it. This is the moment it really starts to look like a proper dip!
- Spoon Over the Salsa. Time for our zesty, tomatoey layer. Remember that quick drain we talked about? It pays off here! Spoon your slightly drained salsa over the guacamole and spread it evenly. We’re building height and color, and it’s looking incredible.
- The Grand Cheese Topping. Take handfuls of your shredded cheese and shower it generously over the salsa layer. Cover every bit of red with a blanket of cheesy goodness. This is the layer that makes everyone’s eyes light up.
- The Grand Finale: Garnish! Now for the confetti! Sprinkle the sliced black olives and chopped green onions evenly over the cheese. This is where you can get creative. Adding those optional diced tomatoes and jalapeños now will give it a stunning, confetti-like finish that’s just irresistible.
- The Patient Chill. I know, I know—you want to dive in right now! But trust me on this one. Gently cover your dip with plastic wrap and pop it in the fridge for at least 30 minutes, or up to 2 hours. This chill time is non-negotiable magic. It allows the flavors to meld together beautifully and firms up the layers, making it much easier to scoop without everything sliding off your chip.
How to Serve This Crowd-Pleasing Dip
Presentation is part of the fun! Place your chilled, gorgeous dip right in the center of your table or snack spread. Pile a mountain of sturdy tortilla chips all around the base of the platter. I like to use a mix of yellow and blue corn chips for extra color. For a real party vibe, add a small bowl of extra jalapeños on the side for the heat-seekers. Then, just step back and watch the magic happen. This dip is meant to be shared, so provide a few serving spoons or small spreaders and let your guests dig in!
Make It Your Own: Delicious Recipe Variations
The beauty of this recipe is its flexibility. Feel free to play and customize it to your heart’s content!
- Spicy Fiesta: Use a spicy salsa, add a layer of pickled jalapeños under the cheese, and mix a teaspoon of hot sauce into the sour cream mixture.
- Protein Power-Up: Brown half a pound of ground beef or turkey with an extra tablespoon of taco seasoning. Let it cool completely, then add it as a layer between the beans and the seasoned sour cream.
- 7-Layer Dip Classic: Add a classic layer of finely shredded iceberg lettuce right before the cheese for that iconic crunch.
- Lighter & Brighter: Swap the sour cream for plain Greek yogurt, use a reduced-fat cheese, and load up on fresh toppings like diced tomatoes and cilantro.
- Fiesta Bean Swap: Instead of refried beans, use a layer of seasoned, mashed black beans for a different flavor and texture profile.
Anna’s Kitchen Notes & Stories
Over the years, this dip has been my trusty sidekick to countless gatherings, and it’s evolved in so many fun ways. I once accidentally used a can of spicy refried beans and didn’t realize it until a friend (with tears in their eyes from the heat) declared it the best dip they’d ever had! It’s now a requested variation.
My biggest tip? Don’t stress about the layers being perfectly level or symmetrical. Part of its charm is that it looks homemade and abundant. I’ve made this in a 9×13 pan for a huge crowd, and in individual little cups for a more controlled portion at a baby shower. It always works. The recipe is a wonderful guide, but your intuition and taste buds are the real chefs here. This dip has never, ever let me down, and I have a feeling it’s going to become a staple in your home, too.
Your Dip Questions, Answered!
I’ve gotten a lot of questions about this dip over the years, so I’ve compiled the most common ones here to help you out!
Q: Can I make this dip ahead of time?
A: Absolutely! You can assemble the entire dip (except for the final olive/green onion garnish if you’re worried about them getting soft) up to 24 hours in advance. Keep it tightly covered in the fridge. I do recommend adding the final fresh garnishes no more than an hour or two before serving for the best texture and color.
Q: My guacamole layer is turning brown! How can I prevent this?
A: The number one trick is to ensure the guacamole is completely sealed by the layers above and below it. Spreading the sour cream underneath and the salsa on top creates a great barrier from the air. Also, using plenty of lime juice in your homemade guacamole helps slow oxidation. If you’re really concerned, you can assemble the beans, sour cream, and salsa layers ahead of time, and then add the guacamole and remaining toppings a few hours before the party.
Q: The dip seems a bit watery after chilling. What happened?
A: This is almost always due to a watery salsa. No worries! Just drain your salsa really well in a fine-mesh strainer for 5-10 minutes before assembling. You can even give it a gentle press with the back of a spoon to squeeze out excess liquid. This simple step makes a world of difference in the final texture.
Q: I’m not a fan of refried beans. Can I skip them?
A: Of course! The base is very flexible. You could use a layer of well-drained and seasoned black beans, or even a creamy layer of hummus for a different twist. If you skip it entirely, just know your first layer will be the seasoned sour cream, so you might want to make a little extra.
Quick Nutrition Note
While we’re all about joy and flavor first, it’s always helpful to have a general idea! Please note, these are estimates and will vary based on your specific ingredients and portion sizes.
Per serving (approx. ½ cup): Calories: ~200 | Protein: 5g | Fat: 14g | Carbs: 12g
Final Thoughts
There’s a reason this loaded taco dip has earned its permanent spot in my party rotation—it’s pure happiness in a dish. No oven, no fuss, just layers of creamy, zesty, crunchy goodness that bring everyone to the table (and then back for seconds). It’s the kind of recipe that proves simple food can still feel special, especially when it’s shared.
I love that it’s endlessly adaptable—whether you’re making it ahead for game day, piling it high for a birthday bash, or keeping it casual for a cozy night in. Every bite tastes like laughter, conversation, and connection. And honestly? That’s what great food is all about.
So next time you’re looking for a guaranteed crowd-pleaser, remember this dip. It’s more than a recipe—it’s a reason to gather. Serve it up with a big bowl of chips, a chilled drink, and your favorite people, and watch the magic happen.