Your New Favorite Dessert is Here, and It’s Blissfully Gooey
Hey there, friend! Anna here. Can I let you in on a little secret? I believe that some of the very best moments in life happen around a kitchen table, often with a cup of coffee in one hand and a truly decadent slice of cake in the other. And if there’s one cake that has the power to turn an ordinary Tuesday into a mini-celebration, it’s this one. Welcome to the glorious, buttery, melt-in-your-mouth world of my Ultimate Gooey Butter Cake.
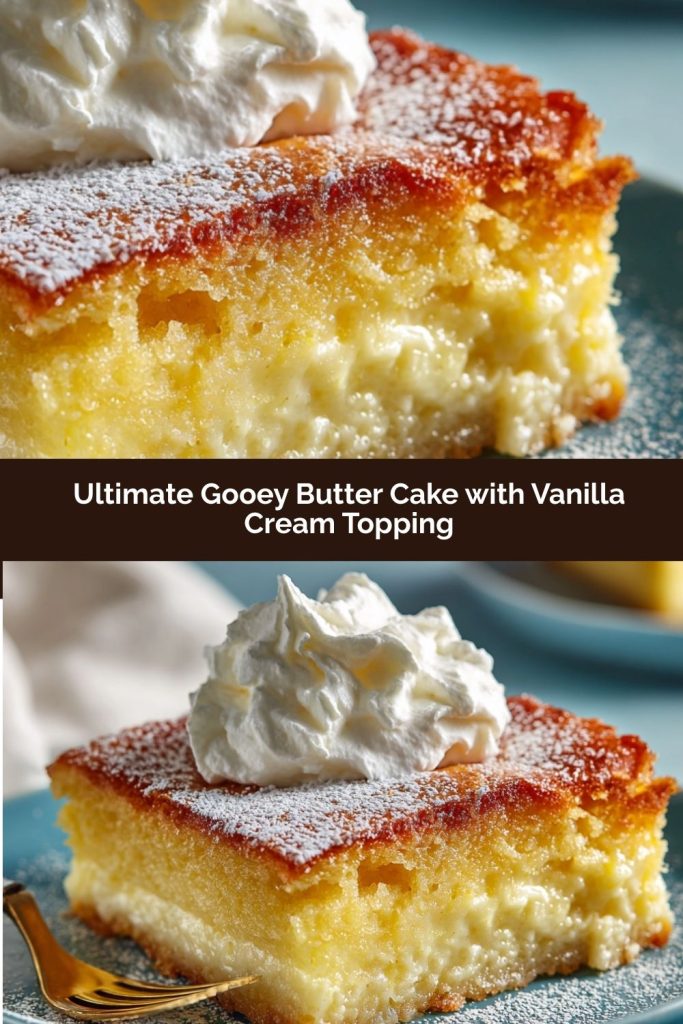
This isn’t just a dessert; it’s an experience. Imagine this: a soft, slightly dense cake base that acts as the perfect foundation for a layer of pure magic. On top, a luscious, creamy, and yes—incredibly gooey—topping that’s rich with cream cheese and vanilla. It’s the kind of dessert that makes people’s eyes light up, the one that disappears from the potluck table in record time, and the recipe you’ll be asked to bring to every single family gathering from now until forever.
I know the name sounds indulgent (and trust me, it is!), but the process is anything but complicated. We’re using a simple, brilliant method that delivers maximum wow-factor with minimal stress. So, if you’ve ever been intimidated by fancy layer cakes or finicky pastries, take a deep breath. This is your sweet spot. This is the recipe that will make you feel like a dessert rockstar. Now, grab your favorite mixing bowl and let’s bake up some pure, unadulterated joy together.
A Slice of St. Louis and a Whole Lot of Love
PrintUltimate Gooey Butter Cake with Vanilla Cream Topping
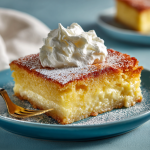
Sink your fork into layers of rich, golden decadence with this Ultimate Gooey Butter Cake. It starts with a soft yellow cake crust and finishes with a luscious cream cheese topping that’s buttery, sweet, and sinfully gooey. Perfect for birthdays, potlucks, or any moment that calls for pure dessert joy.
- Prep Time: 10 minutes
- Cook Time: 40–45 minutes
- Total Time: 55 minutes
Ingredients
Cake Base:
2 boxes (15.25 oz each) yellow cake mix
2 large eggs
1 cup unsalted butter, melted
Gooey Layer:
2 (8 oz) packages cream cheese, softened
4 large eggs, beaten
2 tsp vanilla extract
7 cups powdered sugar
Topping:
Extra powdered sugar, for dusting
Optional: zest of 1 lemon or a dash of almond extract for flavor lift
Instructions
Preheat oven to 350°F (175°C). Grease a 9×13-inch baking pan (or use two 8×8 pans for thick pieces).
Make the crust: In a large bowl, combine cake mix, eggs, and melted butter. Mix until a thick dough forms. Press into the bottom of your prepared pan.
Prepare the filling: Beat cream cheese until smooth. Add beaten eggs and vanilla. Gradually mix in powdered sugar until fully combined and fluffy.
Pour filling over the cake base and spread evenly.
Bake for 40–45 minutes, until the edges are golden and the center is set but still slightly jiggly — it will firm up as it cools.
Cool completely, then sprinkle generously with powdered sugar before slicing.
Nutrition
- Calories: 390 kcal
- Sugar: 38g
- Fat: 20g
- Carbohydrates: 50g
This recipe holds a special place in my heart because it’s steeped in a wonderful, buttery history. The story goes that the original Gooey Butter Cake was a happy accident born in a St. Louis bakery in the 1930s. A baker supposedly mixed up the proportions for a regular coffee cake, ending up with something far more gooey and fantastic. Instead of starting over, they baked it up, and a legend was born!
My own story with this cake started at my grandmother’s house. She wasn’t from St. Louis, but she had a friend who was, and she brought this recipe into our family. I can still remember the first time I tried it. I was about eight years old, and the contrast of the powdered sugar-dusted top against the rich, yellow interior felt like discovering a hidden treasure. We weren’t allowed to have dessert before dinner, but my sister and I would always “inspect” the cake the moment it came out of the oven, just to “make sure it was okay.” It became the centerpiece of birthdays, holidays, and just-because weekends. For me, this cake tastes like nostalgia, laughter, and the simple, profound love that gets baked into family favorites.
Gathering Your Gooey Ingredients
One of the best things about this recipe is its beautiful simplicity. Let’s walk through what you’ll need. I’ve included a few of my favorite chef-y insights and substitutions so you can make it your own!
For the Cake Base:
- 2 boxes (15.25 oz each) yellow cake mix: This is our fantastic shortcut! It creates a perfectly soft and sturdy crust. Don’t use a “pudding in the mix” variety, as it can make the base too dense. A classic, simple yellow cake mix is your best bet.
- 2 large eggs: They bind our crust together, giving it structure and a lovely richness.
- 1 cup unsalted butter, melted: The star of the show! Using melted butter creates a rich, almost shortbread-like crust. I always use unsalted so I can control the salt level in the recipe.
For the Legendary Gooey Layer:
- 2 (8 oz) packages cream cheese, softened: This is non-negotiable—make sure it’s truly softened to room temperature! This ensures a silky-smooth filling with no lumps. If it’s cold, you’ll end up with a chunky filling, and we want pure silk.
- 4 large eggs, beaten: Beaten eggs incorporate more easily into the cream cheese, creating that signature custardy, gooey texture.
- 2 tsp vanilla extract: A generous pour adds a warm, aromatic depth. For a real treat, try using vanilla bean paste—you’ll see those beautiful little specks throughout the topping!
- 7 cups powdered sugar: I know it seems like a lot, but this is what creates the sweet, stable, and wonderfully gooey consistency. Sift it if you have time to prevent any little lumps.
For the Finishing Touch:
- Extra powdered sugar, for dusting: This classic snowy finish isn’t just pretty; it adds a final touch of sweetness that cuts through the richness.
- Optional: Zest of 1 lemon or a dash of almond extract: My little chef’s hack! A bit of lemon zest brightens the entire cake, while a 1/4 tsp of almond extract adds a sophisticated, bakery-style flavor. You can add either to the gooey layer.
Let’s Bake: Your Step-by-Step Guide to Gooey Perfection
Ready to create some magic? Follow these steps, and you’ll be a Gooey Butter Cake pro in no time. I’ve sprinkled in my best tips to guarantee your success!
- Preheat and Prep: Fire up your oven to 350°F (175°C). Now, grab your 9×13-inch baking pan. I’m a big fan of giving it a good coating of non-stick spray or butter. For absolute peace of mind, you can line it with parchment paper, leaving a little overhang on the two long sides. This creates a “sling” that lets you lift the entire cake out for super-clean slicing later!
- Create the Cake Base: In a large bowl, combine the yellow cake mix, 2 eggs, and the melted butter. This will look a bit strange at first—it’ll be thick and more like a cookie dough than a cake batter. That’s exactly what you want! Use a sturdy spoon or even your hands to mix until no dry spots remain. Now, press this dough firmly and evenly into the bottom of your prepared pan. I like to use the bottom of a measuring cup to press it down smoothly—this gives us a perfect foundation for all that gooey goodness.
- Whip Up the Gooey Filling: In another large bowl (I use my stand mixer with the paddle attachment), beat the softened cream cheese on medium speed until it’s completely smooth and creamy. This should take about 1-2 minutes. Scrape down the sides of the bowl. Now, with the mixer on low, slowly add the 4 beaten eggs and the vanilla extract. Mix just until combined. Here’s a pro tip: add the powdered sugar one cup at a time with the mixer on low. Trust me on this—starting on low speed prevents a legendary cloud of powdered sugar from exploding all over your kitchen! Once it’s mostly incorporated, you can bump the speed up to medium and beat for another minute until the filling is smooth, glossy, and utterly dreamy.
- Assemble the Layers of Joy: Pour the beautiful, creamy filling over your pressed cake base. Use a spatula to spread it into an even layer, making sure it reaches all the way to the edges.
- Bake to Perfection: Slide the pan into your preheated oven and bake for 40-45 minutes. Here’s the most important part: you want the edges to be a beautiful golden brown and look set, but the center should still have a distinct jiggle when you gently shake the pan. Do not overbake! The residual heat will continue to cook the center as it cools. If you bake it until the center is completely firm, you’ll lose the “gooey” in Gooey Butter Cake. An instant-read thermometer inserted near the center should read about 200°F.
- The Patience Test: This is the hardest step! Remove the cake from the oven and place the entire pan on a wire rack. You must let it cool completely to room temperature. This can take a few hours. Rushing this step will result in a mess when you try to slice it. The filling needs this time to set up properly. For the cleanest slices, I sometimes even pop the cooled cake into the refrigerator for an hour before cutting.
- The Grand Finale: Just before serving, give the top a generous dusting with that extra powdered sugar. I use a fine-mesh sieve for a lovely, even snowfall effect. Then, slice into squares, serve, and get ready for the compliments to roll in!
How to Serve Your Masterpiece
This cake is a star all on its own, but a little styling goes a long way! I love serving it on a simple white platter to let that golden and white color scheme shine. For an extra special touch, place each square on a dessert plate with a few fresh berries on the side—the tartness of a raspberry or strawberry is a fantastic contrast to the sweet, rich cake. And let’s be real, a warm cup of coffee or a cold glass of milk is this dessert’s soulmate. It’s the perfect ending to a casual weeknight dinner or the star of your next brunch spread.
Get Creative! Fun Flavor Twists
Once you’ve mastered the classic, the fun really begins! Here are a few of my favorite ways to mix it up:
- Chocolate Lover’s Dream: Use a devil’s food cake mix for the base and add 1/2 cup of cocoa powder to the gooey layer along with the powdered sugar.
- Pumpkin Spice Delight: Add 1 cup of pure pumpkin puree and 2 tsp of pumpkin pie spice to the gooey layer for a perfect fall treat.
- Lemon Blueberry Bliss: Add the zest of two lemons to the gooey layer and gently fold in 1 cup of fresh blueberries right before pouring it over the base.
- Peanut Butter Cup: Swirl 1/2 cup of creamy peanut butter into the gooey layer and sprinkle the top with chopped peanut butter cups after baking.
- Gluten-Free Friendly: Simply use your favorite gluten-free yellow cake mix! The rest of the recipe remains the same.
Anna’s Chef Notes & Kitchen Stories
This recipe has been a part of my life for so long that it’s evolved in tiny ways. I used to be terrified of the jiggle and would overbake it every single time, resulting in a cake that was still tasty, but more “buttery” than “gooey.” It took a leap of faith to pull it out at that perfect moment, but oh, what a difference it makes!
One of my funniest kitchen memories involves this cake. I was filming a quick video for my blog and was mid-sentence, talking about how easy it was, when I turned on my mixer full of powdered sugar without the guard on. I was instantly covered in a white dust, and my kitchen looked like a winter wonderland. My dog, Cocoa, started sneezing, and I just had to laugh and include the blooper in the video. It was a great reminder that cooking doesn’t have to be perfect to be joyful! So, if you make a mess, just embrace it. You’re making memories along with the cake.
Your Gooey Butter Cake Questions, Answered!
I’ve gotten a lot of questions about this recipe over the years, so here are the answers to the most common ones.
Q: My center was super runny, not gooey. What happened?
A: This usually means the cake needed a bit more time in the oven. While a jiggle is good, it shouldn’t look liquidy. The edges should be fully set and golden. Oven temperatures can vary, so if this happens, just pop it back in for 5-minute increments until it reaches that perfect jiggle. Also, make sure you’re using the correct size pan—a smaller pan will make the layers too thick and require a longer bake time.
Q: Why did my filling crack on top?
A: A few small cracks are totally normal and nothing to worry about! But large cracks can happen if the eggs were over-mixed or the oven temperature was too high, causing the cake to rise too quickly and then fall. Remember to mix the filling just until combined after adding the eggs, and always trust your oven thermometer! The powdered sugar topping will hide a multitude of sins.
Q: Can I make this ahead of time?
A: Absolutely! In fact, I think it’s even better the next day. Once completely cooled, cover it tightly with plastic wrap or store it in an airtight container in the refrigerator for up to 3 days. The flavors have more time to meld, and it becomes even more decadent. You can serve it cold or let it sit at room temperature for 30 minutes before serving.
Q: My crust was really hard to press out. Any tips?
A: That dough is thick! If you’re struggling, lightly wet your fingertips or the bottom of your measuring cup. The water prevents the sticky dough from clinging to you and makes pressing it out a breeze.
Nutritional Information (Approximate)
Servings: 24 squares | Prep Time: 10 mins | Bake Time: 40-45 mins | Total Time: ~55 mins
Per Serving: Calories: 390 kcal | Fat: 20g | Carbs: 50g | Sugar: 38g | Protein: 4g | Sodium: 250mg
Final Thoughts:
This Ultimate Gooey Butter Cake is proof that the simplest recipes often bring the biggest smiles. It’s easy to make, impossibly decadent, and carries a comforting nostalgia in every bite. Whether you serve it at a family gathering, gift it to a friend, or enjoy it with your morning coffee, it’s sure to become a new favorite. Take your time, savor the process, and let that luscious, gooey topping steal the show.