***
Ultimate Cookie Monster Cookies – Chunky, Chewy, & Loaded with Chocolate
Hey there, friend! Can you smell that? That’s the scent of pure, unadulterated joy wafting from my oven, and it smells a lot like butter, sugar, and a whole lot of chocolate. If you’ve spent any time on TikTok or foodie Instagram lately, you’ve probably seen them: those wildly blue, impossibly chunky cookies that look like they were dreamed up by a cookie-obsessed Muppet. Well, consider this your official invitation to join the party in your own kitchen.
I’m a firm believer that baking should be a blast, not a science exam you’re scared to fail. And these Ultimate Cookie Monster Cookies are the epitome of fun. We’re not just making a cookie here; we’re creating an experience. They’re bright, they’re chewy, they’re packed with not one, not two, but five different kinds of deliciousness. This is the cookie that turns a regular Tuesday into a celebration and makes you the absolute hero of the bake sale or potluck.
So, if you’re ready to bake something that’s guaranteed to bring smiles, tie on that apron, and let’s dive into this delicious, blue-hued adventure together. I promise, it’s going to be magical.
The Day My Kitchen Turned Blue (And My Heart Felt Full)
PrintUltimate Cookie Monster Cookies : Chunky, Chewy, & Loaded with Chocolate
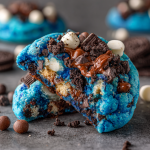
Bright blue, irresistibly chewy, and bursting with mix-ins, these Cookie Monster Cookies are next-level. Packed with melty chocolate chunks, crushed Oreos, and crispy cookie bits, each bite delivers crunch, goo, and nostalgia. Inspired by the viral trend but amped up for serious cookie lovers—these are perfect for parties, bake sales, or anytime you want to wow a crowd.
- Prep Time: 25 minutes
- Cook Time: 10–12 minutes
- Total Time: 35–40 minutes
- Yield: 20 large cookies
Ingredients
• 2 cups butter, room temperature
• 2 cups packed light brown sugar
• 1½ cups granulated sugar
• 4 large eggs
• 4 tsp vanilla extract
• Blue gel food coloring, as desired
• 2 tsp salt
• 4 tsp baking powder
• 6 cups all-purpose flour
• 1½ cups semisweet chocolate chips
• 1 cup white chocolate chips
• 1½ cups chopped Oreos (about 20 cookies)
• 1½ cups chopped crispy chocolate chip cookies (like mini Chips Ahoy or Famous Amos)
• 1½ cups milk chocolate discs or chunks from a chocolate bar
Instructions
Preheat oven to 375°F. Line baking sheets with parchment.
In a large bowl, cream butter and sugars until light and fluffy, about 3 minutes.
Add eggs, vanilla, and blue food coloring. Mix until smooth and vibrant.
In another bowl, whisk together salt, baking powder, and flour. Gradually add to wet mixture, mixing just until combined.
Fold in all the chocolate chips, cookie bits, and chopped Oreos.
Scoop large dough balls (about 3 Tbsp each) and place 2 inches apart on baking sheets.
Bake for 10–12 minutes or until edges are golden and centers are just set.
Cool on the pan for 5 minutes before transferring to a rack.
Nutrition
- Calories: 366
- Sugar: 28g
- Fat: 18g
- Carbohydrates: 45g
- Protein: 4g
- Cholesterol: 45mg
This recipe takes me right back to my son’s fifth birthday party. His one request? “Cookies that look like Cookie Monster, Mama.” Now, I’m all for a challenge, but the first batch I made from a random online recipe was… well, let’s just say they tasted more like food coloring than fun. They were flat, they bled blue, and they made all the kids look a little concerning.
But seeing the slight disappointment in his eyes? That was all the motivation I needed. I spent the next week in my kitchen lab, my hands stained various shades of azure, determined to crack the code. I wanted a cookie that was thick and substantial, with a perfect chewy-crispy texture, and a flavor that could stand up to the bold color. The breakthrough came when I decided to treat it like my classic chocolate chipper but with a confetti-like explosion of mix-ins. The moment I pulled that first perfectly puffy, vibrant, and chunk-filled batch from the oven, I knew we had a winner. The look on his face when he bit into one? Pure, cookie-monstering bliss. That’s the magic I’m sharing with you today.
Gathering Your Cookie Monster Squad
Here’s the dream team of ingredients that makes these cookies legendary. Don’t be intimidated by the list—it’s a party in a bowl, and every guest brings something special!
- 2 cups (4 sticks) butter, room temperature – This is the foundation of our rich, chewy texture. Room temp is non-negotiable! It creams beautifully with the sugar, creating tiny air pockets that help the cookies rise. If you forget to soften it, chef’s hack: cut it into tablespoons and microwave for 5-second bursts until it gives slightly to pressure.
- 2 cups packed light brown sugar – This is our secret weapon for chewiness and that deep, caramel-like flavor. Pack it firmly into your measuring cup!
- 1½ cups granulated sugar – The white sugar helps create a lovely crispness around the edges while keeping the centers soft.
- 4 large eggs – They bind everything together and add structure. Make sure they’re at room temperature to blend seamlessly into the butter and sugar.
- 4 tsp vanilla extract – A generous pour enhances all the other flavors. Don’t be shy with it!
- Blue gel food coloring, as desired – Pro-tip: Gel food coloring is a must! It gives you that vibrant, electric blue without adding extra liquid that can throw off your dough’s consistency. Start with a teaspoon and add more until you reach your desired monster-level blue.
- 2 tsp salt – This might seem like a lot, but trust me, it’s the key to balancing all the sweetness and making the chocolate flavors pop.
- 4 tsp baking powder – Our leavening agent for a beautifully puffy, not flat, cookie.
- 6 cups all-purpose flour – The main structure of our cookie. I like to fluff my flour with a spoon before scooping and leveling it off to avoid over-packing the cup.
- 1½ cups semisweet chocolate chips – The classic, melty backbone of our chocolate mix.
- 1 cup white chocolate chips – These add little pockets of creamy, sweet contrast that look gorgeous against the blue dough.
- 1½ cups chopped Oreos (about 20 cookies) – The “wow” factor! They add a fantastic chocolatey crunch and a fun, black-and-white speckle. No need to remove the cream—it all gets mixed in!
- 1½ cups chopped crispy chocolate chip cookies (like mini Chips Ahoy or Famous Amos) – This is the texture game-changer! They stay a bit crispy inside the baked cookie, giving you an incredible crunch in every bite.
- 1½ cups milk chocolate discs or chunks from a chocolate bar – Using chopped chocolate bars creates those beautiful, irregular puddles of melted chocolate. It feels more artisan and tastes incredible.
Let’s Bake Some Magic: Your Step-by-Step Guide
Okay, team! Here we go. Follow these steps, and you’ll be a Cookie Monster pro in no time. I’ve sprinkled in all my best tips to ensure your success.
- Preheat your oven to 375°F (190°C). Line your baking sheets with parchment paper. This is our first crucial step. A properly hot oven gives us that perfect rise. And parchment paper is a baker’s best friend—it prevents sticking and makes cleanup a dream. Don’t grease the pan, as it can cause the cookies to spread too much.
- In a large bowl, cream your room-temperature butter and both sugars together until the mixture is light, fluffy, and pale in color. This should take about 3 full minutes with a stand or hand mixer. I can’t stress this enough: do not under-cream! This step incorporates air into your dough, which is what gives you a tender, chewy cookie instead of a dense, greasy one. Set a timer if you have to!
- Add the eggs, one at a time, followed by the vanilla and your blue gel food coloring. Mix until everything is completely smooth and vibrantly blue. Adding the eggs one by one allows them to emulsify properly into the butter mixture. Scrape down the sides of the bowl halfway through to make sure no uncolored dough is hiding.
- In a separate bowl, whisk together your salt, baking powder, and all-purpose flour. Whisking the dry ingredients ensures the leavening and salt are evenly distributed, so every cookie bakes up perfectly.
- Gradually add the dry ingredients to the wet mixture, mixing on low speed just until the flour disappears. The key word here is just until combined. Over-mixing at this stage develops the gluten in the flour and can lead to tough cookies. A few stray flour streaks are okay—they’ll get incorporated in the next step.
- Now for the fun part! Switch to a sturdy spatula or wooden spoon and fold in all the chocolate chips, chopped Oreos, and crispy cookie pieces. Folding by hand prevents you from breaking up all those beautiful chunks and ensures everything is evenly distributed without over-working the dough.
- Use a large cookie scoop (about 3 tablespoons) to portion out your dough. Place the dough balls about 2 inches apart on your prepared baking sheets. A cookie scoop is the secret to uniformly sized, perfectly round cookies. Giving them plenty of space is non-negotiable—they need room to spread and puff!
- Bake for 10–12 minutes, or until the edges are a light golden brown and the centers look just set. They might still look a tiny bit soft in the middle, and that’s exactly what you want! They will continue to cook on the hot baking sheet as they cool. This is the secret to a chewy center.
- Let the cookies cool on the hot baking sheet for a full 5 minutes before carefully transferring them to a wire rack to cool completely. I know it’s tempting to eat them immediately, but this resting period allows them to set up so they don’t fall apart when you move them. Your patience will be rewarded, I promise!
How to Serve These Blue Beauties
Presentation is part of the fun! I love piling these cookies high on a rustic wooden board or a brightly colored platter to make that blue really pop. They’re a showstopper all on their own, but for the ultimate experience, serve them slightly warm with a tall, cold glass of milk. The contrast of the cool milk with the warm, melty chocolate is pure heaven. They’re also fantastic crumbled over a scoop of vanilla ice cream for the world’s most epic cookie monster sundae!
Make It Your Own! Fun Recipe Twists
Feel like playing around? This dough is a fantastic canvas for your creativity!
- Monster Mash-Up: Swap the chocolate chips for an equal amount of M&M’s or rainbow sprinkles for a confetti cookie effect.
- Peanut Butter Lover: Replace the white chocolate chips with peanut butter chips and use chopped peanut butter Oreos. It’s a whole new monster!
- Salty-Sweet Supreme: Fold in 1 cup of crushed pretzel pieces along with the cookies for an addictive salty-sweet crunch.
- Gluten-Free Friendly: Use a 1:1 gluten-free flour blend and certified gluten-free Oreos and crispy cookies. The texture is just as amazing!
- “Cookie Dough” Style: For a safe-to-eat raw cookie dough, heat-treat your flour first (spread on a baking sheet and bake at 350°F for 5 minutes) and omit the eggs. Enjoy it straight from the bowl!
Anna’s Chef Notes & Kitchen Stories
This recipe has truly evolved in my kitchen. The first time I made them, I learned the hard way that liquid food coloring is the enemy of cookie structure—my first viral batch spread into sad, blue puddles! Switching to gel was a total game-changer.
Another fun story: I once brought these to a neighborhood barbecue, and a very serious, suit-wearing friend of a friend was caught on camera with a huge blue cookie in each hand, a massive smile on his face. He later told me it was the most fun he’d had in weeks. That’s the power of a great cookie—it brings out the joyful, unapologetic kid in all of us.
Don’t be afraid to really load up the dough with mix-ins. The more, the merrier! A densely packed cookie is a happy cookie. And if your hands get a little blue, just consider it a badge of honor.
Your Cookie Questions, Answered!
Let’s tackle some common questions to make sure your baking journey is smooth sailing.
Q: My cookies spread too much and got flat. What happened?
A: This is usually one of three things: 1) Your butter was too warm or melted. Make sure it’s just softened, not greasy. 2) Your baking powder might be old. Test it by stirring a little into hot water—if it doesn’t bubble vigorously, it’s time for a new can. 3) You didn’t use enough flour. Try fluffing your flour before spooning it into the measuring cup and leveling it off.
Q: Can I make the dough ahead of time and freeze it?
A: Absolutely! This dough freezes like a dream. Scoop the dough balls onto a parchment-lined tray, freeze them solid (about 1-2 hours), and then transfer them to a freezer bag. You can bake them straight from the freezer; just add 1-2 minutes to the baking time. Perfect for fresh-baked cookies anytime the craving strikes!
Q: My cookies aren’t as vibrant blue as I’d like. How can I get that deep color?
A> Gel food coloring is your best friend here! Liquid coloring waters down the dough. Start with a teaspoon of gel and don’t be afraid to add more until you get a shade you love. The color can mute slightly while baking, so go for a shade darker than you think you need.
Q: The centers are still very gooey after 12 minutes. Are they done?
A> A little gooeyness is perfect for a chewy cookie! As long as the edges are set and golden, they’re done. They will continue to firm up as they cool on the baking sheet. If you prefer a firmer cookie, you can bake for an extra minute or two.
Nutritional Info (Because Knowledge is Power!)
Please note: This is an approximate estimate calculated using an online tool and will vary based on your specific ingredients and portion sizes.
Per Cookie (based on 20 cookies):
Calories: 366 | Protein: 4g | Carbohydrates: 45g | Sugar: 28g | Fat: 18g | Saturated Fat: 11g | Cholesterol: 45mg | Sodium: 180mg
Final Thoughts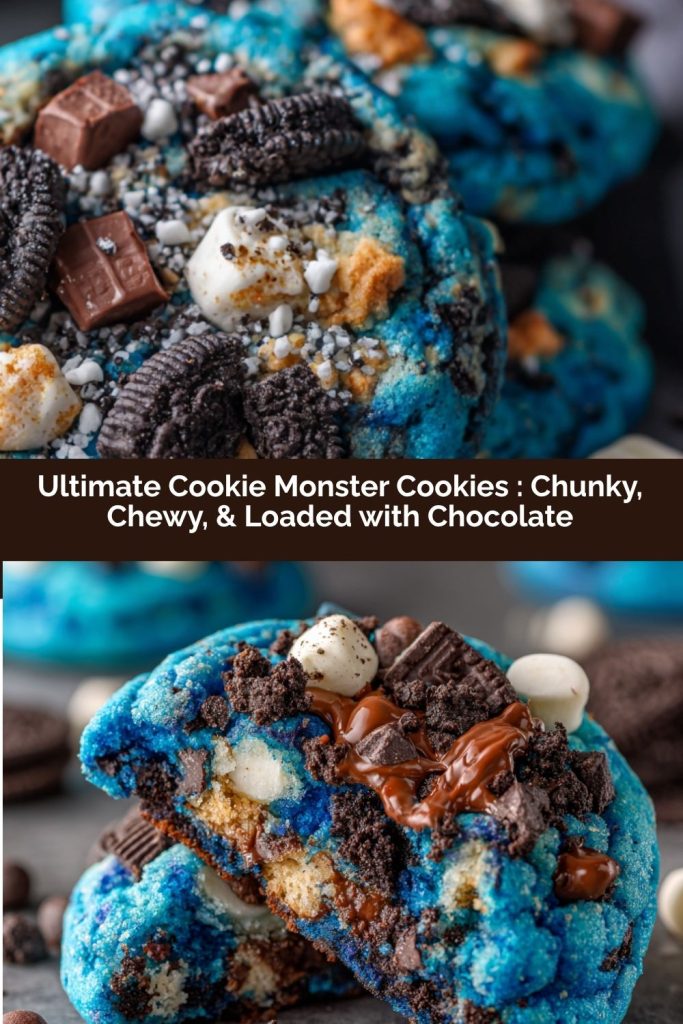
These Cookie Monster Cookies are more than just a dessert—they’re a full-on experience. They’re chewy, chunky, colorful, and packed with every chocolatey, cookie-filled indulgence you could dream of. The best part? They’re approachable enough for a weeknight baking adventure but impressive enough to steal the show at parties or bake sales.
Don’t be afraid to get creative with mix-ins or adjust the blue coloring to your heart’s content—this dough is your playground. And remember, a slightly gooey center is a feature, not a flaw—it’s the hallmark of a perfectly chewy cookie.
So grab your spatula, embrace the mess, and dive into a batch of joy. These cookies don’t just satisfy a sweet tooth—they create memories, smiles, and maybe even a little friendly cookie competition at your next gathering. Happy baking!