***
Ditch the Chip Bag! Your New Favorite Crunchy Snack is Here.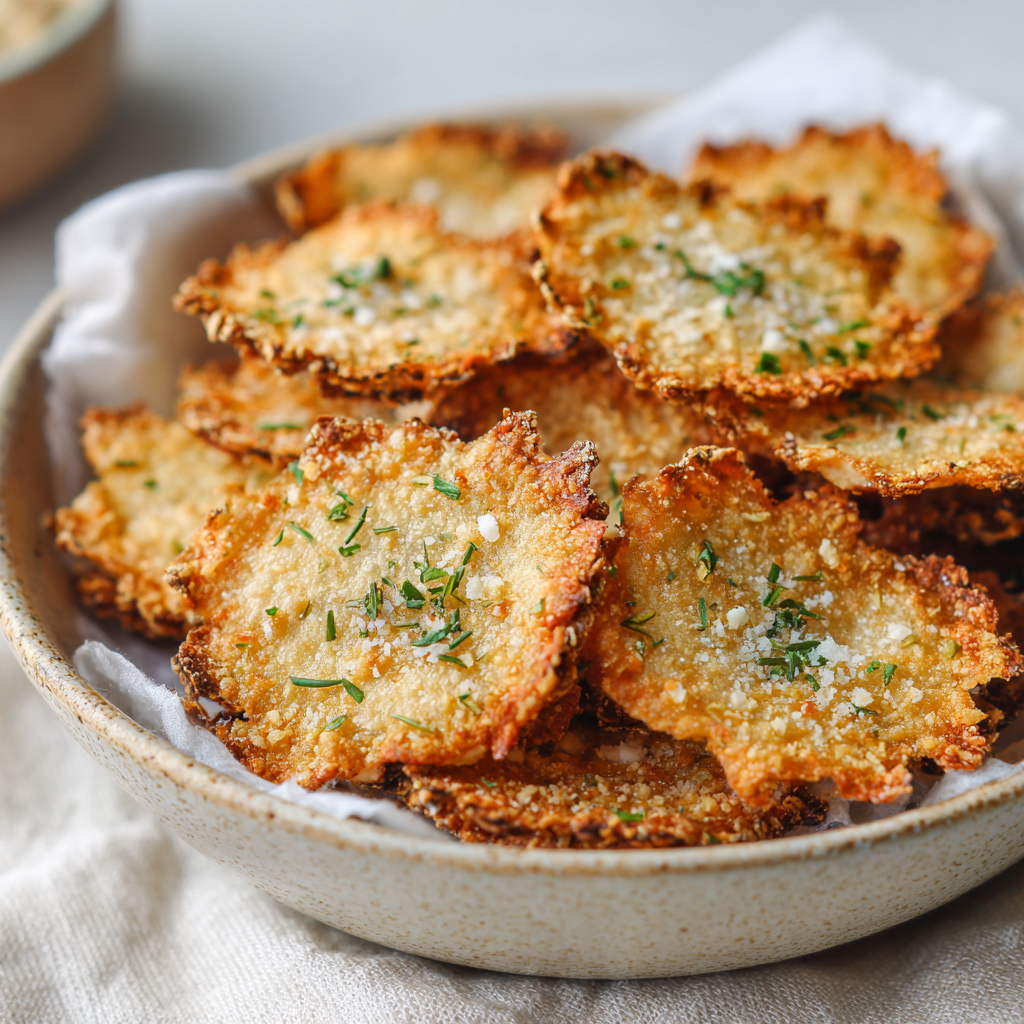
Hey there, friend! Let’s have a little heart-to-heart about snack time. You know the feeling: that 3 PM slump hits, your stomach starts rumbling, and you find yourself staring into the pantry abyss, willing something magical and satisfying to appear. Too often, we reach for a bag of chips or a handful of crackers that leave us feeling… well, a bit blah. They’re gone in seconds, and the crunch is fleeting, leaving us wanting more.
What if I told you there’s a better way? A snack that delivers a serious, satisfying CRUNCH, is packed with protein and fiber to actually keep you full, and is so deliciously savory you’ll forget it’s good for you? Enter my Crunchy Chickpea Parmesan Crisps. These little golden bites of joy are about to become your kitchen’s new best friend.
We’re taking humble, powerhouse chickpea flour and mixing it with nutty Parmesan, a glug of olive oil, and a few pantry spices to create a dough that bakes (or air fries!) into the most incredible, shatteringly crisp snack. They’re gluten-free by nature, endlessly customizable, and so much fun to make. I promise, the only stressful part about this recipe is waiting for them to cool before you devour them all. So, are you ready to turn a boring snack time into a moment of pure, crispy magic? Let’s get mixing!
A Roman Holiday and a Humble Flour
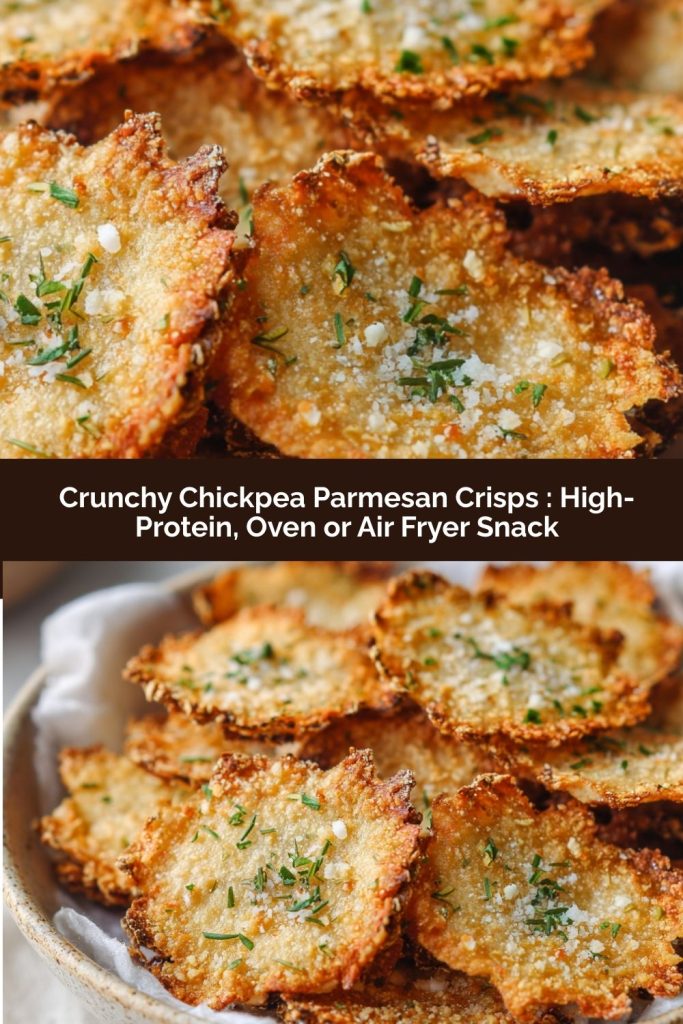
PrintCrunchy Chickpea Parmesan Crisps : High-Protein, Oven or Air Fryer Snack
Snack smarter with these ultra-crispy Chickpea Parmesan Crisps—savory, crunchy, and packed with protein and fiber. Made from chickpea flour, parmesan, and olive oil, they’re baked or air-fried to perfection in just 30 minutes. Whether you enjoy them solo, tossed on a salad, or dipped into hummus, these crisps bring flavor and texture in every satisfying bite.
- Prep Time: 10 minutes
- Cook Time: 15–20 minutes
- Total Time: 41 minute
Ingredients
1 cup chickpea flour
• 1/2 cup grated Parmesan cheese
• 1 tbsp olive oil
• 1/2 tsp garlic powder
• 1/2 tsp salt
• 4–5 tbsp water (as needed for dough)
• Optional: 1 tsp dried herbs (oregano, thyme, or rosemary)
Instructions
Preheat oven to 375°F (190°C), or set air fryer to 350°F (175°C).
In a bowl, mix chickpea flour, parmesan, garlic powder, salt, and herbs if using.
Add olive oil and water gradually, mixing into a soft, pliable dough.
Roll dough thin between two sheets of parchment paper. Cut into small squares or shapes.
Bake 15–18 minutes or air fry 8–10 minutes until golden and crisp.
Cool completely before serving or storing in an airtight container.
Nutrition
- Calories: 160
- Fat: 9g
- Carbohydrates: 10g
- Fiber: 3g
- Protein: 7g
This recipe has a little bit of my heart baked right into it, and it all goes back to a sun-drenched trip to Rome. My husband and I were wandering through a bustling market, completely overwhelmed (in the best way) by the sights and smells. We stumbled upon a tiny stall selling farinata – thin, savory pancakes made from chickpea flour. The vendor, a lovely nonna with a warm smile, handed me a warm, crispy wedge. I took one bite and my mind was blown. It was so simple – just chickpea flour, water, oil, and salt – but the flavor was incredible: earthy, nutty, and deeply satisfying.
I came home obsessed, playing with chickpea flour in my own kitchen. I made farinata, yes, but I also started thinking about how I could transform that same base into a portable, chip-like snack. One day, I added a generous handful of Parmesan, rolled the dough paper-thin, and popped it in the oven. The result? A crisp that echoed the flavors of that Roman market but was entirely its own delicious thing. Now, every time I make a batch, the smell takes me right back to that happy, sunny afternoon, reminding me that the most magical recipes often come from the simplest ingredients and the best memories.
Gathering Your Crispy Cast of Characters
One of the best things about this recipe is the short and sweet ingredient list. You probably have most of this in your pantry already! Here’s what you’ll need and why each one is a star player:
- 1 cup Chickpea Flour: This is the MVP! Also known as gram flour or besan, it’s made from ground dried chickpeas. It’s naturally gluten-free and gives these crisps their signature nutty flavor and a powerful protein and fiber boost. Chef’s Insight: Give the flour a quick whisk in its bag before measuring to aerate it and prevent lumps.
- 1/2 cup Grated Parmesan Cheese: We’re using the real, good stuff here, freshly grated from a block if you can. It provides a salty, umami punch and helps the crisps get beautifully golden and crispy. Substitution Tip: For a dairy-free version, nutritional yeast is a fantastic swap that gives a wonderfully cheesy flavor.
- 1 tbsp Olive Oil: A good glug of extra virgin olive oil adds richness, helps bind the dough, and promotes that perfect golden-brown crispness. Chef’s Insight: The flavor of your oil matters here, so use one you love the taste of!
- 1/2 tsp Garlic Powder: We’re using powder instead of fresh garlic to distribute the flavor evenly without adding any moisture that could make the crisps soggy.
- 1/2 tsp Salt: Essential for making all the flavors pop. Don’t be shy here!
- 4–5 tbsp Water: This is what brings our dough together. The key is to add it gradually, as the exact amount can vary based on your flour. Chef’s Insight: You’re looking for a soft, pliable dough that’s not sticky – think Play-Doh!
- Optional: 1 tsp Dried Herbs: This is where you can make it your own! A teaspoon of dried oregano, thyme, or rosemary (or a mix!) adds a lovely aromatic touch. A pinch of smoked paprika or chili flakes would also be divine.
Let’s Create Some Crispy Magic: Step-by-Step
Ready to see how a few simple ingredients transform into snack-time gold? Follow these steps, and you’ll be a crisp-making pro in no time. I’ve sprinkled in all my favorite chef hacks to ensure your success!
- Preheat and Prep. First things first, preheat your oven to 375°F (190°C). If you’re using an air fryer, set it to 350°F (175°C). Line a baking sheet with parchment paper if baking. Chef’s Hack: No parchment? A silicone baking mat works perfectly. This prevents sticking and makes cleanup a dream.
- The Dry Team Assembles. In a medium-sized mixing bowl, whisk together the chickpea flour, grated Parmesan, garlic powder, salt, and any dried herbs you’re using. Chef’s Commentary: Whisking is a non-negotiable step here! It incorporates air and ensures the salt and spices are evenly distributed throughout the flour, so every single crisp is perfectly seasoned.
- Bring in the Wet Crew. Drizzle the tablespoon of olive oil over the dry ingredients. Then, start adding the water, one tablespoon at a time, mixing with a spoon or your hands after each addition. Chef’s Hack: After about 3 tablespoons, switch to using your hands! You’ll get a better feel for the dough. It’s ready when it comes together into a soft, smooth ball that isn’t sticky. If it’s crumbly, add one more tablespoon of water. If it’s sticky, dust with a tiny bit more chickpea flour.
- Roll It Thin, The Thinner The Better! This is the secret to ultimate crispiness. Place your ball of dough between two sheets of parchment paper. Using a rolling pin, roll it out as thinly and evenly as you possibly can. We’re talking almost see-through in places! Chef’s Insight: Don’t have a rolling pin? A wine bottle works in a pinch! The key is uniform thickness so they all cook at the same rate.
- Cut Your Shapes. Peel off the top layer of parchment. Now, use a pizza cutter or a sharp knife to score the dough into small squares, rectangles, or even fun shapes with a cookie cutter. Chef’s Hack: You don’t need to separate them yet! Scoring them now means they’ll break apart perfectly after baking. It’s a huge time-saver.
- Bake or Air Fry to Perfection.
- For the Oven: Carefully slide the parchment paper with the scored dough directly onto your baking sheet. Bake for 15-18 minutes, or until the edges are deep golden brown and the centers are firm and crisp.
- For the Air Fryer: Carefully transfer the scored dough (on its parchment) to the air fryer basket. You may need to cut it to fit. Air fry for 8-10 minutes, checking halfway, until golden and crisp. Chef’s Commentary: Air fryers are fantastic for this because the circulating air creates an incredible crunch all over! Just keep a close eye on them as they can go from golden to dark brown quickly.
- The Hardest Part: Let Them Cool! I know, I know. The smell is intoxicating. But you must, MUST let the crisps cool completely on the baking sheet or in the air fryer basket. Chef’s Hack: As they cool, they continue to crisp up. Breaking into them too early is the number one reason for slightly chewy crisps. Trust me on this one – your patience will be rewarded with the most satisfying crunch.
How to Serve Your Savory Masterpiece
Once your crisps are completely cool and audibly crunchy, it’s time for the fun part! You can, of course, just grab a handful and enjoy them straight from the bowl (no judgment here). But they’re also incredibly versatile. I love using them as a “cracker” on a cheese board, where their savory flavor pairs beautifully with creamy brie or sharp cheddar. Crumble them over a simple green salad or a bowl of tomato soup instead of croutons for an epic textural upgrade. And my personal favorite? Serving them alongside a big bowl of hummus or tzatziki for the ultimate dippable, protein-packed snack.
Make It Your Own: Delicious Twists & Swaps
The basic recipe is a perfect canvas for your culinary creativity! Here are a few of my favorite ways to mix it up:
- “Everything Bagel” Style: After brushing the rolled-out dough with a tiny bit of water, sprinkle generously with everything bagel seasoning before baking.
- Spicy Sriracha: Swap the olive oil for 1 tablespoon of Sriracha (or your favorite hot sauce) for a kick of heat and a lovely red hue.
- Sun-Dried Tomato & Basil: Add 2 tablespoons of finely chopped sun-dried tomatoes and 1 teaspoon of dried basil to the dry ingredients.
- Vegan “Parmesan”: As mentioned, swap the dairy Parmesan for 1/3 cup of nutritional yeast for a delicious, cheesy, vegan-friendly crisp.
- Seeded Crunch: Mix in a tablespoon each of sesame seeds and flax seeds into the dough for an extra nutritional boost and texture.
Anna’s Kitchen Notes & Stories
This recipe has been a staple in my kitchen for years now, and it’s gone through a few fun evolutions. The first time I made them, I was so impatient that I broke into them while they were still warm. They were *good*, but they bent instead of snapped. It was a valuable lesson in the science of cooling! Now, I always use that waiting time to clean up the kitchen, so it feels like a win-win.
My daughter, who is my toughest critic, once declared these “way better than Cheez-Its,” which I consider one of my highest culinary achievements. We now have a weekly ritual of making a double batch together on Sunday afternoons. She loves cutting them into star and heart shapes, and I love that we’re creating our own kitchen memories, just like the one that inspired them. Don’t be afraid to play and make this recipe your own family tradition!
Your Crispy Questions, Answered!
I’ve gotten so many wonderful questions about these crisps over the years. Here are the most common ones to help you on your crisp-making journey!
Q: My crisps are chewy, not crunchy! What happened?
A: The number one culprit is not letting them cool completely. They crisp up as they cool! Other reasons could be that the dough was rolled too thick, or they needed a few more minutes in the oven/air fryer. If you find they’re still a bit soft after cooling, you can pop them back in for another 2-3 minutes.
Q: Can I make these ahead of time? How do I store them?
A: Absolutely! They are fantastic for meal prep. Once completely cool, store them in an airtight container at room temperature for up to a week. If they lose a little of their crunch, a quick 2-3 minute warm-up in the toaster oven or air fryer will bring them right back to life.
Q: My dough is too sticky/crumbly. Help!
A> No worries, this is an easy fix! If it’s sticky, just knead in a little more chickpea flour, a teaspoon at a time, until it’s smooth. If it’s crumbly and won’t come together, add water, one teaspoon at a time, until it forms a cohesive ball. Different brands of chickpea flour can absorb slightly different amounts of liquid.
Q: Can I use a different kind of cheese?
A: You can! A hard, dry, finely grated cheese works best. Pecorino Romano would be lovely, or even a sharp aged cheddar. Just avoid soft, moist cheeses like mozzarella, as they will release too much oil and moisture during cooking.
Nutritional Information*
*This is an estimate for 1 serving (approximately 1/4 of the recipe) and will vary based on specific ingredients used.
- Calories: ~160
- Protei
Final Thoughts
At the end of the day, these Crunchy Chickpea Parmesan Crisps are more than just a clever little snack—they’re a reminder of how much joy can come from the simplest ingredients and a quiet moment in the kitchen. It never ceases to amaze me how a bit of chickpea flour, a handful of Parmesan, and a few minutes of rolling and baking can transform into something so satisfyingly crisp, savory, and downright irresistible.
Whether you’re fighting off that mid-afternoon slump, packing lunchbox treats, or setting out a cozy little snack board for friends, these crisps always rise to the occasion. They’re wholesome without trying too hard, crunchy in all the right ways, and just special enough to make you feel like you treated yourself.
And maybe that’s the real magic here—something humble, homemade, and full of heart that turns an ordinary moment into a delicious one. So go ahead, make a batch (or two), savor that first crackly bite, and let these little crisps bring a bit of sunshine into your day.
Happy snacking, friend. 💛