Your Homemade Mexican Crunchwrap Supreme: Crispy, Cheesy & Fully Loaded
Hey there, friend! Have you ever had one of those days where you’re craving something big, bold, and gloriously messy, but the thought of getting in the car or waiting for delivery just feels… like too much? You want that perfect combo of warm, seasoned meat, melty cheese, cool crunch, and a toasty tortilla hug—all in one magical, handheld package. I get it. We’ve all been there.
Well, pull up a stool and let me tell you a secret: you can create that fast-food magic right in your own kitchen, and I promise, it’s even better. Not to mention wildly fun to make. Today, we’re bringing the fiesta home with my fully loaded, pan-crisped-to-perfection Homemade Mexican Crunchwrap Supreme.
This isn’t just a copycat recipe; it’s an upgrade. We’re talking layers of flavor you control, quality ingredients you choose, and the sheer satisfaction of crafting that iconic hexagon shape with your own two hands. It’s a project that feels playful, a meal that delivers serious joy, and the ultimate crowd-pleaser for game days, busy weeknights, or “I just deserve something awesome” days. So, tie on that apron, and let’s turn your kitchen into the best taqueria in town. Trust me, once you master the fold, there’s no going back.
The Road Trip That Started It All
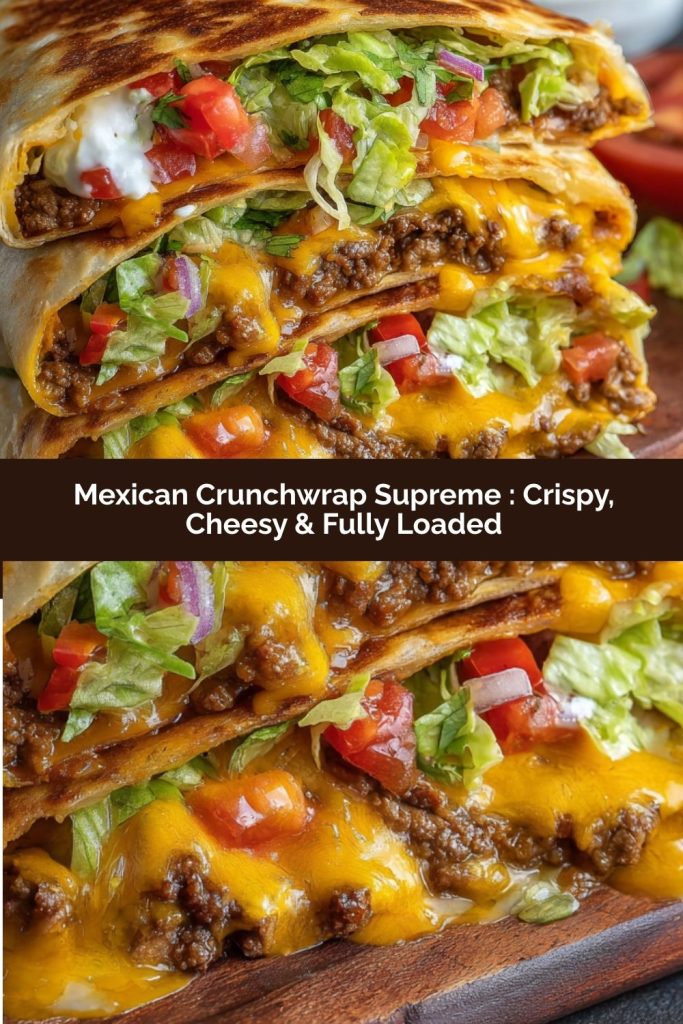
PrintMexican Crunchwrap Supreme : Crispy, Cheesy & Fully Loaded
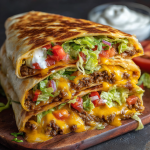
This homemade Mexican Crunchwrap Supreme is a flavor-packed upgrade to your fast-food favorite — layers of seasoned meat, melty cheese, crisp lettuce, and crunchy tostadas, all folded into a golden, pan-crisped tortilla. It’s the ultimate handheld meal that brings the fiesta straight to your kitchen!
- Prep Time: 15 mins
- Cook Time: 20 mins
- Total Time: 35 minutes
- Yield: 6 1x
Ingredients
1 lb ground beef or turkey
1 packet taco seasoning
1/2 cup water
6 large flour tortillas (burrito size)
6 small tostada shells or crunchy tortilla chips
1 ½ cups shredded cheddar or Mexican blend cheese
1 cup nacho cheese sauce (or use shredded cheese)
1 cup shredded lettuce
1/2 cup diced tomatoes
1/2 cup sour cream
Optional: sliced jalapeños, avocado, hot sauce
Instructions
Cook the Meat: In a skillet, brown the meat, drain any fat, and stir in taco seasoning with water. Simmer until thickened.
Layer It Up: On each tortilla, spread nacho cheese in the center. Add taco meat, a tostada shell, sour cream, lettuce, tomatoes, shredded cheese, and any extras.
Fold & Seal: Carefully fold the edges of the tortilla up and over the center to form a hexagon shape, pressing gently to hold.
Crisp It: Heat a skillet over medium heat. Place Crunchwrap seam-side down and cook 2–3 minutes until golden. Flip and repeat.
Serve Hot: Slice in half and serve with salsa, guac, or extra cheese sauce.
Nutrition
- Calories: 480
- Fat: 22g
- Carbohydrates: 35g
- Protein: 28g
My love affair with the Crunchwrap didn’t start in a test kitchen—it started on a dusty highway, somewhere in the vastness of West Texas. My husband and I were on a cross-country move, our car packed to the brim, surviving on snacks and roadside stops. We were tired, a little punchy, and desperately in need of a meal that wasn’t just fuel, but an event.
We pulled into one of those ubiquitous fast-food joints, and I ordered this strange, geometrically fascinating thing I’d never tried. That first bite? Pure revelation. The contrasting textures—the soft tortilla, the crispy shell, the creamy fillings—were a symphony. It was the perfect road food: no utensils, maximum flavor, total eating adventure. We sat in the parking lot, grinning like fools, sauce on our chins, feeling a million times better. That Crunchwrap became a happy memory bookmark in a long journey.
Now, I make them at home, and every time I do, it sparks that same feeling of playful, satisfying joy. It’s my edible high-five. It’s the recipe I pull out when friends come over and we need a fun, interactive meal. It’s a little piece of that road trip freedom, right on our dinner table.
Gathering Your Fiesta Ingredients
Here’s the beautiful part: this is a choose-your-own-adventure kind of dish. The blueprint is simple, and the ingredients are flexible. This is what I use for my ideal, fully-loaded version, but I’ll give you all the chef-y notes and swaps you need to make it your own.
- 1 lb ground beef or turkey: I often use 90/10 beef for flavor without too much grease to drain. Ground turkey or even a plant-based crumble work wonderfully for a lighter twist!
- 1 packet taco seasoning: The ultimate shortcut for big flavor. I like the “less sodium” varieties so I can control the salt. For a from-scratch kick, mix 1 Tbsp chili powder, 1 ½ tsp cumin, 1 tsp each paprika and garlic powder, ½ tsp onion powder, and a pinch of cayenne.
- 1/2 cup water: This helps the seasoning become a saucy, cohesive coating for the meat.
- 6 large flour tortillas (burrito size): THIS IS KEY. You need the big ones (usually labeled 10-inch or “burrito size”). The extra surface area is non-negotiable for a successful fold. Keep them under a damp paper towel to stay pliable.
- 6 small tostada shells or a big handful of sturdy tortilla chips: The “crunch” in Crunchwrap! Tostada shells are perfect circles that fit neatly. In a pinch, a solid layer of good, thick restaurant-style tortilla chips creates that same fantastic crackle.
- 1 ½ cups shredded cheddar or Mexican blend cheese: I use a blend for maximum meltiness. The shreds go on top of the cold veggies to help glue the final fold together when it melts.
- 1 cup nacho cheese sauce (or use more shredded cheese): This is my “glue” layer! A smear of warm nacho cheese sauce (from a jar or homemade) right on the tortilla acts as a moisture barrier to keep the bottom crisp and adds incredible creaminess. If you prefer, just use an extra handful of shredded cheese here.
- 1 cup shredded lettuce: Iceberg is classic for its crisp, refreshing bite. Romaine works too—just chop it finely.
- 1/2 cup diced tomatoes: Pat them dry with a paper towel after dicing! Removing excess juice prevents a soggy wrap.
- 1/2 cup sour cream: The cool, tangy counterpoint to the warm, spicy meat. For a lighter option, try Greek yogurt.
- Optional Boosters: This is where you shine! Sliced jalapeños, diced avocado or a smear of guacamole, a drizzle of hot sauce or creamy chipotle sauce, a spoonful of black beans or refried beans… the world is your crunchy, cheesy oyster.
Let’s Build Some Magic: Step-by-Step
Don’t let the folding intimidate you! We’re going step-by-step, and I’ve got all the tips to ensure success. Think of it as edible origami with a very, very delicious reward.
- Cook the Meat: In a large skillet over medium-high heat, brown your ground beef or turkey. Once it’s fully cooked, drain off any excess fat (this is crucial for a non-greasy result). Reduce the heat to medium, sprinkle over the taco seasoning and pour in the water. Give it a good stir and let it simmer for 3-5 minutes, until the water is mostly absorbed and the meat is coated in a flavorful sauce. Remove from heat. Chef’s Tip: Taste it! This is your chance to adjust. Want more heat? Add a pinch of cayenne. More depth? A dash of smoked paprika. Make it yours.
- Prep Your Station (Mise en Place): This is the French term for “everything in its place,” and it’s a game-changer for assembly-line recipes. Get all your fillings—meat, cheeses, lettuce, tomatoes, sour cream, extras—in little bowls or sections on a cutting board. Warm your nacho cheese sauce if using. Have a clean surface ready for folding and a large skillet (non-stick or cast-iron works great) standing by. Chef’s Tip: Keep your tortillas covered with a lightly damp kitchen towel or paper towels. Dry tortillas crack and make folding a nightmare.
- The Art of the Layering: Place one large tortilla on your work surface. In the dead center, spread about 2 tablespoons of nacho cheese sauce (or a small handful of shredded cheese). This is your flavorful moisture barrier. Next, add a hearty scoop of the seasoned meat, spreading it evenly over the cheese but staying within about a 5-inch circle in the center. Now, place your tostada shell (or a solid layer of chips) right on top of the meat. This is your crunchy core! On top of the crunchy layer, spread a spoonful of sour cream, then a handful of lettuce and tomatoes. Finally, sprinkle a generous portion of your shredded cheese over the cold veggies. This top layer of cheese will melt and act as the “glue” for the final fold.
- The Famous Fold & Seal: Here we go! Starting at the 12 o’clock position of your filled circle, fold the edge of the tortilla up and over the fillings, pressing gently so it adheres to the cheesy top. Move to the 2 o’clock position and do the same. Continue working your way around, creating 5-6 folds until you have a neat hexagon shape and all the fillings are enclosed. The center will be exposed, but that’s okay—the last fold will cover it. Give the whole package a gentle but firm press from the top to help it seal. Chef’s Hack: If a spot won’t stick, a tiny dab of water or sour cream on the tortilla edge can work as edible glue.
- Crisp It to Perfection: Heat a dry skillet or griddle over medium heat (not high!). No oil is needed—the tortilla will toast in its own time. Carefully place your Crunchwrap seam-side down in the hot pan. This seals the deal first. Cook for 2-3 minutes, until beautifully golden brown. Using a wide spatula, carefully flip it over. Cook for another 2-3 minutes on the second side until equally golden and you can see the cheese inside is gloriously melted. Chef’s Tip: If you’re worried about the seal, you can place a small, heat-proof plate or pot lid on top of the Crunchwrap for the first minute of cooking to really press it together.
- Repeat & Rest: Transfer your finished Crunchwrap to a plate and tent it loosely with foil while you cook the remaining ones. Letting it rest for just 2-3 minutes after cooking helps the fillings settle and makes it less molten-lava-hot when you take that first bite.
Serving Your Masterpiece
The beauty of the Crunchwrap is that it’s a complete meal in your hand! I love to slice mine in half diagonally to show off all those gorgeous, colorful layers. Serve it right away while the exterior is shatteringly crisp and the cheese is oozy. On the side, little bowls of extra salsa, guacamole, sour cream, or a simple corn and black bean salad are perfect for dipping and scooping. Don’t forget the napkins—the good, abundant, celebratory kind!
Make It Your Own: Delicious Twists
The basic formula is your playground. Here are a few of my favorite riffs:
- Breakfast Crunchwrap: Scrambled eggs, crispy hash browns (the thin patty kind!), breakfast sausage, cheddar, and a drizzle of salsa verde.
- Spicy Southwest Chicken: Swap the beef for shredded chicken tossed in chipotle peppers in adobo sauce. Add black beans and corn to the filling.
- Fully Loaded Veggie: A hearty mix of sautéed bell peppers, onions, mushrooms, and zucchini with taco seasoning. Use refried beans as the “glue” layer and vegan cheese.
- Buffalo Chicken Crunch: Shredded buffalo chicken, a layer of cool ranch-spiked sour cream, blue cheese crumbles, and lettuce.
- Gluten-Free Friendly: Use large, pliable gluten-free tortillas (warm them well) and certified GF tostada shells or chips.
Anna’s Kitchen Notes
This recipe has evolved so much from my first slightly-lopsided, filling-leaking attempt! My biggest lesson? Don’t overfill. It’s tempting to pack in every ingredient you love, but a modest, flat layer of each component is the key to a flawless fold. That first time, I created what my husband lovingly called a “Crunchwrap volcano” – delicious, but erupting with sour cream. We ate it with a fork and laughed the whole time. Now, I approach it with a light but confident hand, and they come out perfect every time. It’s also become a fantastic “clean out the fridge” dinner—that last bit of leftover chili, taco meat, or roasted veggies often finds a delicious second life wrapped up and crisped in a tortilla. The recipe is a blueprint; your kitchen stories are the secret ingredient.
Your Questions, Answered
Q: My tortilla keeps tearing when I try to fold it. Help!
A: This almost always means the tortilla is too dry or cold. Keep them wrapped in a damp paper towel and microwave the stack for 15-20 seconds before you start assembling. Warm, pliable tortillas are forgiving tortillas.
Q: Fillings are spilling out the sides when I cook it. What did I do wrong?
A: Two likely culprits: 1) Overfilling (see my note above!), or 2) Not creating a wide enough “base” with your initial meat/nacho cheese layer. Keep your central filling pile within a 5-inch circle. The tortilla needs that blank canvas around the edges to fold cleanly over the top.
Q: Can I make these ahead of time?
A: You can absolutely prep the filling components ahead! Cook and season the meat, chop the veggies, shred the cheese. Store separately. But for the best texture, assemble and pan-crisp just before serving. A pre-assembled, uncooked Crunchwrap will get soggy.
Q: My wrap isn’t getting crispy/golden brown. It’s just soft.
A: Your pan might not be hot enough, or you might be flipping too soon. Make sure your skillet is preheated over a solid medium heat. Let the first side cook undisturbed for a full 2-3 minutes until you see that signature browning. Patience is key for the perfect crunch.
Nutritional Information*
*This is a rough estimate for one Crunchwrap made as written with ground beef, based on available data. Values can vary significantly with specific ingredients and substitutions.
Prep Time: 15 mins | Cook Time: 20 mins
Servings: 6
Approx. Per Serving: 480 calories | 28g protein | 22g fat | 35g carbs
 Final Thoughts
Your Homemade Mexican Crunchwrap Supreme is proof that fast-food favorites don’t need to stay in the drive-thru lane—they’re even better when you make them yourself. Crispy, cheesy, fully loaded, and completely customizable, this handheld masterpiece delivers all the textures and flavors you love: crunchy, melty, savory, and fresh, all in one satisfying bite.
The beauty of this recipe is how adaptable it is. Swap proteins, add your favorite veggies, spice it up, or keep it classic—the formula is forgiving, fun, and perfect for feeding a crowd or just treating yourself. Pan-crisping each Crunchwrap adds that golden-brown, shatteringly crisp exterior that elevates it from a simple wrap to an experience.
Make it for game days, casual weeknight dinners, or a playful cooking project with friends or family. Each fold, layer, and bite is a little celebration of bold flavors and kitchen creativity. Once you master the fold, you’ll wonder why you ever waited in line. Homemade Crunchwraps aren’t just a meal—they’re an edible high-five, and every bite is worth the effort.