French Dip Sliders: The Ultimate Party Food That Feels Like a Cozy Hug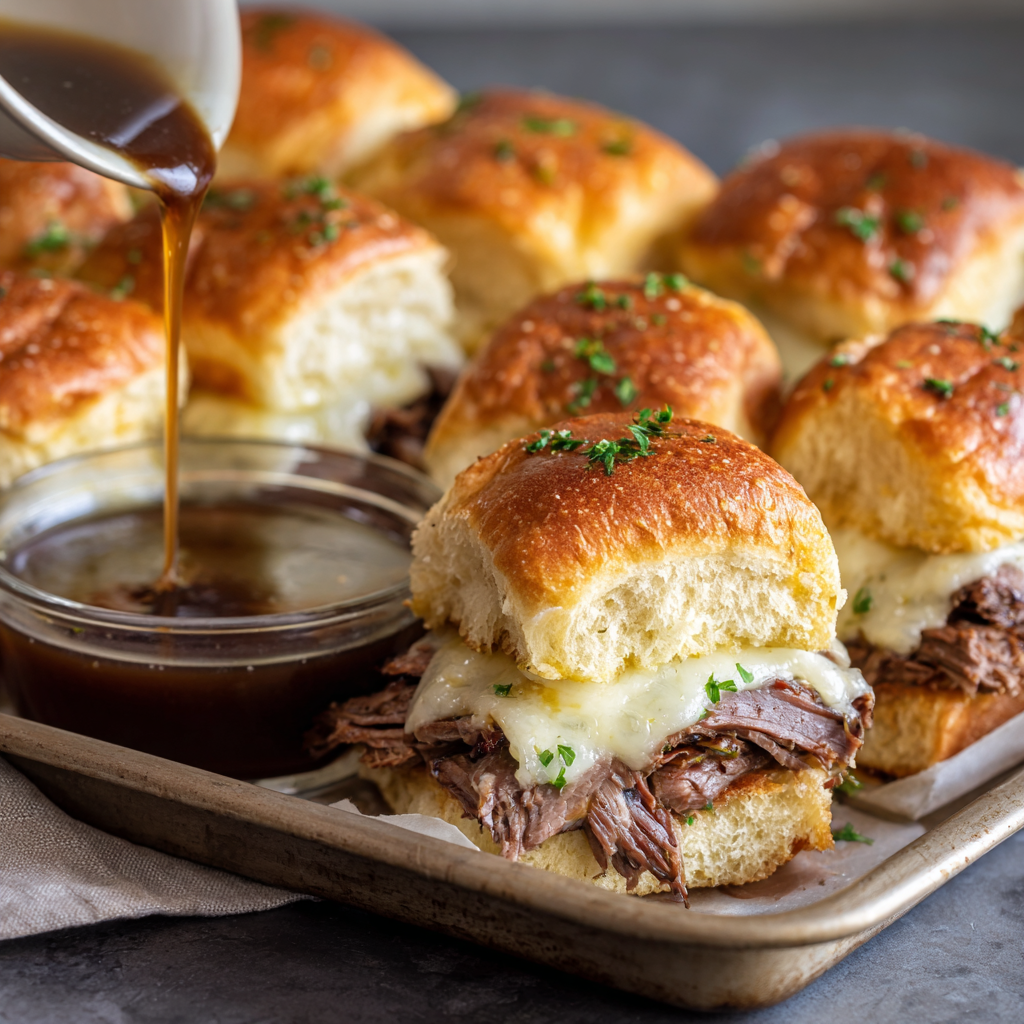
Hey there, friend! Anna here, waving from my flour-dusted kitchen counter. Have you ever had one of those moments where you take a bite of something and it just… clicks? The buttery, soft bread gives way to savory roast beef and oozy provolone, and then—the grand finale—a deep, luxurious dunk into rich, warm au jus. That, my friend, is the magic of a French Dip sandwich. But today, we’re not just making magic; we’re making it mini, shareable, and utterly irresistible with these French Dip Sliders.
Imagine this: a whole tray of golden, pull-apart sliders, steaming hot from the oven, cheese stretching from one to the next, just begging to be grabbed. They’re the hero of game day spreads, the star of casual Friday nights, and the secret weapon for feeding a hungry crowd without breaking a sweat. The best part? They come together in about 30 minutes, and the “wow” factor is absolutely through the roof. This recipe is all about maximizing flavor and joy while minimizing fuss—because I truly believe the best memories are made around delicious, uncomplicated food. So, tie on that apron, and let’s turn your kitchen into the heart of the party. Trust me, these sliders are about to become your new go-to.
The Deli Counter & A Dream of Shared Sandwiches
PrintFrench Dip Sliders : Buttery, Cheesy, and Perfect for Dipping

- Prep Time: 10 minutes
- Cook Time: 20 minutes
- Total Time: 30 minutes
- Yield: 12 sliders 1x
Ingredients
12 Hawaiian rolls or soft slider buns (do not separate)
¾ to 1 lb thinly sliced deli roast beef, shaved or paper-thin
12 slices provolone cheese
1 packet au jus gravy mix
¼ cup butter, melted
1 tbsp Worcestershire sauce
½ tsp garlic powder
½ tsp onion powder
Optional: 1 tbsp chopped parsley for garnish
Instructions
1. Preheat the Oven
Preheat oven to 350°F (175°C). Grease or line a 9×13 baking dish with parchment paper.
2. Slice the Rolls
Without pulling them apart, slice the whole sheet of rolls horizontally with a serrated knife. Place the bottom half in the baking dish.
3. Layer the Fillings
Evenly layer the roast beef over the bottom half of the rolls.
Top with provolone cheese slices.
Place the top half of the rolls back on.
4. Make the Butter Glaze
In a small bowl, whisk together:
melted butter
Worcestershire sauce
garlic powder
onion powder
Brush this mixture generously over the tops of the rolls.
5. Bake
Cover tightly with foil and bake for 15 minutes.
Remove foil and bake 5–7 minutes more, until golden brown and the cheese is melted.
6. Prepare the Au Jus
While sliders bake, prepare the au jus according to package instructions. Keep warm for serving.
7. Serve
Let sliders cool 2–3 minutes, then slice along roll lines to create 12 sliders.
Garnish with chopped parsley if desired.
Serve warm with au jus for dipping.
Nutrition
- Calories: 310
- Sodium: 880mg
- Fat: 18g
- Carbohydrates: 23g
- Protein: 17g
This recipe takes me right back to my grandpa’s kitchen. He was a man of few words but immense culinary passion. Our weekend ritual involved trips to his favorite old-school deli, where the air smelled of peppered salami and fresh rye. He’d always, without fail, order a French Dip. He’d savor it slowly, dipping each bite with deliberate care, declaring the au jus “liquid gold.” But he’d also always slide half of his sandwich onto my plate with a wink. Sharing was his love language.
When I started hosting my own game days and family gatherings, I wanted to capture that feeling—the richness of the sandwich and the joy of sharing it—but in a format that encouraged everyone to dig in together. Turning that beloved classic into these fun, communal sliders felt like the perfect tribute. Now, every time I pull a bubbling tray out of the oven, I think of him and that shared half-sandwich. It’s more than just dinner; it’s a little edible piece of connection. And isn’t that what cooking is all about?
Gathering Your Flavor Toolkit
Here’s what you’ll need to create this slider masterpiece. I’ve included my favorite chef notes and swaps so you can make it your own!
- 12 Hawaiian rolls or slider buns: The sweet, pillowy softness of Hawaiian rolls is a fantastic contrast to the savory fillings, but any soft slider buns or even mini ciabatta rolls will work beautifully. Chef’s Insight: Don’t fully separate the rolls! Slicing the whole sheet horizontally keeps everything neat and creates that fantastic pull-apart effect.
- ¾ to 1 lb thinly sliced deli roast beef: Get the good stuff from the deli counter, not the pre-packaged kind. Ask for it sliced “shaved” or “paper-thin” for the most tender bite. Pro Tip: If you have leftovers from a Sunday roast, thinly slice that up for an incredible homemade touch.
- 12 slices provolone cheese: Provolone melts like a dream and has a mild, creamy flavor that doesn’t overpower the beef. Swiss or mozzarella are great melty alternatives if that’s what you have on hand.
- 1 packet au jus gravy mix: Our delicious shortcut to deep, savory flavor. Look for it near the gravy and broth at your grocery store. Chef’s Hack: For a from-scratch version, simmer beef broth with a splash of soy sauce, Worcestershire, and a pinch of thyme.
- ¼ cup butter, melted: The key to that irresistible, golden-brown top. Salted butter is perfect here.
- 1 tbsp Worcestershire sauce: This umami powerhouse gets mixed into the butter, adding a depth of flavor that’s pure magic.
- ½ tsp garlic powder & ½ tsp onion powder: They blend seamlessly into the butter glaze, giving every bite a well-rounded savory note without any chopping required.
- Optional: 1 tbsp chopped parsley for garnish: A little pop of green makes everything look extra chef-y and fresh!
Let’s Build Some Slider Magic: Step-by-Step
Ready? Here we go! I’ll walk you through each step with all my favorite tips to ensure slider success.
- Preheat & Prep: Fire up your oven to 350°F (175°C). Grab a 9×13-inch baking dish and give it a quick spritz of non-stick spray or line it with parchment paper. This little step guarantees easy cleanup and even easier slider removal later. My little mantra: A happy cook is a cook with less scrubbing to do.
- Slice & Layer: Take your whole sheet of Hawaiian rolls and, using a long serrated bread knife, slice them in half horizontally, so you have one giant top and one giant bottom. Lift the top half off and set it aside. Place the bottom half snugly in your prepared dish. Now, layer on that gorgeous shaved roast beef—don’t be shy! Follow it with the slices of provolone, creating a blanket of cheesy goodness. Gently place the top half of the rolls back on. See how easy that was? You’ve already built the sliders!
- The Golden Glaze: In a small bowl, melt your butter. Whisk in the Worcestershire sauce, garlic powder, and onion powder until it’s a fragrant, unified sauce. Using a pastry brush (or the back of a spoon in a pinch), generously brush this liquid gold all over the top of the sliders. Get into every nook and cranny! This buttery wash is what transforms the tops into a crispy, flavorful crust. Secret weapon alert: I sometimes add a tiny pinch of cracked black pepper to this mix for a little kick.
- Bake to Perfection: Tightly cover the whole dish with aluminum foil. This crucial step traps steam and ensures the rolls heat through and the cheese melts without the tops burning. Bake covered for 15 minutes. Then, remove the foil (hello, beautiful sliders!) and bake for another 5-7 minutes, just until the tops are a perfect, toasted golden brown and the cheese is bubbly around the edges.
- Jus’ in Time: While the sliders bake, prepare your au jus. Simply follow the packet instructions—usually it involves whisking the mix with water and simmering for a few minutes. Keep it warm on the stovetop until serving time. Pro Move: Pour the finished jus into a small pitcher or bowl for elegant, drip-free dipping.
- Slice, Serve & Swoon: Once out of the oven, let the sliders cool for just 2-3 minutes—this helps them set slightly. Then, use a sharp knife to slice along the roll lines, creating 12 individual sliders. Transfer them to a platter, sprinkle with that optional parsley for a fresh touch, and serve immediately with the warm au jus on the side for dipping. Watch them disappear!
Serving Up the Good Vibes
Presentation is part of the fun! I love piling these sliders onto a big, rustic wooden board or a bright ceramic platter. Place the bowl of warm au jus right in the center for communal dipping. For a full spread that screams “party,” flank them with bowls of crisp dill pickle spears, a simple green salad dressed with a tangy vinaigrette (to cut through the richness), and a big pile of crispy potato chips or sweet potato fries. For drinks, cold beers, sparkling water with lemon, or a bold red wine are all fantastic companions.
Make It Your Own: Delicious Twists & Swaps
The beauty of this recipe is its flexibility! Here are a few ways to play with it:
- The Philly Cheesesteak: Swap the roast beef for thinly sliced sautéed steak and onions, and use Cheez Whiz or white American cheese.
- Italian Herb: Add a layer of sautéed sliced bell peppers and onions. Mix ½ tsp of Italian seasoning into the butter glaze.
- Spicy Kick: Add a few slices of pepper jack cheese with the provolone, or mix a teaspoon of horseradish into the au jus before serving.
- Turkey & Swiss: A lighter twist! Use thinly sliced turkey and Swiss cheese. Consider using a chicken gravy packet for the dipping sauce.
- Caramelized Onion Upgrade: Before assembling, slowly cook a thinly sliced onion in a tablespoon of the butter until deeply golden and sweet. Layer this under the roast beef for incredible flavor depth.
Anna’s Kitchen Notes & Stories
This recipe has been a blog favorite for years, and it’s evolved in the funniest ways. I once accidentally used powdered sugar instead of garlic powder in the butter glaze (same white container, very different outcome!). We now label everything. Lesson learned! I’ve also found that letting friends or kids assemble the sliders is a great way to get everyone involved—it’s foolproof. Over time, I’ve tested baking them uncovered the whole time, but that always dries out the bread. The foil tent is non-negotiable for perfect texture. These sliders have fueled countless movie marathons, won over picky eaters, and been the last-minute save for more “oops, I forgot to plan dinner” nights than I can count. They’re a little piece of kitchen confidence I’m so happy to share with you.
Your Questions, Answered!
Q: Can I make these ahead of time?
A: Absolutely! You can assemble the sliders completely (through step 3, including the butter glaze), cover tightly with plastic wrap and then foil, and refrigerate for up to 24 hours. When ready to bake, let them sit on the counter while the oven preheats, then bake as directed, adding maybe 2-3 extra minutes since they’re starting cold.
Q: My rolls got soggy on the bottom. What happened?
A: This usually means there was a bit too much butter glaze that pooled in the pan, or the sliders sat too long after baking before being served. Make sure to brush the glaze primarily on the *tops* and sides. Also, don’t skip the step of letting them rest for just 2-3 minutes after baking—this lets the bread reabsorb some steam and firm up.
Q: Can I use a different cheese?
A: Of course! The best cheeses for melting are provolone, Swiss, mozzarella, fontina, or a mild white cheddar. I’d avoid pre-shredded bags, as they contain anti-caking agents that can make the melt less smooth.
Q: What if I can’t find Hawaiian rolls?
A: No problem! Any soft, sweet dinner roll slider bun will work. Mini brioche buns, potato rolls, or even soft white slider buns are great. The method remains exactly the same.
Nutritional Information (Per Slider)
Please note: This is an estimate based on the specific ingredients listed and may vary with substitutions.
Calories: ~310 | Total Fat: 18g | Saturated Fat: 9g | Cholesterol: 60mg | Sodium: 880mg | Total Carbohydrates: 23g | Dietary Fiber: 1g | Sugars: 8g | Protein: 17g
Final Thoughts
If there’s one recipe that proves food can feel like a celebration and a cozy hug at the very same time, it’s these French Dip Sliders. They’re everything I adore about cooking for the people I love: simple ingredients transformed into something rich, comforting, and irresistibly shareable. Every time that buttery, golden tray comes out of the oven, there’s this little spark of excitement—because you just know they’re going to bring everyone to the table.
There’s something so heartwarming about watching a group of friends or family reach for these sliders, dip them into that warm au jus, and pause for that first, melty bite. It’s a small, joyful moment that reminds me of my grandpa and those deli counter Saturdays, and how food has this funny way of connecting us across time and memory.
Whether you’re hosting game day, feeding a crowd, or just treating yourself to something undeniably delicious, I hope these sliders bring that same comfort and delight into your home. They’re unfussy, deeply satisfying, and guaranteed to become one of those recipes you turn to again and again.
Here’s to good food, good company, and the simple magic of a shared meal. 💛🥪✨