Heart-Shaped Mochi: Sweet, Chewy Bites of Love You Can Make at Home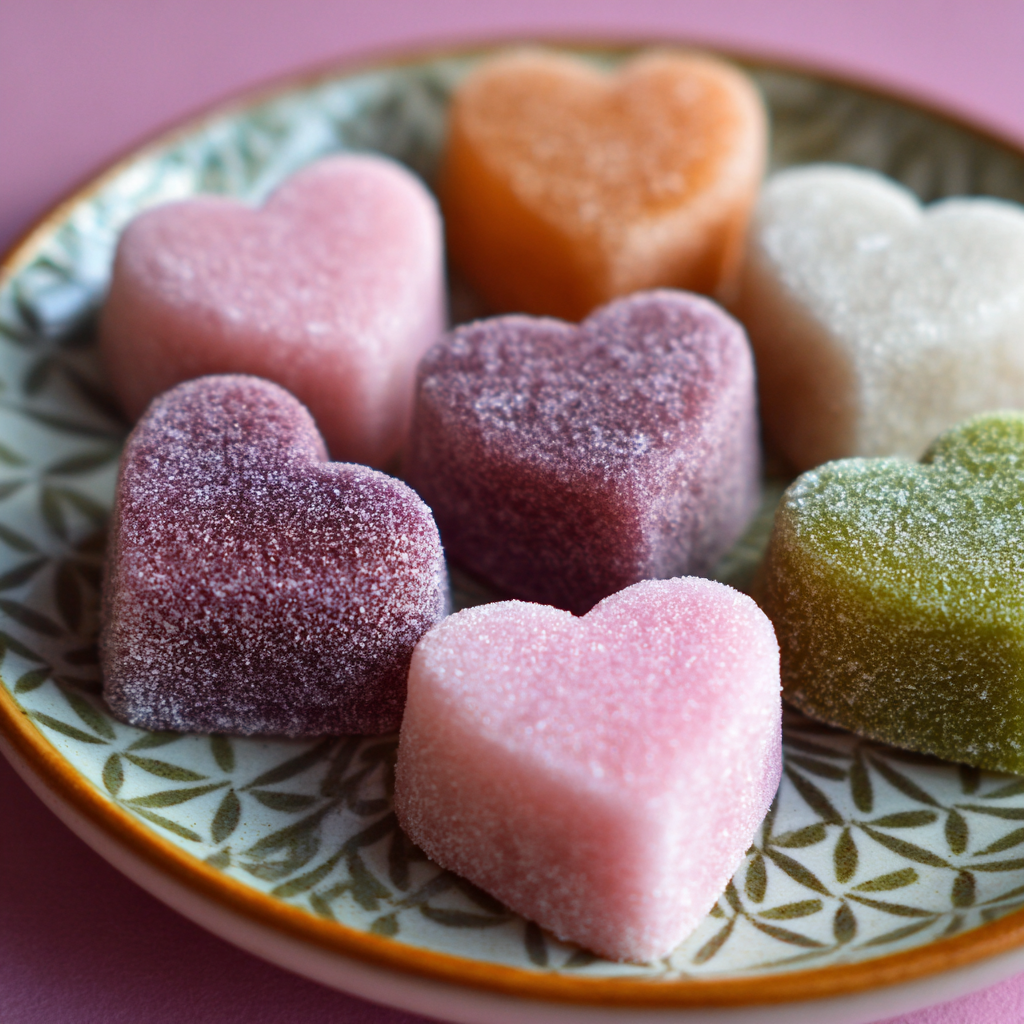
Hey there, friend! Pull up a stool. Can I tell you a little secret? Some of the best things in the kitchen aren’t about fancy techniques or hard-to-find ingredients. They’re about the joyful, squishy, wonderfully messy moments that turn simple ingredients into edible smiles. And that’s exactly what we’re doing today with these irresistibly cute Heart-Shaped Mochi.
Imagine it: soft, pillowy dough that’s delightfully chewy, hugging a sweet little surprise in the center, all shaped into a symbol of love. Whether it’s Valentine’s Day, Galentine’s Day, a birthday, or just a Tuesday that needs a dose of cute, these mochi bites are your answer. They’re little edible hugs, and I promise, they’re so much easier to make than you might think. No special steamer or years of pastry training required—just a microwave, a few simple ingredients, and a willing heart (pun absolutely intended!).
This isn’t just a recipe; it’s a kitchen adventure. We’ll get our hands a little dusty with starch, play with pretty pastel colors, and choose our favorite fillings. It’s the perfect project to do solo with a podcast in the background or with a partner, friend, or kiddo by your side. The process is half the fun, and the result is a homemade treat that’s gluten-free, naturally vegan, and guaranteed to impress. So, are you ready to create some chewy magic? Let’s get our mochi on!
The Day Mochi Stole My Heart (A Kitchen Memory)
PrintHeart-Shaped Mochi : Sweet, Chewy Bites of Love

My love affair with mochi didn’t start in a fancy patisserie. It started on a rainy afternoon in my tiny first apartment kitchen, with my best friend, Maya, and a determination to conquer our fear of “difficult” desserts. We’d bought a beautifully wrapped daifuku (that’s the filled mochi we’re making today!) from a market, and after one blissful bite of the sweet red bean paste encased in that magical, stretchy dough, we looked at each other and said, “We HAVE to learn how to make this.”
Cue the comedy of errors. Our first batch was a sticky, molten-hot mess that glued itself to every surface (lesson learned: more cornstarch, more cornstarch, MORE CORNSTARCH!). The second batch was tough because we overworked it in a panic. But on the third try, as we carefully pinched the edges together over a dollop of jam, something clicked. We weren’t just making dessert; we were shaping little stories with our hands. We laughed, we got powdered sugar everywhere, and when we finally tasted our (slightly lopsided) creations, the triumph was sweeter than the filling. That’s the spirit I want to bring to you today. It’s not about perfection; it’s about the fun, the slight mess, and the incredible pride of saying, “I made that!” Let’s make some new, delicious memories together.
Your Mochi-Making Toolkit: Simple Ingredients, Big Flavor
Gather your squad! One of the best things about this recipe is the short, sweet ingredient list. Here’s what you’ll need and why each one is a star player.
- 1 cup glutinous rice flour (like Mochiko): This is the non-negotiable MVP. Don’t let the name “glutinous” fool you—it’s gluten-free! It refers to the glue-like, wonderfully sticky quality of short-grain sweet rice. It’s what gives mochi its iconic chewy, stretchy texture. Chef’s Insight: I swear by Mochiko brand (the blue box) for consistent results, but any glutinous rice flour will work.
- 3/4 cup water: This binds our dough. For an extra layer of flavor, you can substitute a bit of it with coconut milk or fruit juice!
- 1/4 cup granulated sugar: Sweetens the dough itself. Adjust to your taste, but this amount gives a lovely, balanced sweetness that lets your filling shine.
- Cornstarch or potato starch (for dusting): Your best friend in the fight against stickiness! I keep a small bowlful on the counter at all times during this process. Potato starch gives a slightly more velvety finish, but cornstarch works perfectly.
- Food coloring (optional, but fun!): A drop or two of gel food coloring in pink, red, or even lavender makes these hearts truly special. Gel is better than liquid as it won’t change the dough’s consistency.
- Your Choice of Filling (about 1/2 cup total): This is where you get creative!
- Classic Sweet Red Bean Paste (Anko): The traditional favorite, found in Asian grocery stores.
- Strawberry Jam: A fruity, vibrant, and easy option.
- Nutella or Chocolate Hazelnut Spread: For a decadent, crowd-pleasing twist.
- Peanut Butter & Jam: A mini PB&J inside mochi? Yes, please!
- Diced Fresh Strawberries + a sprinkle of sugar: For a burst of fresh fruit.
Let’s Make Some Magic: Step-by-Step Mochi Instructions
Okay, team! Aprons on. Let’s walk through this together. I’ll be with you every step of the way with tips to ensure your mochi success.
- Mix & Color Your Base. In a large, microwave-safe bowl, whisk together the glutinous rice flour and sugar. Gradually add the water (and a drop of food coloring if using) and whisk until you have a perfectly smooth, thin batter with no lumps. Chef’s Hack: Use a fork or a small whisk for this—it gets into the corners better than a spoon! The batter will look very liquid; that’s exactly right.
- The Microwave Steam. Loosely cover the bowl with a microwave-safe plate or plastic wrap (leave a small vent). Microwave on high for 2 minutes. Carefully remove (the bowl will be hot!) and give the dough a good stir with a wet spatula. It will start to look opaque and clumpy. Pop it back in, and now microwave in 30-second intervals, stirring well after each, until the dough is thick, glossy, and very sticky—usually 2-3 more intervals. Chef’s Tip: Don’t walk away! Microwave powers vary. You’re looking for a dough that pulls away from the sides and forms a cohesive, translucent mass.
- Turn Out & Cool. THIS IS KEY! Generously dust a clean work surface (like a large cutting board or silicone mat) with cornstarch. Carefully scrape the hot mochi dough onto the starch. Dust the top of the dough and your hands liberally with more starch to prevent sticking. Let it sit for 5-10 minutes until it’s cool enough to handle comfortably. It will still be warm, which is good for shaping.
- Roll & Cut Your Hearts. Once cooled, roll the dough out to about 1/4-inch thickness. Keep dusting with starch underneath and on your rolling pin to prevent sticking. Use a heart-shaped cookie cutter (about 2-3 inches wide) to cut out as many pieces as you can. Gently re-roll the scraps to cut more. Chef’s Hack: Dip your cutter in starch before each cut for clean edges!
- Fill & Seal with Love. Take one heart and gently flatten it a bit more in the palm of your starchy hand. Place a small teaspoon of your chosen filling in the center. Top with another heart shape. Now, patiently and gently, pinch the edges together to seal. Don’t stretch the dough too much—just press and pinch. If you have a little filling peeking out, it’s okay! Gently reshape it into a perfect heart. Chef’s Secret: Less is more with the filling! Overfilling is the #1 cause of breakage.
- The Final Dusting. Give your finished heart a light roll in starch to coat it fully. This keeps them from sticking to each other and gives them that classic, finished look. Repeat with all your hearts!
Sharing the Love: How to Serve Your Mochi
Presentation is part of the joy! Gently brush off any excess starch with a soft pastry brush. Arrange your heart-shaped mochi on a beautiful plate or in a small gift box lined with parchment paper. They look stunning on a simple white plate, perhaps with a few fresh rose petals or edible glitter for a festive touch. Serve them at room temperature for the best, softest texture. These are perfect with a cup of green tea, a glass of bubbly, or just as a sweet hand-held treat. They’re gifts from your kitchen, literally made with love!
Mix It Up! Fun Mochi Variations
Once you master the basic heart, the flavor world is your oyster! Here are a few of my favorite twists:
- Matcha Love: Add 1 tsp of high-quality matcha powder to the dry ingredients for beautiful green tea-flavored dough. Fill with white chocolate or sweet red bean paste.
- Tropical Paradise: Use coconut milk instead of water in the dough and fill with a dab of mango or pineapple curd.
- Cookies & Cream: Fill the plain dough with a small piece of a soft chocolate sandwich cookie. The creamy center melts slightly for a delicious surprise.
- Savory-Sweet Surprise: For the adventurous, try filling with a small cube of soft cheese (like brie or cream cheese) and a dot of fig jam.
- Ice Cream Mochi! Let the cooked, rolled-out dough cool completely. Cut circles, wrap around small scoops of hardened ice cream, pinch to seal, and freeze immediately. A divine, chewy ice cream treat!
Anna’s Kitchen Notes & Stories
This recipe has evolved from that sticky first attempt into my go-to for a quick, impressive sweet. Over the years, I’ve learned that embracing the imperfect hearts is part of the charm—they look homemade and full of character! One time, I was making a batch for a party and accidentally used paprika instead of pink food coloring (similar bottles in a chaotic drawer!). We ended up with “sunset” orange mochi filled with apricot jam, and they were a hilarious hit. The lesson? Kitchen “mistakes” can lead to delicious discoveries.
Also, a note on storage: These are best enjoyed the day they’re made, when the texture is supremely soft. If you need to keep them longer, store them in a single layer in an airtight container at room temperature for up to 2 days. The dough will firm up a bit but is still delicious. Do not refrigerate, as it dries out the dough and makes it hard.
Your Mochi Questions, Answered!
Q: My mochi dough is impossibly sticky! Help!
A: This is the most common hurdle, and the answer is STARCH. Don’t be shy with it. Dust your surface, your hands, your rolling pin, and the dough itself generously. If it starts sticking as you work, pause and add more starch. It’s your shield!
Q: My mochi cracked when I tried to seal it.
A: This usually means the dough dried out a bit or was rolled too thin. Make sure to keep unused dough covered with a damp towel while you work. If a piece cracks, you can often gently knead it back together with a dab of water on your finger. Also, ensure your filling isn’t too bulky.
Q: Can I make this without a microwave?
A: Absolutely! You can steam it. Pour the batter into a greased, heat-proof dish, cover with foil, and steam over boiling water for 15-20 minutes until set and translucent. This method is more traditional and yields a great texture.
Q: Is there a way to make these less sweet?
A: You can reduce the sugar in the dough to 2 tablespoons. The sweetness will then primarily come from your filling, so you could also choose a less-sweet filling like lightly sweetened mashed fruit.
Nutritional Information (Approximate)
Per mochi heart (using basic dough with 1/2 tsp strawberry jam):
Calories: ~85 | Carbohydrates: 20g | Protein: 1g | Fat: 0g | Fiber: 0g | Sugar: 8g
Note: This is a rough estimate. Values will change significantly based on your chosen filling. This recipe is naturally gluten-free and can easily be vegan (use plant-based fillings).
**Prep Time:** 20 minutes | **Cook Time:** 4 minutes | **Total Time:** 30 minutes | **Servings:** 10-12 mochi hearts

Final Thoughts
Heart-Shaped Mochi is a little bite of joy—chewy, sweet, and totally customizable. The magic lies in the process as much as the result: dusting your hands in starch, shaping the dough, and tucking in your favorite filling. Each bite is a playful, homemade treat that feels special no matter the occasion.
This recipe proves that you don’t need fancy equipment or years of pastry training to create something impressive and heartfelt. Whether you stick with classic red bean, go fruity, or indulge in chocolate or nut butter, these mochi hearts are guaranteed to delight. They’re perfect for gifting, for a cozy afternoon snack, or even a fun project with friends or family.
Remember: perfection isn’t the goal—fun, flavor, and love in every bite are what really matter. These chewy little hearts are your ticket to a kitchen moment that’s as sweet as it is memorable.