No-Bake Chocolate Oatmeal Cookie Balls: Your New Favorite 10-Minute Treat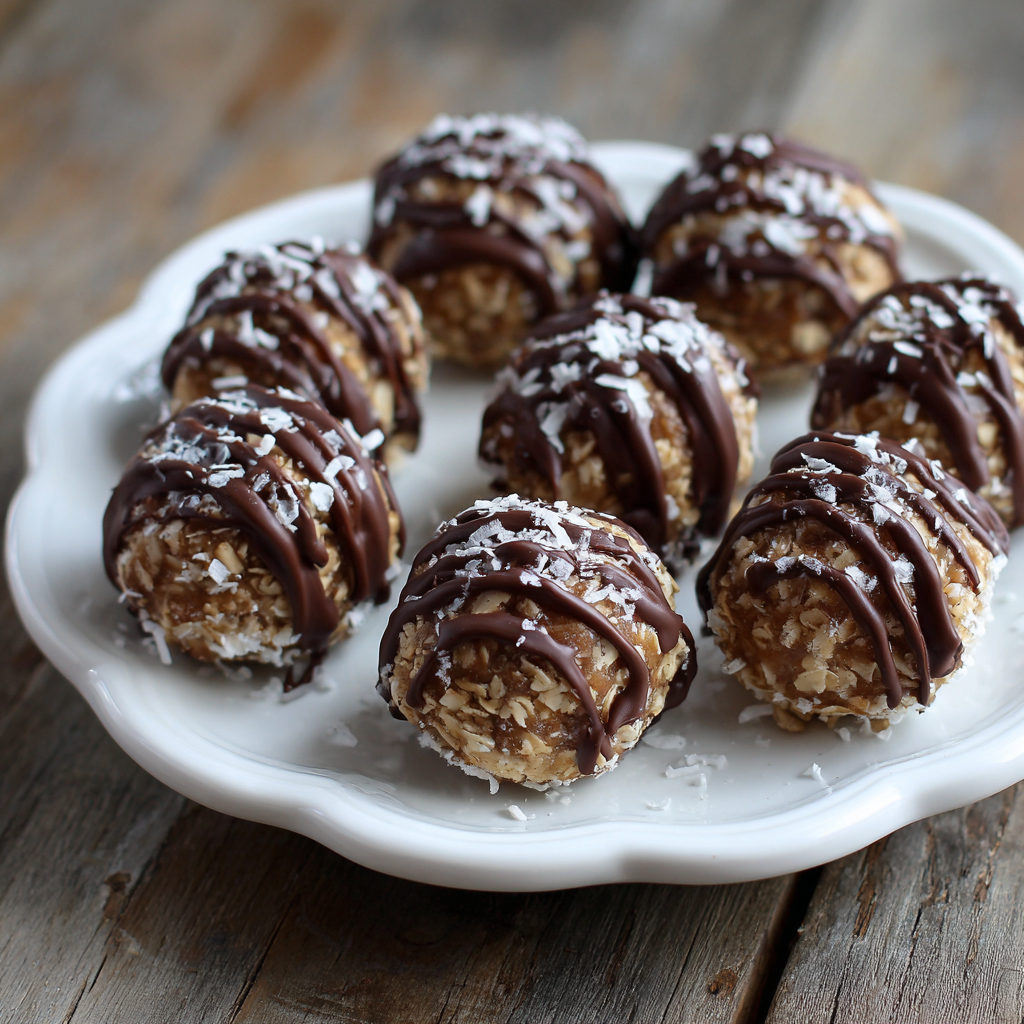
Hey there, friend! Anna here. Can we talk about one of life’s greatest kitchen miracles? I’m talking about the magical moment when a few simple ingredients, a single saucepan, and zero preheating time come together to create something unbelievably delicious. That’s the pure, unadulterated joy of a no-bake treat.
Today, we’re making my No-Bake Chocolate Covered Oatmeal Cookie Balls. Think of them as the lovechild of a fudgy brownie and a chewy oatmeal cookie, all rolled into a bite-sized, powdered sugar-dusted wonder. They’re crave-worthy, seriously easy, and the kind of recipe you’ll memorize after making them just once. Whether your afternoon needs a sweet pick-me-up, your kids are clamoring for a snack, or you need a last-minute treat to bring to a gathering, these little balls of happiness have got your back. So, let’s ditch the oven, grab a spoon, and cook up some magic together!
The Recipe That Started It All: A Sweet Slice of Nostalgia
PrintNo-Bake Chocolate Covered Oatmeal Cookie Balls : Quick & Powdered Sugar-Coated Treats

These No-Bake Chocolate Covered Oatmeal Cookie Balls are the perfect mix of chewy, fudgy, and sweet. Rolled in powdered sugar and packed with cocoa and oats, they come together in minutes—no oven needed. Great for lunchbox treats, after-school snacks, or a quick party platter addition. They’re cozy, craveable, and totally mess-free!
- Prep Time: 10 minutes
- chill time: 30 minutes (optional)
- Total Time: 40 minutes
- Yield: About 24 cookie balls 1x
Ingredients
2 cups quick oats
1 cup sugar
¼ cup unsweetened cocoa powder
½ cup milk
½ cup unsalted butter
½ cup peanut butter (or almond butter)
1 tsp vanilla extract
½ cup powdered sugar (for rolling)
Instructions
In a saucepan, combine sugar, cocoa powder, milk, and butter. Bring to a gentle boil over medium heat, stirring constantly.
Boil for 1 minute, then remove from heat.
Stir in peanut butter and vanilla until smooth.
Mix in oats until fully combined. Let the mixture cool for about 10–15 minutes until it’s easy to handle.
Scoop and roll into 1-inch balls using a spoon or small cookie scoop.
Roll each ball in powdered sugar to coat.
Chill in the fridge for 30 minutes to firm up, or enjoy right away for a softer bite.
Nutrition
- Calories: 110
- Sugar: 10g
- Fat: 6g
- Carbohydrates: 13g
- Protein: 2g
I have to confess, my love for no-bake treats runs deep—right back to my grandma’s linoleum-floored kitchen. She wasn’t a fancy baker, but she was a whiz with a saucepan and a wooden spoon. On hot summer days when turning on the oven felt like a crime, she’d whip up a batch of what she called “cocoa fudge drops.”
The ritual was everything. I’d perch on a stool, watching the butter, cocoa, and sugar melt into a glossy river in her old yellow pot. The smell was intoxicating—like warm, chocolaty hugs. She’d let me stir in the oats and then, with hands dusted in powdered sugar, we’d roll the still-warm mixture into lopsided little balls, laughing as we inevitably sampled a few (or several) before they even made it to the plate. These cookie balls taste like pure, uncomplicated joy to me. They’re a reminder that the best food memories aren’t about perfection; they’re about the shared experience, the sticky fingers, and the simple pleasure of making something wonderful with someone you love. Every time I make them, I’m right back in that kitchen with her.
Gather Your Ingredients: The Cast of Characters
Here’s everything you need for these effortless treats. I’ve added my little chef insights and swap ideas so you can make this recipe work with what you’ve got!
- 2 cups quick oats – Quick oats are key here! They absorb the fudgy mixture perfectly, giving us that ideal chewy-but-not-gummy texture. (If you only have old-fashioned rolled oats, give them a few pulses in the food processor or blender to break them down a bit.)
- 1 cup granulated sugar – This sweetens the pot and helps create the perfect fudgy base when boiled.
- ¼ cup unsweetened cocoa powder – Use a good-quality cocoa powder for the richest chocolate flavor. This is your chance to be a chocolate snob—it makes a difference!
- ½ cup milk – Whole milk adds creaminess, but any milk you have (dairy or non-dairy like almond or oat milk) works beautifully.
- ½ cup (1 stick) unsalted butter – Butter equals flavor and richness. Using unsalted lets you control the saltiness. (If using salted butter, you can omit the pinch of salt mentioned in the chef’s notes.)
- ½ cup peanut butter (or almond butter) – The secret weapon! It adds protein, a hint of salty depth, and helps bind everything together. For a nut-free version, sunflower seed butter is a fantastic swap.
- 1 tsp pure vanilla extract – The flavor enhancer. It rounds out all the other notes and makes the chocolate taste even more chocolatey.
- ½ cup powdered sugar (for rolling) – This creates that classic, pretty, snow-dusted finish and a lovely sweet contrast to the fudgy interior.
Let’s Make Some Magic: Step-by-Step Instructions
Ready? This comes together so fast, you’ll want to read through these steps once before you start. I’ve tucked my favorite kitchen hacks right in with the instructions.
- Combine & Boil: In a medium saucepan over medium heat, combine the sugar, cocoa powder, milk, and butter. Grab a whisk or a wooden spoon and start stirring! We’re bringing this to a gentle, full boil—you should see bubbles popping across the entire surface. This step is crucial for dissolving the sugar and setting up the fudgy texture. Chef’s Tip: Don’t walk away! Stirring constantly prevents scorching and ensures everything melts evenly.
- The One-Minute Timer: Once you’ve reached that gentle boil, set a timer and let it boil for exactly 1 minute, continuing to stir. This quick cook thickens the mixture just enough. When the timer beeps, immediately remove the pot from the heat. Chef’s Tip: Boiling for the full minute is important for texture, but over-boiling can make the balls crumbly. Trust the timer!
- Stir in the Good Stuff: Now, add the peanut butter and vanilla extract to the hot mixture. Stir, stir, stir until it’s completely smooth, glossy, and unified. Take a whiff—it’s heavenly, right?
- Bring in the Oats: Dump in all the quick oats and stir until every oat is fully coated and ensconced in that gorgeous chocolate mixture. It will thicken up as you stir.
- The Cool Down: Let the mixture sit in the pot for about 10-15 minutes. This is the patience-testing part, but it’s essential! It needs to cool enough so you can handle it without burning your fingers, but still be slightly warm and pliable for rolling. Chef’s Hack: To speed this up, you can spread the mixture onto a plate or a baking sheet. More surface area = faster cooling.
- Roll & Coat: Place your powdered sugar in a shallow bowl. Using a spoon, a small cookie scoop (a #60 scoop is perfect!), or your hands, portion out the mixture and roll it into 1-inch balls. Then, roll each ball generously in the powdered sugar until fully coated. Chef’s Tip: If the mixture starts sticking to your hands too much, lightly dampen your palms with water. It’s a game-changer!
- Chill & Set (or Not!): You can enjoy them right away for a softer, almost truffle-like experience. For a firmer, neater treat that holds its shape perfectly, arrange them on a parchment-lined tray and pop them in the fridge for 30 minutes to set.
How to Serve These Little Gems
Presentation is half the fun! Pile these powdered sugar-dusted balls high on a rustic wooden board or a pretty vintage plate for a party. For everyday, I love stacking them in a glass jar on the counter—it’s an irresistible invitation for anyone walking by. They’re perfect tucked into a lunchbox, served with afternoon coffee, or passed around on a platter at your next get-together. No forks required!
Get Creative: Recipe Variations
Love the base recipe? Let’s play! Here are a few of my favorite twists:
- Cookie Dream: Add ¼ cup of mini chocolate chips or chopped nuts (walnuts, pecans) to the oat mixture.
- Tropical Twist: Swap the peanut butter for coconut cream (the solid part from a can) and roll the balls in toasted coconut instead of powdered sugar.
- Double Chocolate: Use chocolate-flavored almond butter and add a pinch of espresso powder to deepen the chocolate flavor.
- Birthcake Ball: Mix in a handful of colorful sprinkles with the oats for a festive look.
- Protein Power: Stir 2-3 tablespoons of chia seeds or ground flaxseed into the oats for an extra nutrition boost.
Anna’s Chef’s Notes & Kitchen Stories
This recipe has been my trusty sidekick for years, and it’s evolved in the best ways. I once, in a pre-coffee haze, accidentally used quick cook steel-cut oats. Let’s just say we ended up with delicious but… decidedly crunchy cookie balls. A happy accident that my texture-loving husband adored! Stick to quick oats for the classic version.
Over time, I’ve added a tiny pinch of flaky sea salt to the saucepan with the initial ingredients. It just makes all the flavors pop. And don’t stress if your balls aren’t perfect spheres—mine rarely are! Their rustic, homestyle look is part of their charm. The most important ingredient is the fun you have making them.
FAQs & Troubleshooting
Q: My mixture is too runny and won’t hold a ball shape. What happened?
A: This usually means the mixture didn’t come to a full boil or didn’t boil for the full minute. The boiling step is key for concentration and setting. You can try putting the whole mixture in the fridge for 20 minutes to firm up, then try rolling again.
Q: Can I make these ahead of time?
A: Absolutely! They keep wonderfully. Store them in an airtight container in the fridge for up to 1 week, or freeze them for up to 3 months. The powdered sugar might melt in a bit over time—just give them a fresh roll in a little more sugar before serving if you like.
Q: The powdered sugar keeps melting into the balls. Help!
A. Make sure the mixture is cool enough before rolling. If the balls are too warm, they’ll melt the sugar. Also, a thicker coating applied right before serving helps. You can also dust them with cocoa powder for a different, non-melting finish.
Q: Are these gluten-free?
A: They can be! Just ensure you use certified gluten-free oats, as oats are often processed in facilities with wheat. All other ingredients are naturally gluten-free.
Nutritional Information (Per Cookie Ball, approx.)
Calories: ~110 | Total Fat: 6g | Carbohydrates: 13g | Sugar: 10g | Protein: 2g
Note: This is an estimate provided for informational purposes. Values may vary based on specific ingredients used and portion size.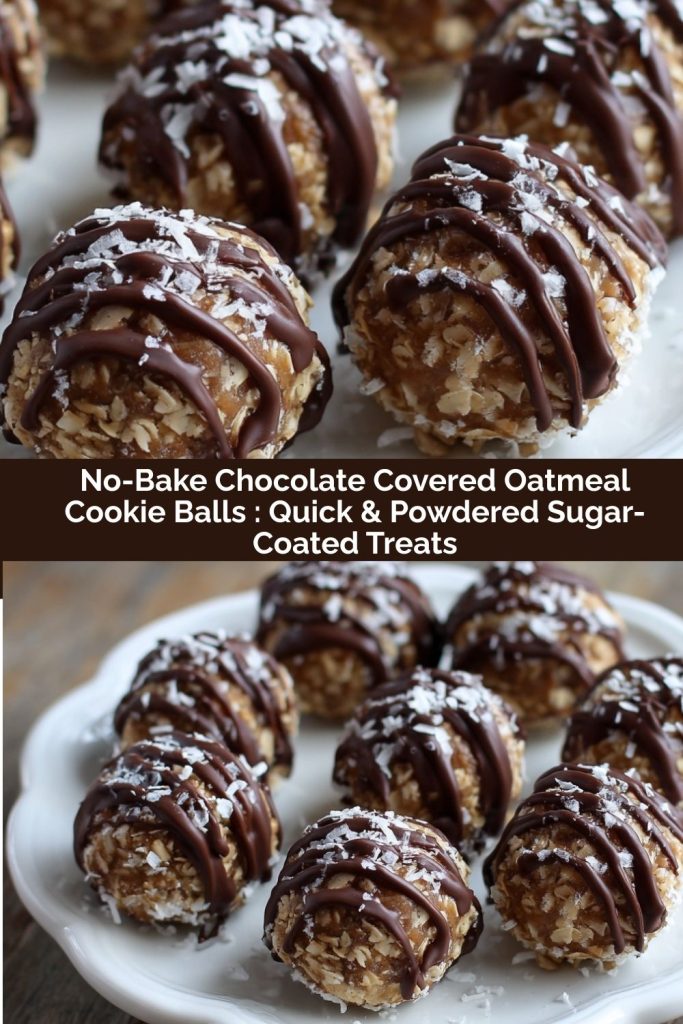
Final Thoughts
At the end of the day, these No-Bake Chocolate Oatmeal Cookie Balls are a sweet little reminder that joy in the kitchen doesn’t have to be complicated. A saucepan, a handful of pantry staples, and a few quiet minutes at the stove can turn into something magical — something that feels like a hug from the past and a treat for right now.
I love that these cookie balls aren’t fussy or formal. They don’t ask you to preheat, sift, or cream. Instead, they invite you to slow down for a moment, stir something warm and chocolatey, and maybe lick the spoon like you did when you were little. They’re nostalgic, practical, cozy, and wildly delicious — my favorite combination.
So the next time life feels busy or you just need a sweet pick-me-up, whip up a batch of these little powdered-sugar-dusted gems. Share them with someone you love… or keep a few tucked away just for you. I won’t tell. 🤍🍫✨