Your Burger’s New Best Friend: Homemade Sourdough Buns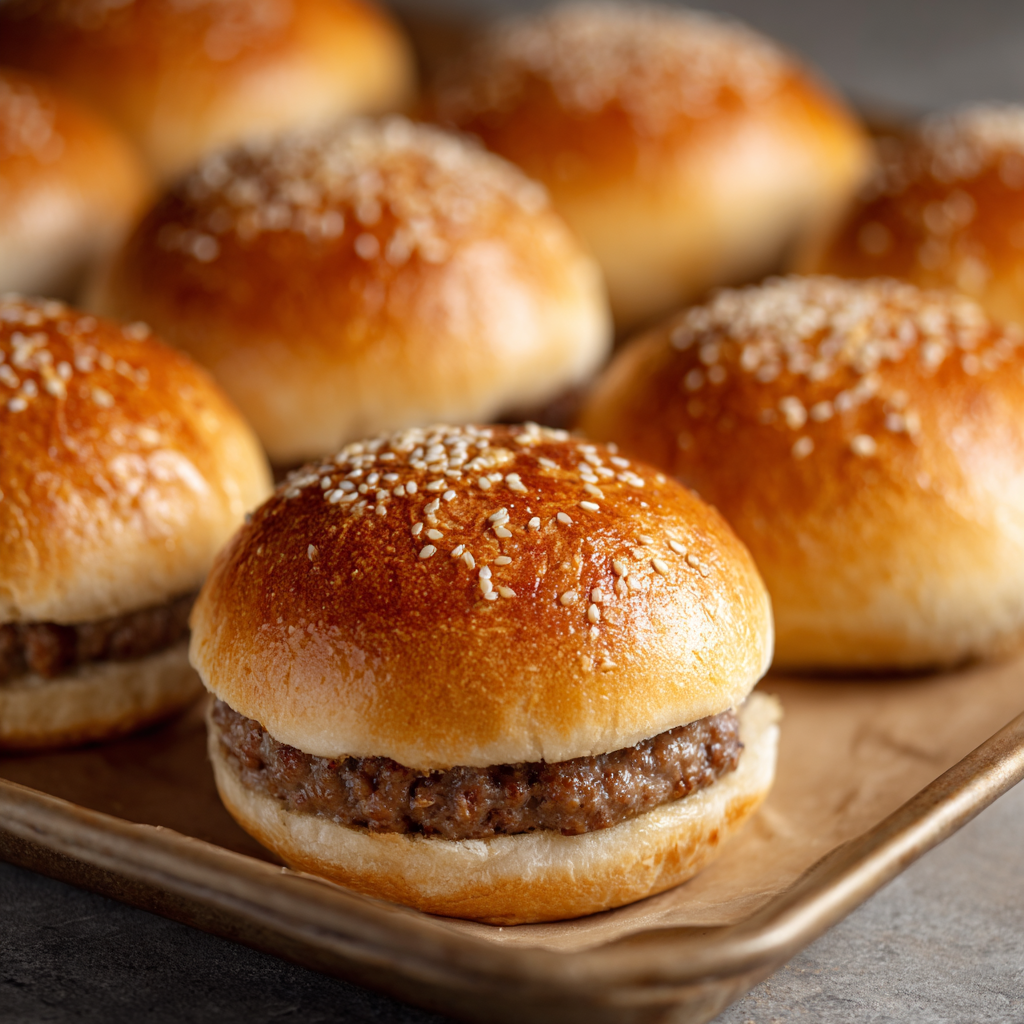
Hey there, friend! Anna here. Let’s talk about a universal truth: a truly epic burger is a symphony, and every single component matters. But if I had to pick an MVP? It’s the bun. That soft, sturdy, flavor-packed vessel that holds your juicy masterpiece together. And yet, so often, we let it be an afterthought—a bland, squishy, store-bought raft that collapses under the first drip of special sauce.
Not today. Today, we’re taking back the bun. We’re rolling up our sleeves and baking Sourdough Hamburger Buns that are so good, they might just steal the show from the patty. Imagine it: a bun with a tender, pillowy crumb, a whisper of tang from your active sourdough starter, and a golden, slightly crisp top dusted with sesame seeds. It’s sturdy enough to handle the juiciest of burgers, yet soft enough to melt in your mouth. This isn’t just baking; it’s an upgrade to your entire culinary life. The best part? It’s a joyful, forgiving process. So, whether your sourdough starter’s name is Bubbles or you just call it “my jar of magic,” let’s use it to cook up something amazing together.
Why These Buns Taste Like Home to Me
PrintSourdough Hamburger Buns : Soft, Tangy & Better Than Store-Bought

Upgrade your burgers with these soft, pillowy Sourdough Hamburger Buns. Made with active sourdough starter, they bring a subtle tang and unbeatable homemade flavor to every bite. With a tender crumb and golden top, these buns hold up to juicy patties and all your favorite toppings. Whether you’re grilling out or making a weeknight sandwich, these naturally leavened buns are a total game-changer.
- Prep Time: 20 mins
- rise time: : 6–8 hrs
- Cook Time: 22 mins
- Total Time: ~8–9 hrs
- Yield: 8 buns 1x
Ingredients
100g (½ cup) active sourdough starter
360g (1½ cups) warm milk
500g (4 cups) all-purpose flour
1 egg
50g (¼ cup) melted butter
25g (2 tbsp) sugar or honey
8g (1½ tsp) salt
Optional: sesame seeds & extra egg for egg wash
Instructions
In a bowl, mix starter, warm milk, sugar, butter, and egg until smooth.
Add flour and salt, then mix into a soft dough.
Knead 8–10 minutes until smooth. Cover and rise 4–6 hours at room temp until doubled.
Divide dough into 8 equal pieces. Shape into smooth balls and flatten slightly.
Place on parchment-lined tray, cover, and proof 1–2 hours until puffy.
Preheat oven to 375°F (190°C).
Brush tops with egg wash and sprinkle with sesame seeds (optional).
Bake for 20–22 minutes, until golden brown. Cool before slicing.
Nutrition
- Calories: 220
- Fat: 7g
- Carbohydrates: 33g
- Protein: 6g
My love for these buns is wrapped up in a memory of chaos, laughter, and a slightly charred patio. It was my dad’s birthday, and he declared a “Burger Bonanza.” He manned the grill with the focus of a scientist, while my mom and I were on assembly duty. We had it all: heirloom tomatoes, crispy lettuce, secret-sauce ingredients, and beautiful local beef. But when I tore open the bag of buns, my heart sank. They were… fine. Just fine. They lacked soul.
The next weekend, buzzing from a successful sourdough loaf, I wondered: what if? What if burger buns had that same character? My first batch was… rustic (read: slightly lopsided). But when we toasted one and piled on a simple beef patty, the reaction was instant. My husband took one bite, closed his eyes, and said, “This. This is what was missing.” That subtle tang, the chewy-yet-soft texture—it lifted the whole burger into something memorable. Now, “Burger Bonanza” always starts with these buns. They’ve seen everything from classic cheeseburgers to towering veggie stacks, and they’ve never let us down. They turn a meal into a moment.
Gathering Your Kitchen Crew (Ingredients & Insights)
Here’s everything you’ll need. Think of these ingredients as your kitchen team, each playing a special role in creating bun magic.
- 100g (½ cup) active sourdough starter: This is your flavor and rise MVP! Make sure it’s bubbly and active, having been fed 4-12 hours before. If it passes the float test (a spoonful floats in water), you’re golden. Chef’s Insight: No active starter? You can use ½ tsp of instant yeast mixed with the flour. You’ll lose the tang but still get fantastic homemade buns.
- 360g (1½ cups) warm milk: Whole milk adds richness for a supremely tender crumb. Warm it to about 95-105°F (35-40°C)—think baby-bottle warm, not hot. Substitution Tip: Any milk (or even water) works, but the fat in whole milk is our friend here.
- 500g (4 cups) all-purpose flour: I love a good bread flour, but all-purpose gives us that perfect balance of softness and strength. Chef’s Insight: For accuracy (and less mess!), I highly recommend using a kitchen scale. Cup measures can vary wildly.
- 1 large egg: Our binder and richness-booster. It gives the dough structure and a beautiful color.
- 50g (¼ cup) melted butter, cooled slightly: Butter = flavor and tenderness. It also helps keep the buns soft for days. Substitution Tip: A neutral oil like avocado or light olive oil works in a pinch.
- 25g (2 tbsp) sugar or honey: A touch of sweetness balances the sourdough tang and feeds the starter for a good rise. Honey adds a lovely depth.
- 8g (1½ tsp) fine sea salt: The flavor enhancer! Never add it directly to your liquid with the starter; mix it with the flour first.
- Optional for topping: 1 egg + 1 tbsp water (for egg wash) & sesame seeds: The egg wash gives that gorgeous, professional golden-brown shine. Sesame seeds are the classic crunchy finish we all know and love.
Let’s Get Our Hands Doughy: Step-by-Step
Ready? Apron on, favorite playlist queued up. Let’s make some magic.
Step 1: The Welcome Party. In a large mixing bowl, combine your active starter, warm milk, sugar/honey, slightly cooled melted butter, and the egg. Use a whisk or a fork to mix until it’s smooth and homogenous. You’re waking everything up and introducing the team. Little Chef Hack: If your butter is still hot, let it cool for a minute so it doesn’t accidentally cook the egg!
Step 2: Bring in the Flour Power. Add all of the flour and the salt to the bowl. If you’re using a stand mixer, fit it with the dough hook. Mix on low speed until a shaggy dough forms and no dry flour remains. If mixing by hand, use a sturdy spatula—it’ll come together, I promise! Commentary: This is the “trust the process” moment. It might look messy, but that’s perfect.
Step 3: The Knead for Speed (or Not!). Now, knead. If using a mixer, turn it up to medium-low and let it knead for 6-8 minutes. If by hand, turn the dough out onto a lightly floured surface and knead for 8-10 minutes. You’re looking for a smooth, slightly tacky (but not sticky) dough that passes the “windowpane test”: gently stretch a small piece; it should thin out enough to let light through without immediately tearing. Little Chef Hack: Set a timer! It’s easy to under-knead. Enjoy the rhythmic, therapeutic motion.
Step 4: The First Rise – Let It Breathe. Place your beautiful, smooth dough ball back in a lightly oiled bowl. Cover it with a damp kitchen towel, a shower cap (my secret weapon!), or plastic wrap. Let it rise at room temperature for 4-6 hours, until it has roughly doubled in size. Commentary: Sourdough is not on our clock; it’s on its own. Warm kitchens speed it up, cooler ones slow it down. Look for the doubled size, not the clock.
Step 5: Shape & Dream. Gently turn the risen dough out onto a very lightly floured surface. Using a bench scraper or a sharp knife, divide it into 8 equal pieces (for large buns) or 10 (for more modest ones). To shape each bun: cup a piece of dough in your hand and roll it in a tight circular motion on the counter, tucking the edges underneath until you have a smooth, taut ball. Flatten it slightly into a disc. Place each shaped bun on a parchment-lined baking sheet, about 2 inches apart.
Step 6: The Final Proof – Almost There! Cover the tray loosely with the same towel or plastic wrap. Let the buns proof again for 1-2 hours, until they look puffy, are touching their neighbors slightly, and spring back slowly when gently poked. Little Chef Hack: Pre-heat your oven for the last 30 minutes of this proof. A properly hot oven is key for the perfect “oven spring” (that last glorious puff!).
Step 7: Bake to Golden Perfection. Preheat your oven to 375°F (190°C). Make your egg wash by beating one egg with a tablespoon of water. Gently brush the tops of each bun—you don’t want to deflate them! Sprinkle generously with sesame seeds. Bake for 20-22 minutes, rotating the tray halfway through, until the buns are a deep, glorious golden brown and sound hollow when tapped on the bottom.
Step 8: The (Hardest) Part: Cooling. Transfer the buns to a wire rack immediately. Let them cool completely before you slice into them. I know, the aroma is torture! But slicing into a warm bun can make it gummy. Commentary: This is the ultimate test of willpower. Put the kettle on for tea, tidy the kitchen… do anything to distract yourself for an hour. It’s worth it.
Serving Up Your Masterpiece
Once cooled, these buns are ready for their destiny! Slice them horizontally with a serrated bread knife. For ultimate burger experience, I love to lightly toast the cut sides in a buttered skillet or on the grill grates just before assembling. It adds a fantastic crunch and prevents sogginess. Pile high with your favorite burger, pulled pork, fried chicken, or a massive veggie patty. They also make phenomenal sandwich bread for any leftover lunch—trust me, a turkey and avocado sandwich will never be the same.
Make It Your Own: Fun Variations
- Everything Bagel Buns: Swap the sesame seed topping for an “everything bagel” spice blend. Instant flavor upgrade!
- Whole Wheat Twist: Substitute up to half of the all-purpose flour with whole wheat flour for a nuttier, heartier bun.
- Brioche-Style: Add an extra egg yolk to the dough for incredible richness and a deeper yellow color.
- Herb & Garlic: Knead 2 tbsp of finely chopped fresh herbs (rosemary, thyme) and 1 tsp of garlic powder into the dough before the first rise.
- Dairy-Free/Vegan: Use a plant-based milk (like oat or soy), replace the butter with oil, and use a flax egg (1 tbsp ground flax + 3 tbsp water). Skip the egg wash or use plant-based milk for brushing.
Anna’s Kitchen Notes
This recipe has been my trusty sidekick for years, and it’s evolved with me. The first time I made them, I was so nervous I checked the dough every 30 minutes! Now, I love the slow, rhythmic pace. It’s a weekend project that fills the house with the best smell on earth. These buns freeze like a dream, too. Once completely cool, pop them in a freezer bag. To use, just thaw at room temperature or warm them in a 300°F oven for 10 minutes. They taste freshly baked! The biggest lesson? Don’t fear the sourdough. It’s a living thing, and it’s more resilient than we give it credit for. Even a slightly lazy starter will make delicious buns—they might just take a little longer to rise. And that’s perfectly okay.
Your Questions, Answered!
Q: My dough didn’t double in size during the first rise. What happened?
A: Don’t panic! This usually means your starter wasn’t quite active enough, or your kitchen is cooler. Give it more time—it can sometimes take 8+ hours. You can also place the bowl in a slightly warm spot (like an oven with just the light on). Patience is key with sourdough.
Q: Can I do a slow, cold rise in the fridge?
A> Absolutely! After kneading, you can cover the bowl and let it rise in the fridge for 12-24 hours. This develops even more flavor! The next day, let it sit at room temp for an hour, then proceed with shaping and the final proof.
Q: My buns spread out more than up. Why?
A> This typically means the dough was a bit too wet, or the final proof went a little too long (over-proofed). Next time, try adding a touch more flour during kneading, or watch the dough during the final proof—it should be puffy but still hold a slight indent when poked.
Q: Can I make these without a stand mixer?
A> 100% yes! I often make them by hand. It’s a wonderful, tactile process. Just use a sturdy wooden spoon or spatula to combine, then turn it out and knead on the counter. It’s great for working out any frustrations!
Nutritional Information*
*Approximate values per bun (based on 8 buns, using whole milk and including egg wash).
Calories: 220 | Total Carbohydrates: 33g | Dietary Fiber: 1g | Sugars: 3g | Protein: 6g | Total Fat: 7g | Saturated Fat: 4g
Final Thoughts:
These homemade sourdough buns aren’t just a vehicle for your burger—they are the experience. Soft, pillowy, with just the right tang and a golden, slightly crisp top, they elevate any sandwich, burger, or even simple toast with jam. The process is joyful, forgiving, and deeply satisfying: from mixing and kneading to the aromatic magic filling your kitchen while they bake. Whether you stick to the classic version or experiment with herbs, seeds, or whole wheat, these buns are a weekend project worth every minute. Freeze extras, savor every bite, and remember: sourdough isn’t intimidating—it’s deliciously rewarding.