Let’s Turn Your Favorite Cozy Dinner into a Grab-and-Go Delight!
Hey there, friend! Anna here, apron on and ready to chat. Raise your hand if you’ve ever had that deep, soul-level craving for a classic chicken pot pie… but also had the thought, “I just don’t have time to make, bake, and clean up a whole pie today.” (My hand is way up). We all have those days—where we’re juggling a million things, but we still deserve that warm, creamy, veggie-packed hug in a flaky crust. What if I told you we could capture every single bit of that cozy magic in a fun, hand-held, no-fork-required package?
Welcome to the glorious world of Chicken Pot Pie Pockets! This is the recipe that lives in my back pocket (see what I did there?) for busy weeknights, lunchbox surprises, and those “what should I make?” moments. Imagine all the goodness—tender shredded chicken, sweet peas and carrots, a velvety, herb-kissed sauce—bundled up in a golden, crispy pastry envelope. It’s the ultimate comfort food makeover. We’re keeping it simple, joyful, and totally approachable. Whether you’re a pastry pro or a self-proclaimed “dough-phobe,” I’m right here with you, cheering you on. So, let’s preheat that oven and cook up something amazing that’s as fun to make as it is to eat!
Why This Recipe Holds a Special Place in My Heart
PrintChicken Pot Pie Pockets : Cozy Comfort in a Hand-Held Bite

Everything you love about classic chicken pot pie—creamy filling, tender chicken, and hearty veggies—wrapped up in golden, crispy hand pies or folded flatbreads. These chicken pot pie pockets are perfect for meal prep, school lunches, or an easy dinner. No fork required, just warm, flaky, satisfying bites every time.
- Prep Time: 20 minutes
- Cook Time: 20 minutes
- Total Time: 40 minutes
- Yield: 6–8 pockets 1x
Ingredients
2 cups cooked, shredded chicken
1 cup frozen mixed vegetables (peas, carrots, corn)
1/2 cup chicken broth
1/2 cup milk
2 tablespoons butter
2 tablespoons flour
1/2 teaspoon garlic powder
Salt and pepper, to taste
1 package refrigerated pie dough or large flatbreads/tortillas
1 egg, beaten (for egg wash)
Instructions
Make the filling: In a skillet over medium heat, melt butter. Stir in flour and cook 1 minute to form a roux. Slowly whisk in broth and milk until smooth. Add garlic powder, salt, pepper, veggies, and chicken. Simmer until thickened, about 5 minutes. Let cool slightly.
Prep the dough: Roll out pie dough and cut into circles or squares. For flatbreads, lay them flat and prepare to fold.
Fill and seal: Spoon chicken mixture onto one side of each dough piece or flatbread. Fold over and press edges with a fork to seal.
Bake: Place on a lined baking sheet. Brush tops with beaten egg. Bake at 400°F (200°C) for 18–22 minutes, or until golden brown.
Serve or store: Cool slightly before eating. These freeze well—just reheat in the oven or air fryer.
Nutrition
- Calories: 390
- Carbohydrates: 28g
- Protein: 22g
This recipe takes me straight back to my grandma’s linoleum-floored kitchen. She was the queen of “clever cooking,” turning leftovers into treasures. One chilly afternoon, after a big Sunday roast chicken dinner, she looked at the leftover chicken and gravy, winked at me, and said, “Let’s make something fun.” She rolled out leftover biscuit dough, plopped spoonfuls of the saucy chicken and veggies on one half, folded them over, and crimped the edges with a fork. Into the oven they went. What emerged were these puffy, golden-brown “chicken puffs,” as I called them. I remember holding one, almost too hot to touch, the steam bursting out with that incredible savory smell. It felt like holding a secret, a personal gift of warmth. That’s the spirit I’ve packed into these pockets: the magic of transformation, the joy of a personal portion of comfort, and the beautiful truth that the best meals often come from a little creativity and a lot of love.
Gathering Your Cast of Characters
Here’s everything you’ll need to create these little pockets of joy. I’ve included my best tips and swaps so you can make this recipe work with what you have!
- 2 cups cooked, shredded chicken: The star! Use leftover rotisserie chicken (my weeknight savior), roasted chicken breasts, or even the meat from a store-bought roast chicken. It’s a fantastic way to reduce food waste. For a vegetarian twist, see the variations below!
- 1 cup frozen mixed vegetables (peas, carrots, corn): Don’t thaw them! The frozen veggies release just the right amount of moisture into the filling and keep their perfect bite. A “classic blend” is ideal, but feel free to use peas and carrots only, or toss in some diced green beans.
- 1/2 cup chicken broth & 1/2 cup milk: This dynamic duo creates our creamy sauce base. Use low-sodium broth to control the salt. For the milk, anything from whole to 2% works—the richer the milk, the creamier the result. For a dairy-free version, use all broth or a splash of unsweetened non-dairy milk.
- 2 tablespoons butter & 2 tablespoons all-purpose flour: Our simple roux! This one-minute cookout is the secret to a lush, non-watery filling that holds its own inside the pastry. It’s the glue that holds our pocket universe together.
- 1/2 teaspoon garlic powder, Salt and pepper, to taste: Flavor builders! Garlic powder disperses evenly. I always say, season in layers—add a pinch to the roux, and then again at the end. Freshly cracked black pepper is a must for that little spark.
- 1 package refrigerated pie dough or large flatbreads/tortillas: The vessel! Refrigerated pie dough (usually 2 crusts per box) gives you that classic, flaky pot pie experience. For a quicker, leaner option, large burrito-size flour tortillas or even puff pastry sheets work wonders. No judgment here—choose your adventure!
- 1 egg, beaten (for egg wash): The beauty treatment! A simple egg wash (just beat an egg with a teaspoon of water) brushed on top gives the pockets a deep, golden-brown, professional-looking shine. For a dairy-free option, you can use milk or even just water, though the color won’t be as rich.
Let’s Build Some Magic: Step-by-Step
Follow these steps, and you’ll be a pocket-folding pro in no time. I’m whispering my best kitchen hacks along the way!
Step 1: Make the Dreamy Filling. In a medium skillet over medium heat, melt your butter. Once it’s bubbling, sprinkle in the flour and whisk constantly for about a full minute. You’re toasting the flour here, cooking out that raw taste—it should smell a bit nutty. This is your roux! Now, slowly drizzle in the chicken broth and milk while whisking like your life depends on it. This prevents lumps and creates a smooth, velvety base. Bring it to a gentle simmer and watch it thicken beautifully. Stir in the garlic powder, a good pinch of salt, and pepper. Now, fold in the frozen veggies and shredded chicken. Let it all simmer together for about 5 minutes, until the veggies are heated through and the sauce is thick enough to coat the back of a spoon. Chef’s Hack: Take it off the heat and let it cool for 10-15 minutes. A hot filling will steam and soften your dough, making it harder to seal and potentially causing leaks.
Step 2: Prep Your Dough Canvas. If using pie dough, let it sit at room temp for 10 minutes per package directions so it’s pliable. Unroll it on a lightly floured surface. Using a bowl or a large round cutter (about 5-6 inches in diameter), cut out as many circles as you can. Gently re-roll the scraps to get more circles! You should get 6-8 from two dough rounds. If using flatbreads, just lay them out on your work surface. No rolling needed!
Step 3: The Fill & Fold (The Fun Part!). Place a dough circle or flatbread in front of you. Spoon a generous 1/4 to 1/3 cup of the cooled filling onto one half, leaving a 1/2-inch border around the edge. Too much filling is the main cause of burst pockets, so resist the urge to overstuff! Fold the empty half over the filling to create a half-moon shape. Now, seal it tight: press the edges together with your fingers, then go around again, crimping firmly with the tines of a fork. This double seal is your leak-proof insurance! Place the finished pocket on a parchment-lined baking sheet. Repeat with remaining dough and filling.
Step 4: Bake to Golden Perfection. Preheat your oven to 400°F (200°C). Before baking, give each pocket its glossy finish: lightly brush the tops with the beaten egg wash. This is also the time to add a sprinkle of flaky salt or everything bagel seasoning for extra flair. Using a sharp paring knife, cut 2-3 small slits in the top of each pocket. This lets steam escape so they don’t puff up like balloons! Bake for 18-22 minutes, rotating the sheet halfway through, until the pockets are deeply golden brown and you can see the filling bubbling slightly through the slits.
Step 5: The (Hardest) Part: Let Them Rest! I know, the smell is irresistible! But let them cool on the baking sheet for at least 5-10 minutes. The filling is essentially molten lava straight from the oven. This resting time lets everything set, so you get a perfect, non-burned-mouth bite.
How to Serve These Cozy Hand-Held Wonders
Presentation is part of the fun! Arrange the warm pockets on a big wooden board or platter for family-style serving. I love to put a small bowl of extra gravy or a creamy garlic aioli in the center for dipping—because more sauce is always a good idea. For a simple dinner, pair them with a bright, crisp green salad tossed in a lemony vinaigrette to balance the richness. Pack them in a lunchbox with some apple slices and a cookie, and you’ve just made someone’s whole day. Remember, the beauty is in the portability—no plates needed, just napkins and happy smiles.
Make It Your Own: Delicious Twists & Swaps
The basic recipe is a perfect canvas! Here are a few ways to play:
- Turkey & Cranberry: Swap chicken for leftover Thanksgiving turkey and add a tablespoon of whole-berry cranberry sauce to each pocket before sealing. Holiday flavors, any day!
- Cheesy Spinach & Chicken: Stir a handful of chopped fresh spinach and 1/2 cup of shredded sharp cheddar into the filling. The cheese makes it extra gooey.
- Curried Vegetable (Veg-Friendly!): Omit the chicken. Add 1 teaspoon of curry powder to the roux and use chickpeas or cooked lentils instead of chicken. So flavorful!
- Biscuit Dough Pockets: Use a can of refrigerated flaky biscuits, roll each one out slightly, and proceed with filling and folding. They’ll be extra fluffy.
- Air Fryer Method: For an even crisper crust, cook at 375°F for 10-12 minutes, flipping halfway. Perfect for making just one or two!
Anna’s Extra Kitchen Notes & Stories
This recipe has evolved so much since my grandma’s “chicken puffs.” My kids now call them “pie-ritos,” and they love being in charge of the fork-crimping station (messy, but worth it). One time, I was filming a video for the blog and was talking so much I completely forgot to cut the steam vents. Let’s just say we ended up with a baking sheet of very plump, slightly explosive “pot pie pillows.” They tasted great, but it was a hilarious reminder that those little slits are important! Don’t be afraid to make this recipe your own. The first time you make it, follow the steps. The second time, start tweaking. That’s how cooking becomes yours. I promise, even the “mistakes” are usually delicious.
Your Questions, Answered!
Q: Can I make these ahead of time and freeze them?
A: Absolutely! They are a meal prep superstar. Assemble the pockets, place them on a baking sheet, and freeze until solid (about 2 hours). Then, transfer them to a freezer bag. Bake from frozen, adding 5-10 minutes to the baking time. No need to thaw!
Q: My filling leaked out everywhere! What did I do wrong?
A> The two most common culprits are 1) The filling was too hot when you assembled, which weakens the dough, and 2) Overfilling. Cool your filling thoroughly and use a measuring cup to be consistent. Also, that double-seal with the fork is non-negotiable!
Q: Can I use fresh vegetables instead of frozen?
A> You can, but you’ll need to cook them first. Sauté diced carrots, celery, and onions in the butter before adding the flour to make your roux. Add peas at the very end since they cook quickly.
Q: The bottom of my pockets seems a bit soggy. Help?
A> A baking sheet lined with parchment paper is key—it promotes even browning and prevents sticking. Also, make sure your oven is fully preheated. If soggy bottoms persist, try placing the baking sheet on a lower oven rack for the last 5 minutes of baking.
Nutritional Information*
*Estimated for one pocket made with standard refrigerated pie dough, yielding 8 pockets.
Calories: 390 | Protein: 22g | Carbohydrates: 28g | Fat: 22g | Fiber: 2g
Prep Time: 20 minutes | Cook Time: 20 minutes | Total Time: 40 minutes | Makes: 6-8 pockets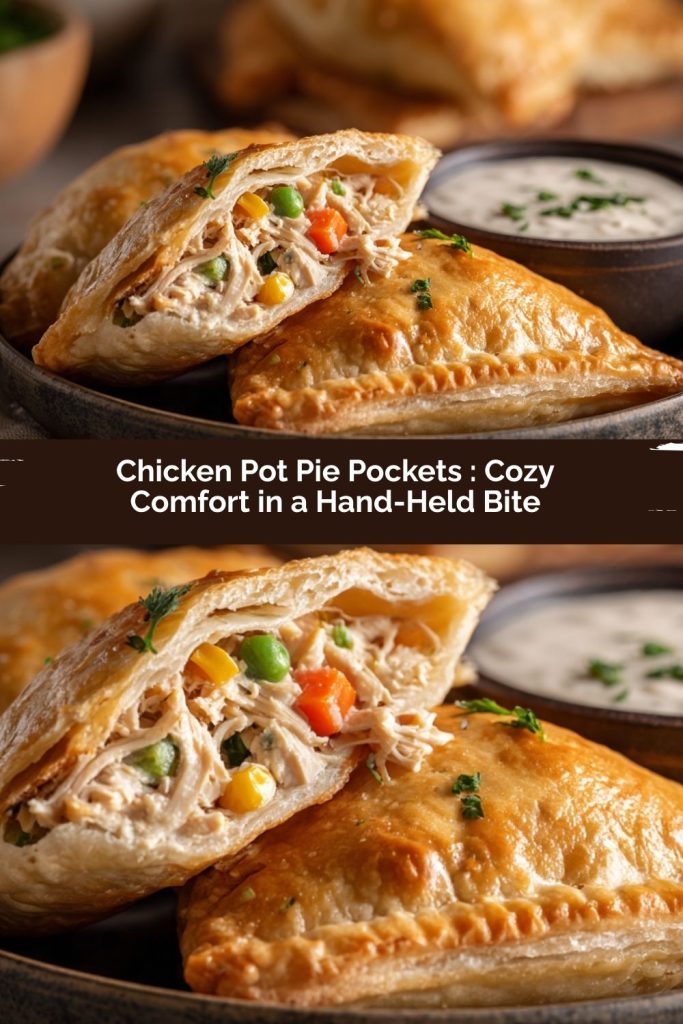
Final Thoughts
These little pockets are everything I love about home cooking—comforting, practical, and made with a whole lot of heart. They take a classic, sit-down-at-the-table kind of meal and turn it into something playful and flexible, something that fits into real life with all its busy schedules and hungry moments in between.
Whether you’re packing them into lunchboxes, stacking them on a platter for family dinner, or sneaking one straight off the baking sheet (no judgment here), they carry that same message: you deserve good food, even on hectic days.
So the next time you’re craving that cozy chicken pot pie feeling but don’t want the fuss, remember these pockets. Golden, flaky, and filled with love—they’re proof that comfort food doesn’t have to be complicated to be truly special. 🥧💛