Cherry Delight Dessert – Your New Favorite No-Bake Miracle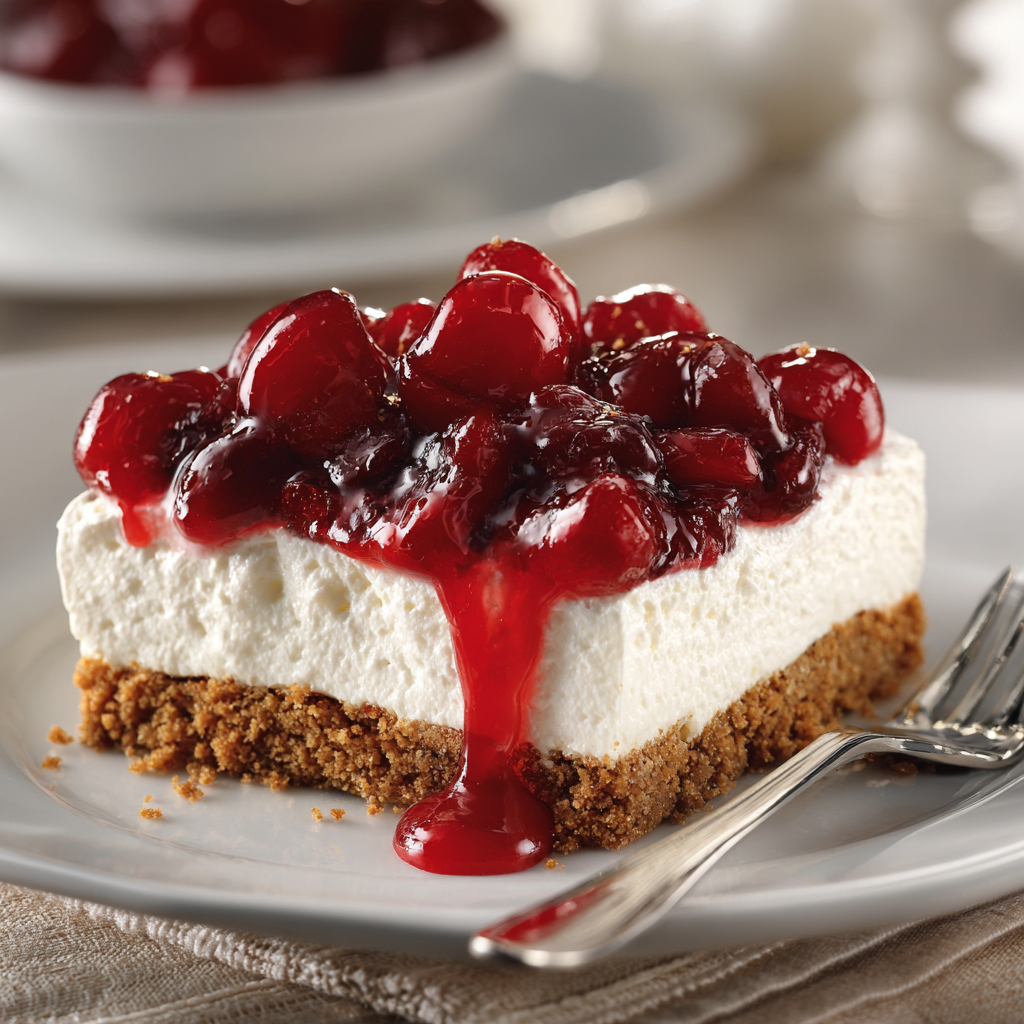
Hey there, friend! Let’s talk about that magical moment when you need a show-stopping dessert but the thought of preheating the oven makes you want to crawl under a cozy blanket instead. I hear you. I’ve been there more times than I can count. That’s why I’m utterly devoted to the magic of no-bake wonders, and today, we’re making the queen of them all: Cherry Delight.
Picture this: a buttery, crumbly graham cracker crust that holds a cloud of sweet, creamy filling that tastes like the best part of cheesecake. On top, a lush blanket of glistening, sweet-tart cherries that add that perfect pop of color and flavor. Each bite is a textural dream—crunch, cream, and juicy fruit all dancing together. It’s nostalgia in a dish, reminiscent of potlucks and family gatherings, yet it’s so effortlessly simple it feels like a secret hack.
The best part? This isn’t just a “dump and stir” recipe (though I love those too!). It’s a chance to create layers of love without any stress. We’ll chat, share some kitchen stories, and I’ll give you all my favorite chef-y little tips along the way. Whether you’re a dessert newbie or a seasoned pro looking for a reliable crowd-pleaser, this Cherry Delight is your ticket to kitchen confidence and a very happy table. So, let’s grab our mixing bowls and make some magic!
The Church Potluck That Started It All
PrintCherry Delight Dessert : No-Bake, Creamy & Perfectly Sweet

Cherry Delight is the dreamy, creamy dessert that always steals the show. With a buttery graham cracker crust, smooth cheesecake-style filling, and a sweet-tart cherry topping, it’s pure joy in every bite. Best part? No baking required! Whether for holidays, potlucks, or just a treat-yourself moment, this layered classic is as easy as it is delicious.
- Prep Time: 15 minutes
- chill time: 2 hours
- Total Time: 2 hrs 15 mins
- Yield: 12 1x
Ingredients
Crust:
1½ cups graham cracker crumbs
¼ cup granulated sugar
½ cup (1 stick) melted butter
Filling:
8 oz cream cheese, softened
1 cup powdered sugar
8 oz whipped topping (like Cool Whip), thawed
1 tsp vanilla extract
Topping:
1 can (21 oz) cherry pie filling
Instructions
Make the crust: Combine graham crumbs, sugar, and melted butter. Press firmly into a 9×13-inch dish. Chill for 10–15 minutes.
Prepare the filling: Beat cream cheese and powdered sugar until smooth. Mix in vanilla, then fold in whipped topping.
Spread filling evenly over chilled crust.
Top with cherry pie filling, spreading gently to cover.
Chill for at least 2 hours before serving (overnight is best for flavor).
Nutrition
- Calories: 320
- Carbohydrates: 30g
- Protein: 3g
My love affair with Cherry Delight began not in a fancy restaurant, but in a bustling church basement, circa 1998. The air was thick with the smell of fried chicken, green bean casserole, and the distinct perfume of old coffee. I was maybe ten, tasked with the very important job of guarding my grandma’s contribution to the dessert table. It was a 9×13-inch pan, shrouded in slightly foggy plastic wrap, and I thought it looked… simple.
But then the line formed. I watched as slice after slice of this pink-and-white layered beauty was lifted onto paper plates. I saw the smiles, heard the “Ooh, Marge brought the cherry thing!” and witnessed a little boy negotiate with his mom for “just a bigger corner piece, please.” When I finally got my own plate, I understood. The cool, creamy filling melted on my tongue, the cherries were a sweet burst of joy, and the crust gave it just the right amount of crunch. It felt like a celebration. That pan, so humble and unassuming, had brought more sheer, unadulterated delight than the fanciest tiered cake there. It taught me that food magic isn’t about complexity; it’s about the joy you share. Every time I make it now, I’m right back in that basement, remembering that the best recipes are the ones that create moments.
Gathering Your Cherry Delight Ingredients
Here’s everything you need to create this masterpiece. I’ve added my little notes next to each one because knowledge is power—even in dessert-making!
For the Buttery, No-Bake Crust:
- 1½ cups graham cracker crumbs: This is the classic! I love the hint of honey. You can buy pre-crumbled or crush whole sheets in a zip-top bag with a rolling pin—super therapeutic. Chef’s Insight: For a deeper flavor, try using cinnamon or chocolate grahams!
- ¼ cup granulated sugar: This sweetens the crust and helps it crisp up just slightly when mixed with the butter. It’s the perfect base note.
- ½ cup (1 stick) melted butter, unsalted: The glue that holds our dreamland together! Melted butter gives the crust its rich flavor and solid structure. Substitution Tip: If you only have salted butter, it’s totally fine—just omit any added salt in other layers (though there isn’t any here!). For a dairy-free version, a good plant-based butter works beautifully.
For the Dreamy Cream Cheese Filling:
- 8 oz block cream cheese, fully softened: This is non-negotiable—softening is key! Take it out of the fridge at least an hour before. Room temp cheese blends into a silky-smooth filling with zero lumps. Chef’s Insight: Use full-fat for the richest, most luxurious texture. The low-fat stuff can make the filling a bit runny.
- 1 cup powdered sugar (also called icing sugar): It dissolves instantly, giving us that smooth sweetness without any graininess. Sift it if it’s lumpy!
- 1 teaspoon pure vanilla extract: The flavor enhancer! It rounds out the sweetness and adds a warm, comforting aroma. A splash of almond extract (¼ tsp) is also a gorgeous friend here.
- 8 oz tub of whipped topping (like Cool Whip), thawed: Our secret weapon for fluffy, stable, no-fuss creaminess. Substitution Tip: Prefer homemade? You can whip 1 ½ cups of heavy cream with 2 tbsp of the powdered sugar until stiff peaks form and fold it in at the end.
For the Glorious Topping:
- 1 can (21 oz) cherry pie filling: The iconic finish! It’s sweet, glossy, and studded with plump cherries. Chef’s Insight: Feel free to get creative here—blueberry, apple, or strawberry pie filling are all amazing. For a fresher twist, see the variations below!
Let’s Build Some Delight: Step-by-Step
Follow these steps, and you’ll have a flawless dessert. I’m right here with you, talking you through every little nuance!
- Create Your Crust Foundation. In a medium bowl, combine the graham cracker crumbs and granulated sugar. Pour the melted butter over the top. Now, get in there with a fork (or your clean hands!) and mix until every single crumb is evenly damp and looks like wet sand. It should hold together when you pinch it. Pour this mixture into your ungreased 9×13-inch baking dish. Pro Tip: I like to use the bottom of a flat measuring cup or a glass to press the crumbs firmly and evenly into the pan. Really press it down—this prevents a crumbly, messy slice later. Pop the whole dish into the fridge for 10-15 minutes to let the butter firm up. This chill time is your secret for a crisp crust that won’t get soggy.
- Whip Up the Cloud-Like Filling. While the crust chills, let’s make the magic happen. In a large mixing bowl, beat the softened cream cheese with an electric mixer on medium speed for about 30 seconds, just until it’s smooth and pliable. Add the powdered sugar. Start mixing on low so you don’t create a sugar-dust cloud in your kitchen (learned that one the hard way!), then increase to medium and beat for 1-2 minutes. Stop and scrape down the sides of the bowl. You want this mixture completely homogeneous—no streaks of plain cream cheese. Beat in the vanilla extract just until combined.
- Fold in the Fluff. Here’s where we keep things light and airy! Grab your thawed whipped topping. Add about one-third of it to the cream cheese mixture. Use a flexible spatula to gently fold it in. Folding means you’re cutting down through the center, sliding along the bottom, and lifting back up, rotating the bowl as you go. This incorporates without deflating all the air. Once that first bit is mostly mixed in, add the rest of the whipped topping and continue folding gently until you have a uniform, fluffy, pale pink-ish filling. No white streaks should remain.
- Layer with Love. Pull your chilled crust from the fridge. Dollop the creamy filling all over the surface. Using an offset spatula or the back of a spoon, gently spread it into a smooth, even layer, reaching all the way to the edges. Be gentle so you don’t pull up the crumbs from the crust. Admire how beautiful and white it looks!
- The Cherry on Top (Literally!). Open your can of cherry pie filling. Give it a gentle stir in the can to redistribute the glossy gel. Spoon dollops of the cherries over the cream layer, then use the back of your spoon to spread them gently into an even, gorgeous blanket of red. Try to distribute the cherries and the “glaze” somewhat evenly.
- The Final (and Most Important) Step: Patience. Cover the pan tightly with plastic wrap or a lid. Now, walk it to the refrigerator. It needs to chill for at least 2 hours, but honestly? Overnight is absolute perfection. This time allows the crust to set completely, the flavors to marry and deepen, and the whole dessert to firm up so you get those picture-perfect, clean slices. Trust me on this—it’s worth the wait!
Serving Your Masterpiece
When it’s finally time to serve, use a sharp knife dipped in hot water and wiped clean between cuts for the neatest slices. I love serving this on simple white plates to let those vibrant layers shine. A little extra dollop of fresh whipped cream on the side never hurt anybody, and a sprinkle of graham cracker crumbs or a fresh mint leaf adds a lovely little chef’s touch. It’s perfect for potlucks, birthdays, holiday dinners, or just a Wednesday that needs a dose of sweet joy.
Make It Your Own: Delicious Variations
The beauty of this dessert is its adaptability! Here are a few of my favorite twists:
- Chocolate Lover’s Dream: Use chocolate graham crackers for the crust. Add 1/4 cup of unsweetened cocoa powder to the cream cheese filling along with the powdered sugar. Top with a chocolate sauce drizzle instead of cherries.
- Lemon Berry Bliss: Add the zest of one lemon and a tablespoon of lemon juice to the cream cheese filling. Top with a can of blueberry or strawberry pie filling for a bright, summery flavor.
- Tropical Escape: Use crushed vanilla wafers or shortbread cookies for the crust. Fold 1/2 cup of toasted coconut into the cream cheese filling and top with a drained can of crushed pineapple or mango pie filling.
- Fresh Fruit Fancy: Skip the canned topping! After chilling the dessert, arrange 2-3 cups of fresh, pitted cherries or mixed berries on top just before serving. Brush with a little warmed apricot jam for a gorgeous gloss.
- Mini Delights: Make individual servings in mason jars or dessert cups. Simply layer the crumb mixture, filling, and topping in each glass. It’s adorable and portion-controlled (in theory!).
Anna’s Chef Notes & Kitchen Stories
This recipe has been a constant in my kitchen for years, and it’s evolved in the funniest ways. I once made it for a big family reunion and, in my haste, accidentally used a tub of frozen whipped topping that was still half-frozen. Let’s just say I had “cherry delight icebergs” floating in my cream cheese mixture! We laughed so hard, but after a vigorous mix and a long chill, it still turned out great. The lesson? This dessert is forgiving.
I’ve also learned that the quality of your vanilla makes a huge difference in the filling. Splurge on the pure stuff if you can—it adds a warm, complex note that imitation vanilla just can’t match. Over time, I’ve started adding that tiny splash of almond extract I mentioned; it subtly elevates the cherries and makes people go, “What is that amazing flavor?” without being able to pinpoint it. That’s my little secret for you!
Your Questions, Answered (FAQs)
Q: Can I make this dessert ahead of time?
A: Absolutely, and I encourage it! Cherry Delight is the ultimate make-ahead dessert. It keeps beautifully, covered, in the refrigerator for 3-4 days. The flavors actually get better after 24 hours. You cannot freeze it, however, as the filling will separate and become watery when thawed.
Q: My crust is too crumbly and won’t hold together when I slice. What did I do wrong?
A: This usually boils down to two things: 1) Not enough butter, or 2) Not pressing it firmly enough into the pan. The crust mixture should look like wet sand and hold its shape when you squeeze a handful. When pressing it in, really use some muscle with the bottom of a cup to compact it. Also, that initial 10-15 minute chill before adding the filling is crucial for setting the butter.
Q: Can I use fresh whipped cream instead of whipped topping?
A: Yes, you can! Whip 1 ½ cups of heavy whipping cream with 2 tablespoons of the powdered sugar from the recipe until you have stiff peaks. Gently fold it into the sweetened cream cheese mixture in place of the thawed tub. The texture will be slightly softer and more decadent, but equally delicious. Note that it may not hold its shape quite as long, so serve within a day or two.
Q: My filling came out runny. How can I fix this next time?
A: A runny filling is almost always due to the cream cheese not being soft enough or the whipped topping being over-mixed. Ensure your cream cheese is at true room temperature—soft to the touch. And remember to fold in the whipped topping, not beat it. Beating knocks out the air and can cause the structure to break down, leading to a softer set. If it happens, just chill it longer; it will still taste amazing, even if it’s a bit softer.
Nutritional Information*
*Please note: This is an estimated nutritional breakdown for informational purposes. Values can vary based on specific brands and ingredient choices.
Per Serving (1 of 12 slices): Calories: ~320 | Total Fat: 20g | Saturated Fat: 12g | Cholesterol: 50mg | Sodium: 180mg | Total Carbohydrates: 30g | Dietary Fiber: 0.5g | Sugars: 22g | Protein: 3g
Prep Time: 15 minutes | Chill Time: 2 hours (best overnight) | Total Time: 2 hours 15 minutes | Servings: 12
Final Thoughts
Cherry Delight is proof that the most memorable desserts don’t need an oven or complicated steps—they just need layers of love, a bit of patience, and quality ingredients. The buttery graham cracker crust, the light, creamy filling, and that glossy cherry topping come together to create a dessert that’s as visually stunning as it is delicious.
The best part? It’s incredibly forgiving and versatile. Swap in fresh fruit, try chocolate or tropical variations, or even make individual servings in jars for a cute, portion-controlled treat. Chill it overnight for the perfect set, or serve it a few hours later when life is calling for something sweet and satisfying.
Whether it’s a potluck, birthday, or a midweek treat for yourself, this Cherry Delight delivers every time. Easy, crowd-pleasing, and utterly delightful—it’s a no-bake miracle that will quickly become a staple in your dessert repertoire.