Sweet and Sour Chicken – Your New Kitchen Triumph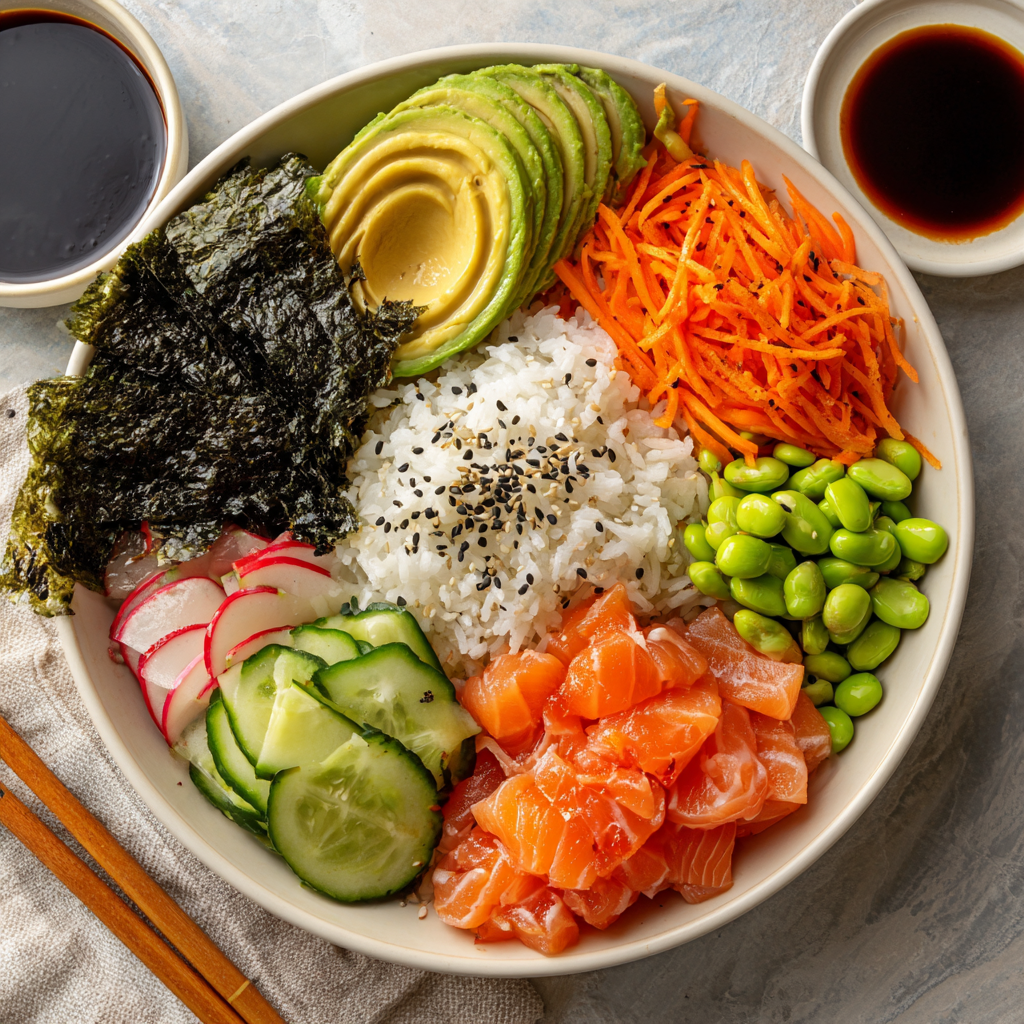
Hey there, friend! Let’s talk about that magical moment when crispy, golden-brown chicken meets a glossy, tangy-sweet sauce, all tossed with vibrant peppers and juicy pineapple. That’s the magic of homemade Sweet and Sour Chicken. If you’ve ever found yourself staring at a takeout menu, craving that perfect bite but wishing it felt a little more like your creation, then pull up a stool at my kitchen counter. This recipe is our answer.
I promise you, this isn’t one of those fussy, complicated restaurant copycats. This is a weeknight warrior, a crowd-pleasing hero, and a recipe that will make you feel like a total rock star in the kitchen. We’re talking about real, simple ingredients coming together to create something spectacularly delicious. The chicken gets incredibly crispy, the sauce is perfectly balanced (not cloyingly sweet, not mouth-puckeringly sour), and the whole dish comes together in about the time it would take for delivery to arrive. But the satisfaction? That lasts so much longer. So, grab your favorite skillet and let’s turn your kitchen into the best Chinese-food spot in town—no cardboard containers required.
The Takeout Box That Started It All
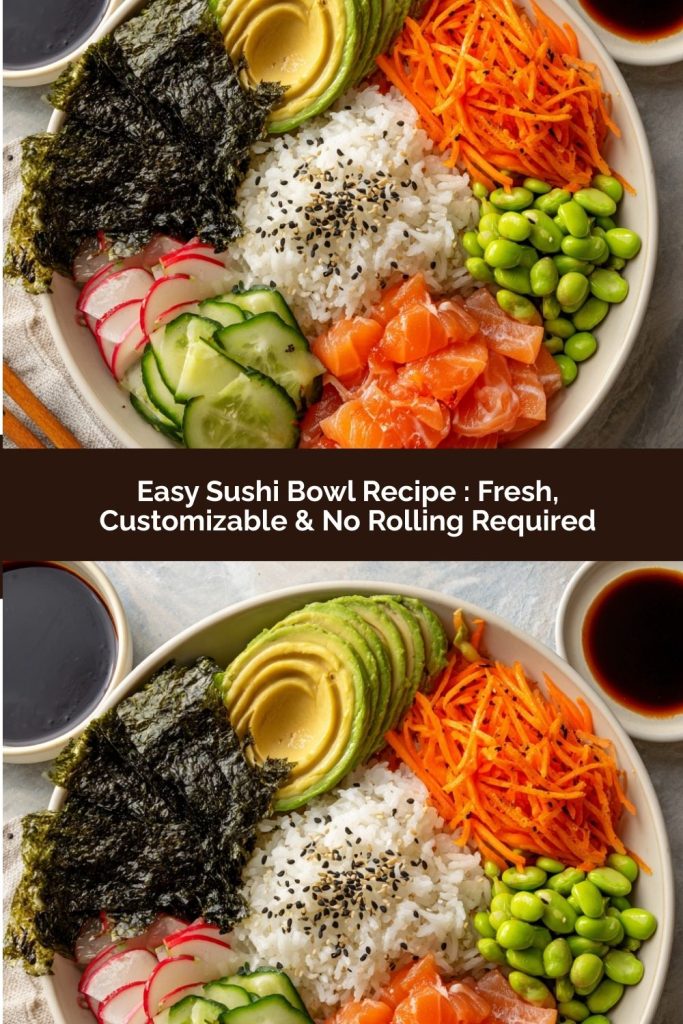
PrintEasy Sushi Bowl Recipe : Fresh, Customizable & No Rolling Required

This sushi bowl is everything you love about sushi—minus the rolling! It’s a fun, easy way to enjoy fresh ingredients like rice, veggies, and your favorite protein in one colorful, delicious bowl. Whether you’re craving salmon, crab, tofu, or just veggies, you can build it your way. Quick to prep, totally customizable, and perfect for lunch or dinner.
- Prep Time: 15 minutes
- Cook Time: 20 minutes
- Total Time: 35 minutes
- Yield: 2 large bowls 1x
Ingredients
Base:
2 cups cooked sushi rice (seasoned with 2 tbsp rice vinegar + 1 tsp sugar)
Toppings (mix & match):
1 cup cooked or raw sushi-grade salmon, tuna, shrimp, imitation crab, or tofu
1 avocado, sliced
½ cucumber, thinly sliced or julienned
1 carrot, shredded
½ cup edamame (cooked & shelled)
2 tbsp pickled ginger
1 sheet nori, cut into strips or crumbled
1 tbsp sesame seeds
Sauce Options:
Soy sauce or tamari
Spicy mayo (¼ cup mayo + 1–2 tsp sriracha)
Eel sauce or teriyaki drizzle
Instructions
Cook and season rice: Prepare sushi rice and season with vinegar and sugar. Let cool slightly.
Assemble bowl: Add a layer of rice to your bowl, then neatly arrange toppings on top.
Add sauce: Drizzle with your favorite sauce(s) and sprinkle with sesame seeds and nori.
Serve: Enjoy with chopsticks or a spoon!
Nutrition
- Calories: 400–550
- Fat: 15–25g
- Carbohydrates: 45–60g
- Protein: 20–30g
My love affair with sweet and sour chicken began in a brightly lit, wonderfully chaotic mall food court. Every Saturday after shopping with my mom, it was our ritual: we’d split an enormous cardboard container of it. I’d meticulously pick out the crispiest pieces, making sure each one was loaded with extra sauce and a single pineapple chunk. It was our special treat, a little celebration of a day spent together.
Years later, as a broke college student, I tried to recreate that taste from a memory. The first attempt was… a sugary, gluey disaster. But it sparked a mission. I tinkered, tweaked, and tested until I landed on this version. It captures that nostalgic food-court joy but tastes so much brighter and fresher because you made it. Now, whenever I make it, the smell of vinegar and garlic hitting the hot pan instantly transports me back to those Saturday afternoons, reminding me that the best recipes are often wrapped in memories.
Gathering Your Flavor Arsenal
Here’s everything you’ll need to build this flavor masterpiece. Don’t stress about being exact—cooking is about playing, and I’ve got notes for every ingredient!
- For the Chicken:
- 1 lb boneless, skinless chicken breast or thighs: Thighs are my secret for extra juicy, forgiving meat, but breasts work beautifully for a leaner option. Just don’t overcook them!
- ½ cup cornstarch: This is our crisp-maker! It creates that incredible, shatteringly crisp coating that holds up to the sauce. Don’t substitute flour here—cornstarch is the magic key.
- 2 eggs, beaten: Our glue. They help the cornstarch create a craggy, perfect crust on every piece of chicken.
- Salt & pepper to taste: Season every layer, my friends. Even the chicken before its coating journey.
- Oil for frying: Use a neutral oil with a high smoke point—avocado, vegetable, or canola oil are perfect. You’ll need enough for about a ½-inch depth in your pan.
- For the Legendary Sauce:
- ½ cup ketchup: This provides the deep tomatoey base and a touch of sweetness. It’s the foundation of that classic takeout color and flavor.
- ⅓ cup rice vinegar: My preferred choice for its mild tang. In a pinch, white vinegar works, but use a touch less as it’s sharper.
- ⅓ cup brown sugar: For that rich, molasses-tinged sweetness that balances the vinegar. It creates a more complex flavor than white sugar.
- ¼ cup soy sauce: Salty, umami depth. Use tamari for a gluten-free version—it works like a charm.
- 1 tsp garlic powder: Quick, easy flavor that distributes evenly. If you have an extra minute, 2 cloves of fresh minced garlic sautéed with the veggies is sublime.
- 1 tbsp cornstarch + 2 tbsp water (slurry): Our thickening agent. Mix it in a separate little bowl before adding to prevent lumps!
- The Vibrant Extras:
- 1 red & 1 green bell pepper, chopped: For color, crunch, and fresh flavor. Use any color you have!
- 1 cup pineapple chunks: The non-negotiable sweet burst! Fresh is fantastic, but canned (drained) is perfectly convenient and delicious.
- Green onions & sesame seeds for garnish: The confetti that makes it feel like a celebration. Absolutely optional, but highly recommended for that final pop.
Let’s Cook: Step-by-Step to Crispy, Saucy Bliss
Follow these steps, and you’re guaranteed success. I’m chatting you through each one with all my favorite chef hacks!
- Prep Your Station & Chicken. Cut your chicken into 1-inch, bite-sized pieces. Pat them very dry with paper towels—this is crucial for maximum crispiness! Season them well with salt and pepper. Now, set up your breading line: one bowl with the cornstarch, one with the beaten eggs. Use one hand for dry (cornstarch) and one for wet (egg) to avoid “club hand.”
- Create the Crispy Coating. Working in batches, toss the chicken pieces in the cornstarch until thoroughly coated. Shake off the excess, then dunk them into the egg, letting any extra drip off. Immediately place them on a plate. You’ll see the cornstarch mix with the egg into a shaggy, craggy coating—that’s exactly what you want!
- Fry to Golden Perfection. Heat about ½ inch of oil in a large skillet, wok, or Dutch oven over medium-high heat. To test if it’s ready, drop a tiny bit of the coating in; it should sizzle vigorously. Carefully add the chicken in a single layer, not crowding the pan (work in batches!). Fry for 3-4 minutes per side until deeply golden brown and cooked through. Transfer to a wire rack set over a baking sheet (this keeps them crispy better than paper towels!).
- Sauté the Veggies & Pineapple. While the chicken rests, drain all but 1 tablespoon of oil from the pan. Add the chopped peppers and pineapple. Sauté over medium-high heat for just 2-3 minutes. We want them softened but still brightly colored and crisp-tender.
- Whisk & Simmer the Sauce. Push the veggies to the side of the pan. In the empty space, pour in your sauce mixture (ketchup, vinegar, brown sugar, soy sauce, garlic powder). Give it a quick whisk right in the pan to combine with the veggie juices, then let it come to a gentle simmer.
- Thicken to a Glossy Dream. Give your cornstarch slurry a final stir (the starch settles quickly!) and pour it into the simmering sauce. Stir constantly! In about 1-2 minutes, you’ll watch the sauce transform from thin and watery to beautifully glossy and thick enough to coat the back of a spoon.
- The Grand Finale: Toss It All Together! Reduce the heat to low. Add all of your glorious crispy chicken back into the pan. Using a gentle folding motion, toss until every single piece is luxuriously coated in that shiny sauce. Be quick and confident—this keeps the chicken crisp!
How to Serve Your Masterpiece
Presentation is part of the fun! Fluff up a big bed of steamed white or brown rice in a shallow bowl. Spoon that gorgeous, saucy chicken and veggie mixture right over the top. Make sure to get all that extra sauce! Finish with a sprinkle of thinly sliced green onions and a pinch of sesame seeds. The contrast of the white rice, colorful peppers, glossy chicken, and green garnish is pure joy. Serve immediately with chopsticks or a fork—no judgments here!
Make It Your Own: Delicious Twists
- Go Vegetarian: Swap the chicken for extra-firm tofu (pressed and cubed) or cauliflower florets. Use the same cornstarch-egg method for incredible crispiness!
- Spicy Kick: Add 1-2 teaspoons of sriracha or a few dried red chili flakes to the sauce mixture for a sweet-and-spicy version.
- Different Protein: Shrimp or pork tenderloin (cut into pieces) work wonderfully with this same method.
- Extra Veggie-Packed: Toss in some broccoli florets, sliced onions, or snap peas with the peppers for more garden goodness.
- Baked Option (For Less Oil): For a lighter version, place the breaded chicken on a parchment-lined baking sheet, spray generously with oil, and bake at 425°F for 15-20 mins, flipping halfway. Toss with the sauce as directed.
Anna’s Kitchen Notes & Stories
This recipe has been on quite a journey with me! The biggest game-changer was switching to a cornstarch-only dry coat (no flour blend) and using the egg wash. It gives that authentic, delicate crunch. I’ve also learned that the sauce thickens perfectly every time if you just let the slurry hit a simmer—no need to boil it violently.
A funny story: I once was filming this recipe and got so excited talking to the camera that I added the cornstarch directly to the sauce without making a slurry first. Let’s just say we had a very lumpy, very “artsy” close-up shot that day. Always mix your slurry in a separate bowl! Now, this recipe is a staple for my busy family nights and my go-to for potlucks. It’s traveled from my mall-food-court dreams to my dinner table, and I love that it can do the same for you.
Your Questions, Answered!
Q: My chicken got soggy after I added the sauce. How do I prevent that?
A: The key is timing and temperature! Make sure your sauce is thickened and ready before you add the chicken back in. Then, toss everything together over low heat just until coated—immediately remove it from the pan and serve. The longer it sits in the hot sauce, the soggier it gets. Also, using a wire rack to cool the fried chicken lets steam escape, keeping it crispier longer.
Q: Can I make this ahead of time?
A> You can prep the components! Cut the chicken and veggies, and mix the sauce ingredients (store separately in the fridge). I don’t recommend frying the chicken ahead, as it loses its perfect crisp. For best results, fry and sauce just before serving. If you have leftovers, they’ll still taste great, though the coating will soften.
Q: My sauce didn’t thicken. What did I do wrong?
A> Two likely culprits: 1) The sauce wasn’t at a simmer when you added the slurry. It needs that heat to activate the cornstarch. 2) The cornstarch slurry was old or not mixed well enough. Always give it a final stir right before pouring. If your sauce is thin, just mix another 1 tsp cornstarch with 1 tbsp water and stir it in, letting it simmer for another minute.
Q: Is there a way to make this gluten-free?
A> Absolutely! Just ensure your soy sauce is swapped for tamari or a certified gluten-free soy sauce. All other ingredients (cornstarch, etc.) are naturally gluten-free. You’ve got a perfect GF meal!
Nutritional Information*
*This is an estimate per serving (1 of 4 servings, including a standard portion of white rice) and will vary based on specific ingredients and oil absorption.
- Calories: ~480
- Protein: 28g
- Carbohydrates: 35g
- Fat: 24g
- Sugar: 18g
- Fiber: 2g
- Sodium: 720mg
Prep Time: 15 mins | Cook Time: 25 mins | Total Time: 40 mins | Servings: 4
Final Thoughts: Better Than Takeout (and Made with Love)
There’s just something so satisfying about recreating a favorite takeout dish at home and realizing… wow, I actually like this version even more. This sweet and sour chicken is crispy, saucy, a little nostalgic, and full of that fresh, homemade magic you just can’t get from a cardboard box.
I love that it feels special enough for a Friday night treat but easy enough for a random Tuesday when you’re tired and hungry and need a win in the kitchen. It’s the kind of recipe that builds confidence—the kind that makes you stand back from the stove, take a bite, and think, Okay… I’ve still got it.
Whether you’re cooking for your family, sharing it with friends, or sneaking extra pieces straight from the pan (no judgment here), I hope this dish brings a little joy, a little crunch, and a lot of smiles to your table.
From my kitchen to yours—may your chicken stay crispy, your sauce stay glossy, and your takeout menus collect a little dust. 💛🍍🍗