Let’s Make Some Bunny Tails!
Hi friend! Anna here. Can we talk about Easter treats for a second? I’m all for the fancy chocolate eggs and the intricately decorated cookies, but my heart—and my schedule—always goes back to the simple, joyful recipes that spark imagination and don’t require turning on the oven. That’s where these adorable Easter Bunny Coconut Tails come hopping in!
Imagine the softest, most pillowy coconut cloud, rolled into a sweet little ball and dusted with more fluffy coconut. Now imagine it in the softest pastel shades of spring: baby blue, blush pink, minty green, and sunny yellow. Are you smiling yet? These no-bake treats are pure, uncomplicated fun. They look like they tumbled right off the tail end of the Easter Bunny himself, and I promise you, they taste even better than they look.
This recipe is my love letter to busy parents, creative kids, and anyone who believes food should be delightful. With just a handful of pantry staples and about 20 minutes of hands-on time, you can create a treat that’s perfect for Easter baskets, spring brunch tables, or a playful after-school snack. It’s less about perfect pastry skills and more about getting your hands a little sticky and making memories. So, are you ready to ditch the stress and cook up a little magic? Grab a bowl and let’s make something amazing—and almost too cute to eat—together.
The Spring My Kitchen Turned into a Pastel Workshop
PrintEaster Bunny Coconut Tails : No-Bake Coconut Treats Kids Love

These soft, pastel-colored coconut balls are the sweetest way to celebrate Easter! Made with just a few ingredients and no baking required, these fluffy treats look like little bunny tails and taste like creamy coconut clouds. Whether you’re making them for a party, Easter baskets, or just for fun, they’re a hit with kids and grown-ups alike.
- Prep Time: 20 minutes
- chill time: 1 hour
- Total Time: 1 hour 20 minutes
- Yield: 20–24 balls 1x
Ingredients
3 cups sweetened shredded coconut (plus extra for rolling)
1 can (14 oz) sweetened condensed milk
1 tsp vanilla extract
Food coloring (pastel shades like pink, blue, yellow, green)
Instructions
In a large bowl, mix coconut, sweetened condensed milk, and vanilla until well combined.
Divide the mixture into separate bowls and tint each portion with a different food coloring.
Chill for 15–20 minutes to make shaping easier.
Roll into balls (about 1 inch) and coat each one in extra shredded coconut.
Place on a tray and refrigerate until firm (about 1 hour).
Nutrition
- Calories: 100
- Fat: 5g
- Carbohydrates: 12g
- Protein: 1g
This recipe has a special place in my heart because it was born out of a minor kitchen disaster that turned into our favorite tradition. Years ago, my then-toddler niece was visiting for Easter weekend. I had grand plans for an elaborate bunny-shaped cake. You know the type—multiple layers, intricate frosting, the works. Let’s just say it did not go according to plan. The cake layers stuck to the pan, the frosting was a runny mess, and I was about ten minutes away from a full-blown “why did I think this was a good idea?” moment.
My niece, with her adorable, flour-dusted cheeks, looked up at me and said, “Aunt Anna, can we just make something fun?” Out of sheer desperation and a nearly empty pantry, I grabbed a bag of coconut and a can of sweetened condensed milk. We mixed, we divided the dough into little bowls, and we used every drop of pastel food coloring I had. As we rolled them into balls, she started giggling. “They look like fluffy bunny butts!” she declared. We spent the next hour laughing, creating a whole family of pastel “bunny tails,” and the stress of the failed cake just melted away. Now, we make them every single year. It’s not Easter in our house without a platter of these colorful coconut clouds and the memory of that messy, perfect afternoon.
What You’ll Need: Simple Magic Makers
Here’s the beautiful part: these treats come together with just a few simple ingredients. Each one plays a key role in creating that perfect, melt-in-your-mouth texture and sweet flavor. Let’s break it down!
- 3 cups sweetened shredded coconut, plus 1 extra cup for rolling: This is the star of the show! The finely shredded texture gives our “tails” their signature fluff. I use sweetened here because it balances perfectly with the condensed milk. Chef’s Insight: For a deeper flavor, you can toast ½ cup of the “rolling” coconut in a dry pan until golden and mix it with the untoasted coconut for coating. It adds a wonderful nutty note!
- 1 can (14 oz) sweetened condensed milk: This is our magic binder and sweetener all in one. It gives the mixture its irresistible creaminess and holds everything together. Make sure it’s full-fat for the best texture—this is not the time for the skim version.
- 1 teaspoon pure vanilla extract: A splash of vanilla rounds out the sweetness and adds a warm, comforting background note. If you have it, vanilla bean paste would be gorgeous here for those little specks.
- Gel-based food coloring in pastel shades (pink, blue, yellow, green): I strongly recommend gel food coloring over liquid. The gels are more concentrated, so you need less, and they won’t make your coconut mixture wet or runny. You can find them in the baking aisle of most craft or grocery stores.
Let’s Make Some Magic: Step-by-Step
Ready? This is the fun part. Put on some happy music, clear a space on your counter, and let’s get rolling—literally!
- Mix the Base: In a large mixing bowl, combine the 3 cups of shredded coconut, the entire can of sweetened condensed milk, and the vanilla extract. Use a sturdy silicone spatula or spoon to mix it all together. You’re looking for a homogeneous, sticky, and wonderfully fragrant mixture. Chef’s Hack: If the mixture feels too wet or loose to handle (this can happen in very humid climates), let it sit for 5-10 minutes. The coconut will drink up some of the milk and make it easier to work with.
- Divide and Color: This is where the party starts! Divide the coconut mixture evenly into separate small bowls—one for each color you want to make. I usually do four, but three works great too. Using a toothpick, add a tiny dab of gel food coloring to each bowl. Start small! You can always add more. Use a fork or clean hands to mix the color thoroughly until you achieve lovely, even pastel hues. Pro Tip: Wear food-safe gloves if you want to avoid colorful fingertips for the rest of the day. Trust me on this one.
- The Chill Factor: Pop all the bowls into the refrigerator for 15-20 minutes. This short chill is a game-changer! It firms up the mixture just enough to make rolling a breeze, preventing sticky fingers and misshapen balls.
- Roll and Coat: Take your chilled mixtures out. Pour your extra cup of shredded coconut into a shallow dish or plate. Now, scoop up about a tablespoon of one color and roll it between your palms to form a smooth, round ball, about 1 inch in diameter. Immediately roll it in the reserved shredded coconut, pressing gently so the coating sticks on all sides. Repeat with all the mixtures. Fun Idea: Get the kids involved here! This is the perfect job for little hands.
- Set and Serve: Place your finished bunny tails on a baking sheet or plate lined with parchment paper. Once they’re all rolled, refrigerate them again for at least 1 hour to set completely. This allows them to firm up into the perfect, bite-sized treat. They can be stored in an airtight container in the fridge for up to 5 days.
How to Serve Your Adorable Creations
Presentation is half the fun! I love piling these pastel puffs high on a pretty cake stand or a rustic wooden board. For Easter baskets, nestle them in a bit of colorful crinkle paper or tissue paper—they’ll be the surprise hit among the chocolate eggs. They’re also fantastic as a sweet little dessert on individual plates after a spring lunch, maybe with a few fresh berries on the side. However you serve them, they’re guaranteed to bring smiles.
Mix It Up! Fun Recipe Twists
Feel like playing? Here are a few ways to customize your bunny tails:
- Chocolate-Dipped Dreams: After they’re set, dip half of each ball in melted white, dark, or pastel melting chocolates. Let them harden on parchment paper.
- Flavor Infusion: Add ½ teaspoon of citrus zest (lemon, lime, or orange) to the mixture along with the vanilla for a bright, springy twist.
- “Carrot Patch” Tails: Make all the tails a light orange color and roll them in crushed-up vanilla wafer cookies or graham crackers to look like they’re covered in “dirt.”
- Almond Joy Vibe: Add ½ cup of finely chopped almonds to the base mixture and use toasted coconut for rolling.
- Dairy-Free/ Vegan: Use a vegan sweetened condensed coconut milk (you can find it online or in well-stocked stores) and ensure your coconut is dairy-free.
Anna’s Chef’s Notes
This recipe has evolved from that first messy batch in the best way. I’ve learned that the quality of your coconut makes a difference—fresh, soft shredded coconut works better than a bag that’s been in the pantry for a year. Also, if you’re a texture person, try the toasted coconut coating trick I mentioned; it’s a revelation!
A funny kitchen story? One year, I was so focused on getting the perfect pastel colors that I didn’t notice my dog, Biscuit, quietly pulling an entire bowl of the uncolored mixture onto the floor for a feast. Let’s just say he had a very sweet, and very coconut-filled, afternoon. Now I keep all bowls safely out of reach of sneaky pups (and helpful kids) until we’re ready to roll!
Your Questions, Answered!
Q: My mixture is too wet and sticky to roll. What do I do?
A: No worries! This usually means the coconut needs a minute to absorb the milk, or your kitchen is a bit warm. First, let the whole mixture sit for 10-15 minutes. If it’s still too sticky, you can add a little more shredded coconut, a tablespoon at a time, until it’s manageable. Chilling is also your best friend here—don’t skip that step!
Q: Can I make these ahead of time?
A: Absolutely! They are the perfect make-ahead treat. Store them in a single layer (or layered with parchment paper) in an airtight container in the refrigerator for up to 5 days. They might soften a tiny bit but will still be delicious.
Q: I don’t have gel food coloring. Can I use liquid?
A: You can, but use it very sparingly—just a drop or two per bowl. Liquid coloring can make the mixture wet. If you do use it and the mixture becomes too wet, just add a touch more shredded coconut to balance it out.
Q: Are these freezer-friendly?
A> Yes! Once they are fully set, you can freeze them in a single layer on a baking sheet, then transfer to a freezer bag or container. They’ll keep for about a month. Thaw in the fridge overnight before serving.
Nutritional Info (Approximate, per ball)
Calories: 100 | Protein: 1g | Fat: 5g | Carbohydrates: 12g
Please note: This is an estimate based on the ingredients used. For precise dietary calculations, use your preferred nutritional calculator with the exact brands and quantities you use.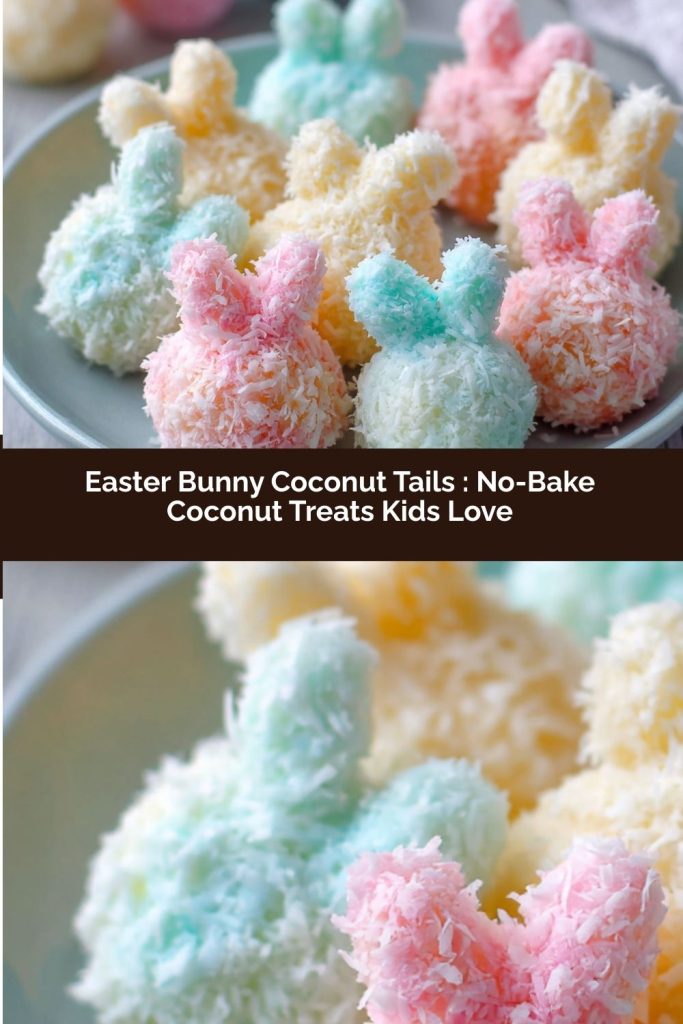
Making these little bunny tails always reminds me that the sweetest moments in the kitchen aren’t about perfection—they’re about laughter, sticky fingers, and sneaking a taste before the tray ever makes it to the table.
Whether you’re tucking these into Easter baskets, setting them out for brunch, or making them just because a spring afternoon feels like it needs something soft and sweet, I hope they bring a little extra joy into your home. Simple ingredients, gentle colors, and a whole lot of heart—that’s my favorite kind of holiday magic.
If you make them, I’d love to know how they turn out in your kitchen. And don’t be surprised if they disappear faster than the Easter eggs. Some treats are just too cute (and too cozy) to last long. 💛🐰