
Hey there, friend! Is there anything more delightful than the buzz of excitement in the kitchen before a holiday? The promise of sweet treats, the laughter of little helpers, and the sheer joy of creating something delicious together. If you’re looking for a dessert that’s guaranteed to spark that magic this Easter, you’ve come to the right place. Forget the fussy baking and the complicated decorating – today, we’re making memories (and a little mess!) with the most playful, adorable treat around: Easter Bunny Dirt Cups.
These aren’t just cups of pudding, oh no. They’re a tiny, edible spring garden. Layers of rich, creamy chocolate “mud,” crumbly chocolate cookie “dirt,” and a fluffy cloud of whipped topping, all crowned with a snoozing marshmallow bunny and a clutch of pastel candy eggs. It’s a dessert that tells a story, and the best part? It comes together in minutes with zero baking required. Whether you’re prepping for a big Easter brunch, a classroom party, or just a fun afternoon activity with your favorite mini chefs, this recipe is your secret weapon for smiles. So, tie on those aprons, call the kids over, and let’s dig into some seriously fun, no-bake magic.
The Day We Planted a Candy Garden
PrintEaster Bunny Dirt Cups : Fun No-Bake Easter Dessert for Kids

- Prep Time: 15 minutes
- chill time: 20–30 minutes
- Total Time: About 40 minutes
- Yield: 6–8 cups 1x
Ingredients
1 package (3.9 oz) instant chocolate pudding mix
2 cups cold milk
1 ½ cups crushed chocolate sandwich cookies
1 cup whipped topping
½ cup pastel mini chocolate eggs
6–8 marshmallow bunny candies (or bunny Peeps)
Easter sprinkles (optional)
Instructions
In a bowl, whisk together chocolate pudding mix and cold milk for 2 minutes. Let thicken for 5 minutes.
Spoon a layer of pudding into the bottom of clear cups.
Add a layer of crushed chocolate cookies to create the “dirt.”
Repeat layers until cups are filled, finishing with cookie crumbs on top.
Pipe or spoon a dollop of whipped topping in the center.
Decorate with marshmallow bunny candies and pastel mini eggs.
Nutrition
- Calories: 260 calories per cup
This recipe takes me right back to my grandma’s linoleum-floored kitchen, sunlight streaming through the curtain sheers. I was about six, my hands already smudged with chocolate from “helping” with something else. My mom, in a stroke of genius to keep me occupied, handed me a plastic cup, a packet of instant pudding, and a mallet wrapped in a towel. “We’re making dirt,” she whispered, like it was our delicious secret.
I remember the profound, silly joy of violently (but safely!) smashing those cookies into a million pieces. She let me layer the pudding and “dirt” with a soupspoon, making a glorious, lopsided mess. Then, from her apron pocket, she produced a tiny, fluffy marshmallow chick. “Look,” she said, nestling it into the whipped cream. “He’s resting in the garden after finding all his eggs.” In that moment, it wasn’t just a cup of pudding; it was a masterpiece, a story, a memory cemented in chocolate and sprinkles. That’s the spirit I want to bring to your kitchen today. It’s not about perfection; it’s about the joy of creating something whimsical together.
Gathering Your Garden Supplies
Here’s everything you’ll need to whip up your own edible Easter patch. The beauty of this recipe is in its simplicity and flexibility – I’ve included my favorite chef-y notes and swaps so you can make it your own!
- 1 package (3.9 oz) instant chocolate pudding mix: This is our “mud” base! Instant pudding is the MVP here for its no-cook convenience and perfect texture. For a darker, richer “dirt,” use a dark chocolate variety. Chef’s Insight: Don’t be tempted to use “cook-and-serve” pudding; it won’t set properly without heating.
- 2 cups cold milk: The colder the milk, the quicker and firmer your pudding will set. Whole milk gives you the creamiest, most luxurious result, but 2% works beautifully too.
- 1 ½ cups crushed chocolate sandwich cookies: The classic “dirt” component! I use regular Oreos, cream filling and all – it adds a lovely extra bit of sweetness and texture. Pro Tip: Toss them in a zip-top bag and let the kids (or you!) go to town with a rolling pin. It’s the best part!
- 1 cup whipped topping (like Cool Whip), thawed: Our fluffy “cloud” or “snow” for the bunnies to rest on. It’s stable and sweet. For a from-scratch feel, you can use an equal amount of freshly whipped heavy cream sweetened with a tablespoon of powdered sugar.
- ½ cup pastel mini chocolate eggs: The robin’s eggs candies are iconic here! They add that essential pop of Easter color and a little chocolate crunch. Substitution Tip: No mini eggs? M&M’s, jelly beans, or even chopped up chocolate bunnies work perfectly.
- 6–8 marshmallow bunny candies or bunny Peeps: The star of the show! Peeps are festive and fun, but any marshmallow bunny candy will do. You can even make your own with large marshmallows and a little creative snipping.
- Easter sprinkles (optional but highly encouraged): A pinch of pastel sprinkles or sanding sugar over the whipped cream adds a final touch of magic and makes everything look extra festive.
Let’s Build Our Edible Easter Garden!
Ready? This is where the fun really begins. I’ll walk you through each step with my favorite kitchen hacks to ensure your dirt cups are not only adorable but absolutely delicious.
- Make the Chocolate Mud: In a medium mixing bowl, vigorously whisk together the instant chocolate pudding mix and the cold milk for a full 2 minutes. I set a timer because it makes a difference! You want it to be well-blended and starting to thicken already. Once whisked, let it sit on the counter to set for about 5 minutes. Chef’s Hack: While it sets, prep your other ingredients. This little rest allows the pudding to firm up just enough so your layers stay distinct and don’t bleed together.
- Create Your Crumbly Dirt: While the pudding sets, place your chocolate sandwich cookies in a sturdy zip-top bag. Seal it tightly, removing as much air as possible. Now, grab a rolling pin, a heavy saucepan, or even a can of beans and gently crush them! You’re aiming for a mix of fine crumbs and a few pea-sized pieces for authentic “dirt” texture. Pour them into a shallow bowl for easy access. Fun Tip: This is the absolute best step to delegate to eager little helpers (just double-bag the bag for safety!).
- Start Layering: Grab 6-8 clear cups, mason jars, or even clear plastic party cups. Clear is key here – you want to see those beautiful layers! Spoon a generous layer of the set pudding into the bottom of each cup, about 1-2 tablespoons. Gently tap the cup on the counter to settle it.
- Add the First Dirt Layer: Sprinkle a thick layer of your crushed cookies over the pudding. Don’t be shy! Press down ever so gently with the back of a spoon to create a solid dirt layer. This prevents the next pudding layer from sinking through.
- Repeat & Top It Off: Add another layer of pudding, then another final, generous layer of cookie crumbs. This top layer is your “soil,” so make it nice and thick. I like to leave a little well in the center for our whipped cream cloud. Repeat until all your cups are lovingly assembled.
- Create a Fluffy Cloud: Give your thawed whipped topping a quick fluff with a spoon. Using a spoon, a piping bag, or even a small cookie scoop, place a generous dollop right in the center of each dirt cup. This is the bunny’s fluffy resting spot.
- Decorate with Joy! This is the masterpiece moment. Tuck a marshmallow bunny into the whipped cream. Scatter a few pastel mini eggs around it like it just finished an egg hunt. For a final touch of sparkle, add a pinch of Easter sprinkles over everything. Chef’s Encouragement: Let your creativity run wild! Maybe add a few green sprinkle “blades of grass” or a jelly bean “carrot.”
- The Final Chill: Pop your completed bunny dirt cups into the refrigerator for at least 20-30 minutes before serving. This chill time lets the flavors meld and makes the dessert perfectly cool and refreshing. They can be made up to a day ahead, just add the bunnies and whipped topping right before serving to keep them from getting soggy.
Presenting Your Masterpiece
Presentation is half the fun! Place each cup on a small napkin or a decorative plate. For a real “garden party” vibe, set them on a tray lined with green Easter grass or a simple white dish towel. I love serving these with a small, cute spoon – it makes the whole experience feel even more special. Watch as your guests’ faces light up when they see these adorable edible gardens!
Make It Your Own: Fun Twists & Swaps
- Cookies & Cream: Use vanilla pudding and crushed golden Oreos for a “blonde dirt” version. Top with a white chocolate bunny!
- Berry Patch: Swap the chocolate pudding for cheesecake-flavor instant pudding. Use crushed graham crackers for the dirt, and top with fresh raspberries and a blueberry “bunny” made from fondant.
- Dairy-Free Delight: Use your favorite dairy-free milk (oat or almond work great) and a dairy-free whipped topping. Ensure your cookies and candies are dairy-free/vegan-friendly.
- Grown-Up Garden: Add a tablespoon of coffee liqueur or Irish cream to the pudding mix for a sophisticated kick. So good!
- Bird’s Nest Cups: Use chocolate pudding, but form the final whipped cream topping into a nest shape using a fork. Fill with a cluster of candy eggs and skip the bunny for a sweet bird’s nest treat.
Anna’s Kitchen Notes
This recipe has been a staple in my family’s Easter tradition for years, and it’s evolved in the silliest ways. One year, my nephew decided every bunny needed a “carrot,” so we started adding a single orange sprinkle or a sliver of a dried apricot. Another year, we made a giant “dirt cake” in a flowerpot for the center of the table! The point is, make it yours. Over time, I’ve found that using slightly cooler pudding makes for cleaner layers, and a gentle hand when pressing the crumbs is the secret to a picture-perfect cross-section. But honestly? The best version is always the one made with giggles and slightly sticky fingers. Don’t stress over perfection; embrace the playful, messy joy of it.
Your Questions, Answered!
Q: Can I make these ahead of time?
A: Absolutely! You can assemble the pudding and cookie layers in the cups, cover tightly, and refrigerate for up to 24 hours. Add the whipped topping, bunnies, and candies right before serving to keep everything from getting soggy or the colors from bleeding.
Q: My pudding is runny! What happened?
A> Two likely culprits: 1) The milk wasn’t cold enough, or 2) It wasn’t whisked for the full 2 minutes. Instant pudding needs that initial agitation with cold liquid to activate the thickeners properly. If it’s too runny, just pop the whole cup (before decorating) into the fridge for an extra 15-20 minutes; it should firm up.
Q: Do I have to use the marshmallow bunnies?
A: Not at all! Get creative. You can use a small chocolate bunny, a bunny-shaped cookie, or even pipe a little bunny face with frosting on the whipped cream. The decoration is your canvas!
Q: What can I use instead of whipped topping?
A> Freshly whipped cream is a fantastic substitute. Just whip ½ cup of heavy cream with 1 tbsp of powdered sugar and ½ tsp of vanilla until stiff peaks form. It’s a bit less stable for making super far ahead, but the flavor is divine.
Nutritional Info (Approximate, per serving)
Yield: 8 cups | Serving Size: 1 cup
Calories: ~260 | Total Fat: 10g | Saturated Fat: 5g | Cholesterol: 5mg | Sodium: 280mg | Total Carbohydrates: 40g | Dietary Fiber: 1g | Sugars: 30g | Protein: 4g
*Nutrition information is an estimate based on standard ingredients and will vary with specific brands and modifications.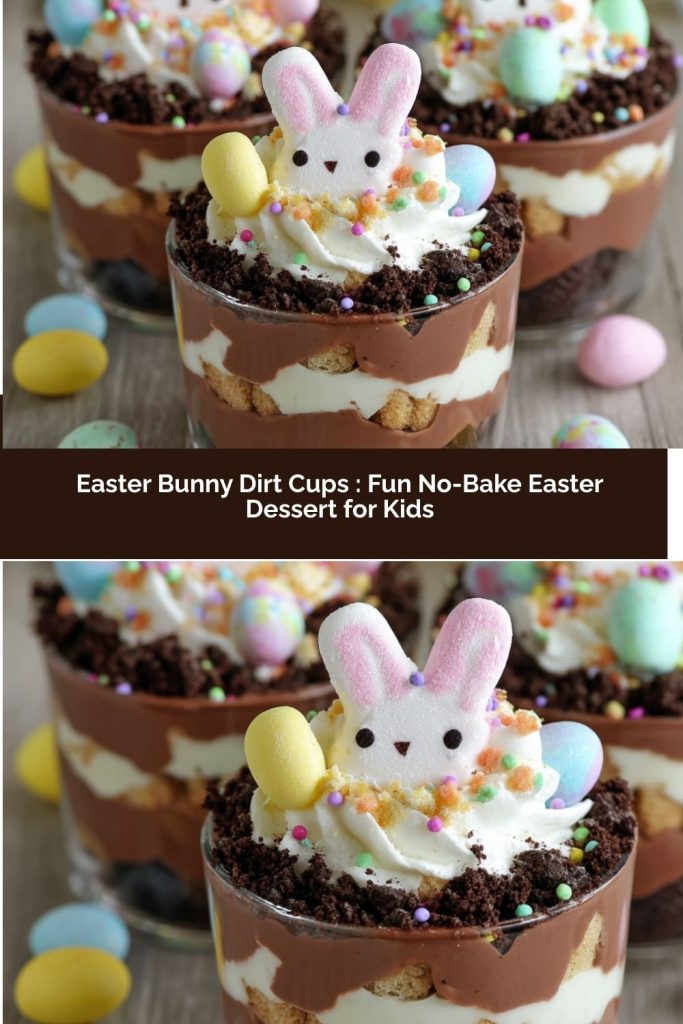
Final Thoughts: Little Cups, Big Easter Joy
At the end of the day, Easter Bunny Dirt Cups aren’t really about pudding or cookies—they’re about laughter echoing through the kitchen, tiny hands sneaking extra candy eggs, and the kind of memories that stick long after the last spoonful is gone. They’re playful, forgiving, and delightfully imperfect, which makes them exactly the kind of treat holidays are meant for.
So don’t worry about perfect layers or Pinterest-worthy bunnies. Let the cups be a little messy. Let the kids decorate with abandon. Let yourself enjoy how easy it feels to create something that brings instant smiles. Whether you’re serving these at a big Easter gathering or making a small batch just for fun, I hope these sweet little gardens bring joy, nostalgia, and a whole lot of chocolatey happiness to your table.
After all, the best holiday desserts aren’t just eaten—they’re remembered. 🐰🌸🍫