Your New Favorite Dessert: The Ultimate No Bake Peanut Butter Pie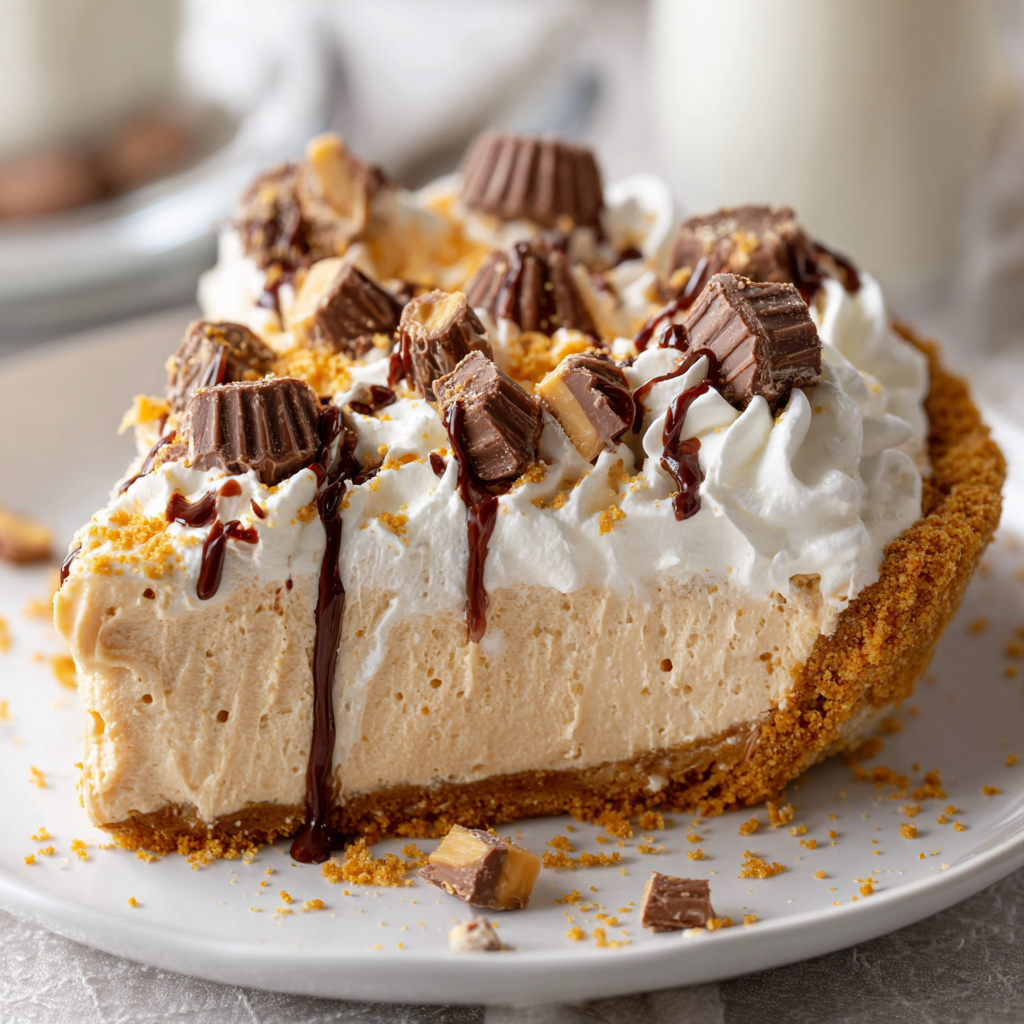
Hey there, friend! Let’s talk about one of life’s most beautiful truths: sometimes, the best things don’t require any heat at all. I’m talking about that magical category of desserts that come together with a little mixing, a little chilling, and a whole lot of love. And right at the top of that list? This outrageously creamy, dreamy, and downright irresistible No Bake Peanut Butter Pie.
If your idea of a perfect dessert involves a silky-smooth filling that tastes like a cloud of peanut butter bliss, a buttery crumb crust that gives you the perfect textural contrast, and the sheer joy of knowing you didn’t have to turn on the oven, then you are in the absolute right place. This pie is your secret weapon for last-minute potlucks, your saving grace on a hot summer day, and your guaranteed crowd-pleaser for every holiday table from here to eternity.
I promise you, this isn’t just a recipe; it’s a hug in pie form. It’s for the days you want to feel like a kitchen wizard without any of the fuss. So, take a deep breath, forget about complicated techniques, and let’s make something amazing together. Trust me, after one bite of this peanut butter pie, you’ll understand why it has a permanent spot in my recipe hall of fame.
A Slice of Nostalgia: My Grandma’s “Secret” Recipe
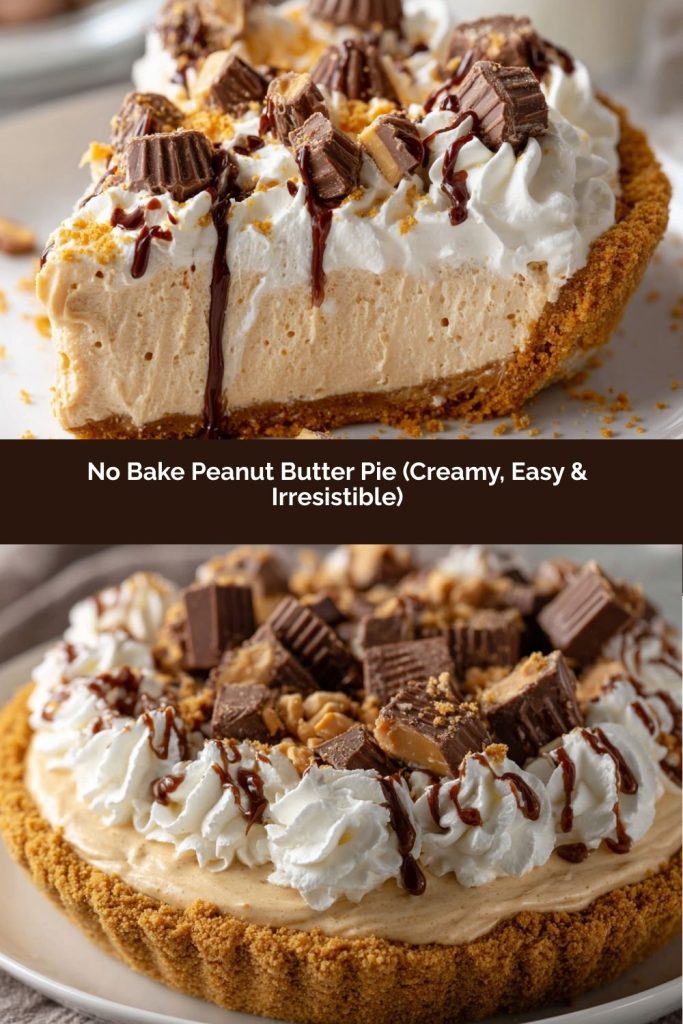
PrintNo Bake Peanut Butter Pie (Creamy, Easy & Irresistible)

Rich, creamy, and completely irresistible, this No Bake Peanut Butter Pie is the ultimate easy dessert. With a buttery cookie crust and a smooth peanut butter filling, it comes together in minutes—no oven required. Perfect for holidays, potlucks, or when you need a quick sweet treat that always impresses.
- Prep Time: 15 minutes
- chill time: 4 hours
- Total Time: 4 hours 15 minutes
- Yield: 8–10 slices 1x
Ingredients
1 (9-inch) prepared graham cracker crust
1 cup creamy peanut butter
8 oz cream cheese, softened
1 cup powdered sugar
1 tsp vanilla extract
1 1/2 cups whipped topping (or freshly whipped cream)
Optional Toppings:
Chocolate syrup or ganache
Chopped peanut butter cups
Crushed peanuts
Extra whipped cream
Instructions
Mix filling: In a large bowl, beat cream cheese and peanut butter until smooth and creamy.
Sweeten: Add powdered sugar and vanilla. Beat until fully combined.
Fold: Gently fold in whipped topping until light and fluffy.
Fill crust: Spoon mixture into graham cracker crust and smooth the top.
Chill: Refrigerate at least 4 hours (or overnight) until firm.
Decorate & serve: Add toppings just before serving. Slice and enjoy.
Nutrition
- Calories: 420–520 kcal
- Carbohydrates: 35–45g
- Protein: 8–10g
This pie always takes me right back to my Grandma Lila’s linoleum-floored kitchen. She wasn’t a fancy baker—her specialty was “keeping hungry people happy.” And her no-bake peanut butter pie was legendary. She’d whip it up for every family gathering, church supper, or just because it was Tuesday.
I remember standing on a step stool, “helping” by licking the beaters clean of that rich peanut butter filling. She’d always wink and say the real “secret” was using the peanut butter from the giant economical jar, not the fancy kind. “The best food,” she’d say, wiping her hands on her flower-print apron, “is the kind that makes you smile without making a mess of your kitchen.” That was her philosophy in a nutshell (or a pie shell!). This recipe is my homage to hers—slightly tweaked and perfected over years, but still carrying that same soul-satisfying, no-fuss spirit. Every time I make it, I can almost smell her perfume and hear her laugh. That’s the power of a great recipe; it feeds more than just your stomach.
Gathering Your Ingredients: A Peanut Butter Lover’s Dream Team
Here’s the beautiful part: you probably have most of this in your pantry right now! Let’s break down what you need and why each ingredient is a star player. I’ve also got some easy swaps in case you need them.
- 1 (9-inch) prepared graham cracker crust: Our foundation! The sweet, slightly cinnamony crunch is the perfect partner for the creamy filling. Chef’s Insight: Feel free to use a chocolate cookie crust for a Reese’s Cup vibe, or get adventurous with a pretzel crust for sweet-and-salaty perfection!
- 1 cup creamy peanut butter: The heart and soul of the pie. Chef’s Insight: Use a standard, no-stir creamy peanut butter for the best consistency and sweetness. The natural, oily kinds can make the filling separate. This is your moment to use the classic stuff!
- 8 oz cream cheese, softened: Our secret weapon for structure and a lovely tang that balances the sweetness. Pro Tip: Truly softened cream cheese is non-negotiable. Leave it on the counter for a good hour before you start. This prevents lumpy filling and makes blending a dream.
- 1 cup powdered sugar: It sweetens and, because it dissolves instantly, keeps our filling silky smooth. Substitution Tip: You can slightly reduce this to 3/4 cup if you prefer a less sweet pie, especially if using sweetened peanut butter.
- 1 tsp vanilla extract: The flavor enhancer. It rounds out all the other ingredients and adds a whisper of warmth. Chef’s Insight: A splash of almond extract is also delicious here if you’re feeling fancy!
- 1 1/2 cups whipped topping (like Cool Whip), thawed: This is what gives our pie its magical, cloud-like lift. Substitution Tip: You can absolutely use an equal amount of freshly whipped heavy cream (whipped with a tablespoon of sugar until stiff peaks form). It’s divine!
Optional Toppings (Go Wild!):
- Chocolate syrup or ganache
- Chopped peanut butter cups
- Crushed peanuts
- Extra whipped cream
- A drizzle of caramel sauce
- Flaky sea salt
Let’s Make Magic: Step-by-Step Instructions
Ready? This is the fun part. Put on some good music, grab your favorite mixing bowl, and let’s create something wonderful.
- The Prep Work: First things first, get that cream cheese out of the fridge and let it get nice and soft on the counter. This is the single most important step for a lump-free pie! While you wait, measure out all your other ingredients. Having everything ready to go (mise en place, as we say in the biz) makes the process feel like a breezy TV cooking show.
- Mix the Filling Base: In a large mixing bowl, combine the softened cream cheese and the creamy peanut butter. Using a hand mixer or a stand mixer fitted with the paddle attachment, beat them together on medium speed for 1-2 minutes. Stop and scrape down the sides of the bowl with a spatula. We want this to be perfectly smooth and completely lump-free. You should see the two become one beautifully creamy, pale tan mixture. Chef’s Hack: If you forgot to soften the cream cheese, you can cut it into chunks and microwave it for 15-second bursts until it’s pliable, but be careful not to melt it!
- Sweeten It Up: Add the powdered sugar and vanilla extract to the peanut butter mixture. Start mixing on low speed so the powdered sugar doesn’t fly into a sweet cloud all over your kitchen (been there!). Once it’s incorporated, bump the speed up to medium and beat for another minute until everything is fully combined and smooth. Give the bowl another good scrape down.
- The Fluffy Finale: Now, here’s where we get that dreamy texture. If using a mixer, switch to the whisk attachment or a sturdy spatula. Add about one-third of the whipped topping (or fresh whipped cream) to the bowl. Fold it in gently. Folding means using a spatula to cut down through the center, scoop along the bottom, and fold over the top. Turn the bowl a quarter turn and repeat. We’re being gentle to keep all that air in the whipped topping. Once that first bit is incorporated, add the rest and fold until no white streaks remain. The mixture will be light, fluffy, and absolutely heavenly.
- Fill & Smooth: Spoon this glorious filling into your waiting graham cracker crust. Use your spatula or an offset icing spatula to smooth the top into beautiful, swoopy peaks or a perfectly flat surface—your choice! This is your canvas.
- The Patience Part (The Hardest Step!): Carefully transfer the pie to your refrigerator. It needs to chill, uncovered, for at least 4 hours, but overnight is truly best. This chilling time is what allows the pie to set up so you can get those perfect, clean slices. It gives the flavors time to marry and become something greater than the sum of their parts.
- Decorate & Devour: Once your pie is firmly set, it’s showtime! Add your toppings just before serving. A drizzle of chocolate, a sprinkle of peanuts, a few peanut butter cup pieces… make it your own. Use a sharp knife, dipped in hot water and wiped dry between cuts, to get beautiful, clean slices.
Serving Your Masterpiece
Presentation is part of the fun! I love serving this pie on a simple cake stand or a colorful plate. A little extra whipped cream rosette on each slice never hurts. For a dinner party, you can even pre-slice it and plate individual pieces, garnishing each with a mini peanut butter cup or a tiny sprinkle of crushed peanuts. It’s rich, so small slices are totally acceptable (but seconds are always encouraged!). A glass of cold milk, a cup of coffee, or even a dessert wine like a Muscat are all fantastic pairing partners.
Make It Your Own: Delicious Recipe Variations
- Chocolate Lover’s Twist: Use a chocolate cookie crust. After spreading the filling, top the whole pie with a layer of chocolate ganache before chilling.
- Nutty Buddy: Swap the creamy peanut butter for an equal amount of crunchy peanut butter for little bursts of texture in every bite.
- Cookie Dough Dream: Fold 1/2 cup of mini chocolate chips into the filling along with the whipped topping for a cookie dough pie experience.
- Lighter Option: Use reduced-fat cream cheese and light whipped topping. The result is still deliciously creamy!
- Allergy-Friendly: Use sunflower seed butter and a gluten-free crust for a nut-free version that’s just as tasty.
Anna’s Chef’s Notes & Kitchen Stories
This recipe has been on quite a journey with me! In my early blogging days, I once accidentally used *chunky* peanut butter when filming a video, realizing my mistake only when I heard the distinctive crunch on microphone. It turned out to be a happy accident—everyone loved the textural surprise! I also used to insist on making my own crust from scratch, but you know what? The prepared crust is fantastic and makes this a true 15-minute active time recipe. Never feel guilty about that shortcut.
Over the years, I’ve learned that this pie freezes remarkably well, too. Wrap it tightly and freeze for up to a month for a future treat. Just thaw in the fridge overnight. The filling might weep a tiny bit, but the flavor is still 100% there. This pie is a testament to my core belief: great food is about joy, connection, and flavor—not perfection or complexity.
Your Questions, Answered: FAQs & Troubleshooting
Q: My filling is lumpy! What did I do wrong?
A: This almost always traces back to the cream cheese not being soft enough. Make sure it’s truly at room temperature. If you have small lumps, you can try pressing the filling through a fine-mesh sieve—a bit of a hassle, but it works! For next time, just plan ahead for that softening time.
Q: Can I make this pie ahead of time?
A> Absolutely! In fact, I recommend it. Making it the day before you need it is ideal. The flavors deepen, and it sets up perfectly. Just add any fresh toppings (like whipped cream or chopped candy) right before serving.
Q: Why did my pie get watery or separate?
A> This can happen if you use a natural peanut butter that separates, or if the whipped topping wasn’t fully thawed and had ice crystals. Stick with conventional creamy peanut butter and ensure your whipped topping is completely thawed. Also, avoid over-mixing when folding in the whipped topping.
Q: I don’t have a hand mixer. Can I make this by hand?
A> You can, but it’s an arm workout! Ensure your cream cheese is *very* soft. Use a sturdy whisk and some serious elbow grease to beat the peanut butter and cream cheese together until completely smooth before adding the other ingredients. A silicone spatula is great for the folding step.
Nutritional Information*
Servings: 8-10 slices | Prep Time: 15 minutes | Chill Time: 4 hours | Total Time: 4 hours 15 minutes
*Estimated Nutrition Per Slice (based on 10 slices, using standard ingredients and including crust): Calories: 420-520kcal | Carbohydrates: 35-45g | Protein: 8-10g | Fat: 30-38g
Please note: This is an estimate generated from standard ingredients. For precise dietary calculations, use your specific brands with a nutrition calculator.
There’s just something magical about a dessert that delivers big, bakery-style flavor with almost zero effort—and this No Bake Peanut Butter Pie does exactly that.
It’s creamy, nostalgic, indulgent, and endlessly adaptable. Whether you’re making it for a summer cookout, a holiday gathering, a birthday surprise, or just because it’s Tuesday and you deserve something sweet, this pie shows up every single time. No oven. No stress. No complicated steps. Just pure peanut butter bliss.
What I love most about this recipe is how it brings people together. It’s the kind of dessert that sparks “Oh wow, who made this?” across the table. It’s the kind of slice that disappears faster than you expected. And it’s the kind of recipe you’ll memorize after making it twice—because you will make it again.
So keep this one in your back pocket. Make it your own with different crusts or toppings. Freeze one for later. Share it with someone you love. Or don’t share at all—I won’t judge.