# The Ultimate Tuna Melt Wrap: Your New Go-To Comfort Food
## Introduction
Hey there, foodies! 🥳 Are you ready to elevate your lunch game to a whole new level? Today, we're diving into a deliciously cozy world of flavors with my ultimate Tuna Melt Wrap recipe! Whether you’re a busy bee or just in the mood for something that feels like a warm hug, this wrap is here to save the day.
You might be thinking, “Tuna melts? Aren't they a bit retro?” Well, yes! But in the best way possible. They’re classic, they’re comforting, and they definitely deserve a spot in our culinary rotation. Plus, with a few simple twists, we’re turning this nostalgic dish into a wrap that’s portable, customizable, and oh-so-delicious!
Now, I’ll be honest with you — the first time I made a tuna melt, I was around eight years old, a little chef in training under my mom’s watchful eye. Picture this: It was a rainy Saturday afternoon, and we accidentally found ourselves at home with nothing but a couple of cans of tuna and some cheese. What’s a girl to do? We crafted these gooey, melty sandwiches that sparked joy across the entire family. Every bite reminded me of warmth, laughter, and the smell of something amazing wafting through the kitchen!
Fast-forward to today, and I’ve taken that cozy memory and transformed it into a fun, portable wrap. Not only is it packed with flavor, but it’s also simple enough for anyone to whip up. So, whether you’re preparing a quick lunch or treating yourself to a delightful dinner, this Tuna Melt Wrap will make your heart sing and your taste buds dance. Grab your apron, and let’s get cooking!
## Personal Story
One of my fondest memories of making tuna melts was an impromptu kitchen adventure with my mom. I could barely reach the countertop, but the thrill of playing chef made me feel like I was on top of the world! As we mixed the tuna with just the right amount of mayonnaise and spices, I remember the way her eyes sparkled with excitement. We took turns sampling the mixture, each taste sparking our imaginations about different flavor combinations.
After just a few minutes, those tuna melts were crispy on the outside and gooey on the inside — pure bliss! We would plate them and rush them to the dining table, where my dad and little brother eagerly awaited. The moment we took our first bites, we knew we had created something special together. Since then, every time I make a tuna melt, I’m not just cooking; I’m reliving that joyful afternoon and sharing it with the people I love.
## Ingredients
Here’s what you’ll need to create your own Tuna Melt Wrap:
- **1 can of tuna, drained**
This is the star of our show! Opt for high-quality tuna — chunk light or solid white will both work beautifully. If you’re feeling adventurous, try flavored tuna like lemon or garlic.
- **2 tablespoons mayonnaise**
For creaminess and binding! You can use regular, light, or even Greek yogurt as a healthier alternative to keep it just as delicious.
- **1 tablespoon mustard**
A little kick! Yellow, Dijon, or spicy brown mustard all offer a different flavor profiles that can change the wrap.
- **1/2 cup shredded cheese (cheddar or your choice)**
Because cheese makes everything better! Cheddar is classic, but feel free to experiment with pepper jack or mozzarella for a different twist.
- **1/4 cup diced celery**
For crunch! Celery adds a refreshing texture. If you’re not a fan, you can substitute with pickles or cucumber.
- **1/4 cup diced bell pepper**
Add some color and sweetness! Any color will do — red, yellow, or green all work well.
- **4 large tortillas**
Flour or whole wheat? Your choice! You could also switch things up with spinach or sun-dried tomato tortillas for some extra flavor.
- **Butter or oil for toasting**
This is essential for that golden crust we all love. You can use olive oil, butter, or even avocado oil.
- **Salt and pepper to taste**
For that extra punch! You can experiment with your favorite seasonings, like garlic powder or paprika, to make it your own.
## Step-by-Step Instructions
Now that we have all our ingredients ready, let’s jump into the kitchen and start creating this magical wrap!
### Step 1: Mix The Filling
In a medium bowl, combine your drained tuna, mayonnaise, mustard, shredded cheese, diced celery, and diced bell pepper. Use a fork to break up the tuna gently while mixing. Season generously with salt and pepper to taste. Here’s a little chef hack: if you prefer a creamier texture, add an extra spoonful of mayo or Greek yogurt.
### Step 2: Prepare the Tortillas
Lay your large tortillas flat on a clean surface or cutting board. If you’re using flour tortillas, consider warming them slightly in the microwave (about 10 seconds) — it makes them easier to work with and keeps them from cracking when we wrap them.
### Step 3: Assemble The Wraps
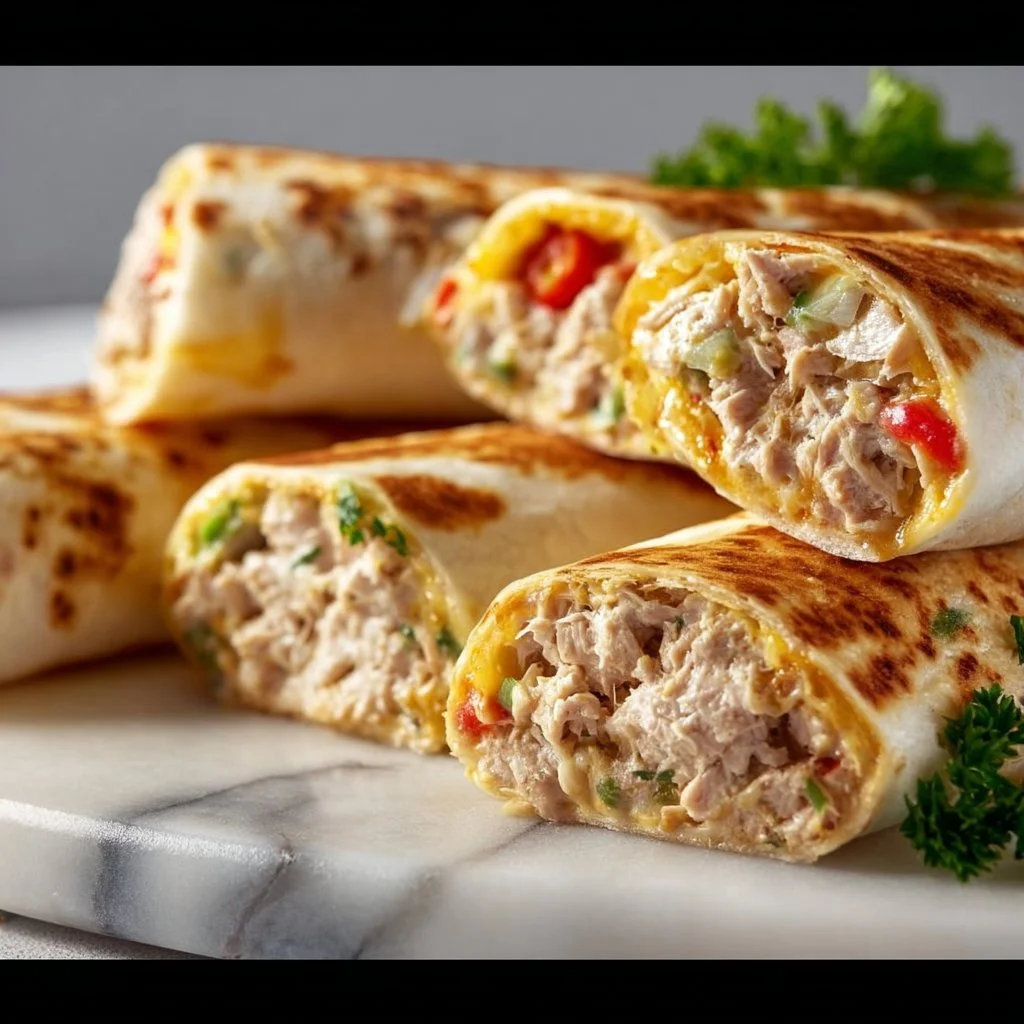
Divide the tuna mixture evenly among the tortillas. Leave about an inch around the edges for easy folding. Spread the mixture into a rectangle shape for easier rolling, ensuring you get that cheesy goodness in every bite.
### Step 4: Roll It Up!
Now, fold in the sides of the tortilla and then start rolling from the bottom up, all the while tucking in any filling that wants to escape. This is key! Make sure it’s tight but not too tight — we want our wraps to hold together without bursting.
### Step 5: Toast Those Wraps
Heat a non-stick skillet over medium heat and add a little butter or oil. Once it’s hot, place your rolled wraps in the pan seam-side down. Cook for about 3-4 minutes per side, until golden brown and crispy. This step is crucial for achieving that delightful crunch! If you want a little extra melty goodness, you can cover the pan with a lid for the last minute or two to help the cheese melt beautifully — trust me, it’s worth it!
### Step 6: Slice and Serve
Once toasted, remove the wraps from the skillet and let them cool for a minute. Use a sharp knife to slice each wrap in half diagonally. Serve warm with your favorite dipping sauce or enjoy them as is!
## Serving Suggestions
These Tuna Melt Wraps are super versatile! Serve them alongside a simple green salad for a balanced meal or pair them with a warm bowl of tomato soup for a classic vibe. You could even sprinkle a bit of fresh parsley or chives on top for that extra touch. I love adding a slice of avocado for a fresh twist!
## Recipe Variations
Feel free to get creative with your wraps! Here are some fun variations to mix things up:
1. **Spicy Tuna Melt**
Add some chopped jalapeños or a dash of hot sauce to the filling for a kick!
2. **Mediterranean Twist**
Swap out the celery and bell pepper for chopped olives and sun-dried tomatoes. Use feta cheese instead of cheddar.
3. **Veggie Loaded**
Add more veggies like shredded carrots, zucchini, or spinach for a health boost!
4. **Bacon Lover’s Tuna Melt**
Toss in some crumbled bacon to the filling for that smoky flavor.
5. **Gluten-Free Option**
Use gluten-free tortillas or lettuce leaves for a light, fresh wrap!
## Chef’s Notes
I’ve evolved this recipe over the years, adding my own touches and experimenting with flavors. One of my favorite kitchen stories is when I made these wraps for a casual family get-together, and my cousin, who claimed to "hate" tuna, devoured three of them and asked me for the recipe!
That moment reminded me that classic recipes like this one have the power to surprise and delight. Give it a try, and you might just change someone’s mind about tuna!
## FAQs and Troubleshooting
**1. Can I use canned tuna in oil instead of water?**
Absolutely! Just keep in mind that it might affect the flavor a bit, making it richer. Drain excess oil before mixing.
**2. What if my wraps aren’t crispy?**
Ensure your pan is sufficiently heated before adding the wraps, and don’t skimp on the butter or oil. If they feel too soft, just give them a few more minutes in the skillet!
**3. Can I prepare these wraps in advance?**
You can assemble the wraps, but I recommend toasting them fresh before serving. If you've made them ahead of time, store them in the fridge and toast them when you’re ready to eat!
**4. How can I store leftovers?**
Store any leftovers in an airtight container in the fridge for up to 2 days. They can also be reheated in the skillet, ensuring you get that crispy exterior!
## Nutritional Info
(Include if needed; otherwise, remove this section)
Estimated per serving (1 wrap):
- Calories: 320
- Protein: 21g
- Fat: 15g
- Carbohydrates: 28g
- Fiber: 2g
## Final Thoughts
There you have it, my delightful Tuna Melt Wrap! This simple yet scrumptious dish is bound to become a regular feature in your meal rotation. Remember, cooking is all about enjoyment, creativity, and making delicious memories.
So, gather your loved ones, roll up your sleeves, and whip up this wrap anytime you need a little comfort in your life. I can't wait to hear how your kitchen adventure turns out! Let’s keep the magic alive, one recipe at a time. Happy cooking! ❤️

The Ultimate Tuna Melt Wrap

A deliciously cozy Tuna Melt Wrap recipe that’s portable, customizable, and packed with flavor.
- Prep Time: 15 minutes
- Cook Time: 10 minutes
- Total Time: 25 minutes
- Yield: 4 servings 1x
- Category: Main Course
- Method: Stovetop
- Cuisine: American
- Diet: Pescatarian
Ingredients
Scale
- 1 can of tuna, drained
- 2 tablespoons mayonnaise
- 1 tablespoon mustard
- 1/2 cup shredded cheese (cheddar or your choice)
- 1/4 cup diced celery
- 1/4 cup diced bell pepper
- 4 large tortillas
- Butter or oil for toasting
- Salt and pepper to taste
Instructions
- Mix the filling: In a medium bowl, combine your drained tuna, mayonnaise, mustard, shredded cheese, diced celery, and diced bell pepper. Use a fork to break up the tuna gently while mixing. Season generously with salt and pepper to taste.
- Prepare the tortillas: Lay your large tortillas flat on a clean surface or cutting board. If using flour tortillas, warm them slightly in the microwave (about 10 seconds).
- Assemble the wraps: Divide the tuna mixture evenly among the tortillas, leaving about an inch around the edges for easy folding. Spread the mixture into a rectangle shape.
- Roll it up: Fold in the sides of the tortilla and then start rolling from the bottom up, tucking in any filling that wants to escape.
- Toast those wraps: Heat a non-stick skillet over medium heat and add a little butter or oil. Once hot, place your rolled wraps in the pan seam-side down and cook for about 3-4 minutes per side, until golden brown and crispy.
- Slice and serve: Once toasted, remove the wraps from the skillet and let them cool for a minute. Slice each wrap in half diagonally and serve warm.
Notes
Serve these wraps alongside a simple green salad or with a warm bowl of tomato soup for a classic vibe.
Nutrition
- Serving Size: 1 wrap
- Calories: 320
- Sugar: 2g
- Sodium: 600mg
- Fat: 15g
- Saturated Fat: 6g
- Unsaturated Fat: 8g
- Trans Fat: 0g
- Carbohydrates: 28g
- Fiber: 2g
- Protein: 21g
- Cholesterol: 45mg
Keywords: tuna melt, wraps, lunch, comfort food, quick meal, easy recipe