
There’s Magic in the Everyday: My Almond Raspberry Loaf Cake
Hey there, friend! Come on in, the kitchen’s warm, the oven’s preheating, and I’ve got a story and a slice of something spectacular to share with you. Have you ever had one of those days that just feels a little… gray? Maybe it’s drizzling outside, or your to-do list is laughing at you, or you just need a moment of pure, simple joy. That’s exactly when I reach for my favorite loaf pan. Because I truly believe that the act of baking—the measuring, the mixing, the incredible aroma that fills your home—is one of the simplest, most powerful ways to turn an ordinary afternoon into a small celebration.
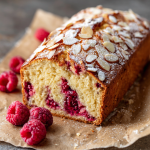
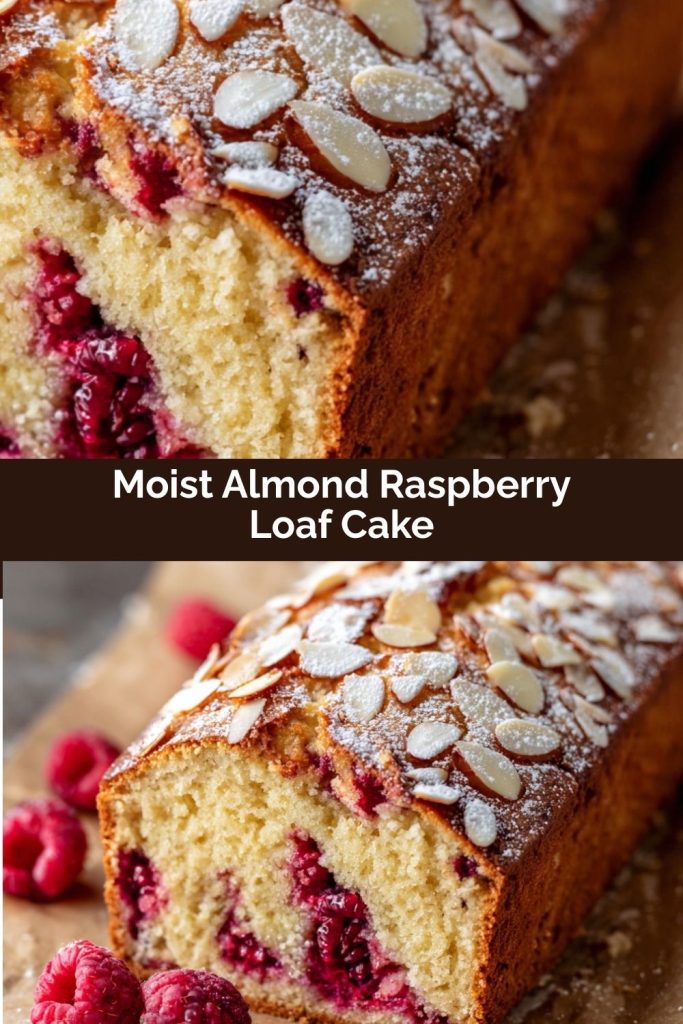
Today, we’re making my Almond Raspberry Loaf Cake. This isn’t just a cake; it’s a hug in bakeware form. Imagine the most tender, moist crumb, fragrant with the warm, cozy flavor of almond, punctuated by pockets of bright, juicy raspberries that burst with a little tart sweetness in every single bite. It has a delicate, golden crust and a texture that’s somehow both sturdy and cloud-soft. It’s the kind of bake that looks and tastes like it came from a fancy patisserie, but I promise you, it’s wonderfully straightforward. It’s perfect for a slow weekend brunch, a hostess gift that will make you a legend, or simply as a sweet companion to your afternoon cup of tea. So, tie on that apron. Let’s push pause on the busy and cook up a little bit of delicious, fragrant magic together.
A Happy Accident & My Grandma’s Tin
PrintAlmond Raspberry Loaf Cake (Moist, Fruity & Bakery-Worthy)
This almond raspberry loaf cake is tender, fragrant, and bursting with juicy raspberries in every slice. With a soft almond-flavored crumb and golden crust, it’s the kind of elevated everyday bake that’s perfect for brunch, gifting, or cozy afternoon tea.
- Prep Time: 15 minutes
- Cook Time: 55 minutes
- Total Time: 1 hour 10 minutes
- Yield: 10 1x
Ingredients
1½ cups all-purpose flour
½ cup almond flour
1½ tsp baking powder
¼ tsp salt
½ cup unsalted butter, softened
¾ cup sugar
2 eggs
½ cup milk (or almond milk)
1 tsp almond extract
1 tsp vanilla extract
1 cup fresh or frozen raspberries
Optional: sliced almonds for topping
Instructions
Preheat oven to 350°F (175°C). Grease and line a loaf pan.
In a bowl, whisk together flours, baking powder, and salt.
In a separate bowl, cream butter and sugar until fluffy. Beat in eggs, one at a time, then add almond and vanilla extracts.
Add flour mixture in 2 parts, alternating with milk. Fold in raspberries gently.
Pour into loaf pan and sprinkle with sliced almonds if using.
Bake for 50–60 minutes, or until a toothpick comes out clean. Cool in pan 10 minutes, then transfer to a rack.
Nutrition
- Calories: 260
- Fat: 14g
- Carbohydrates: 26g
- Protein: 5g
This recipe has roots in a happy kitchen accident and a very special tin. Years ago, I was attempting a classic pound cake, but I realized too late I was nearly out of vanilla. Panic! (Okay, slight drama.) I rummaged and found a nearly full bottle of almond extract. “In for a penny,” I thought, and poured a generous glug into the batter. Then, spotting a half-pint of raspberries wilting in the fridge, I folded those in too, hoping for the best. What emerged from the oven was a revelation—a fragrant, fruity cake that was infinitely more interesting than my original plan.
But the real magic happened when I brought it to my grandma’s house. Without a word, she smiled, went to her pantry, and pulled out this beautiful, old, slightly dented loaf tin. “This is the tin,” she said, “that makes things taste like home.” She’s been gone for some time now, but I use that tin every single time I make this cake. The ritual of buttering its familiar ridges, pouring in the rosy-flecked batter, and waiting for that almond scent to signal it’s done… it’s my way of connecting with her, of turning a simple bake into a story, and of remembering that the best creations often come from a little improvisation and a lot of heart.
Gathering Your Cast of Characters
Here’s everything you’ll need to create this masterpiece. I’ve added my little chef insights and swaps so you can bake with confidence!
- 1½ cups all-purpose flour: Our trusty base. It gives the cake structure. For a slightly more tender crumb, you can swap in ½ cup of cake flour, but all-purpose works beautifully.
- ½ cup almond flour: The *secret weapon*! This isn’t just for flavor—it adds incredible moisture and a delicate, nutty texture that makes this cake truly special. Don’t skip it! If you have a nut allergy, you can replace it with an additional ½ cup of all-purpose flour, but you’ll lose that signature moist, fragrant quality.
- 1½ tsp baking powder: Our leavening agent, giving the cake its lovely lift. Make sure yours is fresh for the best rise.
- ¼ tsp salt: A must! It balances all the sweetness and enhances every other flavor in the bowl.
- ½ cup unsalted butter, softened: “Softened” is key here. It should yield gently to a finger press but not be oily or melted. This allows it to trap air when creamed with the sugar, which is what creates a light texture.
- ¾ cup sugar: The perfect amount for a cake that’s sweet but not cloying, letting the raspberries and almond shine.
- 2 eggs: Best at room temperature. They incorporate much more easily into the batter, leading to a smoother, more cohesive mix.
- ½ cup milk (or almond milk): Whole milk adds richness, but almond milk is a fantastic dairy-free option that doubles down on the almond flavor!
- 1 tsp almond extract: The star of the flavor show! It gives that unmistakable, beautiful aroma. Use pure extract, not imitation, for the best taste.
- 1 tsp vanilla extract: Almond’s best friend. Vanilla rounds out the flavor profile and adds depth.
- 1 cup fresh or frozen raspberries: I often use frozen—they’re picked at peak ripeness, are available year-round, and fold into the batter without turning to mush! No need to thaw.
- Optional: sliced almonds for topping: For a gorgeous, crunchy, bakery-style finish. A light sprinkle before baking adds texture and visual appeal.
Let’s Bake! Your Step-by-Step Guide
Follow these simple steps, and you’ll be rewarded with a perfect loaf. I’ve tucked my favorite tips and hacks right in here with you.
- Prep Party! Preheat your oven to 350°F (175°C). Grease your 9×5 inch loaf pan generously with butter or non-stick spray, then line it with a strip of parchment paper so that it hangs over the two long sides. This creates a “sling” that will make removing your beautiful cake an absolute breeze—no wrestling required!
- Dry Team Mix. In a medium bowl, whisk together your all-purpose flour, almond flour, baking powder, and salt. Give it a good 30-second whisk. This not only combines them but also aerates the flours a little, contributing to a lighter cake. Set this aside.
- Creaming is Key. In a large mixing bowl, beat the softened butter and sugar together on medium-high speed for a full 2-3 minutes. We’re not just mixing here; we’re “creaming.” Watch for the mixture to become noticeably paler, fluffy, and almost like a soft frosting. This incorporates air, which is essential for lift and tenderness. Scrape down the bowl halfway through.
- Egg-cellent Addition. Beat in the eggs, one at a time, making sure each is fully incorporated before adding the next. This prevents the batter from breaking or curdling. Now, pour in the almond and vanilla extracts and mix until just combined. Your kitchen should already be smelling amazing.
- The Gentle Combine. With your mixer on low speed, add about half of the dry flour mixture. Mix until *just* a few streaks remain. Pour in all of the milk, mix until mostly combined, then add the remaining flour mixture. Stop mixing the moment the last bit of flour disappears. A few tiny lumps are FINE! Overmixing is the enemy of a tender loaf—it develops gluten and can lead to a tough cake.
- Berry Fold. Now for the raspberries! Add them to the bowl. Take a flexible spatula and gently, lovingly, fold them into the batter. Use a “scoop and turn” motion from the bottom of the bowl. We want to distribute them without crushing them and turning the whole batter pink (though a few pink streaks are charming!). If using frozen berries, work quickly, as they can start to bleed.
- Pan & Bake. Pour the gorgeous, speckled batter into your prepared loaf pan. Smooth the top with your spatula. If using, sprinkle a handful of sliced almonds evenly over the top. Bake in the center of your preheated oven for 50-60 minutes. The cake is done when it’s golden brown, springs back when lightly touched in the center, and a toothpick or skewer inserted into the middle comes out clean or with just a few moist crumbs (not wet batter).
- The Patience Test. This is crucial! Let the cake cool in its pan on a wire rack for 10-15 minutes. This allows it to set and firm up slightly. Then, using your parchment paper sling, lift it out of the pan and let it cool completely on the rack. I know it’s tempting, but cutting into a warm loaf can make it gummy. Trust me, the wait is worth it for the perfect slice.
Serving Up the Cozy
Once cooled, slice this beauty with a serrated knife using a gentle sawing motion for clean cuts. It’s sublime all on its own, with a cup of coffee or tea. For a truly decadent moment, I love to toast a slice lightly and smear it with a little mascarpone cheese or a dollop of softly whipped cream. It also makes an incredible dessert warmed slightly and served with a scoop of vanilla bean ice cream. However you serve it, do it with a smile—you made this!
Make It Your Own: Fun Twists & Swaps
This recipe is a wonderful canvas! Here are a few ways to play:
- Lemon-Blueberry Bliss: Swap the almond extract for 1 tsp lemon extract and the raspberries for blueberries. Add the zest of one lemon to the batter. Top with a lemon glaze.
- Chocolate Chip Hug: Omit the raspberries and fold in ¾ cup of semi-sweet chocolate chips. The almond + chocolate combo is dreamy.
- Gluten-Free Friend: Use a 1:1 gluten-free all-purpose flour blend and ensure your baking powder is GF. The almond flour already does a lot of the heavy lifting here!
- Bundt or Muffin Magic: This batter works beautifully in a greased Bundt pan (bake time may increase slightly) or as muffins (fill liners ⅔ full and bake for 18-22 minutes).
- Double Almond Crunch: Add ½ cup of chopped, toasted almonds to the batter along with the raspberries for extra texture.
Anna’s Kitchen Notes
This recipe has been my faithful friend for years, and it’s evolved with me. I used to be terrified of overmixing, so I’d undermix and get pockets of flour—oops! Finding that balance comes with practice. I’ve also learned that on humid days, the batter might be a tad thicker, and on dry days, a bit thinner. Don’t fret; the bake knows what to do. The biggest laugh? The first time I made it for my now-husband, he loved it so much he “tested” the ends while it was cooling, leaving me with a very peculiarly shaped loaf to photograph! Now, I just bake two—one for us to devour warm, and one to pretty up for sharing. That’s what cooking is all about, right? Sharing the joy, even if it’s a little imperfect.
Your Questions, Answered
Q: My raspberries all sank to the bottom! What happened?
A Ah, the classic berry sink! To prevent this, you can toss your raspberries (fresh or frozen) in a tablespoon of the measured flour from the dry ingredients before folding them in. This light coating helps them “float” in the batter. Also, make sure your batter isn’t too thin; if it seems runny, that can also cause sinking.
Q: Can I make this dairy-free?
A Absolutely! Use a plant-based butter stick (not spread) for the fat, and swap the milk for almond milk or another unsweetened non-dairy milk. The flavor will still be fantastic.
Q: The top is browning too fast, but the inside isn’t done yet.
A This can happen if your oven runs hot or your rack is too high. Next time, try baking on a lower rack. For this bake, simply tent a loose piece of aluminum foil over the top of the loaf pan for the last 15-20 minutes of baking to prevent further browning while the center finishes cooking.
Q: How do I store it, and how long does it last?
A For peak freshness, store the cooled loaf in an airtight container at room temperature for up to 3 days. It also freezes beautifully! Wrap the cooled whole loaf (or individual slices) tightly in plastic wrap and then foil. Freeze for up to 3 months. Thaw overnight on the counter.
Nutritional Information*
*This is an approximate estimate per slice (based on 10 slices) calculated using standard ingredients. Values may vary based on specific brands and substitutions.
- Calories: 260
- Protein: 5g
- Carbohydrates: 26g
- Fat: 14g
- Prep Time: 15 minutes
- Bake Time: 55 minutes
- Total Time: ~1 hour 10 minutes
Final Thoughts
At the end of the day, this dish is exactly what I love most about home cooking — simple ingredients, big comfort, and a whole lot of heart. It’s the kind of recipe you keep tucked in your back pocket for busy nights, lazy Sundays, or anytime you want something creamy, cozy, and undeniably satisfying without a fuss.
Whether you’re stirring this together for your family, your friends, or just yourself after a long day, I hope it brings the same warm, “everything’s going to be okay” feeling it brings me.
Here’s to good food, clean plates, and those little weeknight wins. Enjoy every bite!