“`html
BBQ Chicken Sliders with Gouda and Garlic-Herb Butter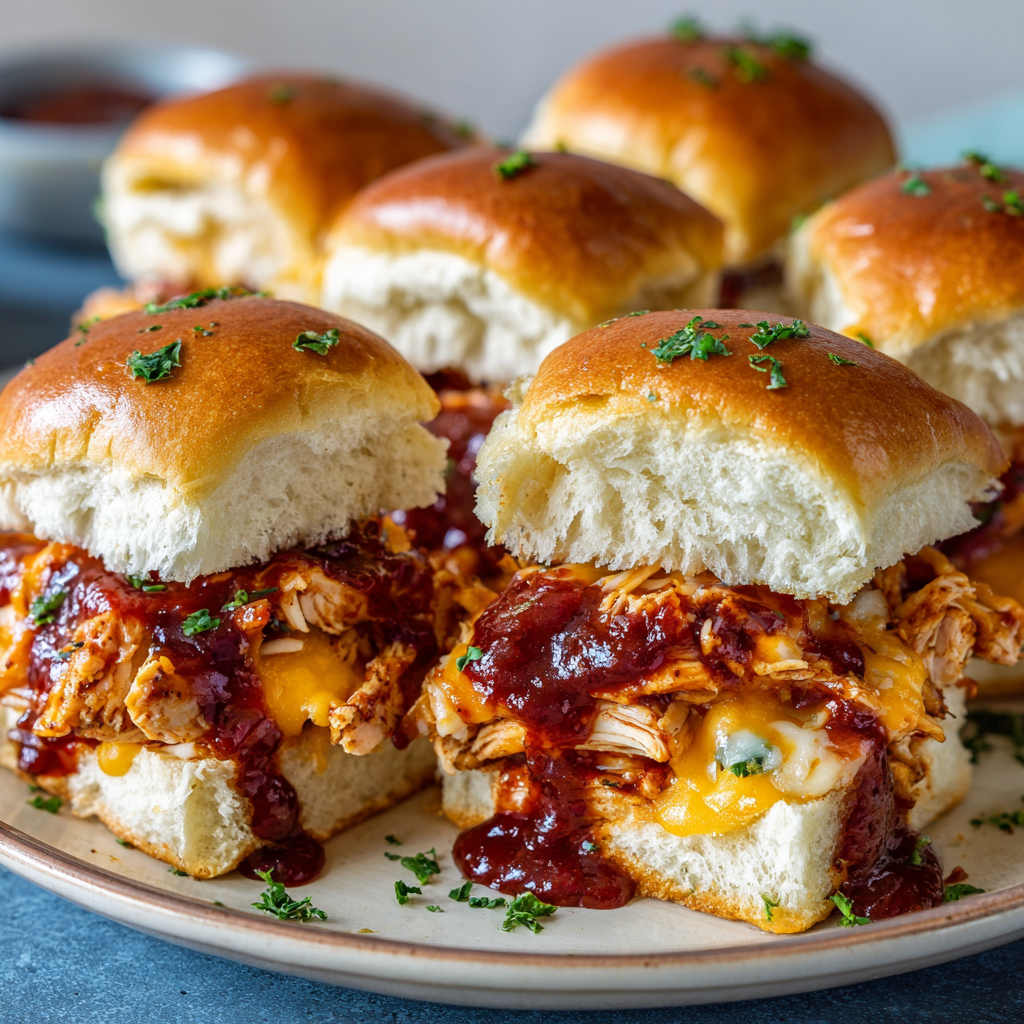
Hey there, friend! Anna here, ready to share one of my all-time favorite recipes for turning a regular Tuesday (or a game day, or a last-minute gathering) into a mini-celebration. Let’s talk about these BBQ Chicken Sliders. Imagine this: tender, smoky BBQ chicken, creamy, melty Gouda cheese, and a pop of fresh cilantro, all hugged by a soft, sweet Hawaiian roll, and crowned with a garlic-herb butter that bakes into the most irresistible golden crust.
These sliders are more than just a sandwich; they’re a flavor experience. They’re the perfect marriage of cozy and crowd-pleasing, and I promise they’re so easy to make, you’ll be wondering why you don’t have them in your weekly rotation already. Whether you’re feeding your family or a whole crew, this recipe is built for joy, not stress. It’s my go-to when I want maximum deliciousness with minimal fuss, and I’ve packed every step with my best kitchen stories and tips to make sure you feel confident and inspired. So, are you ready to make your kitchen smell absolutely incredible? Grab your apron, and let’s get started on these smoky, cheesy, flavor-loaded bundles of happiness!
The Slider That Started It All: A Backyard Memory
PrintBBQ Chicken Sliders : Smoky, Cheesy, and Loaded with Flavor
These BBQ Chicken Sliders are your new go-to for an easy, flavor-packed appetizer or dinner. Juicy shredded BBQ chicken, creamy Gouda cheese, and fresh cilantro are tucked into soft Hawaiian rolls, then topped with a garlic-herb butter that bakes into a golden, crispy crust. They’re sweet, smoky, cheesy—and completely irresistible.
- Prep Time: 10 minutes
- Cook Time: 20 minutes
- Total Time: 30 minutes
- Yield: 12 sliders 1x
Ingredients
12 Hawaiian rolls
2 cups shredded cooked chicken
¾ cup BBQ sauce (your favorite brand)
8 slices Gouda cheese (or 1 ½ cups shredded)
¼ cup finely diced red onion
2 tbsp chopped fresh cilantro
For Garlic-Herb Butter:
¼ cup unsalted butter, melted
½ tsp garlic powder
½ tsp dried parsley or Italian seasoning
Instructions
Preheat oven to 350°F (175°C). Lightly grease a 9×13-inch baking dish.
Slice the rolls horizontally without separating them. Place bottom halves in the dish.
Mix shredded chicken with BBQ sauce. Spread evenly over the bottom rolls.
Top with cheese, onion, and cilantro. Place top buns on.
Stir together melted butter, garlic powder, and herbs. Brush over the tops of the rolls.
Cover with foil and bake for 15 minutes. Uncover and bake 5 more minutes until golden and melty.
Slice and serve warm.
Nutrition
- Calories: 290 per slider
- Fat: 14g
- Carbohydrates: 22g
- Protein: 16g
You know how some recipes just taste like a memory? For me, these sliders will forever taste like a warm summer evening, the sound of laughter, and a little bit of happy chaos. A few years back, we hosted a last-minute backyard potluck. I had a rotisserie chicken, some leftover rolls, and a “what on earth am I going to feed everyone?” moment. In a dash of inspiration (and maybe a hint of panic), I shredded the chicken, mixed it with my favorite smoky BBQ sauce, layered on the only cheese I had—a block of Gouda—and brushed the whole thing with a garlic butter I whipped up. I popped it in the oven, crossed my fingers, and hoped for the best.
What emerged was pure magic. The smell alone had everyone gathering around the kitchen island. We sliced them up, passed around napkins, and watched as that first pan disappeared in what felt like 30 seconds. There was something about the combination—the sweet roll, the savory chicken, that velvety cheese—that felt so special, yet so simple. It was the dish everyone raved about and asked for the recipe. That’s when I knew I had to perfect it and share it with you. It’s proof that the most memorable meals often come from a little improvisation and a whole lot of heart.
Gathering Your Flavor Team: Ingredients & Insights
Here’s everything you’ll need to create this slider masterpiece. I’ve included my little chef notes for each ingredient because knowing the “why” makes cooking so much more fun!
- 12 Hawaiian Rolls: The sweet, pillowy foundation! Their softness and hint of sweetness perfectly balance the smoky BBQ. Chef’s Insight: Don’t separate the rolls! Slicing the whole pack horizontally keeps everything tidy for assembly and baking.
- 2 cups shredded cooked chicken: The star protein. I use a store-bought rotisserie chicken for ultimate ease (no shame in that game!). Substitution Tip: Leftover grilled or baked chicken works wonderfully. For a vegetarian twist, try pulled jackfruit or hearty chickpeas!
- ¾ cup BBQ sauce: The flavor engine. Use your absolute favorite brand—sweet, spicy, or smoky. Chef’s Insight: The sauce you love on its own will shine here. I’m partial to a hickory-smoked variety for maximum depth.
- 8 slices Gouda cheese (or 1 ½ cups shredded): Creamy, buttery, and melts like a dream. Why Gouda? Its mild smokiness echoes the BBQ sauce beautifully. Substitution Tip: Sharp cheddar, provolone, or pepper jack are all fantastic alternatives.
- ¼ cup finely diced red onion: A necessary crunch and bite. Pro Tip: Soak the diced onion in ice water for 10 minutes before using. This mellows the sharpness and gives an even crisper texture.
- 2 tbsp chopped fresh cilantro: The bright, fresh finish. Chef’s Note: If cilantro isn’t your thing, fresh parsley or a sprinkle of green onions are lovely substitutes.
For The Magic Garlic-Herb Butter:
- ¼ cup unsalted butter, melted: The golden glaze. Using unsalted lets you control the seasoning. Chef’s Hack: Melt it in the microwave in a small bowl you can then mix the herbs in—one less dish to wash!
- ½ tsp garlic powder: Provides consistent, mellow garlic flavor without the risk of burning. Why powder over fresh? In this butter wash, it distributes evenly and bakes perfectly onto the rolls.
- ½ tsp dried parsley or Italian seasoning: The herbal fragrance. Dried herbs hold up better in the oven for this application.
Let’s Build Some Sliders! Step-by-Step Guide
Alright, team! Let’s walk through this together. I promise it’s straightforward, but these little tips will make your sliders next-level.
- Preheat & Prep: Fire up your oven to 350°F (175°C). Lightly grease a standard 9×13-inch baking dish. This is your slider canvas! My Tip: I use a quick spray of cooking oil or a smear of that melted butter we’re about to make. It guarantees no sticking and helps the bottom rolls get a touch crispy.
- The Great Slice: Take your package of Hawaiian rolls and, without pulling them apart, use a long serrated bread knife to slice the entire block in half horizontally. You should have one large “slab” of top buns and one of bottom buns. Place the bottom slab snugly into your baking dish.
- Chicken Time: In a mixing bowl, combine your shredded chicken and BBQ sauce. Stir until every nook and cranny of that chicken is coated in saucy goodness. Chef’s Chatter: This is where the flavor foundation is built! Taste a little bit. Want it saucier? Add another tablespoon or two. Love it? Perfect.
- Layer Up the Goodness: Spread the saucy chicken evenly over the bottom rolls in the dish. Now, layer on your slices of Gouda (or sprinkle that glorious shredded cheese). Follow with the diced red onion and a generous sprinkle of fresh cilantro. Assembly Hack: I like to press the toppings down gently with my hands. It helps everything stay put when we add the top bun.
- Top It Off & Butter Up: Place the top slab of rolls on, like putting the lid on the most delicious present ever. Now, in a small bowl (or the bowl you melted the butter in), stir together the melted butter, garlic powder, and dried herbs. Using a pastry brush, generously and lovingly brush this garlic-herb butter all over the top rolls. Get into every seam! This butter is what creates that iconic, fragrant, golden-brown crust.
- Bake to Perfection: Cover the entire baking dish tightly with aluminum foil. Why cover it? This steams the sliders initially, melting the cheese perfectly and warming everything through without over-browning the tops. Bake covered for 15 minutes. Then, remove the foil and bake for another 5-7 minutes, just until the tops are that perfect shade of golden and you can hear the cheese bubbling underneath.
- The Finale: Pull the pan from the oven and let it sit for just 2-3 minutes—this lets the cheese set slightly so they’re less messy to slice. Use a sharp knife to slice along the roll lines, separating them into individual sliders. Serve immediately and watch the smiles appear!
How to Serve These Flavor-Packed Sliders
Presentation is part of the fun! I love serving these right in the baking dish for a rustic, family-style vibe. Pile them high on a platter or wooden board, maybe with a little extra bowl of warm BBQ sauce for dipping on the side. For a full meal, pair them with a crisp, simple green salad, some tangy coleslaw to cut through the richness, or a big pile of sweet potato fries. They’re perfect for a casual dinner, the star of a game-day spread, or the hit of your next potluck. Don’t forget the napkins—these are gloriously messy in the best way!
Make It Your Own: Delicious Twists & Swaps
The beauty of this recipe is its flexibility. Here are a few ways to play with the flavors:
- Spicy Kick: Use a spicy BBQ sauce and pepper jack cheese. Add a few slices of pickled jalapeños under the cheese layer.
- Caramelized Onion & Apple: Swap the red onion for a handful of sweet, slow-cooked caramelized onions. Add a layer of very thinly sliced crisp apple (like Honeycrisp) for a sweet and savory surprise.
- Buffalo Style: Replace the BBQ sauce with Buffalo sauce and use a blue cheese or ranch dressing mixed into the chicken. Top with crumbled blue cheese after baking.
- Pork or Beef: Swap the chicken for pulled pork or shredded beef brisket. The method stays exactly the same!
- Hawaiian Luau: Add a layer of thinly sliced ham and a ring of canned pineapple tidies (well-drained) over the chicken before adding the cheese.
Anna’s Kitchen Notes: The Story Behind the Slider
Over the years, this recipe has become a beloved staple, and it’s evolved with a few tweaks here and there. The garlic-herb butter wash was a later addition—originally, I just melted plain butter, but adding those herbs and garlic powder? Game changer. It makes the whole house smell like a professional bakery. I’ve also learned that while sharp cheddar is a classic, Gouda’s meltability and subtle smokiness make it the ultimate choice for me.
One funny kitchen story: I once was so excited to make these for friends that I accidentally used Hawaiian *sweet bread loaf* instead of the rolls. I just sliced it into thick pieces and treated it like giant sliders. It was a hilarious, delicious mess that we now call “BBQ Chicken Cake.” The moral? Even the “mistakes” can be delicious. Cooking is about the adventure, not perfection. I hope this recipe becomes a tool for your own happy memories and kitchen stories.
Your Questions, Answered: FAQs & Troubleshooting
Q: Can I make these ahead of time?
A: Absolutely! You can assemble the entire pan (up through adding the top bun), cover it tightly, and refrigerate for up to 24 hours. When you’re ready, let the dish sit on the counter while the oven preheats, make your garlic butter fresh, brush it on, and bake. You may need to add 3-5 extra minutes to the bake time since it’s starting cold.
Q: My rolls got soggy on the bottom. How do I prevent that?
A: Great question! This usually happens if the chicken mixture is very wet or if it sits assembled for too long before baking. Make sure your shredded chicken isn’t dripping with extra moisture. Also, a light greasing of the pan creates a tiny barrier. Baking them uncovered for the final few minutes also helps crisp up the base.
Q: Can I use a different type of roll?
A: Of course! Brioche rolls, potato rolls, or even small ciabatta rolls will work. The key is using a soft, slightly sweet roll that will soak up the flavors and butter. Adjust baking time slightly if using a denser roll.
Q: The cheese isn’t melting evenly. Help!
A: Ensure your chicken layer is spread evenly and is warm (if using pre-cooked cold chicken, warming it slightly in the microwave with the sauce helps). Also, covering with foil for the first part of baking is crucial—it traps steam and heat to melt the cheese perfectly. Using thinly sliced cheese rather than thick chunks also promotes even melting.
Nutritional Information*
*Please note: This is an estimated calculation based on the listed ingredients and common brands, meant as a general guideline. For precise dietary needs, use your preferred nutrition calculator with your exact ingredients.
- Prep Time: 10 minutes
- Cook Time: 20 minutes
- Total Time: 30 minutes
- Servings: 12 sliders
- Calories: ~290 per slider
Per Slider (approx.): Protein: 16g | Carbohydrates: 22g | Fat: 14g
Loved This Recipe? Save It For Later!
If these BBQ Chicken Sliders made your day a little tastier, I’d be so grateful if you pinned the image below to your favorite Pinterest board! It helps others discover these recipes and brings more foodie friends to our community.

Final Thoughts — Option 1 (Warm, Heartfelt, Full-Circle)
At the end of the day, these BBQ Chicken Sliders are everything I love about gathering people around the table—simple ingredients, familiar comfort, and just enough flair to make everyone feel a little spoiled. They’re the kind of recipe that turns an ordinary night into something memorable without demanding much from you at all. Whether they remind you of a backyard potluck, a late-summer sunset, or your own happy kitchen chaos, I hope they bring that same spark of joy into your home. Here’s to easy wins, full bellies, and the kind of meals that make people linger just a little longer.