Your New Go-To Party Hero: Chicken Taco Mexican Pinwheels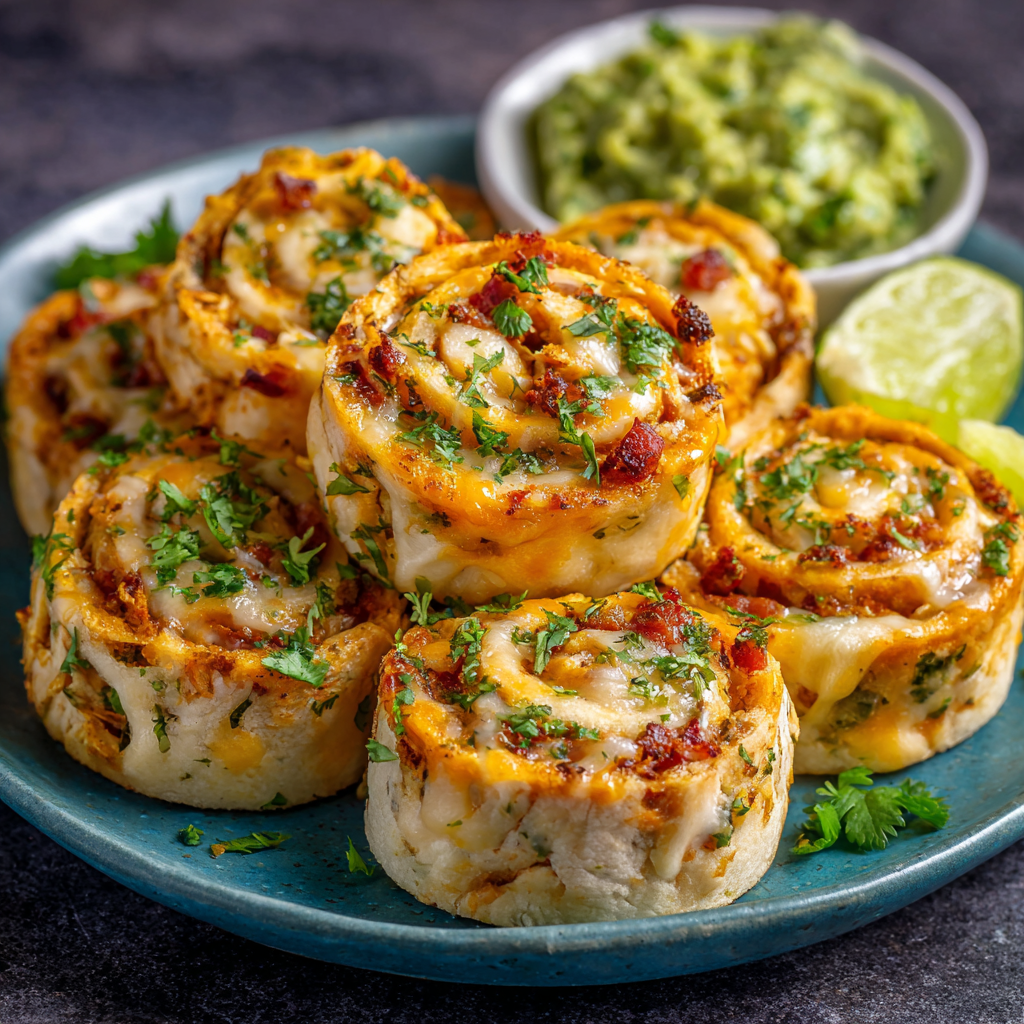
Hey there, friend! Anna here. Let me paint you a picture: It’s five minutes before guests arrive. You’re trying to finish your makeup, light a candle, and somehow get something delicious on the table. The doorbell rings, and a wave of “what did I forget to make?!” panic hits. Sound familiar? I’ve been there more times than I’d like to admit!
That’s exactly why I’m utterly devoted to the magic of the humble, yet mighty, pinwheel. And not just any pinwheel—these Chicken Taco Mexican Pinwheels. They are my culinary secret weapon, my no-stress superhero, and quite possibly the most requested appetizer in my recipe box. They look like you fussed, taste like a fiesta, but come together with the ease of a weeknight dinner. We’re talking creamy, tangy, slightly spicy, and packed with texture in every single bite-sized roll.
Whether you’re gearing up for the big game, hosting a baby shower, need a stunning potluck contribution, or just want a fun Friday night snack with the family, this recipe has your back. They’re kid-friendly (just maybe go light on the green onions for the little ones), adult-approved (hello, perfect match for a margarita!), and they travel like a dream. So, let’s ditch the stress and embrace the joy of making something incredibly tasty without breaking a sweat. Grab your favorite mixing bowl and let’s roll—literally!
The Pinwheel That Saved Game Day
PrintChicken Taco Mexican Pinwheels (Easy Party Roll-Ups)

- Prep Time: 15 mins
- chill time: 30 mins
- Total Time: 45 mins
- Yield: 30–36 pinwheels 1x
Ingredients
-
2 cups cooked chicken, shredded (rotisserie chicken works great)
-
1 (8 oz) package cream cheese, softened
-
1/2 cup sour cream (or Greek yogurt)
-
1 cup shredded cheddar or Mexican blend cheese
-
1 packet taco seasoning (1 oz)
-
1/2 cup diced tomatoes or drained Rotel
-
1/4 cup chopped green onions (or fresh cilantro)
-
5–6 large flour tortillas (10-inch, soft or extra soft)
Optional twists: jalapeños, black beans, corn, or a ranch seasoning swap
Instructions
Step 1: Make the Creamy Base
-
In a large bowl, combine cream cheese, sour cream, and taco seasoning.
-
Mix until completely smooth and creamy. Scrape down the sides to ensure everything is incorporated.
Step 2: Add the Mix-Ins
-
Fold in shredded chicken, cheese, diced tomatoes, and chopped green onions.
-
Stir until everything is evenly coated in the seasoned cream cheese mixture. Taste and adjust seasoning if desired.
Step 3: Roll the Tortillas
-
Lay one tortilla flat on a board. Spread 1/2 to 3/4 cup of the chicken mixture evenly over the tortilla.
-
Roll it tightly from the edge closest to you. Repeat with remaining tortillas. Wrap each log in plastic wrap for easier handling.
Step 4: Chill
-
Refrigerate the rolled tortillas seam-side down for at least 30 minutes (up to 4 hours) to firm up the filling.
Step 5: Slice & Serve
-
Trim the ends of each roll and slice into 1-inch pieces using a sharp serrated knife.
-
Arrange on a platter and serve chilled or at room temperature with salsa, avocado crema, or your favorite dip.
Gathering Your Flavor Party
Here’s everything you need to make these irresistible roll-ups. The beauty is in the flexibility—I’ve included my favorite swaps so you can make it your own!- 2 cups cooked chicken, shredded: The hearty star! I use the meat from a store-bought rotisserie chicken for ultimate convenience and flavor. Leftover grilled or baked chicken works beautifully too. For a twist, try shredded turkey or even well-drained and crumbled firm tofu for a vegetarian version.
- 1 (8 oz) package cream cheese, softened: This is our creamy, lush binder. Full-fat cream cheese gives the best texture, but reduced-fat works in a pinch. For a tangier kick, use whipped cream cheese—it’s easier to mix! Pro-Tip: To soften quickly, remove the foil wrapper and microwave on a plate for 15-20 seconds.
- 1/2 cup sour cream: Adds a delightful tang and loosens the mixture to a perfect, spreadable consistency. Greek yogurt is a fantastic, protein-packed substitute here.
- 1 cup shredded cheddar or Mexican blend cheese: Melty, salty, cheesy goodness! I love a Mexican blend for its combo of Monterey Jack, cheddar, and sometimes queso fresco. Pepper jack cheese would add a lovely kick.
- 1 packet taco seasoning: Our instant flavor bomb! I use a standard 1 oz packet. If you’re sensitive to salt or love controlling spices, use 2-3 tablespoons of your own homemade taco seasoning blend.
- 1/2 cup diced tomatoes (or Rotel, drained): For juicy pops of freshness! Rotel (diced tomatoes with green chilies) is my secret weapon—it adds a subtle, built-in heat. Be sure to drain it well to avoid a soggy filling.
- 1/4 cup chopped green onions: A necessary crunch and mild onion flavor. The green parts are prettier for garnish, but I use the whole stalk in the filling. Fresh cilantro is a vibrant alternative or addition.
- 5–6 large flour tortillas: The vessel! Burrito-sized tortillas (10-inch) are ideal. For the best roll, look for ones labeled “soft” or “extra soft.” Spinach or tomato-flavored tortillas add fun color. If you’re gluten-free, your favorite GF wraps will work—just handle them gently.
Let’s Make Some Magic: Step-by-Step
Ready? This is where the fun happens. I’ll walk you through each step with my best tips to ensure pinwheel perfection. Step 1: The Creamy Base In a large mixing bowl, combine the softened cream cheese, sour cream, and the entire packet of taco seasoning. Use a sturdy spoon or a hand mixer on low to beat it until it’s completely smooth, creamy, and one uniform color. This is your flavor foundation—no lumps allowed! Chef’s Hack: If you’re using a hand mixer, scrape down the sides of the bowl halfway through to incorporate everything evenly. Step 2: The Fun Mix-In Now, add your shredded chicken, shredded cheese, well-drained tomatoes/Rotel, and chopped green onions to the bowl. Grab that same spoon and stir, stir, stir! You want every single strand of chicken and every nook of cheese to be coated in that deliciously seasoned cream cheese mixture. It should hold together when you pinch it. Taste it! This is your chance to adjust—want more heat? Add a pinch of cayenne or chili powder. More tang? A squeeze of lime juice is divine. Step 3: The Art of the Roll Lay one tortilla flat on a clean cutting board. Using a spatula or the back of a spoon, spread about 1/2 to 3/4 cup of the chicken mixture evenly over the entire tortilla, going all the way to the edges. The key here is a thin, even layer. If you pile it too thick in the middle, your roll will be bulky and hard to slice. Starting at the edge closest to you, lift and begin rolling the tortilla away from you, keeping it as tight as possible. Think “snug burrito.” Repeat with remaining tortillas. Pro-Tip: For super clean slicing, lay a large piece of plastic wrap on the board first, place your tortilla on it, spread, then use the plastic wrap to help you roll tightly. Wrap the finished log in the plastic. Step 4: The Chill Factor This step is non-negotiable for pretty pinwheels! Place your rolled tortillas seam-side down on a plate or tray and refrigerate for at least 30 minutes, or up to 4 hours. This firms up the filling, sets the shape, and makes slicing clean and easy. Rushing this = messy, squished pinwheels. Trust the chill! Step 5: Slice & Shine Using a sharp serrated bread knife, trim off the very ends of each roll (chef’s snack!). Then, slice each log into 1-inch pieces. Gently lay the pinwheels flat on your serving platter. If any get a little smushed, just use your fingers to reshape the spiral. Voilà! You’ve just created a platter of party perfection.Serving Up the Fiesta
Presentation is half the fun! I love arranging these pinwheels in a large spiral on a simple white platter or a rustic wooden board. Tuck in a few lime wedges and sprinkle extra chopped green onions or cilantro over the top for a fresh, pop of color. For dipping, a side of cool avocado crema (just blend an avocado with sour cream, lime, and salt), zesty salsa, or even a simple chipotle ranch takes them over the top. Serve them chilled or at room temperature—they’re fantastic either way!Make It Your Own: Delicious Twists
- Southwestern Style: Add 1/3 cup of drained black beans and 1/3 cup of sweet corn to the filling.
- Spicy Fiesta: Mix in 1-2 finely chopped jalapeños (seeds removed for less heat) and use Pepper Jack cheese.
- Ranch Taco Fusion: Swap half the taco seasoning for a packet of dry ranch seasoning. It’s a crowd-pleasing flavor mashup!
- Beef Lover’s: Substitute the chicken with well-seasoned, cooled, and crumbled ground beef or turkey.
- Veggie-Packed: Use the cream cheese base with 1/2 cup each finely chopped bell pepper, black olives, and corn, omitting the chicken for a colorful vegetarian option.
Anna’s Kitchen Notes
This recipe has evolved into my most trusted friend over the years. I’ve made it in a beach rental kitchen with only a butter knife to mix with, and I’ve prepped it for a fancy bridal shower. It never fails. One of my favorite memories is teaching my niece how to make them for her first “grown-up” dinner party she hosted in her college apartment. The pride on her face when her friends devoured them was everything I love about cooking. A funny lesson learned: I once tried to skip the chilling step because I was running late. Let’s just say I ended up with more of a “taco dip log” than elegant pinwheels. The filling squirted out the ends, and the spirals were a blurry mess. We laughed, scooped it up with chips, and it still tasted amazing—but now I always, always chill! You can also make the logs a full day ahead, wrap them tightly in plastic, and slice them the day of your event for ultimate ease.Your Questions, Answered!
Q: Can I make these pinwheels ahead of time? A: Absolutely! They are a fantastic make-ahead appetizer. You have two great options: 1) Prepare the rolls, wrap them tightly in plastic wrap, and refrigerate for up to 24 hours before slicing. 2) Slice them, arrange on a platter, cover tightly with plastic wrap, and refrigerate for up to 6-8 hours. I don’t recommend freezing them after assembling, as the texture of the cream cheese and tortillas can change. Q: My tortillas are cracking when I roll! What did I do wrong? A: This usually means your tortillas are a bit stale or too cold. To fix it: lightly microwave a stack of 3-4 tortillas between damp paper towels for 15-20 seconds to steam and soften them. Also, ensure your filling is spreadable and not too thick—a thinner layer rolls more easily. Q: The filling is oozing out the sides when I slice. Help! A: This is almost always a chilling issue. Pop the unsliced logs back in the fridge for another 30-60 minutes. Also, make sure you’re using a sharp serrated knife and using a gentle sawing motion—don’t press straight down. A clean, swift cut is key. Q: What’s the best way to store leftovers? A: Store any leftover pinwheels in a single layer in an airtight container in the fridge for up to 2 days. They may soften slightly but will still be tasty. I don’t recommend reheating them.Nutritional Info (For Your Info!)
Please note: The following is an estimate based on the specific ingredients used and may vary with substitutions. Prep Time: 15 mins | Chill Time: 30 mins | Total Time: 45 mins | Servings: 30-36 pinwheels Estimated per serving (5 pinwheels): Calories: ~280 | Fat: 18g | Carbohydrates: 16g | Protein: 13g
Final Thoughts
These Chicken Taco Mexican Pinwheels are the ultimate stress-free party hero. They’re colorful, flavorful, and perfectly portioned, making them ideal for game days, potlucks, or any casual get-together. What started as a happy kitchen accident has become a go-to appetizer in my recipe box—and for good reason. The combination of creamy, tangy, taco-seasoned filling and soft, tender tortillas is irresistible, while the make-ahead option keeps entertaining effortless.
A few key takeaways: always chill your rolls before slicing for neat spirals, feel free to customize the filling to your taste, and don’t stress about perfection—these pinwheels are as forgiving as they are delicious. Serve them with a side of salsa, avocado crema, or your favorite dip, and watch them disappear in minutes. Your guests will think you spent hours in the kitchen, but you’ll know the secret: simple ingredients, smart prep, and a little kitchen magic.