***
Your New Go-To Party Hero: The Ultimate Chili Cheese Dip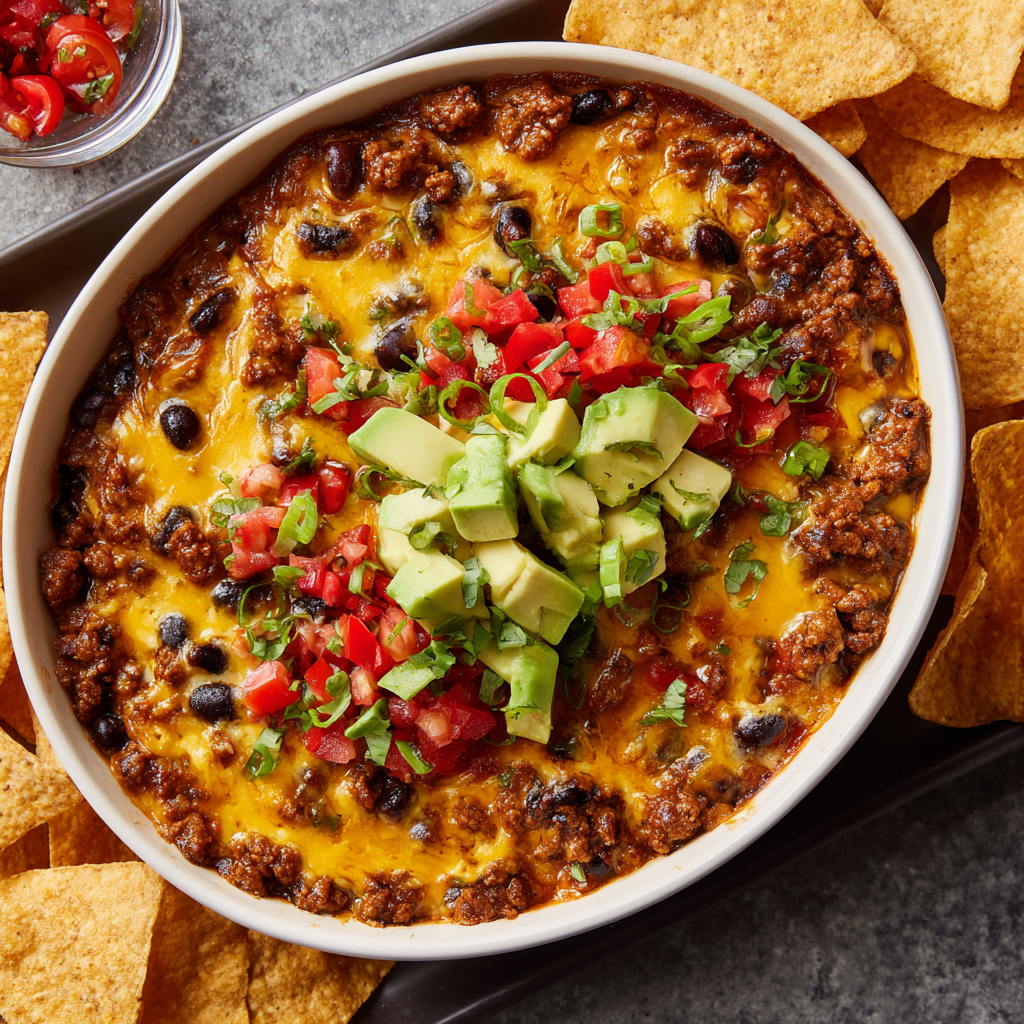
Hey there, friend! Anna here. Can we talk about that magical moment at a gathering when someone walks out of the kitchen holding a dish that’s still bubbling, cheese stretching in glorious, golden strands, and a collective, happy sigh rises from the room? That, my friend, is the power of a truly epic party dip. And I’m about to hand you the keys to creating that exact moment, over and over again.
This isn’t just any dip; this is my legendary, crowd-pleasing, never-fail Chili Cheese Dip. It’s the dish I’m most often asked to bring, the one that vanishes before I’ve even had a chance to set it down properly, and the recipe that has saved me from showing up to potlucks empty-handed more times than I can count. We’re talking about a hearty, meaty, gloriously cheesy masterpiece that’s layered with seasoned ground beef, zesty tomatoes, hearty black beans, and a double dose of melty, gooey cheese. The fresh, cool avocado on top is the perfect creamy contrast to all that warm, savory goodness.
But the real magic? It comes together in about 30 minutes with ingredients you probably already have in your pantry. I believe that the best recipes are the ones that bring people together without stressing the cook out, and this dip is the poster child for that philosophy. So, whether you’re gearing up for game day, hosting a casual movie night, or just need a seriously satisfying snack, you’ve come to the right place. Let’s make your next gathering unforgettable, one cheesy, delicious scoop at a time.
The Dip That Started It All
PrintChili Cheese Dip : Meaty, Cheesy, and the Ultimate Party Appetizer

This Chili Cheese Dip is everything a party dip should be—hot, bubbly, and absolutely loaded with bold flavor. Made with seasoned ground beef, melty cheese, tomatoes, black beans, and taco seasoning, it’s finished with fresh avocado for a creamy bite. Serve it straight from the oven with chips, and watch it disappear!
- Prep Time: 10 minutes
- Cook Time: 20 minutes
- Total Time: 30 minutes
Ingredients
1 lb ground beef
1 packet taco seasoning
1 (10 oz) can diced tomatoes with green chilies (like Rotel), undrained
1 (15 oz) can black beans, drained and rinsed
1 cup shredded cheddar cheese
1 cup shredded pepper jack or Monterey Jack cheese
1 avocado, diced (for topping)
Optional: sour cream, green onions, jalapeños, or cilantro for garnish
Tortilla chips, for serving
Instructions
Preheat oven to 375°F (190°C).
In a skillet, cook ground beef until browned. Drain excess grease.
Stir in taco seasoning, diced tomatoes, and black beans. Let simmer for 5 minutes.
Transfer beef mixture to a greased 9×9 baking dish or oven-safe skillet.
Sprinkle both cheeses evenly over the top.
Bake for 15–18 minutes, or until hot and bubbly.
Top with diced avocado and optional garnishes.
Serve hot with tortilla chips or crackers.
Nutrition
- Calories: 330
- Fat: 24g
- Carbohydrates: 10g
- Protein: 18g
This recipe takes me right back to my first-ever “grown-up” party I hosted in my first little apartment. The furniture was a mix of hand-me-downs and sidewalk finds, my “dining table” was a repurposed door on sawhorses, and I was determined to prove I could be a proper host. I was nervous—what if the food was a flop? What if everyone just stood around awkwardly?
I decided to make this chili cheese dip, a recipe my mom used to whip up for our family’s football Sundays. As it baked, that incredible smell of sizzling beef, taco seasoning, and melting cheese filled my entire apartment. The second my friends walked in, their faces lit up. “What is that amazing smell?!” They crowded around my tiny kitchen, chips at the ready. We didn’t move from that spot for hours, dipping, laughing, and talking over each other. The dip was gone in minutes, but the feeling of creating that warm, joyful, and utterly delicious centerpiece for my friends? That stayed with me. It was a powerful little lesson: great food isn’t about being fancy; it’s about sharing something heartfelt and delicious that makes people feel happy and at home.
Gathering Your Cast of Characters
One of the things I love most about this recipe is its beautiful flexibility. Let’s walk through the ingredients—think of this as our pre-game huddle before we get cooking!
- 1 lb Ground Beef: This is our hearty, meaty base. I typically use an 80/20 blend for the best flavor, but leaner beef works great too! Chef’s Insight: For a lighter twist, you can easily swap in ground turkey or chicken. For a vegetarian version, a plant-based ground “meat” or even an extra can of beans is fantastic.
- 1 Packet Taco Seasoning: This little packet is a flavor powerhouse! It’s our shortcut to a perfectly balanced blend of spices. Substitution Tip: If you have the time, mixing your own with chili powder, cumin, paprika, garlic powder, and a pinch of oregano is a wonderful (and lower-sodium) option.
- 1 (10 oz) Can Diced Tomatoes with Green Chilies (like Rotel): Do not drain this! The liquid helps create the perfect saucy consistency and packs a tangy, slightly spicy punch. Chef’s Insight: If you’re sensitive to heat, use the “mild” version. For a real kick, seek out the “hot” variety!
- 1 (15 oz) Can Black Beans, Drained and Rinsed: These add a wonderful texture, a boost of fiber, and a lovely, earthy flavor. Substitution Tip: Pinto beans or kidney beans would be a delicious stand-in here.
- 1 Cup Shredded Cheddar Cheese & 1 Cup Shredded Pepper Jack or Monterey Jack Cheese: The dynamic duo of dairy! The cheddar gives us that classic, sharp cheesy flavor, while the pepper jack brings a gentle, melty heat. Chef’s Hack: For the love of all that is creamy and smooth, please shred your own cheese from a block! Pre-shredded cheese is coated to prevent clumping, which can make your dip a little grainy. Taking that one extra minute makes a world of difference in the final, silky texture.
- 1 Avocado, Diced (for topping): Our fresh, cool, and creamy finisher. It cuts through the richness of the dip beautifully.
- Optional Garnishes: This is where you can make it your own! A dollop of sour cream, a sprinkle of sliced green onions, a few fresh jalapeño slices, or a handful of chopped cilantro all add fantastic layers of flavor and color.
- Tortilla Chips, for Serving: The trusty vehicle for all that deliciousness! I’m a big fan of a sturdy, restaurant-style chip that can handle a hearty scoop.
Let’s Make Some Magic: Step-by-Step
Okay, apron on? Let’s do this! It’s a straightforward process, but I’ve tucked a few of my favorite chef hacks into each step to make sure your dip is absolutely perfect.
- Preheat your oven to 375°F (190°C). Chef’s Tip: I always do this first thing. A properly preheated oven is the secret to that perfect, bubbly bake. While it’s heating up, I grease my baking dish—a 9×9-inch dish or a 10-inch oven-safe skillet works perfectly. Using a skillet means you can go straight from the stovetop to the oven, which is my personal favorite method for fewer dishes!
- In a large skillet, cook the ground beef over medium-high heat until it’s beautifully browned and no pink remains. Chef’s Hack: I like to use a potato masher to break up the meat as it cooks—it gets it into perfectly small, dip-able crumbles faster than a spoon! Once it’s cooked, carefully drain off the excess grease. This little step is key to ensuring your dip isn’t oily.
- Stir in the taco seasoning, the entire can of diced tomatoes with green chilies (juice and all!), and the drained and rinsed black beans. Give it all a good stir until everything is warmly coated in that spice mixture. Let it simmer for about 5 minutes. Chef’s Insight: This simmering time is crucial! It allows the flavors to really get to know each other and meld together, and it helps cook off some of the liquid from the tomatoes, concentrating the flavor.
- If you’re not using an oven-safe skillet, now’s the time to transfer your flavorful beef mixture to your greased baking dish. Spread it out into a nice, even layer.
- Now for the best part: the cheese! Sprinkle your freshly shredded cheddar and pepper jack cheeses evenly over the top of the beef mixture. Chef’s Tip: Don’t skimp! Make sure every inch is covered in that cheesy blanket. This creates that gorgeous, golden-brown top we’re all dreaming of.
- Pop the dish into your preheated oven and bake for 15-18 minutes. You’re looking for the cheese to be completely melted, the edges to be bubbly and lively, and maybe even a few golden-brown spots starting to form on the cheese. Your kitchen should smell absolutely incredible right now.
- Carefully remove the dip from the oven (it’s hot!). Let it sit for just a minute or two—this makes it easier to scoop. Now, artfully scatter the diced avocado and any other garnishes you’re using over the top. The contrast of the cool, green avocado on the hot, cheesy dip is just *chef’s kiss*.
- Serve it immediately, right from the dish, with a big bowl of sturdy tortilla chips alongside. Chef’s Final Thought: Place it in the middle of the table, take a step back, and get ready for the compliments to roll in. You’ve just made a party legend!
How to Serve This Crowd-Pleasing Masterpiece
Presentation is part of the fun! I love serving this dip straight from the oven-safe skillet or the baking dish I cooked it in—it’s rustic, inviting, and means one less dish to wash. Place the hot dish on a trivet or a thick wooden board right in the center of your snack spread. Pile a big, colorful bowl high with tortilla chips right next to it. For a real “wow” factor, add little bowls of your extra garnishes—sour cream, sliced jalapeños, chopped cilantro—so your guests can customize their perfect bite. This isn’t just a dip; it’s an experience!
Make It Your Own: Delicious Variations
The beauty of this recipe is its adaptability. Here are a few of my favorite ways to mix it up:
- Spicy Fiesta: Kick up the heat! Use hot Rotel, add a diced fresh jalapeño to the beef while it cooks, and use all pepper jack cheese. Top with pickled jalapeños for an extra tangy punch.
- White Chicken Chili Dip: Swap the ground beef for 2 cups of shredded rotisserie chicken and use a packet of white chicken chili seasoning instead of taco seasoning. Use Monterey Jack cheese and a can of drained corn. It’s a whole new flavor profile!
- Fully Loaded Taco Dip: After baking, turn your dip into a loaded masterpiece. Top with a layer of chilled shredded lettuce, a drizzle of sour cream, the diced avocado, and a handful of sliced black olives.
- Breakfast for Dinner Dip: Yes, really! Use a pound of cooked breakfast sausage instead of beef, and a can of diced green chilies (without tomatoes). Swap the taco seasoning for a pinch of salt and pepper. Serve with toast points or hash brown patties for dipping. You’re welcome.
Anna’s Chef Notes & Kitchen Stories
This recipe has been on quite a journey with me! The very first time I made it, in my early cooking days, I made the classic mistake of using pre-shredded cheese. The dip was still delicious, but the cheese was a little…stringy and separate, not that smooth, creamy pool I wanted. It was a live-and-learn moment that taught me the value of that one little extra step. Now, I keep a block of cheese in the fridge specifically for this dip.
Over the years, I’ve also learned that this dip is a fantastic “clean out the fridge” vehicle. Got a half an onion that needs using? Dice it and sauté it with the beef. A lone bell pepper hanging out? Chop it up and toss it in! A handful of corn kernels? You get the idea. Don’t be afraid to make it your own. The recipe is a trusty guide, but your kitchen, your rules!
Your Questions, Answered!
I’ve gotten so many wonderful questions about this dip over the years. Here are the ones that pop up most often:
Q: Can I make this chili cheese dip ahead of time?
A: Absolutely! You can be a total party-prep superstar. Assemble the entire dip—right up to sprinkling the cheese on top—cover it tightly, and refrigerate it for up to 24 hours. When you’re ready, just pop it into a preheated oven. You might need to add 5-10 minutes to the baking time since it’s going in cold.
Q: My dip seems a little greasy. How can I prevent that?
A> This is a common one! The key is in the first step. After browning your ground beef, take the time to drain the excess grease really well. Tilt the skillet and use a spoon to scoop it out, or carefully pour it into an old can. Using a leaner beef (90/10 or 93/7) can also help, but I find a quick drain does the trick perfectly.
Q: Can I make this in a slow cooker instead?
A> You bet! This is a fantastic slow cooker method for keeping the dip warm throughout a party. After browning the beef and draining the grease, transfer it to your slow cooker. Stir in the taco seasoning, tomatoes, and beans. Stir in *most* of the cheese (reserving about ½ cup for the top). Cook on LOW for 2-3 hours, until hot and bubbly. Sprinkle the reserved cheese on top, cover until melted, and then add your fresh toppings.
Q: The cheese on top got a little too brown. What happened?
A> Ovens can vary so much in temperature! If you find your cheese is browning too quickly, your oven might run hot. Try lowering the temperature by 25°F next time. You can also tent the dish loosely with aluminum foil for the first 10 minutes of baking, then remove it to let the cheese get perfectly bubbly for the last 5-8 minutes.
Nutritional Information (Approximate, Per Serving)
Please note, this is an estimate and can vary based on specific ingredients used.
- Calories: ~330
- Protein: 18g
- Carbohydrates: 10g
- Fat: 24g
Prep Time: 10 minutes | Cook Time: 20 minutes | Total Time: ~30 minutes
Final Thoughts
If there’s one thing I’ve learned from years of hosting, it’s this: when you’ve got a warm, bubbly dish of chili cheese dip on the table, everything else falls into place. The laughter gets louder, the conversation gets easier, and everyone finds a reason to linger just a little longer. This dip isn’t just a recipe — it’s a guaranteed good time in a dish. Whether you’re feeding a crowd of football fans, movie-night buddies, or just your own family on a cozy weekend, it’s the kind of comfort food that brings everyone together. So grab that bag of chips, scoop big, and savor every cheesy, spicy, joy-filled bite.