Let’s Bake Some Easter Magic!
Hey there, friend! Anna here, apron on and whisk in hand, ready to dive into one of my all-time favorite springtime traditions. Is there anything more purely joyful than a dessert that’s both delicious and adorable? I don’t think so. Today, we’re making Chocolate Nest Cupcakes—the ultimate edible celebration of Easter, budding flowers, and sunny days ahead.
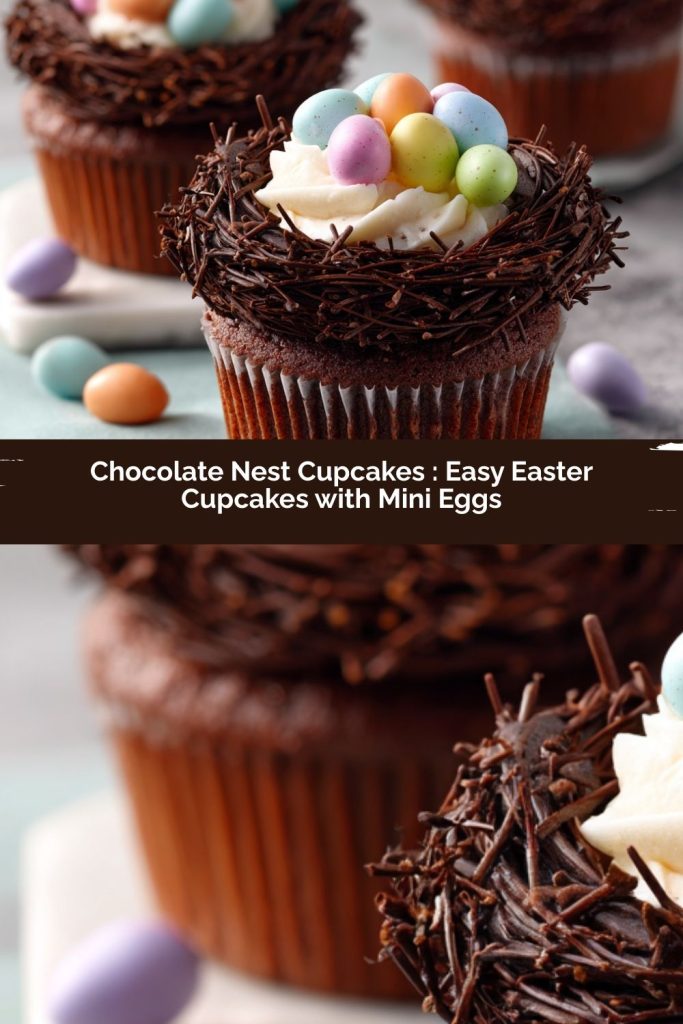
Picture this: impossibly moist chocolate cupcakes, topped with a cloud of the creamiest chocolate buttercream you’ve ever tasted. But the real showstopper? A cute little “nest,” made from chocolate sprinkles, cradling a cluster of pastel mini eggs. They look like you spent hours crafting them, but I’ll let you in on a secret: they’re wonderfully, blissfully simple to make. Whether you’re hosting a big family brunch, need a show-stopping treat for the school bake sale, or just want to add a dash of whimsy to your weekend, these cupcakes are your answer.
This recipe is all about joy, not stress. We’re using a clever shortcut or two (no judgment here—only smart solutions!), and I’ll walk you through every single step. My goal? To have you feeling like a confident, creative baking rockstar, ready to impress everyone who lays eyes on these little masterpieces. So, preheat that oven, gather your cutest mini eggs, and let’s turn our kitchens into a springtime bakery. Get ready for smiles, compliments, and maybe even a happy dance when you see your finished nests. Let’s get started!
A Nest Full of Memories
PrintChocolate Nest Cupcakes : Easy Easter Cupcakes with Mini Eggs
These Chocolate Nest Cupcakes are the sweetest way to celebrate Easter! Rich, moist chocolate cupcakes topped with creamy frosting and a chocolate “nest” filled with pastel mini eggs create the most adorable spring dessert. They’re fun to decorate, kid-friendly, and guaranteed to wow your guests. Bake a batch and bring a little edible Easter magic to your table!
- Prep Time: 25 minutes
- Cook Time: 18–22 minutes
- Total Time: About 1 hour
- Yield: 12 cupcakes 1x
Ingredients
For the Cupcakes:
1 box chocolate cake mix (plus ingredients listed on box)
or homemade chocolate cupcake batter
For the Frosting:
1 cup unsalted butter, softened
3 cups powdered sugar
¼ cup cocoa powder
2–3 tbsp milk
1 tsp vanilla extract
For the Nests:
1 ½ cups chocolate frosting (from above)
1 cup chocolate sprinkles or shredded chocolate
1 cup pastel mini chocolate eggs
Instructions
Prepare and bake chocolate cupcakes according to package or recipe instructions. Cool completely.
In a bowl, beat butter until creamy. Add powdered sugar and cocoa powder gradually.
Mix in vanilla and milk until smooth and fluffy.
Frost each cupcake generously with chocolate frosting.
Roll the outer edge of frosting in chocolate sprinkles to create a “nest” texture.
Use a spoon to gently press a small indent in the center.
Place 3–4 pastel mini eggs in the middle of each cupcake.
Nutrition
- Calories: 350
These cupcakes always transport me right back to my grandma’s sunny kitchen table, the smell of melting chocolate hanging in the air. She wasn’t a fancy pastry chef, but she was a wizard at creating magic with simple ingredients and a whole lot of love. Every Easter, she’d let me and my cousins be her “sous chefs” for the day. My job? Carefully rolling the frosted cupcakes in a bowl of chocolate sprinkles to create the nest texture.
I remember concentrating so hard, my tongue poking out, determined to make each one perfect. She’d then hand me the precious bag of pastel mini eggs and say, “Now, you decide where the baby birds go, Anna.” Placing those three little eggs in the center of each nest felt like a monumental, magical task. It wasn’t just baking; it was storytelling. We were creating a whole sweet, crunchy, chocolatey world on top of a cupcake. That feeling of playful creativity is what I want to bring to you today. It’s more than a recipe—it’s a tiny, delicious tradition waiting to happen in your own kitchen.
Gathering Your Nest-Building Supplies
Here’s everything you’ll need to create your flock of adorable cupcakes. I’ve added my little chef notes next to each one to help you shop and bake like a pro!
For the Chocolate Cupcakes:
- 1 box chocolate cake mix (plus the ingredients listed on the box) – This is our brilliant shortcut! I love a from-scratch cake, but for seasonal, decorated treats, a reliable mix is a lifesaver. It guarantees a moist, consistent base every single time, so we can focus our energy on the fun decorating part. Chef’s Tip: Go for a “moist” or “fudge” style mix for an extra-rich cupcake.
OR your favorite homemade chocolate cupcake batter for 12 cupcakes.
For the Chocolate Buttercream Frosting:
- 1 cup (2 sticks) unsalted butter, softened – “Softened” is key! Leave it on the counter for 1-2 hours until it yields gently to a press. This makes for the fluffiest, smoothest frosting. No melted butter, please!
- 3 cups powdered sugar – Also called confectioners’ sugar. Sift it if it’s lumpy for a silky texture.
- ¼ cup unsweetened cocoa powder – Use natural or Dutch-processed. Dutch-processed is a bit darker and less acidic, giving a deeper chocolate flavor.
- 2-3 tablespoons milk or heavy cream – Start with 2. Heavy cream will give you an even richer, creamier frosting. We’ll adjust to get the perfect spreading consistency.
- 1 teaspoon pure vanilla extract – The flavor enhancer! It rounds out all the sweetness and chocolate beautifully.
For the Adorable Nests & Decoration:
- 1 ½ cups of your prepared chocolate frosting – Yes, we use our delicious buttercream right from the bowl above! You’ll have plenty.
- 1 cup chocolate sprinkles (jimmies) OR finely shredded chocolate – This creates the “nest” texture! Chef’s Insight: Chocolate jimmies (the little rod-shaped sprinkles) work BEST as they mimic twigs. Shredded chocolate or chocolate vermicelli is a great gourmet alternative. Avoid nonpareils (the tiny round balls) as they don’t stick as well.
- 1 cup pastel mini chocolate eggs – The star of the show! You’ll need about 3-4 per cupcake. Feel free to mix in some speckled eggs or other small Easter candies for extra color.
Building Your Sweet Little Nests, Step by Step
Follow these steps, and you’ll have a bakery-worthy tray of cupcakes in no time. I’m right here with you, cheering you on!
- Bake & Cool Your Cupcakes. Prepare your chocolate cupcake batter according to the box (or your homemade recipe) and divide it evenly between 12 lined muffin cups. Bake as directed, usually 18-22 minutes at 350°F, until a toothpick inserted comes out clean. My #1 Tip: Let them cool COMPLETELY in the pan on a wire rack before you even think about frosting. Warm cupcakes will melt your beautiful buttercream into a puddle. Patience makes perfect nests!
- Create the Fluffy Cloud Frosting. In a large bowl, beat the softened butter with an electric mixer on medium speed for 2-3 minutes until it’s super pale, creamy, and smooth. This step is crucial for texture! Gradually add the powdered sugar and cocoa powder, mixing on low at first (to avoid a sugar snowstorm!) then increasing to medium. Add the vanilla and 2 tablespoons of milk/cream. Beat on medium-high for a full 2-3 minutes until it’s light, fluffy, and dreamy. If it’s too thick, add the remaining milk 1 teaspoon at a time. You want it spreadable but firm enough to hold the nest shape.
- Frost with Generosity. Using an offset spatula, a butter knife, or even just a spoon, spread a generous, swoopy mound of frosting onto each cooled cupcake. Don’t be shy! We need a good base for our nests. Aim for about a 1.5-inch tall dome. Pro hack: For a rustic “nest” look, don’t worry about making it perfectly smooth. A few peaks and swirls add character!
- The Magical Nest Transformation. Now for the fun part! Pour your chocolate sprinkles into a shallow bowl or plate. Hold a frosted cupcake by its liner base at a slight angle. Gently roll the outer edge of the frosting in the sprinkles, applying a little pressure so they stick. Continue all the way around until the sides are fully covered, leaving the very top center exposed. This creates the “nest bowl.” Repeat with all cupcakes.
- Create the Cozy Indent. Take the back of a small spoon or your clean thumb and gently press a little well into the center of each frosting dome, right where the sprinkles end. This is where your mini eggs will nestle snugly.
- Welcome the Eggs Home! Finally, place 3-4 pastel mini eggs into the indent of each cupcake. Arrange them so they look cozy and natural. And just like that, you’ve done it! You’ve created a whole basket of edible spring joy.
Presenting Your Masterpiece
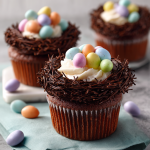
These cupcakes are a celebration all on their own! For serving, I love using a simple rustic wooden board, a pastel-colored platter, or a tiered cake stand to really show them off. If you’re bringing them to a gathering, a simple cardboard cupcake carrier lined with a checked napkin makes for a charming, portable presentation. Pair them with fresh coffee, cold milk, or a pot of floral spring tea. Watch as they become the instant centerpiece of your table—and the first dessert to disappear!
Make It Your Own! Creative Twists on the Classic Nest
The beauty of this recipe is how easily it adapts. Here are a few ways to play with your food:
- Peanut Butter Paradise: Use a chocolate peanut butter cake mix and add a tablespoon of peanut butter to your frosting. Roll the nests in crushed chocolate-peanut butter cereal (like Cocoa Puffs) and use peanut butter eggs!
- Spring Coconut Nest: For a tropical twist, use a vanilla cupcake base. Frost with vanilla buttercream and roll the edges in toasted coconut flakes. Place jelly beans or robin’s egg candies in the center.
- Cookies & Cream: Use a chocolate cupcake base. Mix crushed Oreo crumbs into your chocolate frosting. Roll the edges in more Oreo crumbs and top with mini white chocolate eggs.
- Gluten-Free & Dairy-Swap Friendly: Use a certified GF cake mix and your preferred plant-based butter and milk for the frosting. Most sprinkles and dark chocolate mini eggs are naturally gluten-free (always check labels).
Anna’s Kitchen Notes & Stories
This recipe has been my Easter staple for over a decade, and it’s evolved in the silliest ways. One year, I was out of sprinkles and in a panic, I crushed up some shredded wheat cereal and mixed it with melted chocolate to form little twigs. It worked, but it was a messy labor of love! Lesson learned: always check your sprinkle supply before Easter weekend.
I also love that this is the perfect recipe to do with little helpers. Kids are absolute geniuses at the “rolling in sprinkles” and “placing the eggs” steps. Embrace the mess—it means memories are being made. Over time, I’ve learned that a slightly thicker frosting holds the nest shape better, and letting the frosted cupcakes sit for 10 minutes before rolling in sprinkles can help them set just enough. But honestly? However they turn out, they’re always met with delight. It’s the thought, the love, and the chocolate that truly count.
Your Questions, Answered!
Q: My frosting is too runny and won’t hold the nest shape. What happened?
A: This usually means the butter was too soft or the cupcakes were still warm. Pop the whole bowl of frosting into the fridge for 20-30 minutes to firm up, then re-whip it briefly. For next time, ensure your butter is just softened, not oily, and your cupcakes are completely room-temperature cool.
Q: Can I make these ahead of time?
A> Absolutely! Bake the cupcakes 1 day ahead, let cool, and store unfrosted in an airtight container. Make the frosting, store it covered in the fridge, and let it come to room temperature and re-whip before using on the day of. I recommend assembling the full nests (with sprinkles and eggs) the day you plan to serve them for the freshest look.
Q: The sprinkles aren’t sticking to the sides of my frosting. Help!
A> You might need a slightly thicker layer of frosting, or your frosting might be a bit too dry/crusty on the outside. Try frosting one cupcake and immediately rolling it while the frosting is fresh and slightly sticky. If needed, you can very lightly mist the frosted side with water from a spray bottle before rolling—just a tiny spritz!
Q: What’s the best way to store leftover cupcakes?
A> Store them in a single layer in an airtight container at room temperature for up to 2 days. If it’s very warm, you can store them in the fridge, but let them come to room temperature for about 30 minutes before serving for the best frosting texture.
A Sweet Note on Nutrition
These cupcakes are a celebratory treat! Each one is approximately 350 calories. While they’re packed with joy (and chocolate!), they’re perfect for sharing and savoring as part of your holiday festivities. Remember, food is about connection and celebration, too!
Prep Time: 25 minutes | Bake Time: 18-22 minutes | Total Time: ~1 hour | Yield: 12 adorable cupcakes