***
Your Cozy Cup of Christmas Magic Awaits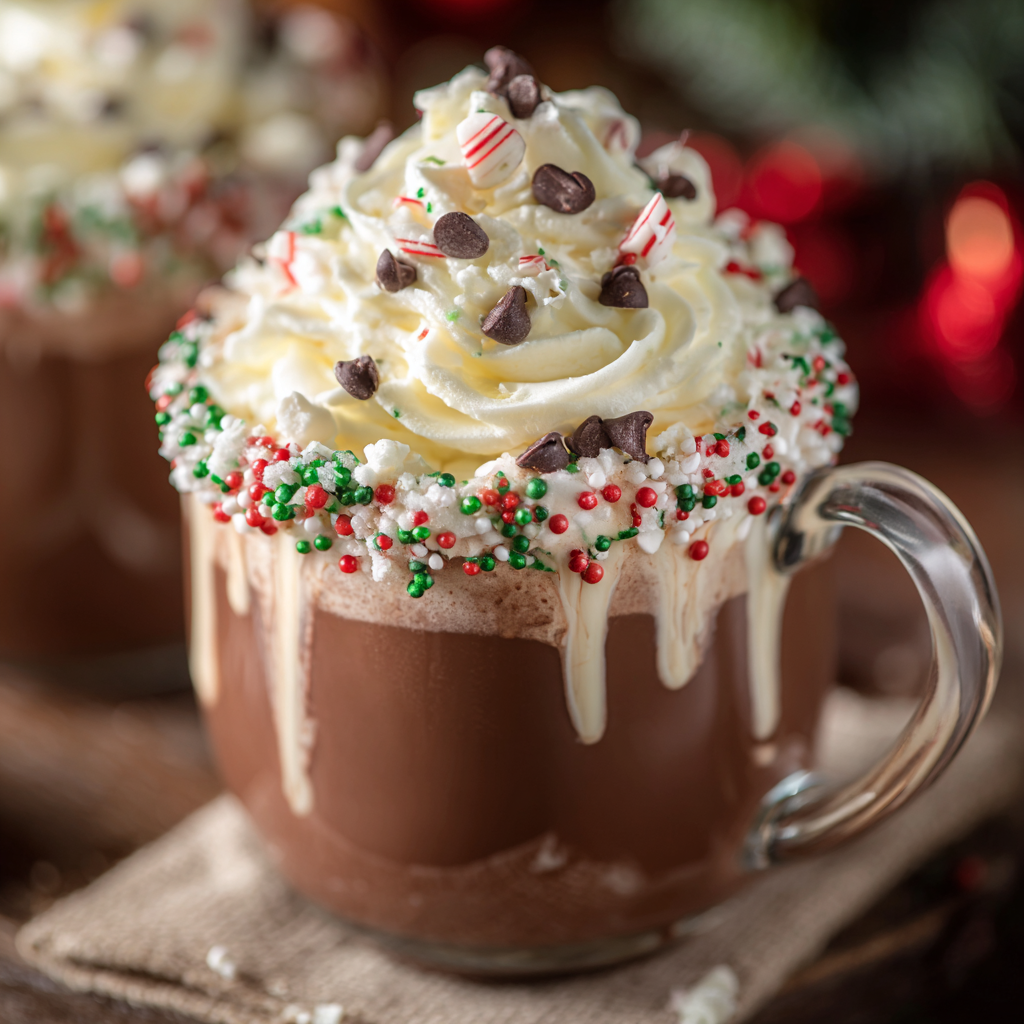
Hello, my friend! Is there anything that whispers “holiday magic” quite like a steaming mug of hot chocolate? I’m not talking about the powdery stuff from a packet (no judgment, we’ve all been there in a pinch!). I’m talking about the real deal—a rich, velvety, soul-warming concoction that feels like a hug from the inside out. The kind that makes you want to curl up by the fire, put on your favorite cheesy holiday movie, and forget the world exists for a little while. Well, pull up a chair, because today we’re making that dream a reality with my ultimate Christmas Elf Hot Chocolate.
This isn’t just any hot chocolate. This is the stuff of Santa’s workshop legends. Imagine the deepest, darkest chocolate flavor, swirled with creamy, sweet white chocolate, all brought to life with the freshest, most festive hint of peppermint. It’s topped with a cloud of homemade whipped cream and a cheerful sprinkle of red and green jimmies. Every single sip is a celebration. It’s decadent without being overly heavy, perfectly sweet but not cloying, and it has that special “something” that turns a simple drink into a core holiday memory. I’ve made this for frosty morning tree-trimming sessions, for bustling Christmas Eve gatherings, and for quiet, post-present-opening recovery moments. It’s my go-to, and I am just so thrilled to share it with you. So, let’s grab our favorite mugs and create a little kitchen magic together!
The Year the Elves (Almost) Stole the Hot Chocolate
PrintChristmas Elf Hot Chocolate
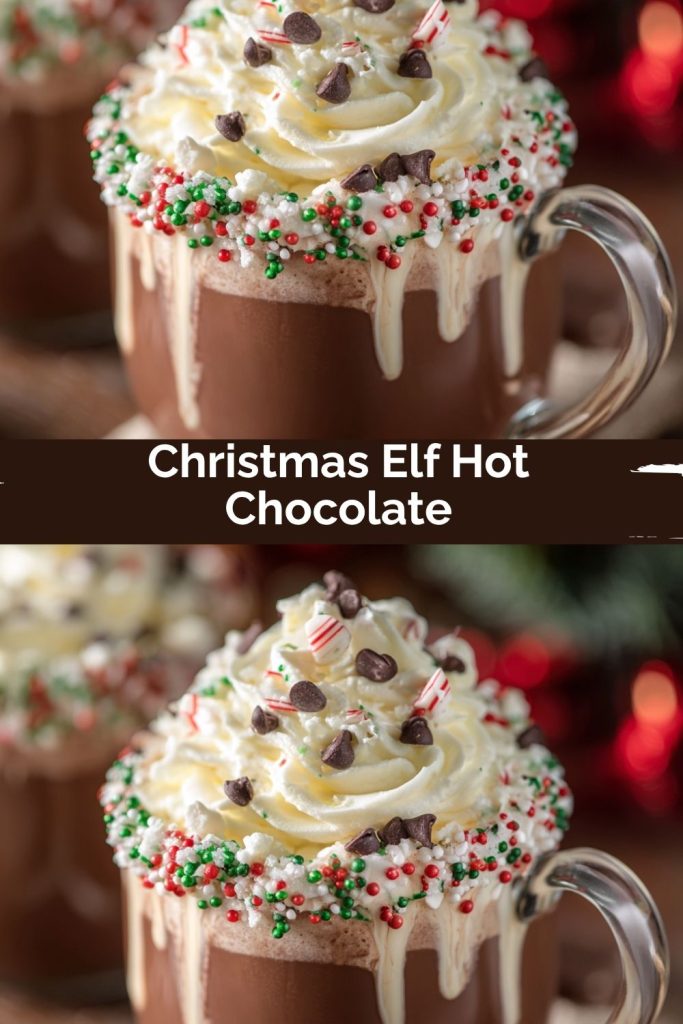
This cozy, creamy hot chocolate is straight from Santa’s kitchen. With layers of rich dark and white chocolate, a swirl of peppermint, and topped with whipped cream and festive sprinkles, it’s the ultimate winter treat. Perfect for snuggling by the fire, watching holiday movies, or serving at your next Christmas gathering.
- Prep Time: 5 minutes
- Cook Time: 10 minutes
- Total Time: 15 minutes
Ingredients
2 cups milk
1 cup heavy cream
½ cup dark chocolate chips
½ cup white chocolate chips
2 tablespoons cocoa powder
1 teaspoon vanilla extract
¼ teaspoon peppermint extract
Instructions
In a medium saucepan, combine milk and heavy cream. Heat over medium-low until warm, not boiling.
Stir in dark chocolate chips, white chocolate chips, and cocoa powder. Whisk gently until completely melted and smooth.
Remove from heat and stir in vanilla and peppermint extracts.
Pour into mugs, top generously with whipped cream, and finish with red and green sprinkles.
Nutrition
- Calories: 320
- Fat: 22g
- Carbohydrates: 28g
- Protein: 4g
This recipe holds a very special place in my heart, and it all started a few years ago with my then five-year-old nephew, Leo. We have a tradition of spending the first weekend of December baking and decorating for the season. That year, we decided to go all out on a “North Pole Breakfast” for the family. We made cinnamon rolls, snowy scrambled eggs, and the centerpiece was going to be this incredible, from-scratch hot chocolate. I had been tinkering with the recipe for weeks, trying to get the balance of chocolates just right.
The morning of the breakfast, the kitchen was a whirlwind of flour and glitter. Leo, my official “Chief Elf Assistant,” was in charge of the sprinkles. As I was carefully stirring the pot, he decided the hot chocolate needed a little extra elf magic. Before I could stop him, he grabbed the bottle of green food coloring and gave it a hearty squirt right into the simmering pot! My first instinct was panic—my beautiful, creamy brown creation was now a murky, swampy green! But Leo’s face was beaming with pride. “Now it’s REAL elf hot chocolate, Aunt Anna!” he declared. We laughed so hard, and you know what? We served the “Swamp Elf Special” that day, and it was a huge hit. It taught me that the real magic isn’t in perfection; it’s in the joy and the stories we create. (I’ve since kept the food coloring well out of reach, but I always think of that story when I make this recipe!).
Gathering Your Elf-Worthy Ingredients
Great food starts with great ingredients, and the beauty of this recipe is its simplicity. Here’s what you’ll need to create this cup of cozy perfection. Don’t forget to check out my little chef notes next to each one for tips and tricks!
- 2 cups whole milk: I highly recommend whole milk for its richness, which creates a luxurious mouthfeel. The fat content helps carry the chocolate flavor beautifully. If you need a dairy-free option, oat milk or full-fat canned coconut milk are fantastic, creamy substitutes.
- 1 cup heavy cream: This is our secret weapon for an extra-indulgent texture. It makes the hot chocolate incredibly smooth and helps form a lovely, rich base. For a slightly lighter version, you can use half-and-half, but the cream is truly what makes it magical.
- ½ cup dark chocolate chips: I use a good-quality dark chocolate (around 60-70% cacao) for a deep, complex chocolate flavor that isn’t too sweet. This provides the backbone of our drink. If you only have a bar of dark chocolate, just chop it up finely so it melts evenly.
- ½ cup white chocolate chips: The white chocolate adds a wonderful creaminess and a touch of vanilla-like sweetness that balances the dark chocolate perfectly. Look for real white chocolate that lists cocoa butter as an ingredient.
- 2 tablespoons unsweetened cocoa powder: This might seem like overkill, but trust me! The cocoa powder intensifies the chocolate flavor and gives the drink a beautiful, dark color. Use a natural, unsweetened cocoa powder for the best result.
- 1 teaspoon pure vanilla extract: Vanilla is the flavor bridge that ties everything together. Always use pure vanilla extract for the best flavor—it makes a world of difference compared to imitation.
- ¼ teaspoon peppermint extract: A little goes a long way! This gives our hot chocolate that classic, festive elf vibe. Start with ¼ teaspoon and add a tiny bit more if you love a stronger minty kick. You can also use 2-3 tablespoons of peppermint syrup if that’s what you have on hand.
Brewing the Magic: Step-by-Step Instructions
Ready to make some magic? This process is simple, but a few key steps will ensure your hot chocolate is silky smooth and perfectly blended. Let’s do this!
- Combine the Milky Base. In a medium saucepan, pour in your milk and heavy cream. Place it over medium-low heat. This is our first chef hack: low and slow is the way to go! We want to gently warm the liquids until they are steaming hot but not boiling. Boiling can cause the milk to scorch or develop a skin, and we want everything to stay perfectly smooth. You’ll know it’s ready when you see little bubbles forming around the edge of the pan.
- Whisk in the Chocolate Trio. Once the milk and cream are hot, reduce the heat to low. Now, add in the dark chocolate chips, white chocolate chips, and cocoa powder. Here’s a pro tip: sift the cocoa powder into the pot as you whisk. Cocoa powder is notoriously clumpy, and sifting it ensures it incorporates seamlessly without any dry pockets. Whisk gently but constantly until all the chocolate has melted and the mixture is completely smooth and unified. This should take about 3-5 minutes. You’ll see it transform from a milky liquid into a rich, dark, and glorious chocolate pool.
- Infuse the Flavor. Once your hot chocolate is velvety smooth, take the saucepan off the heat. This is important! Adding extracts to a boiling liquid can cause some of their delicate flavors to evaporate. Off the heat, stir in the vanilla and peppermint extracts. Give it a good final whisk to make sure the mint is evenly distributed. Take a quick taste—this is the chef’s privilege! Adjust the peppermint if needed.
- Pour and Create Your Masterpiece. Now for the fun part! Carefully pour the hot chocolate into your favorite mugs. I love using big, sturdy mugs that can hold a mountain of toppings. Immediately top each mug with a generous dollop of freshly whipped cream (homemade is easiest—just whip that leftover heavy cream with a touch of sugar and vanilla!). The whipped cream acts as a delicious insulator, keeping your drink hot. Finally, shower it with festive red and green sprinkles, a drizzle of chocolate sauce, or even a mini candy cane. This is where you can really let your inner elf shine!
How to Serve Your Christmas Elf Hot Chocolate
Presentation is part of the fun! For a truly magical experience, warm your mugs with hot water for a minute before pouring in the hot chocolate—this keeps it warmer, longer. Serve it immediately with a spoon and a napkin, because this is a drink you’ll want to eat as much as sip. It’s the perfect centerpiece for a holiday movie night, a wonderful welcome drink for a Christmas party, or a cozy treat after building a snowman. Pair it with shortbread cookies, gingerbread men, or a simple slice of coffee cake for the ultimate festive moment.
Let’s Get Creative! Recipe Variations
This recipe is a wonderful canvas for your own creativity! Here are a few of my favorite twists:
- Naughty Elf Mocha: Stir in 1-2 tablespoons of strong brewed espresso or 1 teaspoon of instant espresso powder along with the chocolate. The coffee enhances the chocolate flavor beautifully.
- Cozy Spiced Elf: Add a pinch of ground cinnamon, nutmeg, and a tiny pinch of cayenne pepper when you add the cocoa powder for a warm, subtly spicy version.
- Dairy-Free Delight: Use full-fat canned coconut milk and your favorite unsweetened almond or oat milk. Be sure to use dairy-free chocolate chips.
- Adult Elf: For a boozy treat for the grown-ups, add a shot of peppermint schnapps, Irish cream, or bourbon to each mug before pouring in the hot chocolate.
- Blended Frozen Elf: Let the hot chocolate cool completely, then blend it with a couple of cups of ice for an incredible frozen hot chocolate frappe!
Anna’s Chef Notes: A Few More Sprinkles of Wisdom
This recipe has evolved so much over the years. I started with just dark chocolate, but found it could be a bit one-dimensional. The addition of white chocolate was a game-changer for creaminess. And the peppermint extract? That was inspired by my love for those classic Christmas candy canes we always hang on the tree.
One of my favorite kitchen fails (because we all have them!) was the time I tried to be fancy and use a block of expensive dark chocolate. I was chatting away with a friend and not paying attention, and I added the chocolate while the heat was still too high. The chocolate seized up and turned grainy! I had to start all over. The lesson? Even simple recipes deserve your full attention for those few critical minutes of melting. But also, don’t stress! It’s just hot chocolate, and even the “mistakes” are usually still pretty delicious.
I encourage you to make this recipe your own. Add more peppermint, less peppermint, top it with marshmallows instead of cream… this is your kitchen, your rules! The goal is to create a moment of joy.
Your Hot Chocolate Questions, Answered!
Q: My hot chocolate turned out a bit grainy. What happened?
A: This usually happens if the heat was too high when you added the chocolate. Chocolate can “seize” or become grainy if it’s heated too aggressively. Always melt your chocolate over low heat, and be patient! If it does get grainy, you can sometimes save it by adding a tablespoon of warm milk and blending it with an immersion blender until smooth.
Q: Can I make this in a slow cooker for a party?
A: Absolutely! This is a fantastic party trick. Combine all ingredients (except the extracts and toppings) in a 3-quart slow cooker. Cook on LOW for 2 hours, whisking occasionally, until the chocolate is melted and smooth. Stir in the extracts right before serving. Keep it on the WARM setting for guests to help themselves.
Q: How can I store leftovers?
A: Let the hot chocolate cool completely, then store it in an airtight container in the refrigerator for up to 3 days. Reheat it gently on the stovetop over low heat, whisking frequently. It might separate a little, but a good whisk will bring it right back together.
Q: Is there a way to make this less rich?
A: For a lighter version, you can use 3 cups of 2% milk and omit the heavy cream. The result will be a thinner but still delicious hot chocolate. You could also reduce the amount of chocolate chips slightly, but I’d recommend trying the full recipe first—it’s a treat worth savoring!
Nutritional Information (Approximate, per serving)
Please note, this is a rich, indulgent treat! The following is an estimate based on the ingredients listed and will vary with specific brands and toppings.
- Calories: 420
- Fat: 30g
- Carbohydrates: 35g
- Protein: 7g
Christmas Elf Hot Chocolate
Prep Time: 5 minutes | Cook Time: 10 minutes | Total Time: 15 minutes
Yield: Serves 3-4
Ingredients
- 2 cups whole milk
- 1 cup heavy cream
- 1/2 cup dark chocolate chips
- 1/2 cup white chocolate chips
- 2 tablespoons unsweetened cocoa powder
- 1 teaspoon vanilla extract
- 1/4 teaspoon peppermint extract
- Whipped cream and sprinkles, for serving
Instructions
- In a medium saucepan over medium-low heat, combine the milk and heavy cream. Heat until steaming hot but not boiling.
- Reduce heat to low. Whisk in the dark chocolate chips, white chocolate chips, and sifted cocoa powder. Whisk constantly until the chocolate is fully melted and the mixture is smooth.
- Remove from heat. Stir in the vanilla and peppermint extracts.
- Pour into mugs and top generously with whipped cream and festive sprinkles. Serve immediately.
Final Thoughts
This Christmas Elf Hot Chocolate is more than just a drink—it’s a little cup of holiday joy. Every swirl of chocolate, every cloud of whipped cream, and every sparkle of sprinkles feels like it was made to capture the magic of the season. It’s festive, it’s cozy, and it’s the kind of treat that makes ordinary evenings feel like Christmas morning.
Whether you’re sipping it by the fire, serving it at a holiday party, or making it a family movie night tradition, this cocoa has a way of bringing out the childlike wonder in all of us. So grab your mug, pile on the toppings, and let this recipe add a little extra sparkle to your holiday celebrations.