The Sweet & Salty Magic of Classic Strawberry Pretzel Salad
Hey there, friend! Grab a seat at my kitchen island and let’s talk about one of those legendary, conversation-starting desserts that has a permanent spot on my family’s potluck table: the iconic Strawberry Pretzel Salad. Now, I know what you might be thinking—”Salad? Really, Anna?”—but trust me, this is the glorious, no-lettuce-allowed kind of salad we all crave. It’s a stunning trifecta of flavors and textures: a salty-sweet pretzel crust, a luscious creamy cheesecake layer, and a shimmering, fruity gelatin topping studded with juicy strawberries.
This dessert is a showstopper. It’s the dish that gets a chorus of “oohs” when you unveil it from the fridge and the one that disappears first, every single time. Whether you’re a seasoned host or just looking for a guaranteed crowd-pleaser for your next gathering, this recipe is your secret weapon. It’s wonderfully straightforward to make, but the layered result looks like you spent all day crafting something truly special. So, if you’re ready to make a dessert that sparks joy, nostalgia, and maybe a little friendly recipe-swapping, you’re in the right place. Let’s turn ordinary ingredients into something absolutely magical together!
A Pan of Love and Laughter: My Pretzel Salad Story
PrintClassic Strawberry Pretzel Salad (Sweet & Salty Layered Jello Dessert)
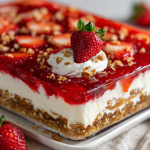
Classic Pretzel Salad is a nostalgic layered dessert that combines a buttery pretzel crust, creamy cheesecake-style filling, and a fruity gelatin topping. It’s sweet, slightly salty, cool, and refreshing — making it a must-have for holidays, potlucks, and family gatherings.
- Prep Time: 20 minutes
- chill time: 4 hours
- Cook Time: 10 minutes
- Total Time: 4 hours 20 minutes
- Yield: 12 1x
Ingredients
For the Pretzel Crust
200g crushed pretzels
150g unsalted butter, melted
3 tablespoons sugar
For the Cream Layer
225g cream cheese, softened
150g sugar
250ml whipped topping or whipped cream
For the Gelatin Layer
1 (170g) package strawberry gelatin
500ml boiling water
400g sliced strawberries (fresh or frozen, thawed and drained)
Instructions
Prepare the Crust
Preheat oven to 180°C (350°F). In a bowl, mix crushed pretzels, melted butter, and sugar. Press firmly into the bottom of a 9×13-inch baking dish. Bake for 8–10 minutes, then allow to cool completely.
Make the Cream Layer
Beat cream cheese and sugar until smooth and fluffy. Gently fold in whipped topping until fully combined. Spread evenly over the cooled pretzel crust, sealing the edges to prevent gelatin from seeping through. Refrigerate for 30 minutes.
Prepare the Gelatin
Dissolve strawberry gelatin in boiling water. Stir until completely dissolved. Let cool to room temperature (do not let it set). Stir in sliced strawberries.
Assemble
Carefully pour the cooled gelatin mixture over the cream layer.
Chill
Refrigerate for at least 4 hours, or until fully set.
Serve
Slice into squares and serve chilled.
Nutrition
- Calories: 320–360 kcal
- Protein: 3–4g
My love affair with this dessert started not in a fancy restaurant, but at a bustling church basement potluck. I was maybe ten years old, navigating a sea of casserole dishes and slow cookers, when I saw it—a glistening, pink-topped creation that looked like a dessert from a fantasy novel. I took a square, skeptical of the pretzel bits peeking through. One bite was a revelation. The crunch, the cream, the cool fruit—it was perfect. I spent the rest of the party strategically hovering near that pan, hoping for seconds.
Years later, when I got my first apartment, I called my aunt for the recipe. It came to me on a faded index card, splattered with vanilla extract and butter stains—the best kind of recipe card. Making it myself for the first time felt like a rite of passage. Now, I make it every summer for our big backyard barbecue. It’s not a true party in my house until this pan is chilling in the fridge. It’s more than a dessert; it’s a tangible piece of my food history, a sweet and salty thread connecting those church basement days to my own crowded, laughter-filled kitchen today. It’s a taste of pure, shared joy.
Gathering Your Sweet & Salty Symphony
Here’s everything you’ll need to conduct this delicious kitchen orchestra. I’ve added my little chef’s notes to help you pick your players and understand their roles!
For the Salty-Sweet Pretzel Crust:
- 200g (about 4 cups) crushed pretzels: The star of the base! I use classic thin salted pretzels. The salt is non-negotiable for that perfect contrast. Crush them until you have a mix of fine crumbs and some pea-sized pieces for great texture. A food processor is quick, or put them in a zip-top bag and channel your inner superhero with a rolling pin.
- 150g (2/3 cup) unsalted butter, melted: This is the glue that holds our crunchy crust together. Using unsalted butter lets us control the salt level perfectly with the pretzels. If you only have salted, just skip the extra pinch of salt in the crust.
- 3 tablespoons granulated sugar: This little bit of sweetness is the yin to the pretzel’s salty yang, creating that addictive flavor foundation.
For the Luscious Cream Layer:
- 225g (8 oz) full-fat cream cheese, softened: Full-fat is key here for richness and stability. Let it sit on the counter for a good hour—truly soft cream cheese blends smoothly without lumps. This is our creamy dream layer.
- 150g (3/4 cup) granulated sugar: Sweetens the cream cheese beautifully. You can sift it if you’re worried about graininess, but beating it well with the soft cheese does the trick.
- 250ml (8 oz tub or 1 cup) whipped topping (like Cool Whip), thawed: This gives the layer its cloud-like fluff and helps it set. Chef’s Swap: You can use an equal amount of freshly whipped heavy cream sweetened with a tablespoon of powdered sugar. It’s divine, but the layer will be slightly softer.
For the Sparkling Gelatin Topping:
- 1 (170g/6 oz) package strawberry gelatin: Jell-O brand works perfectly. This creates that gorgeous, jewel-like top layer. Strawberry is classic, but see my variations for more fun!
- 500ml (2 cups) boiling water: For completely dissolving the gelatin crystals. No shortcuts here—get it good and hot!
- 400g (about 3 cups) sliced strawberries: Fresh or frozen (thawed and well-drained) both work! Frozen berries often release more juice, making the gelatin layer even more flavorful. I like to slice some and halve others for visual interest.
Let’s Build Some Layers: Your Step-by-Step Guide
Okay, friend! Aprons on? Let’s do this. We’re building from the ground up, and each step is simple but important for that iconic layered look.
Step 1: The Foundation – Bake the Pretzel Crust. First, preheat your oven to 180°C (350°F). In a medium bowl, stir together the crushed pretzels, melted butter, and sugar until every crumb is buttery and coated. It should look like wet sand. Pour this into your ungreased 9×13-inch baking dish and press it firmly and evenly into the bottom. I use the bottom of a measuring cup to really tamp it down—a tight pack is what gives us a solid base that won’t crumble when sliced. Pop it in the oven for 8-10 minutes. You’re not looking for color, just to set it. Let it cool completely on a wire rack. Patience here is crucial! A hot crust will melt our cream layer.
Step 2: The Cloud – Make the Cream Cheese Layer. While the crust cools, let’s make the fluff. In a large bowl, beat the softened cream cheese and sugar together with an electric mixer on medium speed for 1-2 minutes. Stop and scrape down the bowl. Beat again until it’s completely smooth, pale, and fluffy—no lumps allowed! Now, gently fold in the whipped topping. I switch to a spatula for this. “Folding” means gently turning the mixture over from the bottom until it’s uniform, keeping as much air in as possible. Spread this creamy bliss evenly over the completely cooled crust. Here’s a pro-tip: use your spatula to seal the cream layer right up to the edges of the pan, creating a little barrier. This helps prevent the gelatin from sneaking down the sides later. Pop the whole pan in the fridge for at least 30 minutes to firm up.
Step 3: The Jewel – Prepare the Gelatin Layer. In a heat-proof bowl or large measuring jug, empty the packet of strawberry gelatin. Pour the boiling water over it and whisk vigorously for 2 full minutes, until the powder is completely dissolved. Now, let it cool on the counter until it’s just lukewarm to the touch (about 20-30 mins). This is vital! If the liquid is too hot, it will melt the cream layer. If you let it set even slightly, it won’t pour smoothly. Stir in your sliced strawberries.
Step 4: The Grand Finale – Assemble and Chill. Take your chilled pan from the fridge. Slowly and carefully, pour the strawberry-gelatin mixture over the cream layer. Try to pour it evenly to avoid disrupting the layer below. It’s okay if some berries sink or float—it looks homemade and wonderful. Gently place the pan back in the refrigerator, on a flat shelf. Let it chill for at least 4 hours, but honestly, overnight is best. This gives every layer time to fully set, making for the cleanest, most beautiful slices.
Presenting Your Masterpiece
When it’s time to serve, run a thin, sharp knife under hot water, wipe it dry, and slice straight down into squares. I love serving it on a simple white platter to let those gorgeous pink and cream layers shine. For a fancy touch, garnish each piece with a fresh mint leaf or a single perfect whole strawberry. It’s best served cold, right from the fridge, so keep it chilled until the very moment your guests are ready to dig in!
Make It Your Own: Fun Twists & Swaps
- Berry Blast: Use raspberry or mixed berry gelatin and matching frozen berries for a different fruity profile.
- Tropical Escape: Try pineapple or mango gelatin with drained crushed pineapple or diced mango. So refreshing!
- Chocolate-Pretzel Dream: Swap the fruit layer for a chocolate pudding layer. Prepare instant chocolate pudding with only 1 1/2 cups of milk for a thicker set, let it cool, then spread it over the cream layer. Top with extra pretzel crumbs.
- Lighter Note: Use low-fat cream cheese and light whipped topping. The texture will be slightly softer, but the flavor is still fantastic.
- Nutty Crunch: Add 1/4 cup of finely chopped pecans or walnuts to the pretzel crust mixture before baking.
Anna’s Kitchen Notes
This recipe has been on quite a journey with me! That original index card recipe called for a whole extra stick of butter in the crust, which I found made it greasy. I dialed it back for the perfect snap. I also learned the hard way about that “cooled gelatin” step—my first attempt was a delicious but soupy mess because I rushed it! Now I set a timer and walk away. It’s become my most-requested dish, and I love that my friends’ kids now hover around my pan just like I did all those years ago. Food memories are the best kind of heirlooms.
Your Questions, Answered!
Q: My gelatin layer seeped into the cream layer. What happened?
A: Ah, the great seeping! This usually happens for one of two reasons: 1) The cream layer wasn’t sealed to the edges of the pan, or 2) The gelatin mixture was still too warm when poured. Next time, really focus on creating that cream cheese barrier at the edges and let the gelatin cool until it’s barely warm (test a drop on your wrist—it should feel neutral, not hot).
Q: Can I make this ahead of time?
A> Absolutely! In fact, I highly recommend it. This dessert needs that long set time, so making it the day before your event is perfect. Just cover it tightly with plastic wrap once the gelatin is fully set (after about 4 hours). It will keep beautifully for up to 3 days in the fridge.
Q: My crust is really hard to cut/chewy. Any tips?
A> This often means the crust was over-baked or packed *too* firmly. Remember, we’re just setting it, not browning it—stick to 8-10 minutes. And when pressing, firm but don’t Hulk-smash it. Using some smaller pretzel pieces (not just dust) also helps with texture.
Q: Can I use all fresh fruit and skip the boxed gelatin?
A> You can, but it’s a different technique. You’d need to use unflavored gelatin and simmer fresh berries with sugar to make a syrup. While delicious, it won’t have the same bright, clear-jelled quality. The boxed mix is the nostalgic, easy charm of this dessert!
Nutritional Information (Per Serving, Approximate)
Calories: ~340 kcal | Carbohydrates: 45g | Protein: 4g | Fat: 17g | Saturated Fat: 10g | Cholesterol: 45mg | Sodium: 280mg | Sugar: 32g
Prep Time: 20 minutes | Bake Time: 10 minutes | Chill Time: 4 hours (or overnight) | Total Time: 4 hours 30 minutes | Servings: 12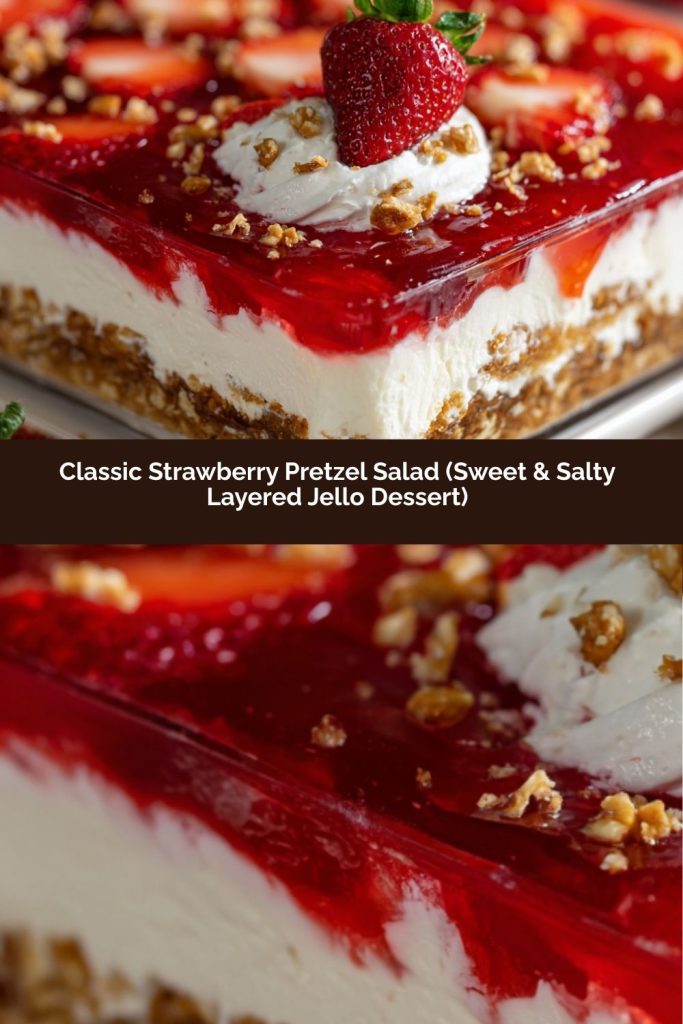
Final Thoughts
There’s a reason Strawberry Pretzel Salad has stood the test of time—it’s the perfect balance of sweet, salty, creamy, and fruity in every bite. With a crunchy pretzel crust, a cloud-like cream cheese layer, and a jewel-toned strawberry topping, it’s as much a feast for the eyes as it is for the taste buds.
The magic is in the layers: take your time to cool the crust, seal the cream layer, and let the gelatin set fully for the cleanest, most beautiful slices. Don’t be afraid to play with flavors—berries, tropical fruits, or even chocolate add a fun twist while keeping the classic charm intact.
Whether you’re bringing it to a potluck, a backyard BBQ, or simply treating your family at home, this dessert is guaranteed to get smiles, “oohs and aahs,” and maybe even a few recipe requests. It’s simple, nostalgic, and utterly irresistible—the kind of dessert that turns ordinary moments into sweet memories.