***
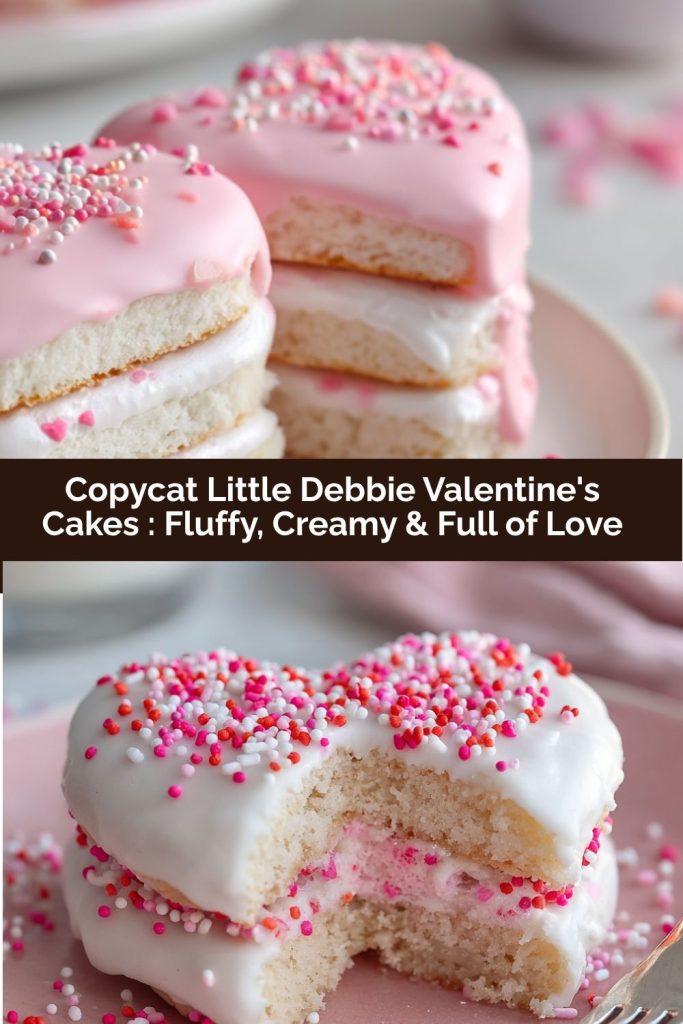
Copycat Little Debbie Valentine’s Cakes – Fluffy, Creamy & Full of Love
More Than a Snack Cake: A Bite of Sweet Nostalgia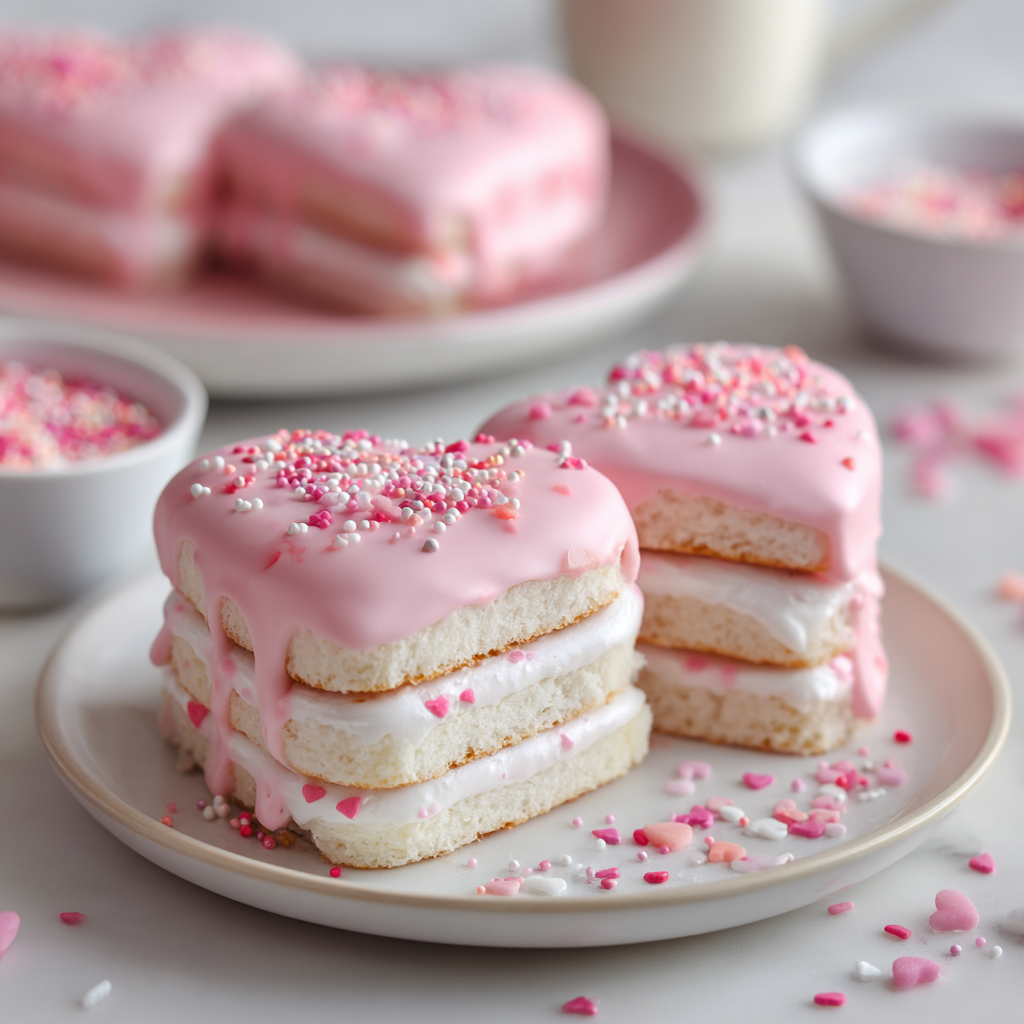
Hello, my lovely friend! Anna here, welcoming you back to my cozy kitchen corner. Is there anything that captures the pure, uncomplicated joy of childhood quite like a brightly colored snack cake? I’m talking about those cellophane-wrapped treasures that showed up in lunchboxes and promised a moment of pure sugar-fueled happiness. For me, and maybe for you too, the Little Debbie Valentine’s Cakes were the absolute pinnacle of February fun. That soft, vanilla cake, that impossibly fluffy white filling, and that iconic pink icing shell… they weren’t just a dessert; they were a tiny, edible Valentine.
But as much as I adore that nostalgic flavor, I also love the magic of making things from scratch. There’s something so incredibly special about recreating a beloved treat with your own two hands, infusing it with real ingredients and a whole lot of love. That’s exactly what we’re doing today. We’re taking that classic lunchbox memory and transforming it into a homemade masterpiece that’s even more tender, more flavorful, and infinitely more shareable.
These Copycat Little Debbie Valentine’s Cakes are our love letter to simpler times. They’re perfect for Valentine’s Day, of course—imagine the look on your loved one’s face when you present a platter of these!—but they’re also just the thing for birthday surprises, Galentine’s parties, or simply turning a regular Tuesday into something worth celebrating. So, are you ready to preheat that oven and create some kitchen magic together? Let’s bake up a whole lot of love!
The Lunchbox Swap That Started It All
PrintCopycat Little Debbie Valentine’s Cakes : Fluffy, Creamy & Full of Love

Bring back childhood nostalgia with these homemade heart-shaped Little Debbie-inspired Valentine’s cakes. With soft vanilla layers, a fluffy cream cheese filling, and a smooth iced coating, these charming cakes are perfect for sharing the love—whether on Valentine’s Day, birthdays, or any sweet moment in between.
Ingredients
2 cups all-purpose flour
2 tsp baking powder
¼ tsp salt
½ cup (1 stick) unsalted butter, softened
1 cup granulated sugar
3 large eggs, room temperature
1 cup whole milk
2 tsp vanilla extract
Cream Cheese Filling
8 oz cream cheese, softened
4 cups powdered sugar (divided use)
½ cup unsalted butter, softened
–2 tbsp milk (as needed for texture)
Optional: ½ tsp almond extract or 2 tbsp marshmallow fluff for a twist
Frosting (Icing Coating)
2 cups powdered sugar
2–3 tbsp milk
Food coloring (pink, red, or white)
Sprinkles or sanding sugar for decoration
Instructions
Step 1: Bake the Cake
Preheat oven to 350°F (175°C). Line a large rimmed baking sheet (jelly roll pan) with parchment and grease lightly.
In a medium bowl, whisk together flour, baking powder, and salt.
In a large bowl, cream butter and sugar until fluffy (3–4 mins).
Add eggs one at a time, then mix in vanilla.
Alternate adding dry ingredients and milk, mixing just until combined.
Spread evenly into pan and bake for 20–25 minutes. Let cool completely.
Step 2: Cut the Hearts
Once cooled, use a heart-shaped cookie cutter to cut even pairs of hearts from the sheet cake.
Gently remove excess cake and transfer hearts to a lined tray.
Step 3: Make the Filling
Beat cream cheese and butter together until smooth.
Add powdered sugar, one cup at a time, and mix until creamy.
Add a splash of milk if needed for spreadable texture.
Pipe or spread filling onto half the heart cakes, then top with matching hearts to sandwich.
Step 4: Frost the Cakes
Whisk powdered sugar with 2–3 tablespoons of milk until smooth and pourable.
Tint with food coloring if desired.
Spoon or drizzle over each sandwich cake, letting it drip slightly down the sides.
Decorate with festive sprinkles or sanding sugar immediately before icing sets.
Tips & Variations
Use strawberry or raspberry jam for the filling instead of cream for a fruity center.
Add freeze-dried strawberry powder to the frosting for a natural pink tint and fruity flavor.
Want chocolate? Swap ¼ cup flour with cocoa powder for chocolate hearts.
Chill the cakes for 10 minutes before icing for cleaner coverage.
Serving & Storage
Serve on a platter with berries, or individually wrapped for gifting.
Store in an airtight container for up to 3 days at room temp or refrigerate for up to 5 days.
Freeze for up to 2 months, wrapped tightly and thawed in the fridge overnight.
Nutrition
- Calories: 380
- Sugar: 38g
- Fat: 18g
- Carbohydrates: 48g
- Protein: 3g
I can still feel the crinkle of the cellophane wrapper and see the faint pink smudge it would leave on my fingers. In my elementary school cafeteria, trading snacks was a serious business, and the Valentine’s Cakes were the ultimate currency. I vividly remember one year, my best friend Sarah and I made a pact: we’d each save the cakes from our lunchboxes every day for a whole week leading up to Valentine’s Day. On the big day, we’d have a feast, just the two of us, at our little table by the window.
The plan was flawless, until Wednesday, when the temptation became too real. I’ll never forget the whispered negotiation: “I’ll trade you my fruit roll-up for a bite of your cake,” I pleaded. She considered it, then shook her head. “Nope. We have to be strong!” That week taught me a lot about delayed gratification, but more importantly, it cemented the idea that certain foods are so much more than fuel—they’re a vessel for memory, for friendship, and for shared joy. Every time I make this recipe, I’m transported back to that lunchroom, grinning with my friend, celebrating our willpower (and eventual indulgence) with those perfect, pink-hearted cakes. It’s that feeling I want to bottle up and share with you in every bite.
Gathering Your Sweet Ingredients
Before we begin, let’s get our mise en place—that’s just a fancy chef term for having everything in its place! Measuring everything out beforehand makes the baking process feel like a joyful dance instead of a frantic scramble. Here’s what you’ll need to create this edible nostalgia.
For the Vanilla Cake Layers:
- 2 cups all-purpose flour: The reliable backbone of our cake, providing just the right structure for those soft, tender layers.
- 2 tsp baking powder: Our little leavening hero! This is what gives the cake its beautiful rise and airy crumb. Make sure yours is fresh for the best lift.
- ¼ tsp salt: Don’t skip this! Salt is the flavor enhancer that makes the vanilla and sweetness truly pop. It’s the secret to a well-balanced cake.
- ½ cup (1 stick) unsalted butter, softened: The key word here is softened. Leave it on the counter for an hour before you start. It should yield gently to a press—this is non-negotiable for a fluffy, not dense, cake.
- 1 cup granulated sugar: For that classic, sweet cake flavor we know and love.
- 3 large eggs, room temperature: Room temp eggs incorporate into the batter much more smoothly, leading to a better texture. Just pop them in a bowl of warm water for 5-10 minutes if you forgot to take them out!
- 1 cup whole milk: The fat content in whole milk gives us a richer, more tender crumb. It’s worth it for this special treat!
- 2 tsp vanilla extract: Use the good stuff! Pure vanilla extract adds a warm, complex flavor that imitation vanilla just can’t match.
For the Dreamy Cream Cheese Filling:
- 8 oz cream cheese, softened: Again, softening is crucial! This gives our filling that impossibly smooth, lump-free texture.
- 4 cups powdered sugar (divided use): We’ll use most of this in the filling, and save a couple cups for the icing. It dissolves beautifully for a silky finish.
- ½ cup unsalted butter, softened: Combined with the cream cheese, this creates the stable, rich base for our filling.
- 1–2 tbsp milk: This is our “as needed” ingredient. Use it to adjust the filling to a perfectly spreadable consistency.
- Optional: ½ tsp almond extract or 2 tbsp marshmallow fluff: A little chef’s secret! Almond extract adds a lovely, bakery-style depth, while marshmallow fluff makes the filling even lighter and fluffier.
For the Pretty Pink Icing:
- 2 cups powdered sugar: The base of our simple, sweet, and smooth coating.
- 2–3 tbsp milk: Start with two tablespoons and add a third if needed to get a pourable, but not too runny, consistency.
- Food coloring (pink, red, or white): Go for that classic Valentine’s pink! Gel food coloring gives a more vibrant color without thinning the icing.
- Sprinkles or sanding sugar for decoration: The finishing touch! This is where you can let your personality shine. Heart sprinkles? Rainbow jimmies? Go for it!
Let’s Bake: Creating Your Edible Valentines
Okay, friend, apron on, favorite playlist on, and let’s get baking! I’ll walk you through every step with all my best tips and tricks to ensure your cakes are absolutely perfect.
Step 1: Bake the Perfect Sheet Cake
First, preheat your oven to a cozy 350°F (175°C). This ensures a consistent temperature for even baking. Now, grab a large rimmed baking sheet (a jelly roll pan, roughly 10×15 inches, is ideal). Line it with parchment paper and give it a light greasing. This dynamic duo guarantees your cake will release like a dream. Chef’s Hack: After greasing, sprinkle a light dusting of flour over the pan and tap out the excess. This gives the cake extra insurance against sticking!
In a medium bowl, let’s whisk together our dry team: the flour, baking powder, and salt. Giving them a good whisk now means we won’t have to overmix later, which is the secret to a tender cake. In a large bowl, it’s time for the butter and sugar to become best friends. Using a hand mixer or stand mixer fitted with the paddle attachment, cream them together on medium-high speed for a full 3-4 minutes. We’re not just mixing; we’re aerating! The mixture should become pale, fluffy, and glorious. This step is the foundation of a light cake, so don’t rush it.
Now, add your room-temperature eggs in one at a time, beating well after each addition. This allows them to fully emulsify into the butter mixture. Then, mix in that beautiful vanilla extract. Scrape down the sides of the bowl—this is a habit of all great bakers! Now, with the mixer on low, we’ll alternate adding the dry ingredients and the milk. Start and end with the dry ingredients (Dry-Milk-Dry is an easy rhythm to remember). Mix just until the flour disappears. A few streaks are okay! Overmixing is the enemy of fluffiness.
Pour the batter onto your prepared pan and use an offset spatula or the back of a spoon to spread it into a smooth, even layer. Pop it into the preheated oven and bake for 20-25 minutes. You’ll know it’s done when the top is lightly golden and springs back when gently touched, and a toothpick inserted into the center comes out clean. Let the cake cool completely in the pan on a wire rack. I know, the waiting is the hardest part, but a warm cake will crumble when we cut our hearts!
Step 2: Cut Out the Love
Once your cake is completely cool, the real fun begins! Find your favorite heart-shaped cookie cutter (about 2.5-3 inches wide is perfect). Dip the cutter in a little powdered sugar to prevent sticking, and press down firmly to cut out as many hearts as you can. Pro Tip: Try to cut them as close together as possible to minimize waste. Gently remove the excess cake (we can use those scraps for a fabulous cake trifle later!). Carefully transfer your perfect heart cakes to a parchment-lined tray. You’ll want to create pairs, as each finished cake is a sandwich!
Step 3: Whip Up the Fluffy Filling
Time for the cloud-like cream cheese filling! In a clean bowl, beat the softened cream cheese and butter together until they are completely smooth, creamy, and lump-free. This should take about 2 minutes. Now, with the mixer on low speed, gradually add the powdered sugar, one cup at a time. Once it’s mostly incorporated, crank the speed up to medium-high and beat for another minute until it’s dreamily fluffy. If the filling seems a bit thick, add a splash of milk, one tablespoon at a time, until it’s a spreadable consistency. If you’re using the almond extract or marshmallow fluff, beat it in now.
You can spread this filling with a knife, but for a truly professional look, spoon it into a piping bag (or a sturdy plastic bag with a corner snipped off!). Pipe a generous swirl onto one heart from each pair, then gently press its matching partner on top to create a cake sandwich. Don’t press too hard—we want to keep that filling fluffy!
Step 4: The Icing on the Cake (Literally!)
We’re in the home stretch! For the signature pink icing, simply whisk the powdered sugar and 2 tablespoons of milk together in a medium bowl. You’re aiming for a smooth, pourable consistency that will coat the back of a spoon. If it’s too thick, add the extra tablespoon of milk. Too thin? Add a bit more powdered sugar. Now, tint it with your pink or red food coloring to your desired shade of Valentine’s cheer.
Now, for the final flourish. Place a cake sandwich on a wire rack with the tray underneath to catch drips. Spoon the icing over the top of each cake, letting it drip naturally down the sides. Don’t worry about it being perfect—the homemade, slightly rustic look is part of the charm! Immediately, while the icing is still wet, shower it with your favorite sprinkles or sanding sugar. Let the icing set completely before serving. Chef’s Hack: For a super clean, smooth coating like the original, you can carefully dip the top of the cake into the icing instead of spooning it on!
Sharing the Sweetness: How to Serve
Presentation is part of the fun! Arrange these gorgeous heart cakes on a beautiful cake stand or a simple wooden board. Scatter a few fresh raspberries or strawberries around the platter for a pop of color and a hint of freshness. For a truly adorable gift, wrap them individually in clear cellophane bags tied with a pink ribbon. They make the most thoughtful, handmade Valentine for teachers, neighbors, friends, or that special someone. Seeing these little parcels of love will absolutely make anyone’s day.
Make It Your Own! Delicious Twists & Swaps
The beauty of this recipe is its versatility! Don’t be afraid to play and personalize.
- Fruity Fun: Swap half the cream cheese filling for a layer of strawberry or raspberry jam. It’s a burst of fruity goodness!
- Naturally Pink: Skip the food coloring and blend 2 tablespoons of freeze-dried strawberry powder into your icing powder before adding the milk. It gives a gorgeous pink hue and a subtle fruity flavor.
- Chocolate Lover’s Dream: For a chocolate cake base, swap out ¼ cup of the all-purpose flour for unsweetened cocoa powder.
- Dairy-Free Delight: Use your favorite plant-based butter and milk, and a dairy-free cream cheese alternative. It works like a charm!
- For a Crispy Bite: Add ¼ cup of crushed freeze-dried strawberries to the cream cheese filling for a fun, subtle crunch and tang.
Anna’s Kitchen Chronicles: A Recipe That Grows With You
This recipe has been a labor of love in my kitchen for years. The first time I tried it, I was so impatient that I tried to cut the hearts while the cake was still warm. Let’s just say I ended up with more of a “heartfelt crumble” than heart cakes! It was a delicious, if messy, lesson in patience. Over time, I’ve learned that the quality of vanilla truly makes a difference, and that adding that tiny pinch of almond extract to the filling was the “a-ha!” moment that made it taste just right. I also used to be so careful with the icing, trying to make it perfectly smooth. Now, I love the drippy, whimsical look—it feels more joyful and homemade. Food, like us, isn’t meant to be perfect. It’s meant to be made and shared with love. I hope this recipe becomes a tradition in your home, just like it has in mine.
Your Questions, Answered!
I’ve gotten so many wonderful questions about this recipe over the years. Here are the answers to the most common ones to help you bake with confidence!
Q: My cake turned out a bit dense. What happened?
A: The most common culprits for a dense cake are overmixing the batter or using butter/eggs that weren’t properly softened. When you overmix after adding the flour, you develop the gluten, which leads to a tougher texture. Mix just until you no longer see streaks of flour! Also, ensure your butter is soft enough to leave an indent when pressed, and your eggs are room temp.
Q: Can I make these ahead of time?
A> Absolutely! These are fantastic for prepping. You can bake the cake sheet, let it cool completely, and then wrap it tightly in plastic wrap a day ahead. You can also store the assembled (but un-iced) cakes in an airtight container in the fridge for up to 24 hours. Ice them the day you plan to serve them for the freshest look and texture.
Q: My icing is too thin/too thick. How can I fix it?
A> No worries, this is an easy fix! If it’s too thin, whisk in more powdered sugar, a tablespoon at a time, until it thickens up. If it’s too thick, add more milk, just a teaspoon at a time, until it reaches that lovely pourable consistency. Remember, it should coat the back of a spoon and drip off slowly.
Final Thoughts
There’s just something special about recreating a childhood favorite from scratch — especially when it turns out better than the original. These Copycat Little Debbie Valentine’s Cakes are soft, sweet, and full of that nostalgic charm that makes you smile with every bite. The tender vanilla cake, the creamy filling, the pretty pink icing — it all comes together in one dreamy, heart-shaped treat that feels like love at first bite.
Whether you’re making them for Valentine’s Day, a sweet surprise for someone special, or just to treat yourself, these little cakes are guaranteed to spread joy. So go ahead — grab your mixer, dust off that heart-shaped cutter, and make a batch of edible love notes. Because sometimes, the sweetest way to say “I love you” is with a homemade cake — wrapped in pink and filled with cream.