Let’s Make Hummus That’s Actually Magical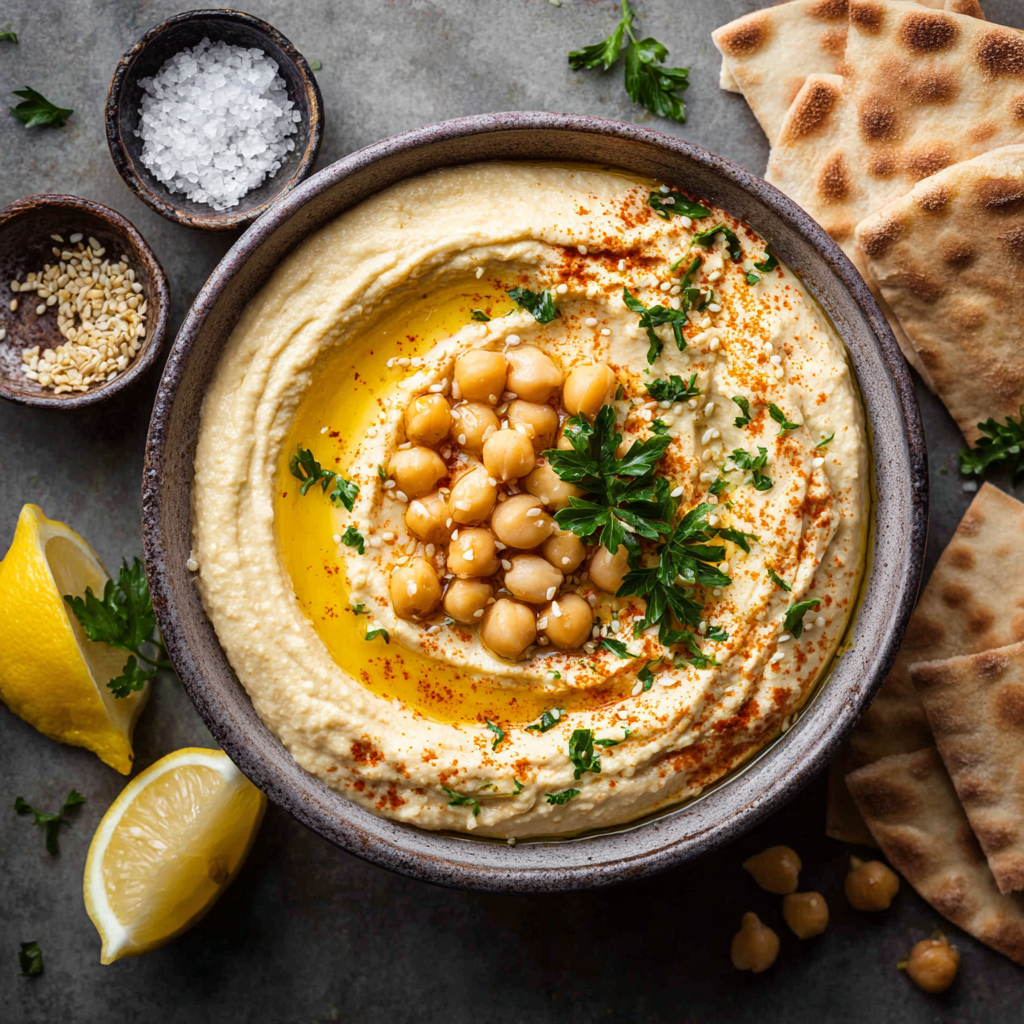
Hey there, friend! Grab a carrot stick and pull up a stool. I’ve got a secret to share that’s going to change your snack game forever: the absolute, mind-blowing joy of making your own creamy, dreamy hummus from scratch. I know, I know—the store-bought tub is convenient. But what if I told you that in less than 10 minutes, with a few simple ingredients, you could create a dip so smooth, so bright, so alive with flavor that it makes the grocery store version taste like, well, beige paste?
This isn’t just another recipe; it’s a kitchen revelation. Hummus is one of those foundational foods that, when made with love and a few key tricks, becomes so much more than a dip. It’s a spread for your morning toast, a glorious dollop on a grain bowl, the star of your veggie platter, and your secret weapon for making any sandwich instantly more exciting. It’s healthy, it’s satisfying, and it has this magical ability to make everyone hover around the kitchen island, waiting for the first taste.
So today, we’re ditching the stabilizers and the sometimes-funky aftertaste. We’re embracing the real deal. This recipe is my tried-and-true, foolproof blueprint for classic, creamy homemade hummus. It’s my most-requested party trick, and I’m so excited to pass it on to you. Trust me, once you experience that first silky-smooth, lemony-garlicky bite of your own creation, there’s no going back. Ready to make some magic? Let’s get blending!
The Hummus That Started It All
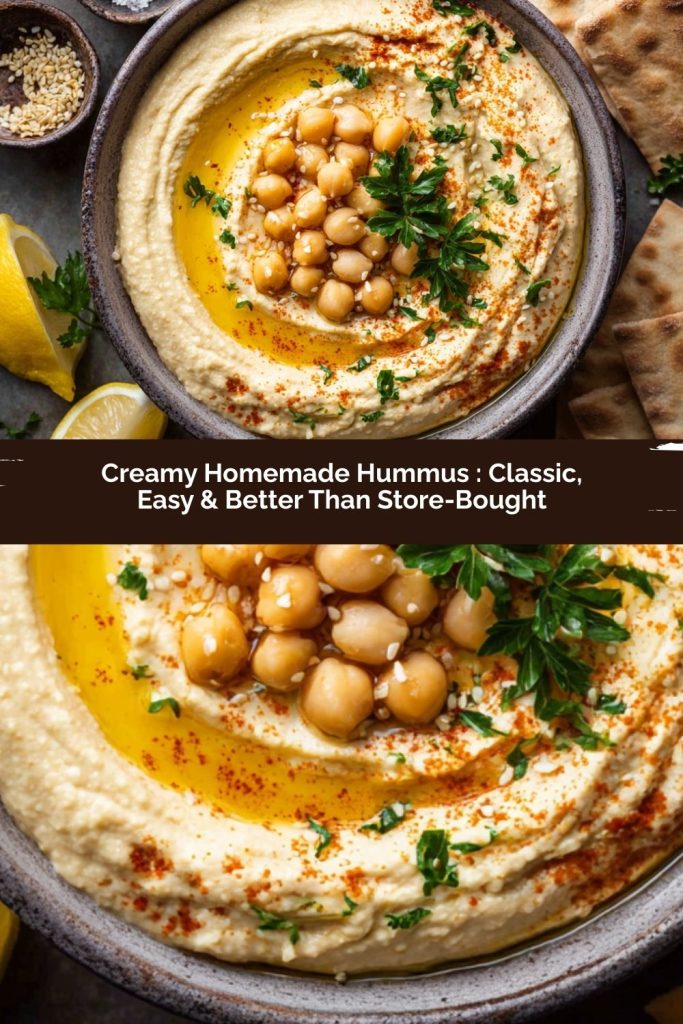
PrintCreamy Homemade Hummus : Classic, Easy & Better Than Store-Bought

This homemade hummus is ultra-creamy, full of bright, zesty flavor, and comes together in just minutes with pantry staples. Made with chickpeas, tahini, lemon, and garlic, it’s a Mediterranean classic that works as a dip, spread, or healthy snack. Once you try it fresh, you’ll never want to go back to store-bought again!
- Prep Time: 10 mins
- Total Time: 10 mins
Ingredients
1 (15 oz) can chickpeas, drained and rinsed
¼ cup fresh lemon juice (about 1 large lemon)
¼ cup tahini
1 small garlic clove, minced
2 tbsp olive oil (plus more for topping)
2–4 tbsp cold water
½ tsp ground cumin
Salt to taste
Optional: paprika or chopped parsley for garnish
Instructions
In a food processor, blend tahini and lemon juice for 1 minute until creamy and pale.
Add garlic, olive oil, cumin, and a pinch of salt. Blend again until smooth.
Add chickpeas and blend for 1–2 minutes, scraping the sides.
Slowly add cold water, 1 tbsp at a time, until desired consistency is reached.
Taste and adjust salt or lemon.
Spoon into a bowl, drizzle with olive oil, and sprinkle with paprika or parsley if desired.
Nutrition
- Calories: 140
- Carbohydrates: 13g
- Protein: 5g
My love affair with homemade hummus began not in a fancy kitchen, but in a tiny, sun-drenched apartment with a rickety old food processor that sounded like a jet engine. I was fresh out of college, trying to impress some new friends with a “fancy” spread for game night. My budget said “canned beans,” but my heart said “make it special.” I remembered watching my mom make it once, the smell of toasted cumin and lemon filling the air.
I whirled together what I had—a can of chickpeas, a lemon, some garlic, and a jar of tahini I’d bought on a whim. I didn’t know the tricks yet, but I added a splash of the chickpea liquid (aquafaba, though I didn’t know its fancy name!) and let that machine run. And run. And run. When I finally stopped it, I dipped a spoon in and my eyes went wide. It was transcendent. It was creamier and brighter than anything I’d ever bought. My friends devoured it, and in that moment, I truly understood the power of a few simple, good ingredients treated with care. That loud, old processor taught me that the best food isn’t complicated—it’s honest, made with intention, and meant to be shared.
Gathering Your Hummus Magic (A.K.A. The Ingredients)
Here’s the beautiful part: the ingredient list is short and sweet. Quality here makes a huge difference, so let’s break it down like we’re chatting over the grocery cart.
- 1 (15 oz) can chickpeas (garbanzo beans), drained and rinsed – Our creamy base! I use canned for ultimate ease, but if you’re feeling ambitious, 1 ½ cups of cooked dried chickpeas work wonderfully. Chef’s Tip: Save that liquid from the can (aquafaba)! We might use it later for extra creaminess.
- ¼ cup fresh lemon juice (about 1 large, juicy lemon) – This is the bright, sunny spark. Please, please use fresh juice. The bottled stuff just can’t compete. Roll your lemon on the counter firmly before cutting to get every last drop.
- ¼ cup tahini – The rich, nutty soul of the hummus. Give the jar a really good stir before measuring, as the oil separates. If your tahini tastes bitter, it might be old—fresh tahini should taste smooth and nutty.
- 1 small garlic clove, minced – We start small because raw garlic can get potent. You can always add more! For a mellower flavor, try roasting the whole clove first.
- 2 tbsp good olive oil (plus more for topping) – Use the best extra-virgin olive oil you have for drizzling. Its fruity, peppery notes will shine right on top.
- 2–4 tbsp ice-cold water (or reserved aquafaba) – The SECRET WEAPON for ultra-creamy texture! Cold liquid helps emulsify everything into cloud-like smoothness. Aquafaba (the chickpea can liquid) adds creaminess, while water lets the other flavors pop purely.
- ½ tsp ground cumin – This warm, earthy spice is the cozy blanket that wraps all the flavors together. Toasting whole cumin seeds and grinding them fresh is next-level, but the pre-ground stuff works great too.
- Salt to taste – We’ll start with a pinch and build. Kosher salt is my kitchen bestie.
- Optional for garnish: a drizzle of olive oil, a sprinkle of paprika, smoked paprika, or sumac, and/or chopped fresh parsley. – This is where you make it pretty! A little color goes a long way.
Let’s Make It: The Path to Creamy Perfection
Okay, chef friend, here’s where the magic happens. The order of operations is the second secret (after the cold water)! Following these steps ensures everything emulsifies perfectly for that dreamy texture.
- Prep Your Chickpeas (The Optional, Game-Changing Step). For the smoothest hummus imaginable, take 2 minutes to pop the skins off your rinsed chickpeas. Just pinch each one and the skin slides right off. It’s a little meditative, I promise, and it removes the tough outer layer that can cause graininess. No time? No problem! It’ll still be delicious—just blend a bit longer.
- Wake Up the Tahini. In your food processor (a good blender works too!), combine the tahini and fresh lemon juice. Blend this for a full minute. It will look weirdly thick and almost seized at first, then it will become smooth, pale, and creamy. This step “wakes up” the tahini and starts our emulsion strong.
- Build the Flavor Base. To the creamy tahini-lemon mix, add the minced garlic, 2 tbsp olive oil, cumin, and a good pinch of salt. Blend again until it’s completely smooth and fragrant, about 30 seconds. You’re creating a flavor-packed paste that will coat every chickpea.
- Bring in the Chickpeas. Add your (peeled or unpeeled) chickpeas to the processor. Now, let it run! Blend for a good 2-3 minutes, stopping to scrape down the sides once or twice. You want it to look thick and almost paste-like. Be patient here—this long blending time breaks everything down super fine.
- The Creamy Miracle. With the processor running, slowly stream in your ice-cold water (or aquafaba), one tablespoon at a time. Start with 2 tbsp, then let it process for another 30 seconds. Look at it. Dip a spoon. Want it creamier, smoother, more dippable? Add another tbsp of cold liquid. I usually use 3-4 tbsp total. You’ll watch it transform from a thick paste to a gloriously smooth, velvety cloud.
- Taste and Tweak. This is the most important step! Stop the machine and taste. Need more brightness? Add a squeeze more lemon. More depth? A pinch more cumin. More zip? A tiny bit more garlic. Not quite salty enough? Add salt in small increments. Make it yours!
- The Grand Finale. Spoon your hummus into a shallow bowl. Use the back of your spoon to make lovely swoops and swirls on the surface—these little grooves are perfect for catching the good stuff. Drizzle generously with your best olive oil and sprinkle with paprika or parsley. Ta-da! You just made restaurant-quality hummus.
How to Serve Your Masterpiece
Presentation is part of the joy! I love serving hummus in a wide, shallow bowl. Those swoops you made? They’re not just pretty—they create little pools for the olive oil. For a real showstopper, arrange a platter with warm, fluffy pita bread (cut into triangles), crisp cucumber spears, colorful bell pepper strips, sweet cherry tomatoes, and crunchy carrot sticks. For a heartier snack, add some salty Kalamata olives, tangy feta cheese crumbles, and a sprinkle of za’atar. Don’t forget it’s also the world’s best sandwich spread or a glorious bed for a spiced ground lamb or roasted vegetable topping.
Play With Your Food! Fun Flavor Twists
Once you’ve mastered the classic, the world is your hummus-flavored oyster! Here are a few of my favorite riffs:
- Roasted Red Pepper: Blend in ½ cup of jarred roasted red peppers (drained) for a sweet, smoky, vibrant orange dip.
- Everything Bagel: After plating, top with a heavy sprinkle of everything bagel seasoning and extra sesame seeds.
- Herb & Green: Add a big handful of fresh parsley, cilantro, or dill (or a mix!) during the final blending for a garden-fresh green hummus.
- Spicy Harissa: Swirl 1-2 tablespoons of harissa paste into the finished hummus for a warm, North African-inspired kick.
- Kalamata Olive: Pulse in ⅓ cup of pitted Kalamata olives at the very end for a briny, chunky texture and gorgeous purple hue.
Anna’s Kitchen Notes & Stories
This recipe has been my trusty sidekick for years, and it’s evolved with me. The “cold water trick” was a happy accident on a hot summer day when I added an ice cube to cool it down quickly—the texture was so incredible I never looked back. I’ve learned that hummus tastes even better after it sits in the fridge for an hour, letting the flavors get to know each other. But good luck waiting that long!
Funny story: I once accidentally used a whole head of garlic instead of one clove (I was distracted, chatting with a friend!). Let’s just say that batch had a serious… personality. We ate it anyway, laughing through the garlic breath, but it taught me to always measure my garlic with focus! The beauty of this recipe is its flexibility. Make it once, then make it yours. That’s what home cooking is all about.
Your Hummus Questions, Answered
Q: My hummus is grainy/chunky. What did I do wrong?
A: Don’t worry, we can fix it! The main culprits are under-blending or the chickpea skins. First, just let your food processor run longer—sometimes it needs a full 4-5 minutes. If that doesn’t work, next time try peeling the chickpeas (it’s worth it, I swear!) or pushing the blended hummus through a fine-mesh sieve for an ultra-silken finish.
Q: Can I make this without a food processor or blender?
A: You can! It’s a labor of love, but a potato masher and a lot of elbow grease will get you a rustic, chunky version. For smoother results without a machine, try mashing the peeled chickpeas with a fork first, then whisking vigorously with the other ingredients. It’ll be a great arm workout!
Q: How long does homemade hummus last in the fridge?
A: Stored in an airtight container, it’s at its peak for about 4-5 days. The olive oil on top helps seal it. You might notice it thickens up in the fridge—just stir in a teaspoon of warm water or lemon juice to loosen it back up before serving.
Q: My tahini seems really bitter. Is that normal?
A> Fresh, good-quality tahini should taste rich, nutty, and smooth, not unpleasantly bitter. The bitterness can come from over-toasted sesame seeds or it being past its prime. Taste a tiny bit on its own. If it’s harsh, I’d grab a new jar from a store with high turnover. A great tahini makes all the difference!
Nutritional Info (A Perk of Making It Yourself!)
This is an estimate per ¼ cup serving: Calories: ~140 | Protein: 5g | Carbs: 13g | Fat: 8g | Fiber: 4g. Remember, you control what goes in—no preservatives, no weird additives, just simple, wholesome goodness.
Final Thoughts
These Broccoli Egg Bites aren’t just breakfast—they’re little bundles of confidence, nourishment, and happiness you can hold in your hand. They prove that healthy can be hearty, quick can be delicious, and veggies can—dare I say—be fun. Whether you’re rushing out the door, building a brunch spread, or sneaking in a protein-packed snack between meetings, these bites have your back.
The real magic lies in their versatility. Swap, mix, and match veggies, cheeses, or seasonings to fit your mood, your pantry, or your picky eaters. They freeze beautifully, reheat like a dream, and always taste like care went into them. Best of all, they carry a little story with each bite—a reminder that even the simplest breakfast can start your day off with joy.
So grab your muffin tin, your favorite mix-ins, and a smile. Breakfast doesn’t have to be stressful, and with these egg bites, it can actually be something you look forward to. Here’s to starting your mornings happy, full, and fueled!