*
Forget Everything You Thought You Knew About Cauliflower
Hey there, friend! Anna here. Can we talk about cauliflower for a second? I feel like this humble veggie has been through it all. For years, it was the quiet, pale cousin at the veggie platter, often steamed into a sad, mushy submission. Then, it had its glorious glow-up, becoming the low-carb hero of pizza crusts and rice bowls. It’s versatile, it’s healthy, and it’s a total blank canvas for flavor.
But today? Today, we’re turning it into pure, unadulterated comfort food magic. We’re talking about a snack so crispy, so cheesy, and so downright addictive that you’ll be fighting your family for the last one. We’re making my famous Crispy Parmesan Cauliflower Tots.
Imagine this: a golden-brown, bite-sized tot with a satisfyingly crunchy exterior that gives way to a tender, flavorful, and perfectly cheesy center. They’re baked, not fried, so you can feel great about enjoying them. They’re the ultimate vehicle for your favorite dipping sauce, the star of your next game-day spread, and my not-so-secret weapon for getting extra veggies into my kids (and, let’s be honest, my husband). They prove that healthy eating doesn’t have to mean sacrificing flavor or fun. So, are you ready to see just how magical this simple veggie can be? Let’s get toasting… I mean, totting!
The Tot That Started It All
PrintCrispy Parmesan Cauliflower Tots (Baked, Cheesy & Bite-Sized)

These crispy Parmesan cauliflower tots are the ultimate healthy comfort snack—golden on the outside, tender on the inside, and packed with veggie goodness. Made with simple ingredients and baked to crunchy perfection, they’re ideal for dipping, sharing, or sneaking veggies into snack time.
- Prep Time: 10 minutes
- Cook Time: 25 minutes
- Total Time: 35 minutes
Ingredients
2 cups riced cauliflower (fresh or frozen, steamed and squeezed dry)
1 egg
½ cup grated Parmesan cheese
¼ cup breadcrumbs (or almond flour for low-carb)
1 tsp garlic powder
½ tsp onion powder
Salt and pepper to taste
Optional: 1 tbsp chopped parsley or chives
Instructions
Preheat oven to 400°F (200°C) and line a baking sheet with parchment paper.
In a bowl, mix all ingredients until combined. Shape mixture into small tot-sized cylinders using your hands or a spoon.
Place tots on the baking sheet and lightly spray with olive oil.
Bake for 20–25 minutes, flipping halfway, until golden and crispy.
Serve hot with your favorite dipping sauce like ketchup, ranch, or sriracha mayo.
Nutrition
- Calories: 130
- Fat: 7g
- Carbohydrates: 8g
- Protein: 8g
This recipe was born out of a classic “Mom needs a win” moment. My youngest went through a phase where the only vegetable he’d even look at was a French fry. I was desperate to find a way to make a vegetable just as fun and finger-food-friendly. One rainy afternoon, staring at a head of cauliflower that was on the verge of giving up, I had an idea. What if I could capture the crispy, dippable joy of a tater tot, but with cauliflower as the star?
That first batch was… experimental. Let’s just say we had a few casualties in the “holding their shape” department. But the moment I pulled that first successful, golden-brown tot from the oven and my little one popped it in his mouth without a second thought, I knew we had a winner. The happy little “Mmm!” and the immediate request for “more, please!” was music to this kitchen storyteller’s ears. Now, these tots are a weekly staple in our house. They’re not just a snack; they’re a tiny, cheesy testament to the fact that a little creativity in the kitchen can turn a standoff into a celebration.
Gathering Your Tot-Making Toolkit
One of the best things about this recipe is its beautiful simplicity. You likely have most of these ingredients in your kitchen right now! Here’s what you’ll need to make about 20-24 perfect, bite-sized tots.
- 2 cups riced cauliflower (fresh or frozen): This is our main event! Riced cauliflower is simply cauliflower blitzed into tiny, rice-like pieces. You can find it pre-riced in the produce or freezer aisle, or make your own by pulsing cauliflower florets in a food processor until they reach a sandy texture. Chef’s Insight: Using frozen? No problem! Just be sure to thaw it completely and squeeze out every last drop of water with a clean kitchen towel. This is the single most important step for getting crispy tots instead of mushy ones.
- 1 large egg: Our trusty binder! The egg holds everything together, ensuring our tots don’t fall apart in the oven. If you need an egg-free version, a “flax egg” (1 tbsp ground flaxseed mixed with 3 tbsp water, left to sit for 5 mins) works beautifully.
- ½ cup grated Parmesan cheese: Hello, flavor and crispiness! The salty, umami punch of Parmesan is irreplaceable here. It also helps form that gorgeous golden crust. Substitution Tip: For a sharper taste, try Pecorino Romano. For a non-dairy version, a vegan Parmesan-style cheese can work, but the texture may vary slightly.
- ¼ cup breadcrumbs: These are our crunch-makers! They absorb any excess moisture and create that perfect, crispy exterior. Substitution Tip: For a gluten-free or low-carb option, almond flour is a fantastic swap. It toasts up beautifully and adds a lovely, nutty flavor.
- 1 tsp garlic powder & ½ tsp onion powder: These dried heroes provide a consistent, mellow base of flavor that permeates every single bite. They’re more reliable here than fresh, which can add unwanted moisture.
- Salt and black pepper to taste: Don’t be shy! Seasoning is key. I start with about ½ tsp of salt and a few good cracks of black pepper, then taste the mixture (before adding the egg, if you’re cautious) and adjust from there.
- Optional: 1 tbsp chopped fresh parsley or chives: I almost always add these for a little pop of fresh color and a subtle herbal note. It makes them look extra fancy with zero extra effort!
Let’s Build Some Tots! Your Step-by-Step Guide
Okay, team! Aprons on, oven preheating, and let’s transform this simple list into crispy perfection. I’ll walk you through every step with my favorite little chef hacks to ensure your tots are absolutely foolproof.
- Preheat and Prep: First things first, get that oven roaring hot to 400°F (200°C). This high heat is crucial for achieving maximum crispiness. While it’s warming up, line a baking sheet with parchment paper. Chef’s Hack: Give the parchment a very light spritz of cooking spray too. This guarantees a non-stick surface and helps the bottoms of the tots get extra golden. Trust me on this one!
- The Great Squeeze: If you’re using fresh riced cauliflower, steam it for about 5 minutes until just tender. If you’re using frozen, thaw it completely. Now, for the most therapeutic part of the recipe: take that cauliflower and plop it into the middle of a clean, thin kitchen towel or a few layers of cheesecloth. Gather the edges and twist, twist, TWIST over the sink until you’ve wrung out every possible drop of water. You will be shocked at how much liquid comes out! This step is non-negotiable for the perfect tot texture.
- The Mixing Bowl Hug: In a medium-sized bowl, combine your thoroughly dried cauliflower, the egg, Parmesan, breadcrumbs, garlic powder, onion powder, salt, pepper, and any fresh herbs. Now, get in there with your hands and mix it all together! Using your hands is the best way to ensure everything is evenly distributed. The mixture should hold together when you pinch it. If it feels too wet, add another tablespoon of breadcrumbs. If it feels too dry and crumbly, let it sit for a minute—the salt will draw out a tiny bit more moisture from the cauliflower, which usually does the trick.
- Shape with Love: Now, the fun part! Scoop up about a tablespoon of the mixture. Using your hands, roll it into a small log or cylinder, about the size and shape of a traditional tater tot. Don’t worry if they aren’t perfect—rustic, homemade tots have more character! If you’re finding the mixture sticks to your hands, a little trick is to lightly dampen your palms with water. This creates a barrier and makes shaping a breeze.
- Bake to Golden Perfection: Arrange your little tot soldiers on the prepared baking sheet, making sure they aren’t touching. Give them a light but thorough spritz with olive oil spray—this is what will make them brown and crisp up so nicely. Pop them in the hot oven and bake for 10-12 minutes. Then, pull the sheet out, flip each tot over, and spray the other side. This double-sided crisping action is the secret to an all-over crunch. Bake for another 10-13 minutes, until they are deeply golden brown and firm to the touch.
- The Final Countdown: When they’re done, resist the urge to eat them immediately! Let them cool on the baking sheet for about 5 minutes. This allows them to set and firm up, making them much less likely to break when you pick them up for a dip.
Time to Plate (and Dip!)
Presentation is part of the fun! I love serving these on a big wooden board or a colorful platter for sharing. Pile them high in a little basket lined with a checkered napkin for a diner-style feel. And the most important part? The DIPS! Serve them with a few small bowls of your favorite sauces. My family is fiercely divided between classic ketchup, cool and creamy ranch, and a spicy sriracha mayo (just mix sriracha and mayo to your desired heat level). They’re also incredible with a garlic aioli, marinara sauce, or even a honey mustard. Let everyone choose their own adventure!
Get Creative! Flavor Twists & Swaps
Once you’ve mastered the classic, the world is your cauliflower tot! Here are a few of my favorite ways to mix things up:
- Buffalo Bleu: Mix 2 tablespoons of Buffalo sauce into the cauliflower mixture and use crumbled blue cheese instead of (or with!) the Parmesan.
- Everything Bagel: Swap the garlic and onion powder for 2 tablespoons of Everything Bagel Seasoning. It’s a game-changer!
- Pizza Tots: Add ¼ cup of finely chopped pepperoni and 1 teaspoon of Italian seasoning. Serve with warm marinara for dipping.
- Veggie-Packed: Sneak in ¼ cup of finely grated zucchini or carrot (squeezed dry, of course!) for an extra nutrient boost.
- Spicy Southwest: Add 1 tsp chili powder, ½ tsp cumin, and ¼ cup of shredded sharp cheddar cheese.
Anna’s Extra Pinch of Advice
This recipe has truly evolved in my kitchen. That first “experimental” batch taught me the critical importance of drying the cauliflower. I’ve also learned that a slightly heaped tablespoon is the perfect tot size—big enough to feel substantial, but small enough to get a perfect crisp-to-tender ratio. A funny kitchen story? I once accidentally used cinnamon instead of paprika for a “smoky” variation I was testing. Let’s just say my “Autumn Spice Cauliflower Tots” were not a hit with the family and we ordered pizza that night! The moral of the story: always label your spice jars. Always. But that’s the joy of cooking, right? We learn, we laugh, and we try again. Don’t stress if your first tot isn’t perfect. They’ll still taste incredible, I promise.
Your Tot Questions, Answered!
I’ve made these countless times and have helped hundreds of readers make them too. Here are the most common questions and how to solve them.
- Q: My tots are mushy and not crispy. What did I do wrong?
A: 99% of the time, this is due to excess moisture in the cauliflower. You really, REALLY have to squeeze it dry. If you think you’ve squeezed enough, squeeze for another minute. Also, ensure your oven is fully preheated and you’re giving them a good spritz of oil, which promotes browning. - Q: Can I make these ahead of time?
A: Absolutely! You have two great options. 1) Shape and Freeze: After shaping the raw tots, place them on a baking sheet and freeze until solid, then transfer to a freezer bag. Bake from frozen, adding 5-10 minutes to the cooking time. 2) Make and Reheat: You can bake them completely, let them cool, and store them in the fridge for up to 3 days. Re-crisp them in a 375°F oven or an air fryer for about 5-7 minutes until hot and crispy again. - Q: Can I cook these in an air fryer?
A: You sure can! Air fryers are fantastic for this recipe. Arrange the shaped tots in a single layer in your air fryer basket, spray with oil, and cook at 375°F (190°C) for 10-12 minutes, shaking the basket halfway through. They get incredibly crispy! - Q: My mixture is too wet/crumbly and hard to shape. Help!
A: If it’s too wet, add another tablespoon of breadcrumbs or Parmesan until it comes together. If it’s too dry and crumbly, let it sit for 5-10 minutes. The salt will draw out a tiny bit more moisture from the cauliflower, which often binds it. If it’s still dry, you can add another egg yolk (not the whole egg, as that might make it too wet).
Nutritional Information*
*Please note: This is an estimate provided for informational purposes only. Exact values can vary based on specific ingredients used.
Per Serving (5 Tots, approx.):
Calories: 130 | Protein: 8g | Carbohydrates: 8g | Dietary Fiber: 2g | Net Carbohydrates: 6g | Fat: 7g | Saturated Fat: 3g
Prep Time: 10 minutes | Cook Time: 25 minutes | Total Time: 35 minutes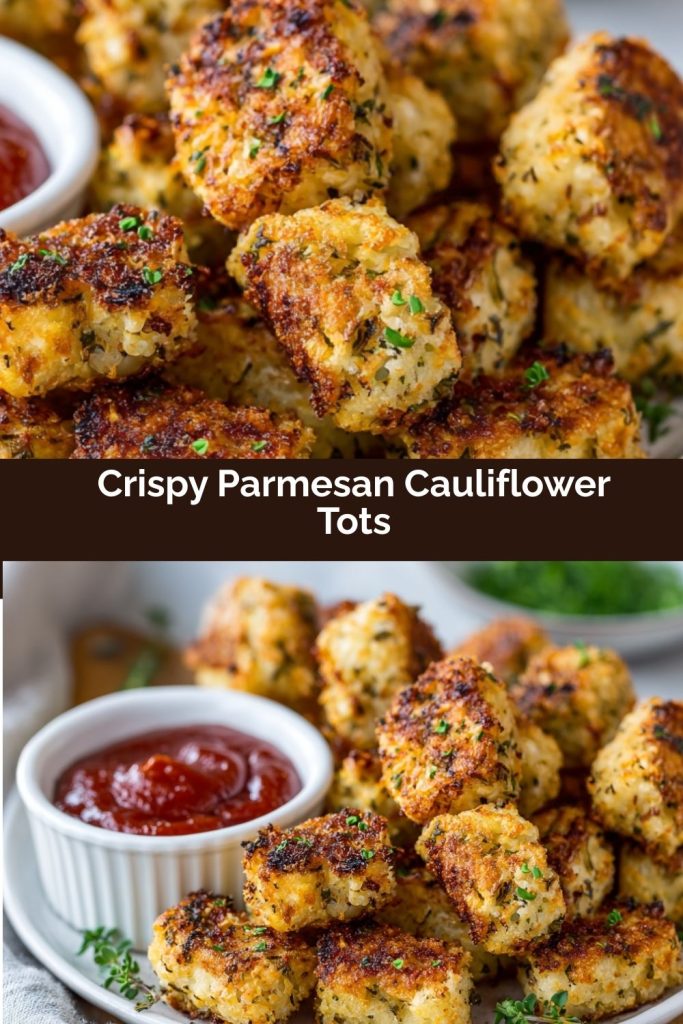
Final Thoughts
At the end of the day, these Crispy Parmesan Cauliflower Tots are so much more than a clever veggie hack—they’re a little reminder of what happens when creativity meets comfort in the kitchen. A humble head of cauliflower becomes a golden, cheesy, totally irresistible snack that brings everyone to the table… and usually keeps them there, reaching for “just one more.”
They’re the kind of recipe you make once and suddenly find yourself whipping up every week. The kind that turns picky eaters into proud veggie lovers. The kind that makes you feel like a kitchen magician, transforming something simple into something unforgettable.
So the next time you’ve got a lonely head of cauliflower in the fridge or a craving for something crispy and cozy, you know exactly what to do. Get your towel ready, warm up that oven, and let a batch of these little beauties bring joy straight to your table. Happy tot-making, friend—may your cauliflower always be dry, your tots always be golden, and your dip bowl always be full. 🧡