Easter Cake in a Jar: Your New Make-Ahead Party Star!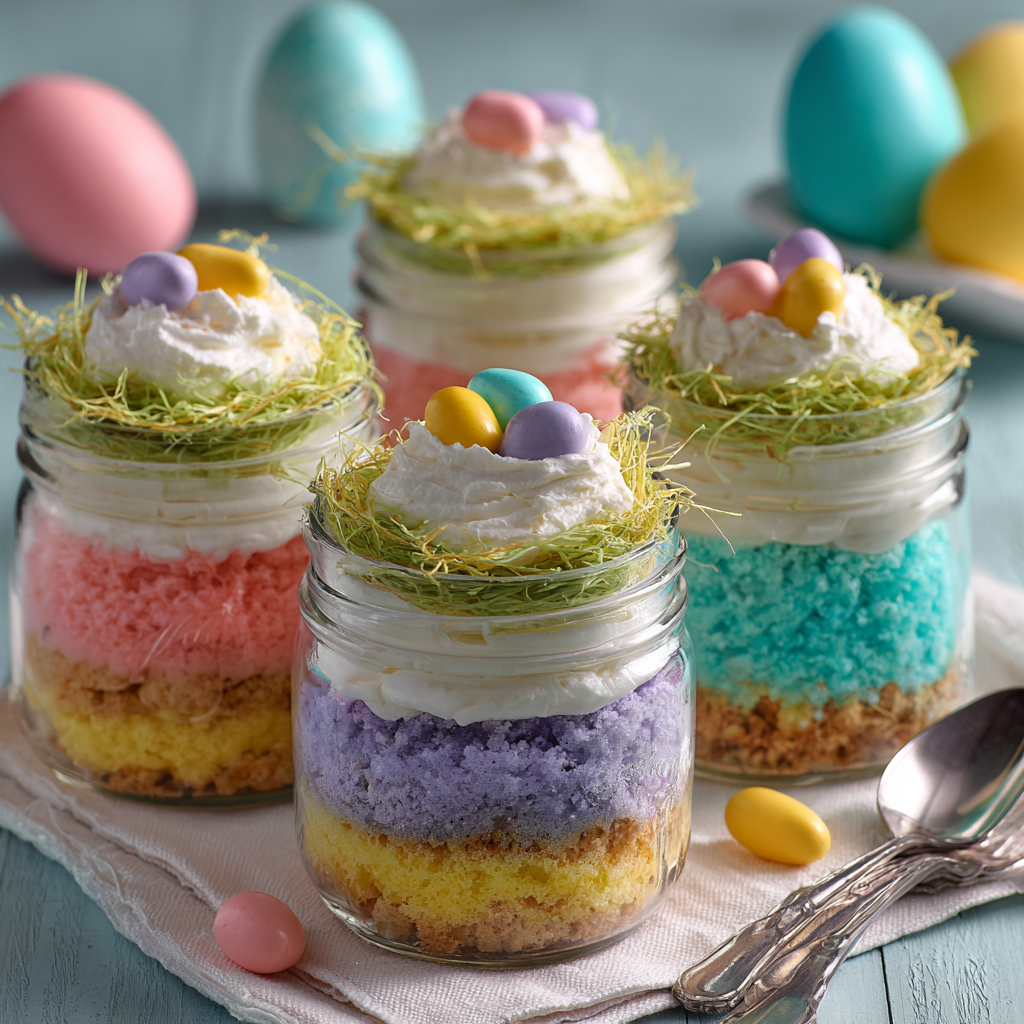
Hey there, friend! Anna here. Can you feel it? That little flutter of spring excitement in the air? The days are getting longer, the flowers are peeking out, and my kitchen is buzzing with ideas for celebrating the season. And let me tell you, nothing says “festive gathering” quite like a dessert that makes everyone’s eyes light up with joy. That’s exactly why I’m so thrilled to share these Easter Cakes in a Jar with you today.
Imagine this: individual servings of soft, crumbled cake in the happiest pastel hues, layered with clouds of sweet frosting, all tucked into a cute little jar. The top is a whimsical nest of edible grass and tiny jelly bean eggs. It’s part dessert, part centerpiece, and totally, completely delightful. The best part? They are a dream for entertaining. You can bake, layer, and assemble them entirely ahead of time. When your guests arrive (or when the kids come running in from an egg hunt), you simply pull these colorful gems from the fridge, and you look like a total hosting rockstar with zero last-minute stress.
Whether you’re planning a big Easter brunch, a cozy family dinner, or just want to add a splash of edible sunshine to your week, these jar cakes are your answer. They’re foolproof, incredibly fun to make, and appeal to every age. So, let’s ditch the complicated layer cakes for a minute and create something playful, portable, and downright magical. Grab your favorite mixing bowl and your most vibrant food colors—we’re about to cook up a whole lot of happy!
A Nostalgic Nod to Sweet Simplicity
PrintEaster Cake in a Jar : A Colorful, Make-Ahead Party Favorite

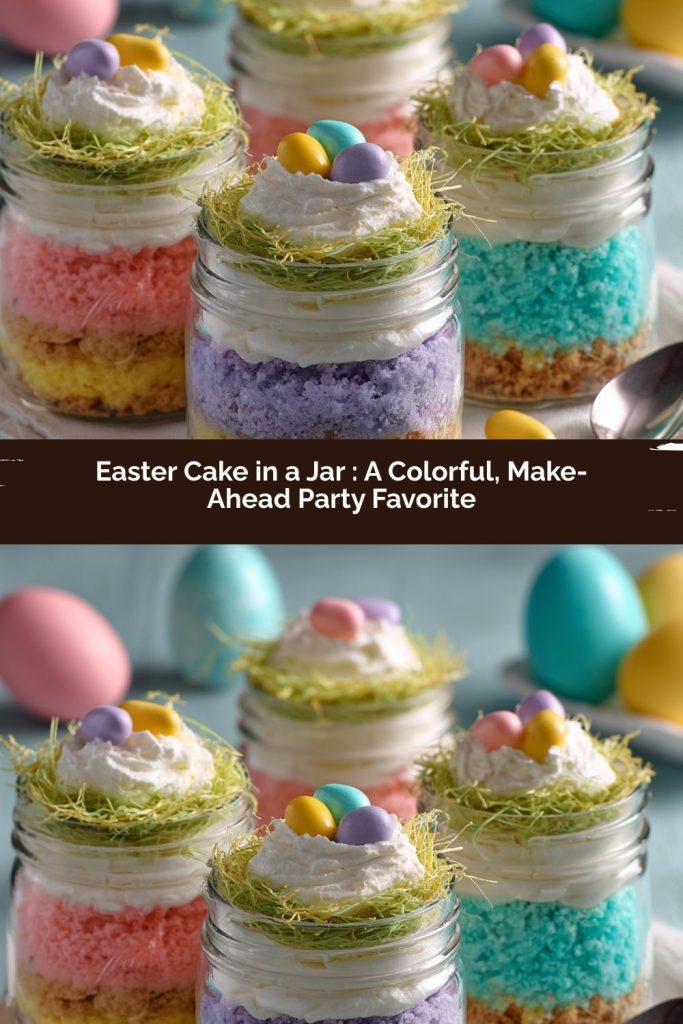
Bring a burst of color to your Easter celebration with these vibrant Easter Cakes in a Jar. Layers of crumbled cupcakes and creamy frosting are packed into mini jars and topped with edible Easter grass and jelly beans to resemble sweet little nests. These fun, single-serve desserts are a hit with kids and grown-ups alike—and perfect for make-ahead entertaining.
- Prep Time: 20 minutes
- cooling time: 30 minutes
- Cook Time: 28 minutes
- Total Time: 1 hour 18 minutes
Ingredients
1 box white cake mix (prepared per package directions)
1 can white frosting
Food coloring (pink, yellow, teal, purple)
Edible Easter grass
Jelly bean Easter eggs
Optional: Easter sprinkles
4 glass jars (4–6 oz size)
Instructions
Color the batter
Divide prepared cake batter into 4 bowls. Tint each with a different food coloring.
Bake the cupcakes
Scoop each color into cupcake liners and bake as directed on the box. You’ll get about 4 cupcakes per color. Let them cool completely.
Crumble the cake
Remove the liners and crumble each cupcake color into separate bowls.
Layer in jars
Add a spoonful of one cake color to the bottom of each jar. Pipe a thin layer of frosting on top using a plastic bag with the corner snipped. Repeat with the remaining colors, ending with frosting on top. Make sure the frosting touches the edge of the jar for that layered look.
Decorate
Top each jar with edible grass and jelly bean eggs to create a nest. Or sprinkle with Easter sprinkles for a more playful touch.
Nutrition
- Calories: 120
This recipe always takes me right back to my grandma’s kitchen on the Saturday before Easter. While the grown-ups were busy with a hundred other preparations, she’d set up a “decorating station” just for me and my cousins. It wasn’t anything fancy—usually just a bowl of simple buttercream, some food coloring, and a batch of plain sugar cookies. But in her hands (and soon, in our messy little ones), it became an art project. She taught us that joy in food isn’t just about the eating; it’s in the making, the creating, the playing with color and texture.
These Easter Cakes in a Jar are the spiritual successor to that memory. They capture that same spirit of playful, creative assembly. Instead of cookies, we’re using crumbled cake as our canvas. Instead of one color, we’re painting with a whole spring palette. And that final step of adding the “nest” on top? It’s pure, unadulterated kitchen fun. It reminds me that some of the best food memories come from recipes that invite you to be a bit whimsical, to not take it all so seriously, and to make something that’s as much a delight to look at as it is to eat. Every time I layer these jars, I feel a little of that Saturday magic all over again.
Gathering Your Rainbow: Ingredients & Insights
Here’s everything you’ll need to create these edible spring landscapes. I’ve added my little chef notes next to each one—think of them as helpful whispers from me to you over the kitchen counter!
- 1 box white cake mix, plus ingredients to prepare it – This is our fantastic shortcut and a wonderful blank canvas. I always opt for a butter recipe white cake mix if I can find it—it just has a richer flavor. Prepare it exactly as the box directs for cupcakes. Chef’s Insight: Using a mix here keeps things simple and ensures a consistent, tender crumb that’s perfect for layering.
- 1 can (16 oz) vanilla or white frosting – The glue that holds our colorful layers together! I’m a fan of the classic vanilla. Pro Tip: Give the frosting a quick stir with a spatula to loosen it up before you start piping. This makes it much easier to work with.
- Food coloring gel (pink, yellow, teal/blue, purple) – This is where the magic happens! I strongly recommend gel food coloring over liquid drops. The colors are more vibrant and intense (hello, beautiful pastels!) and they won’t thin out your batter. Substitution Tip: No teal? Mix a drop of blue and a drop of green. No purple? Mix red and blue. Have fun with your palette!
- Edible Easter grass – This is the “nest” material! You can find it in the seasonal baking aisle. It’s usually made from cellophane or paper-thin potato starch and is 100% edible, though it’s more for fabulous decoration than snacking.
- Jelly bean “Easter eggs” – The classic finish! Any brand will do. For a fun twist, look for the ones that are speckled or have fun flavors.
- Optional: Easter sprinkles – Because more is more when it’s a celebration! A little sprinkle medley adds fantastic texture and extra color.
- 4 glass jars (4–6 oz size), cleaned and dried – Mason jars, mini jam jars, or even small dessert glasses work perfectly. The clear glass is key for showing off those gorgeous layers!
Let’s Build Some Sweetness: Step-by-Step
Okay, apron on? Let’s do this! I’ll walk you through each step with all my favorite tips to ensure your jar cakes are nothing short of spectacular.
Step 1: Bake Your Rainbow. First, preheat your oven and prepare your cake batter exactly as the box instructs for cupcakes. Now, for the fun part: divide the batter evenly among four small bowls. Using your gel colors, tint each bowl a different pastel shade—I go for pink, yellow, teal, and purple. A little gel goes a long way! Stir until the color is uniform. Line a muffin tin with liners (you’ll get about 3-4 cupcakes per color). Scoop the colored batters into the liners and bake according to package directions. Let them cool completely on a wire rack. Chef’s Hack: To speed up cooling, you can pop the cupcakes (out of the tin) into the fridge for 15-20 minutes.
Step 2: The Great Crumble. Once your cupcakes are totally cool, remove the liners. Take each color and, using your fingers or a fork, crumble them into separate, medium-sized bowls. You want nice, small, even crumbs—think the texture of soft, moist sand. This crumbled texture is what allows us to create those beautiful, distinct layers in the jar. Commentary: I find this step incredibly therapeutic. It’s okay to get your hands in there! It’s all part of the process.
Step 3: Frosting Prep. Scoop your entire can of frosting into a disposable piping bag or a sturdy zip-top bag. If using a zip-top bag, push the frosting down into one corner. When you’re ready, you’ll snip just a small corner off (about ½-inch). No fancy piping tip needed! This bag is your tool for adding the creamy frosting layers between the cake.
Step 4: Layer with Love. Here’s where we assemble our masterpiece. Grab your clean jars. Start with a spoonful of your first cake color (say, pink) and gently press it into the bottom of the jar to form your first layer. Now, pipe a thin, even layer of frosting directly over the cake crumbs. The key is to pipe all the way to the edges so you can see the white ring when you look at the jar from the side. Repeat! Add a layer of yellow crumbs, then frosting. Then teal, then frosting. Finally, purple crumbs, and one last swirly, generous layer of frosting on top. Pro Tip: Use the back of a spoon to gently smooth or swirl the top layer of frosting for a pretty finish.
Step 5: Create the Nest. This is the grand finale! Take a small pinch of edible Easter grass and fluff it into a little nest shape on top of the frosting. Gently press a few jelly beans into the grass. For a sprinkle-tastic version, you can skip the grass and just press sprinkles into the top frosting layer for a confetti explosion. And there you have it—a perfect, personal Easter treat!
How to Serve These Little Jars of Joy
Presentation is half the fun! I love lining these jars up on a wooden board or a pretty pastel tray as a centerpiece for our Easter table. Tuck a small, colorful spoon (like a teaspoon or a vintage demitasse spoon) into the grass of each one, or serve them with the spoons on the side. They’re perfectly portable, so they’re also ideal for a spring picnic or as a delightful treat to drop off at a friend’s doorstep. Just be sure to keep them refrigerated until you’re ready to serve!
Mix It Up! Fun Variations to Try
- Lemon Zest Sunshine: Add the zest of one lemon to the cake batter and use lemon frosting instead of vanilla for a bright, citrusy twist.
- Bunny Bottom Decoration: Skip the nest and press a clean, flat-bottomed marshmallow into the top frosting. Dip it in pink sanding sugar to make cute “bunny tail” toppers.
- Chocolate Bird’s Nest: Use a chocolate cake mix and chocolate frosting. For the nest, use chocolate frosting piped in a circle and press chocolate-covered espresso beans or mini eggs into it.
- Coconut “Grass” Nest: Tint shredded coconut green with a drop of food coloring and use that instead of edible grass for a nest you can actually eat!
- Gluten-Free/Dairy-Free: Use your favorite GF cake mix and a vegan frosting. Most jelly beans are naturally vegan, but double-check the label!
Anna’s Chef’s Notes: A Recipe That Grows With You
I’ve been making versions of this dessert for years, and it has evolved in the best way. It started as a way to use up leftover cake scraps (waste not, want not!), and turned into a sought-after treat my nieces and nephews request by name. One year, I even let the kids do the entire assembly line—crumbs and frosting everywhere, and it was the most fun (and mess!) we’d had in the kitchen all season. The laughter was the best ingredient of all.
Don’t be afraid to make this recipe your own. The first time you make it, follow the steps. The second time, play with the colors or the flavors. That’s the true joy of home cooking—it’s a living thing, shaped by your hands and your heart. These little jars are more than just cake; they’re a container for creativity and connection. Now, go make some delicious memories!
Your Questions, Answered: FAQs & Troubleshooting
Q: Can I make these further ahead than just a day?
A: Absolutely! The assembled jars keep beautifully in the refrigerator for up to 3 days. I recommend adding the edible grass and jelly beans just before serving so the grass stays crisp and the colors from the jelly beans don’t bleed. You can bake and crumble the cupcakes up to 2 days in advance and store them in airtight containers at room temperature.
Q: My layers are blending together and not looking distinct. What am I doing wrong?
A: The most common culprit here is the frosting layer being too thick or not spread to the edge. You want a thin sealing layer of frosting. When you pipe it, make sure it touches the glass all the way around to create that clean white line that separates the colorful cake layers. Also, ensure your cake crumbs aren’t too moist or large; fine, even crumbs create the best definition.
Q: I don’t have gel food coloring. Can I use the liquid kind?
A: You can, but proceed with caution. Liquid food coloring is less concentrated, so you’ll need more to achieve vibrant colors, and that extra liquid can slightly alter the consistency of your batter. Add it drop by drop and mix thoroughly. Your pastels might be a bit more subtle, but they’ll still be lovely!
Q: What’s the best way to eat a cake in a jar?
A: However brings you joy! You can dig in with a spoon, getting a bit of every layer in each bite. Some folks like to stir it all together into a delicious, colorful mush (kids, I’m looking at you!). Or, you can carefully tip it out onto a plate. There’s no wrong way—just enjoy!
Nutritional Info (Approximate, per jar)
Calories: ~420 | Carbohydrates: 72g | Protein: 2g | Fat: 14g | Saturated Fat: 3g | Sodium: 320mg | Sugar: 55g
Note: This is an estimate based on specific brands and will vary. For precise dietary needs, calculate using your exact ingredients.