***
Your New Favorite No-Bake Holiday Masterpiece
Hey there, friend! Anna here. Can you smell it? That magical mix of pine needles, cinnamon sticks, and… well, let’s be real, probably a hint of stress? The holidays are a whirlwind of joy, but let’s talk about the kitchen elephant in the room: the pressure to create a perfect, show-stopping dessert while you’re already juggling a million other things. I see you, and I’m here to give you the biggest virtual high-five with a recipe that’s about to become your holiday superhero.
Imagine a dessert that looks like you spent hours crafting layers of intricate pastry, but secretly comes together in about 25 minutes of active, fun-in-the-kitchen time. A dessert that doesn’t require you to turn on the oven, wrestle with finicky pie crusts, or worry about anything deflating. A dessert that’s creamy, crunchy, chocolatey, and bursting with festive cheer in every single bite. Sounds like a dream, right? Well, pull up a chair, because I’m so excited to introduce you to my Easy Christmas Lasagna Dessert.
This isn’t your Nonna’s lasagna (though I love that, too!). This is a brilliant, no-bake wonder that layers a crunchy Oreo crust, a tangy cream cheese cloud, a duo of smooth vanilla and chocolate pudding, and a final blanket of whipped topping, all dressed up with a confetti of holiday sprinkles. It’s a guaranteed crowd-pleaser that feeds a whole party, and the best part? It’s absolutely foolproof. Whether you’re a baking newbie or a seasoned pro looking for a delicious shortcut, this recipe is my gift to you. So, take a deep breath, put on your favorite holiday playlist, and let’s cook up some magic together.
A Sweet Slice of Holiday Memory
PrintEasy Christmas Lasagna Dessert

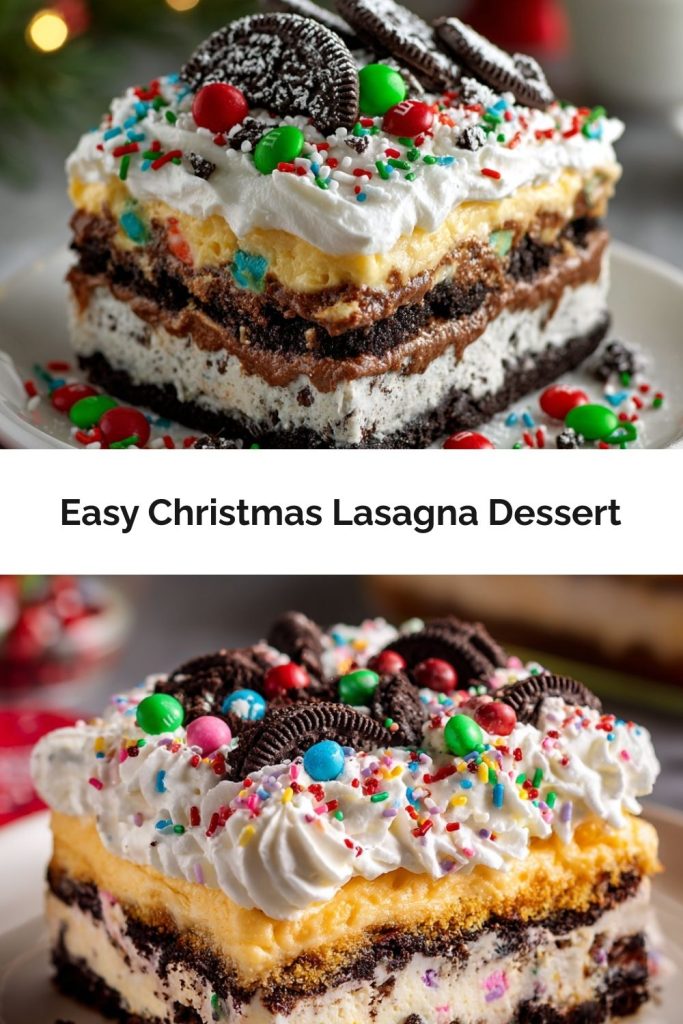
This no-bake Christmas Lasagna Dessert is a fun, festive treat that layers Oreo cookies, creamy cheesecake filling, pudding, whipped topping, and colorful holiday sprinkles. It’s easy to make, feeds a crowd, and is guaranteed to light up your holiday table.
- Prep Time: 25 minutes
- chill time: 4 hours
- Total Time: 4 hours 25 minutes
- Yield: 12–15 1x
Ingredients
Crust Layer
36 Oreo cookies, crushed into fine crumbs
½ cup unsalted butter, melted
Cream Cheese Layer
8 oz cream cheese, softened
¼ cup granulated sugar
2 tbsp milk
1 tsp vanilla extract
1 ½ cups whipped topping (Cool Whip or similar)
Pudding Layer
1 (3.4 oz) box instant vanilla pudding mix
1 (3.4 oz) box instant chocolate pudding mix
3 cups cold milk
Topping
1 ½ cups whipped topping
Christmas sprinkles
Mini M&M’s or red & green candies
Instructions
Make the crust: Mix Oreo crumbs with melted butter. Press firmly into the bottom of a 9×13 dish. Chill.
Cream cheese layer: Beat cream cheese, sugar, milk, and vanilla until smooth. Fold in whipped topping. Spread over crust.
Pudding layer: Whisk pudding mixes with cold milk until thickened. Spread evenly on top of cream cheese layer.
Final topping: Spread whipped topping over pudding. Decorate with sprinkles and candies.
Chill: Refrigerate at least 4 hours or overnight before serving.
Nutrition
- Calories: 320
- Fat: 20g
- Carbohydrates: 32g
- Protein: 4g
This recipe always takes me right back to one particularly chaotic Christmas Eve at my house. I was about ten years old, and my mom, the queen of traditional baking, was up to her elbows in flour, crafting her famous stollen and a dozen different types of cookies. The kitchen was a warm, fragrant war zone. I desperately wanted to help, but my little hands were more of a hazard than a help with her delicate recipes.
Seeing my disappointed face, my dad swooped in like a superhero in an apron. He cleared a small corner of the counter and declared we were going to make our own signature dessert—one that didn’t need the oven. He pulled out Oreos, pudding mix, and Cool Whip, and we got to work, smashing cookies with a rolling pin (therapeutic!), mixing fillings, and creating what we grandly called “The Christmas Layer Surprise.” It was messy, it was silly, and it was one of the most fun cooking experiences I’d ever had. When we served it that night, my mom’s beautifully complicated desserts got polite nods, but our wacky, colorful “lasagna” was the absolute hit of the party. It taught me a lesson I carry to this day: the most magical dishes aren’t about perfection; they’re about joy, creativity, and a whole lot of love. This Christmas Lasagna is the grown-up, refined version of that childhood memory, and I hope it creates some of your own.
Gathering Your Magical Ingredients
Here’s everything you’ll need to create this festive masterpiece. The beauty of this dessert is its simplicity, but each ingredient plays a starring role. I’ve included some of my favorite chef insights and swaps to make it your own!
For the Crust Layer:
- 36 Oreo cookies: We’re using the whole cookie, cream filling and all! This creates a rich, fudgy base. Chef’s Tip: For a twist, try mint or peanut butter Oreos for a festive flavor boost!
- ½ cup unsalted butter, melted: This is the glue that holds our crust together. Using unsalted lets you control the saltiness. Substitution: Salted butter works just fine; the salt can actually balance the sweetness beautifully.
For the Cream Cheese Layer:
- 8 oz cream cheese, softened: This is non-negotiable—softened cream cheese is key to a smooth, lump-free layer. Leave it on the counter for at least an hour. Chef’s Hack: In a pinch, you can microwave it for 10-15 seconds on low power, but be careful not to melt it!
- ¼ cup granulated sugar: Just enough sweetness to balance the tang of the cream cheese.
- 2 tbsp milk: A splash to help loosen the mixture and make it spreadable. Any kind you have on hand works.
- 1 tsp vanilla extract: The secret weapon! Always use pure vanilla extract for the best flavor.
- 1 ½ cups whipped topping (like Cool Whip), thawed: This makes the layer light and airy. Make sure it’s thawed so it folds in easily.
For the Pudding Layer:
- 1 (3.4 oz) box instant vanilla pudding mix: The classic flavor that pairs with everything.
- 1 (3.4 oz) box instant chocolate pudding mix: Hello, chocolatey goodness! Together, they create a cookies-and-cream vibe. Substitution: Feel free to use two vanilla or two chocolate boxes if you prefer!
- 3 cups cold milk: Cold is crucial! Instant pudding sets best with ice-cold milk. I like to use whole milk for a richer result, but 2% works great too.
For the Topping & Decoration:
- 1 ½ cups whipped topping, thawed: For that beautiful, snowy finish.
- Christmas sprinkles, Mini M&M’s, red & green candies: This is where the magic happens! Go wild with your favorite holiday-themed sprinkles, crushed candy canes, or even shaved chocolate.
Let’s Build This Beautiful Lasagna!
Ready for the fun part? Let’s layer up this dessert! I’ll walk you through each step with my best tips to ensure perfect results.
- Make the Crust: First, we need to turn those Oreos into crumbs. You can do this in a food processor (the fast way) or place them in a sturdy zip-top bag and crush them with a rolling pin (the stress-relief way!). Pour the fine crumbs into a bowl and stir in the melted butter until the mixture looks like wet sand. Chef’s Tip: The key to a crust that holds together is to press it firmly and evenly into the bottom of your 9×13-inch dish. I like to use the flat bottom of a measuring cup to really tamp it down. Pop the whole dish into the refrigerator to chill and set while you make the next layer. This little rest makes all the difference!
- Whip Up the Cream Cheese Layer: In a large mixing bowl, beat the softened cream cheese with an electric mixer until it’s completely smooth and creamy. No lumps allowed! Now, beat in the sugar, milk, and vanilla extract until everything is well combined and silky. Here’s the important part: switch to a spatula and gently fold in the 1 ½ cups of whipped topping. We want to keep all that airy lightness, so don’t stir vigorously! Once it’s a uniform, fluffy cloud, take your crust out of the fridge and spread this cream cheese mixture evenly over the top. An offset spatula is my best friend for this, but a butter knife works too. Little Chef Hack: Spread this layer right to the edges to create a seal that prevents the pudding from seeping into the crust.
- Create the Pudding Layer: Now for the dynamic duo! In another large bowl, whisk together both boxes of instant pudding mix with the 3 cups of cold milk. Whisk for a full 2 minutes—set a timer! It will start to thicken beautifully. You want it to be the consistency of a thick, spreadable paste. Now, working relatively quickly, pour the pudding over the cream cheese layer and spread it out evenly. The firmer your cream cheese layer is, the easier this will be. Pro Tip: If you’re worried about the layers mixing, you can pop the dish back in the fridge for 10 minutes after adding the cream cheese layer to let it firm up a bit more before adding the pudding.
- Add the Final Toppings: Almost there! Gently spread the remaining 1 ½ cups of whipped topping over the pudding layer. This is your blank canvas! Now, unleash your inner artist with the Christmas sprinkles, M&M’s, and candies. I love creating a festive pattern, but a joyful, generous sprinkle works just as well. The more color, the merrier!
- The All-Important Chill: This is the hardest part: waiting! Cover the dish with plastic wrap or a lid and refrigerate it for at least 4 hours, but ideally overnight. I know, I know, it’s tempting to cut into it sooner, but trust me on this. The chill time allows the layers to set firmly, the crust to become perfectly crisp, and the flavors to meld together into something truly magical. It makes for clean, beautiful slices when you serve it.
How to Serve Your Holiday Masterpiece
When it’s time to serve, use a sharp knife to cut clean squares. For picture-perfect slices, wipe the knife clean between each cut. This dessert is rich, so a smaller square is often plenty! I love serving it on festive plates with a sprig of fresh mint or a dusting of cocoa powder for an extra touch of elegance. It pairs wonderfully with a hot cup of coffee or a glass of cold milk. It’s the star of the show all on its own!
Make It Your Own: Fun Flavor Twists!
The fun doesn’t stop here! This recipe is a fantastic base for creativity. Here are a few of my favorite variations:
- Peppermint Bark: Use mint Oreos for the crust, and add ½ teaspoon of peppermint extract to the cream cheese layer. Top with crushed candy canes!
- Cookies & Cream: Use only chocolate pudding mix, and fold ½ cup of crushed Oreos into the cream cheese layer.
- Lemon Berry Bliss: Use Golden Oreos for the crust, lemon pudding mix instead of chocolate, and top with fresh raspberries and blueberries for a red, white, and blue theme (perfect for the 4th of July!).
- Nutella Swirl: Swirl ½ cup of warmed Nutella into the cream cheese layer for a decadent hazelnut twist.
- Dairy-Free Delight: Use dairy-free cream cheese, plant-based milk, and coconut whipped topping. Most Oreos are accidentally vegan!
Anna’s Final Thoughts & Kitchen Stories
This Christmas Lasagna has evolved so much from that first “Surprise” dessert my dad and I made. Over the years, I’ve learned that the secret isn’t just in the ingredients, but in the joy you bring to making it. I’ve made this with my kids, with friends during cookie exchanges, and even as a easy treat for summer potlucks (just change the sprinkles!).
One year, I was bringing it to a party and, in my rush, I placed the finished dish on a seemingly flat spot in the car. You can guess what happened—a quick stop and we had “Leaning Tower of Pisa Lasagna.” I was mortified, but you know what? I just smoothed out the top, added extra sprinkles to cover the evidence, and nobody knew the difference. It was still the first dessert to disappear! So, please don’t worry about it being perfect. Embrace the fun, the little imperfections, and the love that goes into it. That’s the real magic. I hope this recipe brings as much happiness to your table as it has to mine.
Your Questions, Answered!
Here are answers to some common questions to make sure your dessert is a smashing success.
Q: My pudding layer is runny. What happened?
A: The most common culprit is not using instant pudding mix. “Cook-and-serve” pudding will not set properly for this no-bake recipe. Also, make sure your milk is very cold, and that you’re whisking for the full 2 minutes. If it’s still a bit soft, don’t panic! The long chilling time will help it firm up significantly.
Q: Can I make this further in advance?
A: Absolutely! This dessert is actually better the longer it chills. You can make it up to 24 hours in advance. In fact, I highly recommend making it the night before—it takes the stress out of the day you’re serving it. Just wait to add the final sprinkles until a few hours before serving so they stay crisp.
Q: My crust is too crumbly and doesn’t hold together when I slice it. How can I fix this?
A: This usually means the crust wasn’t pressed firmly enough into the pan, or you might need a touch more melted butter. Next time, really use some muscle to press it down. For this batch, just serve it with a spoon—it will taste just as delicious! It’s now a “Christmas Lasagna Trifle.”
Q: Can I use homemade whipped cream instead of Cool Whip?
A> You can! For the whipped topping in the recipe, you would need to substitute with an equal amount of stabilized sweetened whipped cream. Regular whipped cream will weep and deflate over time. To stabilize it, whip 2 cups of heavy cream with ¼ cup of powdered sugar and 1 teaspoon of vanilla until soft peaks form, then add 1 tablespoon of instant clear jel or cornstarch to help it hold up.
Nutritional Information*
*This is an estimated nutritional breakdown. Please note that it can vary based on the specific brands of ingredients you use.
Per Serving (approx., based on 15 servings): Calories: 320 | Total Fat: 20g | Saturated Fat: 12g | Cholesterol: 40mg | Sodium: 250mg | Total Carbohydrates: 32g | Dietary Fiber: 1g | Sugars: 24g | Protein: 4g
Final Thoughts
This Christmas Lasagna isn’t just dessert—it’s a holiday lifesaver. It proves you don’t need an oven, hours of prep, or bakery-level skills to create something that feels truly special. Layer by layer, it’s creamy, chocolatey, crunchy, and so full of festive cheer, but more than that—it’s a recipe that invites joy into the kitchen.
Whether you’re making it with kids, bringing it to a party, or sneaking a forkful straight from the fridge (no judgment!), this no-bake wonder has a way of turning stress into smiles. So don’t sweat the sprinkles or the perfect slice—embrace the fun, make it ahead, and let this Christmas Lasagna be the dish everyone asks for year after year.
Because at the end of the day, holiday magic isn’t about perfection—it’s about laughter, love, and a dessert that disappears in minutes.