***
Forget Takeout: These Are the Crispiest, Juiciest Chicken Tenders You’ll Ever Make
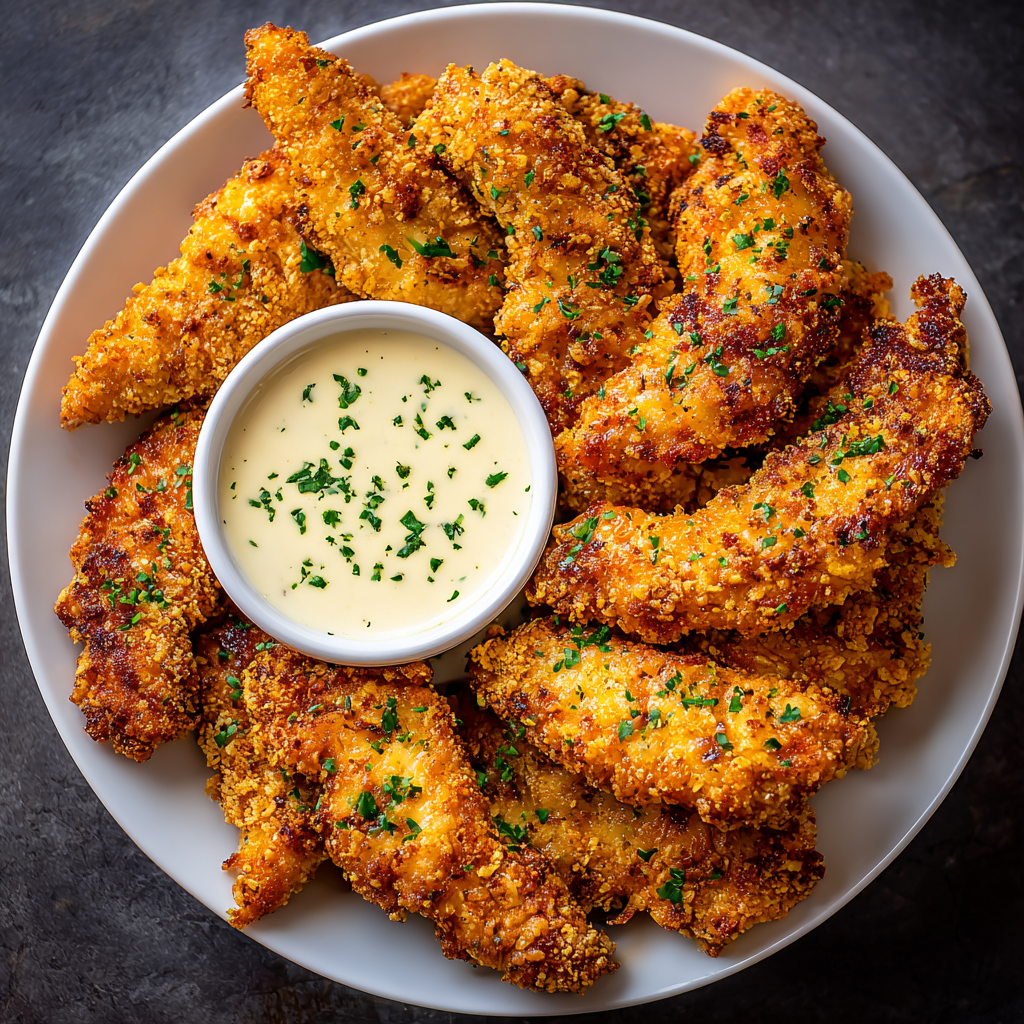
Hey there, friend! Anna here. Can we talk about one of life’s greatest, most universal comfort foods for a second? I’m talking about the humble, the glorious, the downright irresistible chicken tender. That perfect, golden-brown crunch giving way to the most tender, juicy chicken inside. It’s the stuff of childhood dreams and busy weeknight victories.
But let’s be real. We’ve all had that disappointing experience, haven’t we? The one where the coating slides right off, or the chicken inside is as dry as a bone, or the whole thing just tastes… bland. I’ve been there, and it’s a culinary heartbreak I don’t wish on anyone. That’s exactly why I became a woman on a mission in my own kitchen, determined to crack the code on the ultimate Extra Crispy Buttermilk Chicken Tender.
And let me tell you, after more taste tests than I can count (a tough job, but someone’s gotta do it!), I’ve landed on what I truly believe is the perfect recipe. This isn’t just another fried chicken recipe. This is your new go-to, a dish that’s deceptively easy but delivers a result that will have everyone at your table thinking you’re a certified kitchen wizard. We’re talking a tangy buttermilk marinade that tenderizes the chicken to perfection, a seasoned flour coating that crackles with flavor, and a frying technique that guarantees that shatteringly crisp, golden-brown crust we all crave. So, grab your favorite apron and let’s turn your kitchen into the best little chicken shack in town. You’re about to become a hero.
A Tale of Two Tenders: My First Kitchen Triumph
PrintExtra Crispy Buttermilk Chicken Tenders : Juicy, Golden, and Easy to Make
These Extra Crispy Buttermilk Chicken Tenders are everything you crave—juicy inside, golden and crunchy outside, and full of flavor in every bite. Marinated in tangy buttermilk and seasoned perfectly, they’re easy to make and taste better than takeout. Perfect for dipping, stacking in sandwiches, or serving with fries for the ultimate comfort meal.
- Prep Time: 10 minutes (+ marinating time)
- Cook Time: 15 minutes
- Total Time: 25 minutes (+ marinate)
- Yield: 4 1x
Ingredients
1½ lbs chicken tenders
1 cup buttermilk
1 tsp hot sauce (optional, for marinade)
1½ cups all-purpose flour
1 tsp paprika
1 tsp garlic powder
½ tsp onion powder
½ tsp salt
½ tsp black pepper
Oil for frying
Instructions
Marinate: In a bowl, combine buttermilk and hot sauce. Add chicken tenders, cover, and refrigerate for at least 1 hour (or overnight for max tenderness).
Prep Coating: In another bowl, whisk together flour, paprika, garlic powder, onion powder, salt, and pepper.
Dredge: Remove chicken from marinade, letting excess drip off. Coat well in flour mixture.
Fry: Heat oil in a deep skillet or fryer to 350°F (175°C). Fry chicken in batches for 4–5 minutes until golden brown and cooked through. Drain on paper towels.
Serve: Enjoy hot with your favorite dipping sauces.
Nutrition
- Calories: 420 per serving
- Fat: 22g
- Carbohydrates: 22g
- Protein: 36g
This recipe takes me right back to my first “dinner party” in my first tiny apartment. I was so nervous, wanting to impress my new friends with something that felt special. I decided on homemade chicken tenders—how hard could it be? Famous last words. I skipped the marinating step, impatient to get cooking, and my seasoning was, let’s say, timid. The result was a plate of sad, pale, and frankly, boring chicken strips. My friends were kind, but I knew. I could feel the lack of magic.
That little failure lit a fire in me. I called my grandma the next day, and she laughed her wonderful, hearty laugh and said, “Anna, honey, you can’t rush good food, and you can’t be shy with flavor!” She walked me through her “secret” buttermilk soak and her double-dredge technique over the phone. The next time I tried, it was a revelation. The sound of the sizzle was different. The color was a deep, golden amber. And the taste? It was a flavor and texture explosion that had us all moaning with happiness around my wobbly IKEA table. That was the moment I truly understood the power of a great recipe and a little bit of patience. It’s the heart of everything I do here—turning potential kitchen flops into your future triumphs.
Gathering Your Golden, Crispy Arsenal
One of the things I love most about this recipe is that you probably have most of these ingredients in your kitchen right now! It’s all about simple components working together to create something truly extraordinary. Here’s what you’ll need:
- 1½ lbs Chicken Tenders: Also called chicken tenderloins. Using pre-cut tenders is a huge time-saver, but you can also slice boneless, skinless chicken breasts into 1-inch strips. The key is to get them as uniform as possible so they cook evenly.
- 1 cup Buttermilk: This is our magic potion! The gentle acidity in buttermilk tenderizes the chicken on a molecular level, ensuring it stays incredibly juicy and moist. It also helps the flour coating stick like a dream. Chef’s Tip: No buttermilk? No problem! Make a quick “sour milk” by adding 1 tablespoon of white vinegar or lemon juice to a cup of regular milk. Let it sit for 5 minutes until it curdles slightly. Good as gold!
- 1 tsp Hot Sauce (optional): I almost always add this. It doesn’t make the chicken spicy, but it adds a wonderful depth of flavor and a subtle background hum. Frank’s RedHot is my classic go-to for this.
- 1½ cups All-Purpose Flour: The foundation of our crispy crust. It creates the perfect structure for all those craggy, crunchy bits we love.
- 1 tsp Paprika: For that beautiful golden-red color and a sweet, smoky warmth. Using smoked paprika can add an even deeper flavor profile.
- 1 tsp Garlic Powder & ½ tsp Onion Powder: The dynamic duo of savory flavor! Using powder instead of fresh ensures the flavor distributes evenly throughout the coating without burning.
- ½ tsp Salt & ½ tsp Black Pepper: The essential seasonings. Don’t be shy here! This is what makes the coating taste great, not just crunchy. I always use coarse kosher salt for seasoning.
- Oil for Frying: You’ll need enough to come about 1.5 inches up the side of your pot or skillet. A neutral oil with a high smoke point is best. My top choices are canola, vegetable, or peanut oil.
Let’s Get Cooking: Your Path to Crispy Perfection
Okay, friends, this is where the magic happens. Follow these steps, and you are guaranteed chicken tender glory. Read through them once before you start—it makes the whole process feel like a smooth, joyful dance in the kitchen.
- Marinate with Love: In a medium-sized bowl, whisk together the buttermilk and that optional (but highly recommended) hot sauce. Now, add your chicken tenders, making sure each one is fully submerged in the creamy, tangy bath. Cover the bowl with plastic wrap and pop it in the fridge. Here’s my biggest tip: Let it hang out for at least 1 hour, but if you have the time, let it go for 4 hours or even overnight. The longer it marinates, the more tender and flavorful your chicken will be. This is the single most important step for juicy results!
- Create Your Flavor Coating: While the chicken is getting happy in the fridge, let’s make the dredge. In a shallow dish (a pie plate works perfectly!), whisk together the all-purpose flour, paprika, garlic powder, onion powder, salt, and black pepper. Take a moment to really whisk it well—you want every single one of those spices to be evenly distributed so every bite is perfectly seasoned. Give it a little taste; you should be able to taste the seasoning, not just plain flour.
- The Dredge Dance: Now for the fun, slightly messy part! Pull your chicken out of the fridge. Working with one piece at a time, lift a tender from the buttermilk and let the excess drip off. You don’t want it sopping wet, but you don’t want it bone-dry either. Drop it into the flour mixture and use your other hand to scoop the flour over the top, pressing down gently. Chef’s Hack: This press is crucial! It helps the flour adhere and creates those lovely, craggy bits that equal extra crunch. Shake off the excess and place the coated tender on a wire rack or plate. Repeat with all the tenders. Letting them sit for 5-10 minutes on the rack before frying helps the coating set and stick even better.
- Fry to Golden-Brown Glory: Pour your oil into a heavy-bottomed pot or deep cast-iron skillet until it’s about 1.5 inches deep. Attach a deep-fry or candy thermometer to the side—this is your best friend for perfect frying! Heat the oil over medium-high heat until it reaches a steady 350°F (175°C). Why this temperature? Too low, and the chicken will absorb oil and be greasy. Too high, and the outside will burn before the inside cooks. Carefully place a few tenders in the oil, don’t overcrowd the pan! Fry for 4-5 minutes, flipping halfway through, until they are a deep, golden brown and the internal temperature reaches 165°F. Pro-Tip: Use a spider strainer or tongs to gently move them around in the oil for even cooking.
- The Rest is Everything: As the tenders finish frying, resist the urge to eat one immediately! Instead, transfer them to a wire rack set over a baking sheet to drain. Do not drain them on paper towels. Paper towels can trap steam and make the bottom of your gorgeous, crispy coating soggy. The wire rack allows air to circulate, keeping the entire tender crisp. You can keep them warm in a 250°F oven if you’re frying in batches.
Let’s Dish ‘Em Up!
Presentation is part of the fun! For a classic family-style meal, I love piling these golden beauties high on a big wooden board or a large platter, with little bowls of dipping sauces scattered around. It feels rustic, inviting, and totally irresistible. For individual plates, place 3-4 tenders alongside a big handful of crispy waffle fries or a simple arugula salad to cut through the richness. And let’s not forget the ultimate comfort move: stacking them on a soft, toasted brioche bun with a slather of mayo, crunchy lettuce, and a pickle for the best chicken sandwich of your life.
Make It Your Own: Delicious Twists & Swaps
The beauty of this recipe is its versatility. Feel like mixing it up? Here are a few of my favorite riffs:
- Nashville Hot: Whisk 2 tablespoons of the hot frying oil with 1 tablespoon of cayenne pepper, 1 teaspoon of brown sugar, and a pinch of salt. Brush this spicy glaze over the hot tenders right after they come out of the oil.
- Oven-Baked “Fried”: Want a lighter version? Arrange the dredged tenders on a wire rack set on a baking sheet. Spray generously with cooking spray or drizzle with melted butter. Bake at 425°F for 15-20 minutes, flipping halfway, until crispy and cooked through.
- Gluten-Free Goodness: Simply swap the all-purpose flour for your favorite 1:1 gluten-free flour blend. The result is just as crispy and delicious!
- Herbaceous Crunch: Add 2 tablespoons of finely chopped fresh herbs like parsley, dill, or thyme to the flour mixture for a fresh, fragrant twist.
From My Kitchen to Yours: A Few Parting Thoughts
This recipe has been a living, evolving thing in my kitchen. I once accidentally added a tablespoon of paprika instead of a teaspoon, and you know what? We loved the deeper, smokier color and flavor so much that I now often upped the amount! Don’t be afraid to play with the seasonings to suit your taste. That’s how you make a recipe truly yours.
I also have a funny memory of my dog, Barney, sitting like a perfect statue directly under the wire rack of cooling tenders, just hoping and praying for one to fall. (Spoiler: He got a tiny, unseasoned piece of plain chicken as a reward for his patience). Cooking should be filled with these little moments of joy. It’s not about perfection; it’s about the love and the stories you create along the way. I hope this recipe becomes a part of your own family’s story.
Your Questions, Answered!
Over the years, I’ve gotten a lot of questions about this recipe. Here are the ones that come up most often to help you troubleshoot like a pro.
Q: My coating is falling off! What did I do wrong?
A: This is usually one of two things. First, you didn’t let the excess buttermilk drip off enough before dredging, creating a too-thick, slippery layer. Second, the oil wasn’t hot enough. If the oil is below 350°F, the coating doesn’t set immediately and can slide right off. Always use that thermometer!
Q: Can I make these ahead of time?
A> You can absolutely do the prep ahead! Marinate the chicken for up to 24 hours. You can also dredge them in the flour mixture and keep them on the rack in the fridge for an hour or two before frying. I don’t recommend frying them too far in advance, as they are truly best served fresh. However, you can re-crisp them in a 400°F oven for 5-10 minutes.
Q: Why is my chicken dry even though I marinated it?
A> The most likely culprit is overcooking. A thermometer is your best defense! Pull the chicken out of the oil as soon as it hits 165°F internally. It will carry over cook a little as it rests. Also, be sure you’re not using chicken that has been previously frozen and thawed multiple times, as this can affect texture.
Q: What are your favorite dipping sauces?
A> Oh, let me count the ways! A classic Honey Mustard (mix equal parts mayo and Dijon with a big squeeze of honey), a creamy Buttermilk Ranch (thematic!), a spicy Sriracha Mayo, or even just a squeeze of fresh lemon juice. They’re all fantastic!
Nutritional Information (Per Serving)
Please note: This is an estimate and can vary based on specific ingredients used and how much oil is absorbed during frying.
- Servings: 4
- Calories: ~420
- Protein: 36g
- Carbohydrates: 22g
- Fat: 22g

Final Thoughts
At the end of the day, these chicken tenders are more than just a recipe—they’re a reminder that a little patience, a little seasoning, and a whole lot of love can turn the simplest ingredients into something unforgettable. Whether you’re cooking for picky eaters, feeding a hungry crowd, or just treating yourself after a long day, this recipe delivers pure comfort and big flavor every single time.
I hope your kitchen fills with that same golden, nostalgic smell that takes me right back to my grandma’s words and my very first triumph at that wobbly IKEA table. And if one of your tenders disappears the second it cools enough to touch? Well… I’d say you’re doing it exactly right.
Here’s to crispy edges, juicy centers, and the little moments that make cooking feel like magic. Enjoy every bite, friend. 🍗✨
