Let’s Bake a Slice of Sunshine: My Easy, Juicy Fresh Strawberry Pie
Hey there, friend! Anna here. Can we just take a moment to appreciate the humble strawberry? That first bite of a perfectly ripe, ruby-red berry in the peak of summer… it’s pure joy. It tastes like sunshine, backyard picnics, and the sweet promise of easier, warmer days. And what better way to celebrate that glorious flavor than by tumbling a whole pound of them into a pie?
Today, I’m so excited to share my go-to recipe for Fresh Strawberry Pie. This isn’t a pie that hides its stars under a mountain of cooked-down filling. Oh no. This is a pie that showcases them. We’re talking about whole, juicy berries suspended in a shimmering, ruby-red glaze, all nestled in a flaky, buttery crust. Every forkful is a burst of that bright, authentic strawberry flavor we wait all year for.
The best part? This beautiful dessert is deceptively simple. If you can stir a pot and slice some berries, you are 100% equipped to make this showstopper. It’s the kind of recipe that looks like you fussed for hours but secretly comes together in about 30 minutes of active time. Perfect for impressing guests at a Memorial Day BBQ, bringing to a potluck where you want to be the hero, or just treating yourself on a Tuesday because you deserve it. So, tie on your favorite apron, grab those gorgeous berries, and let’s turn an ordinary day into a delicious one together.
A Patch of Memories: Why This Pie Tastes Like Summer
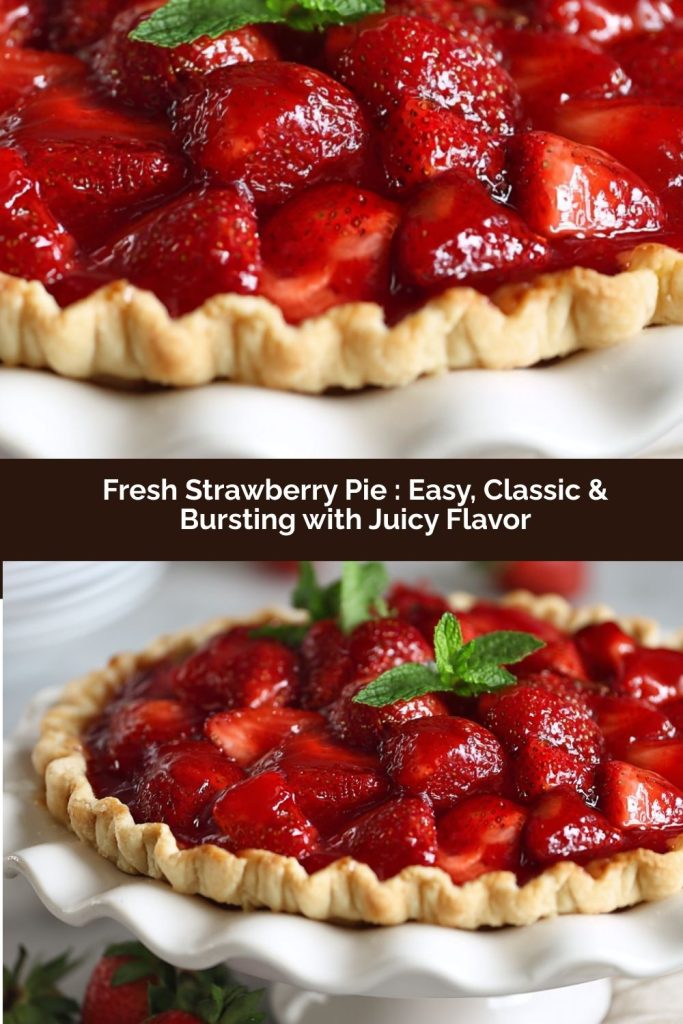
PrintFresh Strawberry Pie : Easy, Classic & Bursting with Juicy Flavor

This strawberry pie is the sweet taste of summer in every bite — loaded with fresh strawberries, glazed to perfection, and set in a flaky, golden crust. With its vibrant color and juicy filling, it’s perfect for spring picnics, holidays, or anytime you’re craving something light and lovely.
- Prep Time: 15 minutes
- chill time: 4 hours
- Cook Time: 10 minutes
- Total Time: 4 hrs 25 mins
Ingredients
For the Filling:
1 pre-baked 9-inch pie crust (homemade or store-bought)
1 lb fresh strawberries, hulled and halved
1 cup water
3/4 cup granulated sugar
2 tbsp cornstarch
1 small box (3 oz) strawberry gelatin (Jell-O)
Optional Toppings:
Whipped cream
Fresh mint
Extra whole strawberries for garnish
Instructions
Arrange halved strawberries in the cooled pie crust.
In a saucepan, whisk water, sugar, and cornstarch until smooth. Cook over medium heat, stirring, until thick and bubbly.
Remove from heat and stir in strawberry gelatin until fully dissolved.
Pour the warm glaze evenly over the strawberries in the crust.
Chill in the fridge for at least 4 hours, or until set.
Serve topped with whipped cream and fresh berries.
Nutrition
- Calories: 280 kcal
- Sugar: 25g
- Fat: 12g
- Carbohydrates: 38g
- Protein: 2g
This pie will always, always remind me of my grandma’s hands. She had this magical way in the kitchen that made everything seem effortless and filled with love. Every June, without fail, we’d make the pilgrimage to our local U-pick strawberry farm. The air would be thick with the scent of sweet fruit and warm earth, and we’d spend the morning filling baskets, our fingers stained pink with juice, sneaking the warmest, sun-ripened berries straight from the plant.
The mission was always clear: get home and make the pie before the berries lost even a hint of their just-picked magic. I’d stand at the counter next to her, my small hands clumsily hulling berries while she deftly rolled out crust. She’d tell stories, her voice a gentle hum alongside the whisk in the saucepan. The kitchen would transform into the heart of our home, fragrant and warm. That first slice, eaten while the glaze was still just barely set, was my childhood summer distilled into a dessert. It’s that feeling—of simplicity, of family, of savoring a perfect ingredient at its peak—that I’ve baked right into this recipe for you.
Gathering Your Sunshine: Ingredients & Why They Work
Here’s everything you need to create this berry masterpiece. I’ve added a few notes and swaps because I want you to feel confident, no matter what’s in your pantry!
- 1 pre-baked 9-inch pie crust (homemade or store-bought): This is our foundation! A flaky, buttery crust is non-negotiable for me. Chef’s Insight: If you’re using store-bought, I’m a fan of the frozen deep-dish ones you bake yourself—they often have a better texture than the pre-formed ones in the foil tins. If you’re going homemade, blind bake it until it’s a beautiful golden brown and let it cool completely. A warm crust will make the glaze weep!
- 1 lb fresh strawberries, hulled and halved: The stars of the show! Look for berries that are fragrant, uniformly red, and firm but not rock-hard. Pro Tip: Wash and hull your berries, but be sure to pat them very dry with paper towels after slicing. Extra water can thin out our beautiful glaze.
- 1 cup water: The simple base for our glaze.
- 3/4 cup granulated sugar: Sweetens and helps create the glossy texture. You can reduce this slightly if your berries are incredibly sweet, but the sugar is crucial for the right set.
- 2 tbsp cornstarch: Our thickening agent hero! It creates that luscious, scoopable texture that holds the berries in place. Substitution: An equal amount of clear jel can be used for a slightly clearer, less cloudy glaze.
- 1 small box (3 oz) strawberry gelatin (Jell-O): Now, don’t panic! This isn’t for a jiggly, fake-tasting pie. This is my secret weapon for incredible color and an extra boost of pure strawberry flavor that makes the whole pie sing. It amplifies the natural berry taste perfectly.
- Optional Toppings: Whipped cream, fresh mint, extra whole strawberries: The finishing touches! A dollop of freshly whipped cream (a tiny splash of vanilla in it is *chef’s kiss*) adds a lovely creaminess. A mint leaf or a whole berry on top makes it look straight from a bakery case.
Let’s Build Some Magic: Your Step-by-Step Guide
Ready? Let’s do this! I’ll walk you through each step with all my favorite little hacks to ensure your pie is perfect.
- Prep Your Stage. First, make sure your beautiful pie crust is fully baked and completely cooled to room temperature. This is key! A warm crust will make the glaze runny. While it’s cooling, wash, hull, and halve your strawberries. Lay them out on a few paper towels and gently pat them dry. We want to lock in that juice for eating, not for watering down our glaze.
- Create the Berry Mosaic. Take your cooled crust and start arranging the strawberry halves! I like to place them cut-side down, starting from the outer edge and working in concentric circles toward the center. Pack them in snugly—this is a generously filled pie! Tilt a few so the pointed ends face up for lovely texture. Little Chef Hack: Save a handful of the most perfect, uniform berry halves for the top layer after you pour the glaze, for a gorgeous, jeweled finish.
- Cook the Glaze. In a medium saucepan, combine the water, sugar, and cornstarch. Here’s the trick: Whisk them together before you turn on the heat. This prevents the cornstarch from forming stubborn lumps. Once it’s smooth, place the saucepan over medium heat. Cook, whisking constantly (I mean it—don’t stop!), until the mixture becomes very thick, bubbly, and turns from cloudy to almost clear. This usually takes about 5-7 minutes. You’ll know it’s ready when you can see the bottom of the pan for a second as you whisk.
- The Flavor Boost. Remove the saucepan from the heat immediately. Open your box of strawberry gelatin and sprinkle it all over the top of the hot glaze. Whisk vigorously for a full minute, until the gelatin is completely dissolved and the mixture is smooth, glossy, and brilliantly red. Pro Tip: Let this glaze cool for about 5-10 minutes, stirring occasionally. It will thicken slightly as it cools, which helps it coat the berries perfectly without just sinking to the bottom.
- The Big Pour. Slowly and carefully pour the warm (not scalding hot) glaze over the arranged strawberries in your crust. Use a spoon or spatula to gently guide the glaze into all the nooks and crannies between the berries, ensuring everything is coated. If you saved some berries for the top, now’s the time to artfully place them into the still-wet glaze.
- The Patient Chill. This is the hardest part! Carefully transfer the pie to your refrigerator. Let it chill, undisturbed, for at least 4 hours, but ideally overnight. This allows the glaze to set firmly so you get clean, beautiful slices. Kitchen Storytime: I cannot tell you how many times I’ve “just peeked” too early and left a fingerprint in the glaze. Patience, my friend, is a virtue that pays off in perfect slices!
How to Serve Your Masterpiece
When it’s finally set, take that gorgeous pie out of the fridge and admire your work! Use a sharp, thin-bladed knife (run it under hot water and dry it for the cleanest cuts) to slice. Slide your pie server underneath each piece, getting right under the crust for support. I love serving this on simple white plates—it lets that stunning red color really pop. Top each slice with a generous cloud of freshly whipped cream (the kind from the can is fine in a pinch, but homemade is next-level), a perfect whole strawberry, and maybe a tiny, elegant mint leaf. It’s pure, simple, summer-on-a-plate elegance.
Make It Your Own: Delicious Twists & Swaps
- Mixed Berry Bliss: Swap out half the strawberries for raspberries, blueberries, or blackberries for a gorgeous “summer berry” medley.
- Cream Cheese Layer: For a decadent surprise, spread a thin layer of sweetened whipped cream cheese or lemon curd on the bottom of the cooled crust before adding the berries.
- Citrus Zing: Add the zest of one lime or lemon to the glaze as it cooks for a bright, sophisticated twist that cuts the sweetness.
- Graham Cracker Crust: For a different vibe, use a pre-made graham cracker crust. No baking needed! Just fill and chill.
- “Almost Sugar-Free” Option: Use sugar-free strawberry gelatin and replace the granulated sugar with a monk fruit/allulose blend designed 1:1 for baking. The texture will be slightly different but still delicious!
Anna’s Final Notes from My Kitchen to Yours
This recipe has been my summer staple for over a decade, and it’s evolved in tiny ways. I used to mash some berries into the glaze for a more “jammy” layer, but I’ve come to adore the pure clarity and shine of this version. It lets the fresh fruit truly be the star. A funny confession? For years, I was a “pour-the-glaze-while-it’s-scalding-hot” person, until I realized my beautiful berry arrangement was getting slightly cooked and soggy on the bottom. Letting it cool for those few minutes was a total game-changer for texture!
This pie is a love letter to simplicity. It doesn’t need fancy techniques, just good ingredients and a little patience. It’s the dessert I make when I want to feel connected to those sunny days in the strawberry patch with my grandma. I hope it becomes a tradition in your kitchen, too, creating sweet memories with every slice you share.
Your Questions, Answered!
Q: My glaze didn’t set / is runny. What happened?
A: The most common culprits are: 1) The crust was still warm when you poured the glaze in, 2) The glaze wasn’t cooked long enough to reach a full, thick boil, or 3) The pie didn’t chill long enough. Make sure you hit that full, bubbly thick stage in the saucepan and give it a full 4+ hours in the fridge. If it’s still a bit loose, it will still taste amazing over ice cream!
Q: Can I use frozen strawberries?
A: I don’t recommend it for this specific recipe. Frozen berries release too much water when they thaw, which will prevent the glaze from setting properly and make the whole pie soupy. Fresh is definitely best here.
Q: How far in advance can I make this?
A: It’s a fantastic make-ahead dessert! You can bake the crust a day ahead. The fully assembled pie keeps beautifully in the fridge for 1-2 days. Any longer and the crust can start to get a bit soft from the moisture, but it’s usually gone by then anyway!
Q: Can I use a different flavor of gelatin?
A: Absolutely! Raspberry gelatin is phenomenal with strawberries or a berry mix. Cherry would be lovely, or even orange for a creamsicle-inspired vibe. Have fun with it!
Nutritional Information (Per Slice, 1 of 8)
Please note: This is an estimate provided for informational purposes. Values can vary based on specific ingredients used.
- Calories: ~280 kcal
- Carbohydrates: 38g
- Protein: 2g
- Fat: 12g
- Sugar: 25g
- Dietary Notes: Vegetarian, Make-Ahead Friendly
Final Thoughts
This Fresh Strawberry Pie is one of those desserts that reminds me why simple, seasonal recipes are often the most special. There’s no hiding behind heavy fillings or complicated techniques here—just sweet, sun-ripened berries doing what they do best. It’s light, joyful, and full of that unmistakable taste of summer that makes everyone pause after the first bite.
I hope this pie finds its way to your table for backyard gatherings, holiday weekends, or quiet evenings when you want something a little extra lovely. Share it with people you love, savor it slowly, and don’t be surprised if it becomes your signature summer dessert. From my kitchen to yours, happy baking—and may every slice taste like sunshine. 🍓☀️