***
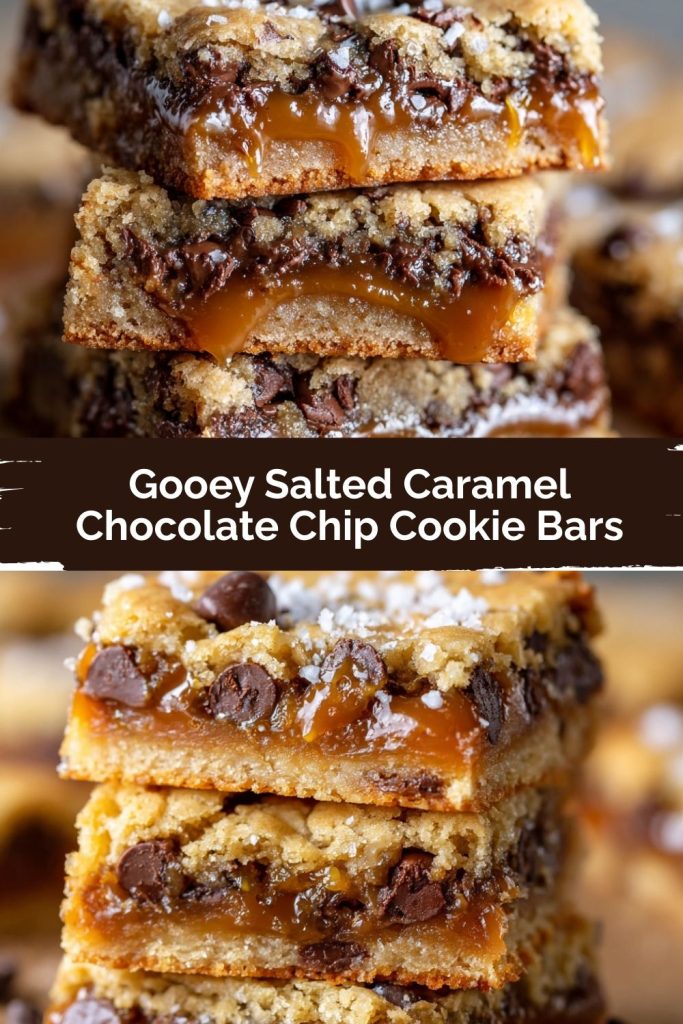
Gooey Salted Caramel Chocolate Chip Cookie Bars: Your New Favorite Dessert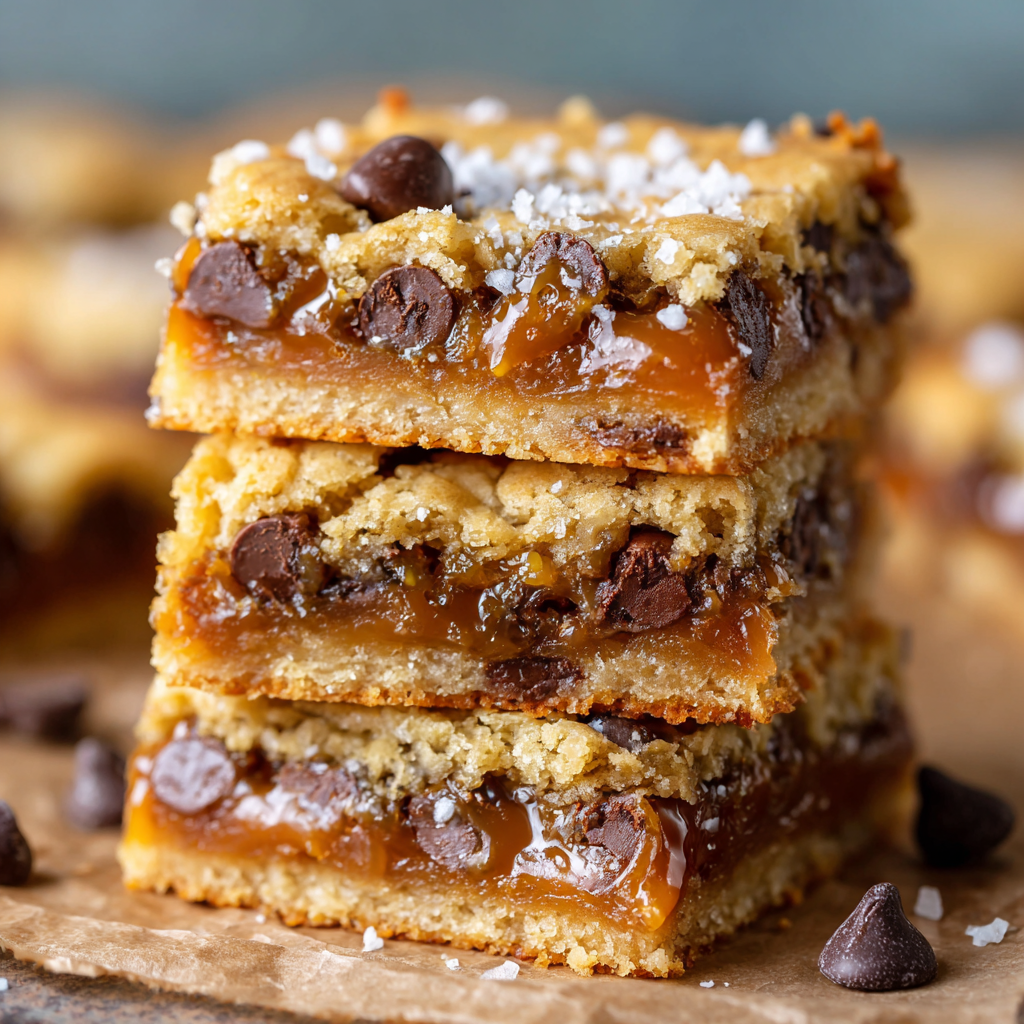
Hey there, friend! Anna here. Can you smell that? It’s the warm, buttery, intoxicating scent of chocolate chips melting into a golden cookie base, swirled with a river of rich, gooey caramel, all finished with a whisper of flaky sea salt. It’s the kind of smell that makes everyone in the house magically appear in the kitchen, eyes wide with hopeful anticipation. If you’re dreaming of a dessert that’s part cookie, part candy bar, and 100% pure comfort, you’ve come to the right place.
Today, we’re making my legendary Gooey Salted Caramel Chocolate Chip Cookie Bars. This isn’t just a recipe; it’s a happiness project. These bars are the ultimate crowd-pleaser, the potluck hero, the “you-need-a-pick-me-up” treat that never, ever fails. They’re thick, chewy, and packed with pockets of melty chocolate and that irresistible, stretchy caramel center. The sprinkle of salt on top? That’s the magic trick. It cuts through the sweetness and makes every single flavor pop in the most incredible way.
I know sometimes bar recipes can seem daunting, but I promise you, this one is joyfully simple. We’re using one bowl for the cookie dough (less cleanup = more joy!) and a quick microwave hack for the caramel. Whether you’re a baking newbie or a seasoned pro, I’ll be right here with you, cheering you on. So, tie on your favorite apron, put on some fun music, and let’s turn this ordinary day into something deliciously amazing together.
A Sweet Slice of Nostalgia
PrintGooey Salted Caramel Chocolate Chip Cookie Bars

Thick, buttery, and loaded with melty chocolate and rich caramel, these Salted Caramel Chocolate Chip Cookie Bars are a guaranteed crowd-pleaser. The golden cookie layers sandwich a gooey caramel center, finished with a sprinkle of flaky sea salt for the ultimate sweet-salty bite. Perfect for bake sales, potlucks, or cozy nights in.
- Prep Time: 20 minutes
- cool: 30–60 minutes
- Cook Time: 25–30 minutes
- Total Time: 43 minute
- Yield: 24 bars 1x
Ingredients
1 cup unsalted butter, softened
1 cup light brown sugar, packed
½ cup granulated sugar
2 large eggs
2 tsp vanilla extract
2 ½ cups all-purpose flour
1 tsp baking soda
½ tsp salt
2 cups semisweet or dark chocolate chips
1 (11 oz) bag soft caramels, unwrapped
3 tbsp heavy cream
Flaky sea salt, for topping
Instructions
Preheat oven to 350°F (175°C). Line a 9×13-inch baking pan with parchment paper, leaving some overhang.
In a large bowl, cream together butter and both sugars until light and fluffy.
Beat in eggs and vanilla.
In a separate bowl, whisk together flour, baking soda, and salt. Gradually add dry ingredients to wet and mix until combined.
Stir in chocolate chips.
Press half the cookie dough evenly into the bottom of the prepared pan.
In a microwave-safe bowl, melt caramels with heavy cream in 30-second intervals, stirring until smooth.
Pour caramel over the cookie base and spread evenly.
Drop remaining cookie dough in spoonfuls over the caramel layer, gently spreading to cover most of the surface.
Bake for 25–30 minutes, or until golden brown and set.
Cool completely, then sprinkle with flaky sea salt and cut into bars.
Nutrition
- Calories: 290
- Sugar: 24g
- Fat: 15g
- Carbohydrates: 36g
This recipe always takes me right back to my grandma’s linoleum-floored kitchen. She was a wizard with a wooden spoon and a bag of chocolate chips. Her classic chocolate chip cookies were legendary, but she had a special trick for when all us grandkids came over: the “cookie cake.” She’d press her famous dough into a big, well-loved jelly roll pan, and we’d all get to sprinkle our own handful of toppings over our designated section—M&Ms for my brother, nuts for my dad, and an obscene amount of extra chocolate chips for me.
One rainy afternoon, I decided to be “fancy.” I sneakily unwrapped a whole handful of those little caramel candies from her candy jar and pressed them into my section of the cookie cake before baking. What emerged from the oven was a revelation—a puddle of molten, bubbling caramel had erupted through the top, creating a gorgeous, messy, delicious marbled effect. That first risky, hot, sweet-and-salty bite was a total lightbulb moment. These bars are my grown-up, refined (but just as fun) homage to that happy kitchen accident. It’s a reminder that the best recipes often start with a little bit of curiosity and a whole lot of love.
Gathering Your Kitchen Crew: The Ingredients
Here’s everything you’ll need to create this masterpiece. I’ve included my best chef tips and substitutions so you can bake with confidence, no matter what’s in your pantry!
- 1 cup (2 sticks) unsalted butter, softened – This is the foundation of our rich, buttery flavor. Using unsalted lets us control the salt level ourselves. Pro Tip: Your butter is perfectly softened when you can press your thumb into it easily and it leaves a slight indentation. No time to wait? Cut the sticks into tablespoons and let them sit for 10-15 minutes!
- 1 cup light brown sugar, packed – Brown sugar is our secret weapon for a chewy, moist texture and that deep, almost toffee-like flavor. Pack it firmly into your measuring cup!
- ½ cup granulated sugar – The white sugar helps create a lovely, lightly crisp top on our bars. It’s the perfect partner to the brown sugar.
- 2 large eggs – These act as the binder, bringing our dough together. Make sure they’re at room temperature! This helps them emulsify with the butter and sugar, creating a smoother, fluffier dough.
- 2 tsp vanilla extract – Pure vanilla extract is always my go-to for the best flavor. It adds a warm, aromatic depth that makes the chocolate and caramel sing.
- 2 ½ cups all-purpose flour – The structure of our bars! Be sure to spoon and level your flour into the measuring cup. Scooping directly from the bag can pack in too much flour and lead to dry bars.
- 1 tsp baking soda – Our leavening agent, which gives the bars a little lift and a perfect chewy texture.
- ½ tsp salt – Crucial for balancing all the sweetness. Trust me, don’t skip this!
- 2 cups semisweet or dark chocolate chips – I’m a dark chocolate gal myself (it pairs so well with the caramel!), but semisweet is a classic choice. Feel free to use chunks for even bigger pockets of chocolate!
- 1 (11 oz) bag soft caramels, unwrapped – The star of the show! I use classic Kraft caramels for reliability. Yes, unwrapping them is a bit of a chore—perfect job for a kitchen helper!
- 3 tbsp heavy cream – This turns our solid caramels into a lush, pourable sauce. Milk can work in a pinch, but cream gives it the richest texture.
- Flaky sea salt, for topping – This is non-negotiable! Maldon sea salt is my favorite. The delicate flakes provide the perfect salty crunch that takes these bars from great to absolutely sublime.
Let’s Bake! Your Step-by-Step Guide to Gooey Perfection
Okay, team! Let’s do this. Read through the steps once before you start—it makes the process so smooth and relaxing.
Step 1: Prep Your Pan & Preheat
Preheat your oven to 350°F (175°C). Now, let’s set ourselves up for success! Take your 9×13-inch baking pan and line it with parchment paper, leaving a few inches of overhang on the two longer sides. Chef’s Hack: A quick spritz of non-stick spray on the pan before laying down the parchment helps it stick in place. This parchment “sling” is your best friend—it makes lifting the entire slab of bars out for clean slicing an absolute breeze.
Step 2: Cream the Butter & Sugars
In a large bowl, combine your softened butter, packed brown sugar, and granulated sugar. Using a hand mixer or a stand mixer fitted with the paddle attachment, beat them together on medium speed for a good 2-3 minutes. We’re not just mixing; we’re creaming! You’ll know it’s ready when the mixture becomes noticeably lighter in color and fluffy. This step incorporates air, which is key for texture.
Step 3: Add Eggs & Vanilla
Scrape down the sides of the bowl with a spatula (a good habit to get into!). Beat in the eggs, one at a time, making sure the first is fully incorporated before adding the second. Then, beat in the glorious vanilla extract. Your mixture might look a little curdled at this point—that’s totally normal! Don’t panic.
Step 4: Combine the Dry Ingredients
In a separate, medium-sized bowl, whisk together your flour, baking soda, and salt. This isn’t just busywork; whisking ensures the baking soda and salt are evenly distributed throughout the flour, so every bite is consistent. Gradually add the dry ingredients to the wet ingredients, mixing on low speed just until the flour disappears. Pro Tip: Overmixing at this stage can lead to tough bars! A few streaks of flour are okay.
Step 5: Fold in the Chocolate Chips
Switch to a sturdy spatula or wooden spoon and gently fold in those beautiful chocolate chips. This ensures you don’t break them and distributes them evenly without overworking the dough.
Step 6: Layer the Cookie Base
This is where the magic starts! Take just slightly more than half of your cookie dough and plop it into your prepared pan. Using lightly moistened fingers or the bottom of a measuring cup, press the dough into a smooth, even layer across the bottom of the pan. This is our foundation for the caramel river!
Step 7: Create the Caramel Sauce
While your dough is chilling out in the pan, let’s make the caramel. Unwrap all those caramels (I promise it’s worth it!) and place them in a medium microwave-safe bowl with the heavy cream. Microwave on high for 1 minute. Remove and stir. It will look messy. Continue microwaving in 20-30 second bursts, stirring vigorously in between, until the sauce is completely smooth and lump-free. This usually takes me about 2 minutes total. Watch closely to avoid burning!
Step 8: The Caramel Layer
Pour that gorgeous, smooth caramel directly over the cookie dough base. Use an offset spatula or the back of a spoon to spread it into an even layer, leaving a small border around the edges.
Step 9: Top It Off
Take the remaining cookie dough and dot it across the caramel layer in small clumps or spoonfuls. Don’t worry about making it perfect or sealing it completely! The dough will spread as it bakes, and having little gaps allows the caramel to peek through and bubble up beautifully.
Step 10: Bake to Golden Brown Perfection
Slide your pan into the preheated oven and bake for 25-30 minutes. You’re looking for a lovely golden brown color on top and the edges pulling slightly away from the pan. The center might still look a little soft—that’s exactly what we want for that gooey center! Remember: Ovens vary, so start checking at 25 minutes.
Step 11: The All-Important Cool Down
This is the hardest part: patience! Remove the pan from the oven and place it on a wire cooling rack. You MUST let these cool completely—I’m talking fully, 100% room temperature—before you even think about cutting them. This allows the caramel to set. Rushing this step will result in a delicious but messy lava-flow of caramel. For a cleaner cut, you can even pop them in the fridge for an hour after they’ve cooled on the counter.
Step 12: The Finishing Touch & Serve
Once completely cool, use the parchment paper overhang to lift the entire block of bars out of the pan and onto a cutting board. Sprinkle generously with flaky sea salt. Then, using a large, sharp knife, cut into squares. Wipe the knife clean between cuts for the prettiest bars!
How to Serve These Heavenly Bars
These bars are a superstar all on their own, but a little flair never hurts! For the ultimate indulgence, serve them slightly warm (a quick 10-second zap in the microwave does the trick) with a scoop of high-quality vanilla bean ice cream. The contrast of cold ice cream and warm, gooey bar is a religious experience. For a pretty party platter, stack them on a cake stand with a little dusting of powdered sugar. And of course, they pair perfectly with a cold glass of milk or a hot cup of coffee. Pure bliss!
Make It Your Own: Delicious Variations
Love to play with your food? Me too! Here are a few fun twists on this classic:
- Salty Pretzel Crunch: Add ½ cup of crushed pretzel pieces to the dough with the chocolate chips for an amazing sweet-salty-crunchy situation.
- Nutty Delight: Swap out 1 cup of the chocolate chips for a cup of chopped toasted pecans or walnuts. The nuttiness is incredible with the caramel.
- Double Chocolate: Replace ½ cup of the flour with ½ cup of unsweetened cocoa powder for an intensely chocolatey base.
- Shortcut Salted Caramel: Short on time? Instead of melting caramels, you can use 1 cup of a good-quality store-bought thick caramel sauce or dulce de leche. Just pour it straight over the base layer.
- Seasonal Twist: In the fall, try adding a teaspoon of cinnamon to the dry ingredients and using pumpkin-shaped chocolate chips!
Anna’s Chef Notes & Kitchen Stories
This recipe has been through many iterations in my kitchen! The first time I made it for a family gathering, I was so excited that I completely forgot the baking soda. The result was a delicious, but dense and flat, brick of caramel and chocolate. We still ate it with spoons straight from the pan (no shame!), but it was a great lesson in the importance of leavening agents!
Over time, I’ve learned that the brand of caramel can make a difference. Some store-brand caramels don’t melt as smoothly, so I stick with the classics for guaranteed results. I’ve also found that using a metal pan gives you a better, crispier edge than glass or ceramic. Most of all, this recipe has taught me that the best moments often happen around the kitchen counter, waiting for dessert to cool, laughing and making memories. That’s the real secret ingredient.
Your Questions, Answered!
Q: My caramel layer hardened and is chewy, not gooey. What happened?
A: This usually means the caramel was overheated or the bars were overbaked. Be sure to microwave the caramel in short bursts and stir well! Also, ensure you’re taking the bars out of the oven when the center still looks slightly soft. They continue to set as they cool.
Q: Can I make these gluten-free?
A: Absolutely! I’ve had great success using a 1:1 gluten-free all-purpose flour blend (like Bob’s Red Mill or Cup4Cup). Just make sure your blend includes xanthan gum, which helps mimic the structure that gluten provides.
Q: Why did my bars turn out cakey instead of chewy?
A: A cakey texture is often the result of overmixing the dough after adding the flour, or using too much flour. Remember to spoon and level your flour, and mix until *just* combined. Also, ensure your butter was softened, not melted.
Q: How should I store these, and how long do they keep?
A: Once cooled and cut, store them in an airtight container at room temperature for up to 4 days. For longer storage, you can freeze them for up to 3 months! Layer them between sheets of parchment paper in a freezer-safe container. Thaw at room temperature.
Nutritional Information (Approximate)
Prep Time: 20 minutes | Bake Time: 25-30 minutes | Cool Time: 1 hour | Servings: 24 bars
Approximate values per bar: Calories: 290 | Fat: 15g | Saturated Fat: 9g | Carbohydrates: 36g | Sugar: 24g | Protein: 3g
Final Thoughts ✨
If you’ve been searching for a dessert that feels like a hug on a plate, these Gooey Salted Caramel Chocolate Chip Cookie Bars are it. They’re chewy, buttery, and loaded with melty chocolate and rivers of golden caramel—all tied together with that perfect sprinkle of flaky sea salt. The kind of treat that makes people hover around the kitchen, waiting for “just one more square.”
They’re unfussy enough for a weeknight baking project, but special enough to bring to a party, potluck, or holiday table. And just like my grandma’s cookie cake, they’re proof that the best recipes are often born from happy accidents and a little curiosity.
So, the next time you’re craving comfort or want to wow your friends, bake up a batch of these bars. Trust me—once you’ve had that first gooey bite, they’ll earn a permanent spot in your recipe box.