***
Grandma’s Thanksgiving Stuffing – Party-Sized with a Twist
Hello, my friend! Welcome back to the kitchen. Can you smell it? That’s the smell I wait for all year long. It’s the scent of toasted bread, savory herbs, and sautéed onions drifting through the house, mingling with the aroma of roasting turkey and sweet pies. It’s the unmistakable, soul-warming perfume of Thanksgiving.
If there’s one dish that truly captures the heart of the holiday table, it’s the stuffing. Or dressing, depending on where your family hails from! In my family, it was always just “Grandma’s Stuffing,” and it was the undisputed star of the show. The platter of turkey might be majestic, but it was the humble casserole dish of stuffing that always, always emptied first.
Today, I’m so incredibly excited to share my take on that beloved classic. This is Grandma’s Thanksgiving Stuffing, reimagined for a bigger, modern crowd and kissed with a few little upgrades that make it truly unforgettable. We’re keeping all the cozy, nostalgic comfort of the original—the soft, savory interior, those irresistibly crispy, golden-brown edges—but we’re boosting it with rich broth, a garden of fresh herbs, and a few fun twists you can add if you’re feeling adventurous. This is the ultimate make-ahead, crowd-pleasing side dish that will have everyone at your table coming back for seconds (and thirds!). So, let’s tie on our aprons and cook up a big batch of memories together.
The Heart of the Holiday: A Stuffing Story
PrintGrandma’s Thanksgiving Stuffing
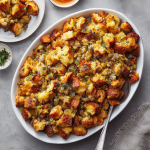
A nostalgic classic with a boost of flavor—this stuffing delivers all the comfort of Grandma’s original recipe, plus savory herbs, rich broth, and golden, crispy edges. Doubled to serve a bigger table and enhanced with a few modern upgrades, it’s the dish everyone will come back for seconds.
- Prep Time: 20 minutes
- Cook Time: 40–50 minutes
- Total Time: 41 minute
- Yield: 16 1x
Ingredients
20 cups cubed bread (sourdough or French, slightly dried out)
2 large onions, finely diced
6–7 celery stalks (about 4 cups), finely chopped
4 tablespoons fresh sage, chopped
4 tablespoons fresh thyme, chopped
2 tablespoons fresh rosemary, chopped
8 cups low-sodium chicken or vegetable broth
1 cup (2 sticks) unsalted butter, melted
1 cup chopped mushrooms (optional twist)
1 cup diced apple (for a sweet-savory balance)
1 cup cooked sausage, crumbled (for extra richness)
Salt and freshly ground black pepper, to taste
Instructions
Preheat oven to 350°F (175°C). Grease a large baking dish (or two medium ones).
In a large skillet, sauté onions and celery in a bit of butter until soft, about 8–10 minutes. Add mushrooms, sausage, or apple here if using.
Add fresh herbs and cook for another 2 minutes until fragrant.
In a large bowl, toss bread cubes with the sautéed mixture. Slowly pour in melted butter and broth, stirring until the bread is moist but not soggy.
Season with salt and pepper to taste.
Transfer to baking dish, cover with foil, and bake for 30 minutes.
Uncover and bake an additional 20–25 minutes, until golden and crisp on top.
Nutrition
- Calories: 290
- Sugar: 4g
- Fat: 15g
- Carbohydrates: 30g
- Protein: 7g
My most vivid childhood Thanksgiving memory isn’t of the perfectly set table or the first slice of pie. It’s of standing on a wobbly wooden stool in my grandma’s kitchen, my chin just barely clearing the countertop, watching her work her magic. Her hands, dotted with flour and freckles, would tear enormous loaves of day-old bread into ragged, imperfect chunks with a quiet, practiced rhythm.
The air was thick with the scent of celery and onion sizzling in a mountain of melted butter. She’d let me sprinkle in the dried sage from a little tin, creating a miniature dust storm that made us both cough and laugh. She never used a recipe; it was all done by sight, by smell, by taste. “A little more broth, Anna,” she’d say, letting me pour it in. “It needs to feel like a damp sponge, not a wet one.” That was the secret. That, and an absurd amount of butter.
This recipe is my love letter to her. I’ve written down her intuitive “pinches and handfuls,” scaled it up for our ever-growing family gatherings, and swapped the dried herbs for fresh ones to really make the flavors sing. But the soul of it—that soft, savory, buttery soul—is all hers. Making this stuffing every year feels like giving her a hug, and it’s my greatest joy to now share that feeling with you.
Gathering Your Cast of Characters
Great stuffing starts with great ingredients. Here’s everything you’ll need to create this masterpiece. Remember, the best cooking is flexible, so I’ve included all my favorite tips and swaps!
- 20 cups cubed bread (sourdough or French, slightly dried out): This is the foundation! Stale, dried-out bread is the KEY to achieving the perfect texture—it soaks up all that glorious broth and butter without turning into mush. Chef’s Insight: I love the tangy depth of sourdough, but a good rustic French loaf works beautifully too. Cut it into 1-inch cubes and leave it out on sheet pans overnight, or toast it in a 300°F oven for 20-30 minutes until dry.
- 2 large onions, finely diced: They add a sweet, savory backbone. Yellow or white onions are perfect here.
- 6–7 celery stalks (about 4 cups), finely chopped: For that essential crunch and classic flavor.
- 4 tablespoons fresh sage, chopped: The quintessential stuffing herb. It’s earthy, peppery, and smells like Thanksgiving.
- 4 tablespoons fresh thyme, chopped: Adds a lovely, subtle lemony warmth.
- 2 tablespoons fresh rosemary, chopped: A little goes a long way! Its piney fragrance is incredible. Tip: Chop your herbs finely so they distribute evenly throughout the stuffing.
- 8 cups low-sodium chicken or vegetable broth: Using low-sodium broth is a chef’s secret! It allows you to control the salt level perfectly. Warm your broth in a saucepan before adding it—this helps the bread absorb it more evenly and keeps the baking time accurate.
- 1 cup (2 sticks) unsalted butter, melted: For richness and that irresistible flavor. This is not the time to skimp!
- 1 cup chopped mushrooms (optional twist): My favorite umami booster! Sauté them with the onions and celery until golden brown.
- 1 cup diced apple (for a sweet-savory balance): A sweet, crisp apple like Honeycrisp or Granny Smith adds a fantastic little burst of flavor and moisture.
- 1 cup cooked sausage, crumbled (for extra richness): A Italian sausage or a sage breakfast sausage takes this to a whole new level of decadence.
- Salt and freshly ground black pepper, to taste: Season in layers! Taste as you go.
Let’s Build the Magic: Step-by-Step
Okay, team! Let’s transform these simple ingredients into the star of your Thanksgiving table. Follow these steps, and you really can’t go wrong.
Step 1: Preheat your oven to 350°F (175°C). This is our target temperature for golden, crispy perfection. Take your large baking dish (or two medium ones—no shame in that!) and give it a good greasing with butter or non-stick spray. We want those crispy edges to release beautifully.
Step 2: In your largest skillet, melt a tablespoon or two of your pre-measured butter over medium heat. Now, in go the onions and celery! Sauté them for 8-10 minutes, stirring occasionally. We’re not looking for color here, just softness and sweetness. You’ll know they’re ready when the onions become translucent and the whole kitchen smells amazing. Chef’s Hack: If you’re using my optional twists (mushrooms, sausage, or apple), add them to the skillet now! Cook sausage until browned, mushrooms until they’ve released their water and turned golden, and apples for just 2-3 minutes to soften slightly.
Step 3: This is the fragrance booster! Add all of your beautifully chopped fresh herbs—the sage, thyme, and rosemary—to the skillet. Stir and cook for just another minute, maybe two, until the herbs are incredibly fragrant. This quick bloom in the fat wakes up all their essential oils and makes the entire dish sing with flavor.
Step 4: Time for the big bowl! Dump all your dried bread cubes into the largest mixing bowl you own. Seriously, go for the giant one. Pour the sautéed vegetable and herb mixture over the bread. Now, slowly drizzle the melted butter over everything. Use a large spatula or (clean) hands to toss everything together, ensuring every nook and cranny of bread gets a little love.
Step 5: Here’s the most important step: gradually pour in the warm broth. I do this in 2-3 cup increments, tossing thoroughly between each addition. Why? We want every single bread cube to be moistened and flavorful, but we are not making bread soup! The mixture should feel like a damp sponge—if you squeeze a handful, it should hold its shape without dripping liquid. This is the exact wisdom my grandma gave me. Season generously with salt and pepper as you go, tasting a little bit (it’s safe, it’s all cooked!) to make sure it’s perfectly seasoned.
Step 6: Gently transfer your beautiful stuffing mixture into your prepared baking dish(es). Spread it out evenly but don’t pack it down too hard—we want some air pockets for texture. Cover the dish tightly with aluminum foil. This first bake (30 minutes) is all about heating it through and cooking the interior gently.
Step 7: After 30 minutes, carefully remove the hot foil (steam alert!). Return the dish to the oven, uncovered, for the final 20-25 minutes. This is where the magic happens! The top will transform into a golden-brown, crispy, irresistible crust. You’ll know it’s done when the edges are pulling away from the dish and the top is beautifully crisp.
Bringing It to the Table
Let the stuffing rest for about 10 minutes after pulling it from the oven—this helps it set and makes serving easier. I love to garnish it with a few extra fresh thyme sprigs or a sprinkle of flaky sea salt for a little chef’s flair. Serve it right from the baking dish for a rustic, family-style feel. Spoon it onto plates alongside that gorgeous turkey, a pool of gravy, and all your other favorite sides. Watch as your guests’ eyes light up with that first, perfect bite.
Make It Your Own: Delicious Variations
The beauty of this recipe is its flexibility! Here are a few of my favorite ways to mix it up:
- Fruit & Nut: Add 1 cup of dried cranberries or cherries and 1 cup of toasted pecans or walnuts along with the bread cubes for a fantastic sweet and crunchy contrast.
- Fully Loaded: Go all-in on the optional twists! Use the sausage, apples, AND mushrooms for the ultimate savory, sweet, umami-packed experience.
- Vegetarian Delight: Use vegetable broth and omit the sausage. For extra heartiness, add 1 cup of toasted, chopped walnuts and a tablespoon of soy sauce or tamari to the broth for a hit of savory depth.
- Gluten-Free Friendly: Simply swap the bread for your favorite sturdy gluten-free bread cubes (check that they’re stale or dried out too!). The method remains exactly the same.
- Cornbread Twist: Replace half of the bread cubes with stale, cubed cornbread for a slightly sweet, Southern-inspired variation.
From My Kitchen to Yours: Chef’s Notes
This recipe has evolved so much over the years! My grandma would probably raise an eyebrow at the fresh herbs (“Anna, the dried stuff in the jar is just fine!”), but I know she’d love the final result. The first time I added the apple, it was a complete accident—I had one left over from a pie and thought, “why not?” It’s been a permanent part of my version ever since.
A funny kitchen story: One year, I was so proud of myself for making the stuffing entirely ahead of time. I prepped it, put it in the dish, covered it, and put it in the fridge. The next day, I went to put it in the oven and realized I had forgotten one crucial step: the broth. I had a beautiful dish of dry bread and vegetables! I had to quickly toss it all back into the bowl, add the broth, and reassemble it while guests were arriving. It still turned out great, but it taught me to always double-check my steps! The moral of the story? Even kitchen mess-ups can have a happy ending.
Your Stuffing Questions, Answered!
Q: Can I make this stuffing ahead of time?
A: Absolutely! This is the perfect make-ahead dish. You have two options: 1) Assemble the entire stuffing (through step 5) up to 24 hours in advance. Keep it covered tightly in the bowl in the refrigerator. When ready to bake, let it sit at room temp for 30 minutes, transfer to the dish, and bake as directed (you may need to add 5-10 minutes to the covered baking time since it’s cold). Or, 2) Bake it completely, let it cool, cover, and refrigerate. Reheat, covered with foil, in a 350°F oven for 20-30 minutes until warmed through.
Q: My stuffing turned out too dry/too wet. What happened?
A: This usually comes down to the bread and the broth. If it’s too dry, your bread might have been too stale or you may have needed a bit more broth. Next time, ensure your bread is just dry, not petrified, and add broth until it truly feels like a damp sponge. If it’s too wet (soggy), the bread may not have been dry enough to start, or you may have added too much broth. Remember, you can always add more broth, but you can’t take it out! Add it gradually until the texture is just right.
Q: Can I use dried herbs instead of fresh?
A: You can, but the flavor will be less vibrant. The general rule is 1 tablespoon of fresh herbs = 1 teaspoon of dried herbs. So, you would use 4 teaspoons dried sage, 4 teaspoons dried thyme, and 2 teaspoons dried rosemary. Add them when you sauté the vegetables to help wake up their flavor.
Q: How do I get those super crispy edges everyone fights over?
A: My favorite question! For maximum crispiness, make sure you’re using a large enough dish so the stuffing isn’t too deeply layered (this is why I sometimes use two dishes). Don’t press the stuffing down too firmly into the dish—keep it a bit loose. And finally, that uncovered bake at the end is non-negotiable for that perfect golden crust.
Nutritional Information
Per Serving (approximately 1 cup): Calories: ~290 | Protein: 7g | Fat: 15g | Carbohydrates: 30g | Sugar: 4g
Preparation Time: 20 minutes | Cooking Time: 40–50 minutes | Servings: 16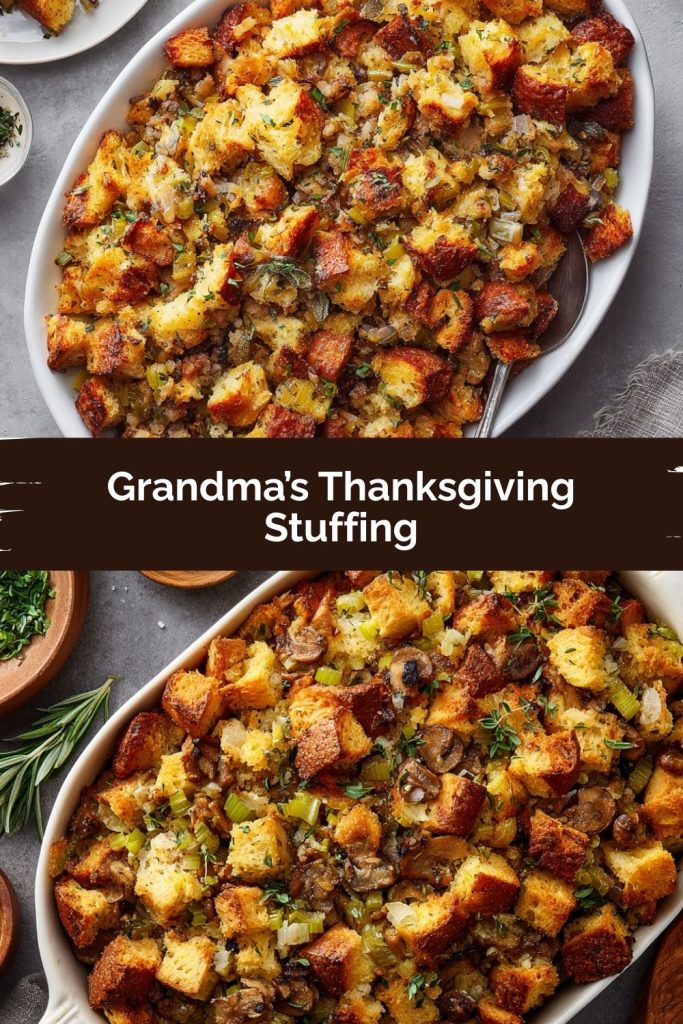
Final Thoughts
There’s something magical about a dish that’s more than just food—it’s memory, tradition, and love all baked into one golden, fragrant pan. This stuffing isn’t just a side dish; it’s the soul of Thanksgiving. It’s the bite that makes you close your eyes, smile, and remember why we gather around the table in the first place.
Whether you keep it classic, load it up with sausage and apples, or give it a cornbread twist, this recipe is built to bring people together. It’s Grandma’s wisdom, reimagined for big, bustling tables full of laughter, clinking glasses, and maybe a little friendly competition for the last crispy-edged scoop.
So this year, when the turkey’s carved and the pies are waiting their turn, let this stuffing take center stage for just a moment. It’s proof that sometimes the humblest dish can carry the most joy. Here’s to full plates, full hearts, and a holiday that feels like home.