## 👻 Spooky, Gooey, & Oh-So-Fun: Halloween Cinnamon Rolls That’ll Haunt Your Taste Buds!
Hey there, friend! Anna here, your kitchen cheerleader and fellow lover of all things cozy and delicious. Can you feel it? That crisp snap in the air, the rustle of fallen leaves, the faint scent of pumpkin spice drifting from a cozy cafe? Halloween is creeping closer, and my kitchen is buzzing with festive energy! Forget *just* carving pumpkins – let’s carve out some time to bake up pure magic. Today, we’re conjuring **Halloween Cinnamon Rolls** that are guaranteed to be the star of your spooky season. Imagine: impossibly soft, pillowy dough swirled with warm, buttery cinnamon sugar, baked until golden and gooey, then drizzled (or drenched, no judgment!) with *vibrantly colored* icing in wicked Halloween hues. We’re talking electric orange, deep purple, eerie green, maybe even a touch of spooky black! Top them with candy eyes peeking out or a sprinkle of fun Halloween jimmies, and you’ve got a treat that’s equal parts adorable and absolutely irresistible. Whether you’re hosting a boo-tiful brunch, fueling up before trick-or-treating, or just want to make a regular Tuesday feel delightfully spooky, these rolls are your ticket. They fill the house with the most comforting aroma – pure cinnamon-sugar bliss mixed with festive fun. Best part? While they *look* like they came from a fancy bakery, they’re totally approachable. I promise, you’ve got this! So, grab your favorite mug of cider or coffee, put on that apron (maybe one with bats?), and let’s turn up the Halloween vibes together. Get ready for soft, sweet, spooky perfection! 🎃✨
### A Ghoulishly Good Memory: Why These Rolls Spark Joy
Halloween Cinnamon Rolls
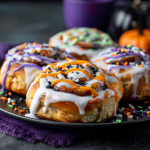
Looking for a festive and sweet treat to spice up your spooky season? These Halloween Cinnamon Rolls are soft, gooey, and topped with a vibrant icing drizzle that screams Halloween fun! Whether you’re throwing a party or cozying up for a scary movie night, these rolls are a must-bake for fall vibes.
- Prep Time: 20 mins
- rise time: 1.5 hrs
- Cook Time: 25 mins
- Total Time: 2 hrs 15 mins
- Yield: 9–12 rolls 1x
Ingredients
For the Dough:
2 ¾ cups all-purpose flour
3 tbsp granulated sugar
1 tsp salt
2 ¼ tsp instant yeast
½ cup whole milk (warm)
¼ cup water (warm)
3 tbsp unsalted butter (melted)
1 large egg
For the Filling:
½ cup brown sugar (packed)
2 tbsp ground cinnamon
¼ cup unsalted butter (softened)
For the Icing:
1 cup powdered sugar
2–3 tbsp milk
Food coloring (orange, purple, green, black)
Candy eyes or Halloween sprinkles (optional)
Instructions
In a large bowl, mix flour, sugar, salt, and yeast. Add warm milk, water, melted butter, and egg. Mix until dough forms.
Knead for 5–7 minutes until smooth. Cover and let rise 1 hour or until doubled.
Roll dough into a rectangle, spread softened butter, and sprinkle cinnamon sugar.
Roll tightly into a log and slice into 9–12 pieces. Place in a greased baking dish.
Cover and rise for 30 minutes. Bake at 350°F (175°C) for 20–25 mins until golden brown.
Mix powdered sugar with milk for icing. Tint with Halloween colors.
Drizzle icing on warm rolls. Add candy eyes or spooky sprinkles if desired.
Nutrition
- Calories: 290
- Sugar: 20g
- Fat: 9g
- Saturated Fat: 5g
- Carbohydrates: 46g
- Protein: 4g
Picture this: It was my kiddo’s first *real* Halloween where she truly grasped the concept of costumes and candy. The excitement was palpable! She was determined to be a tiny, fierce dinosaur (roars included). The night before the big neighborhood parade, amidst the costume chaos and prepping treat bags, I wanted to create a special, non-candy breakfast surprise. Something warm, welcoming, and dripping with Halloween spirit. Enter the humble cinnamon roll – but how to make it *spooky*? Inspiration struck in the baking aisle: food coloring! I whipped up a simple glaze and divided it into little bowls, transforming it into a palette of Halloween colors. Watching her eyes light up the next morning when she saw those bright orange and purple swirls drizzled over warm rolls, topped with wobbly candy eyes, was pure magic. “Mama, the monsters made breakfast!” she declared between delighted giggles. That messy, colorful, icing-smeared breakfast table, filled with her dino-roars and our laughter, cemented these rolls as a yearly tradition. It wasn’t just about the sugar; it was about creating a moment of pure, silly, shared joy. That’s the heart of these Halloween Cinnamon Rolls for me – turning an ordinary morning into a little bite of edible magic and memory-making. Now, every time I smell that cinnamon sugar baking, I’m transported right back to that tiny, roaring dinosaur’s pure delight. Let’s make some spooky-sweet memories in *your* kitchen!
### 🧪 Your Potion Ingredients: What You’ll Need & Why
Gather your cauldron… I mean, mixing bowls! Here’s everything you need to brew up these spellbindingly soft rolls. Don’t worry, substitutions are totally allowed – cooking should be flexible and fun!
**For the Dough: The Pillowy Base of Dreams**
* **2 ¾ cups all-purpose flour:** The trusty foundation! Spoon & level it for accuracy. *Chef’s Insight:* Bread flour works too for a slightly chewier texture, but AP gives perfect softness.
* **3 tbsp granulated sugar:** Feeds the yeast and adds a touch of sweetness to the dough itself.
* **1 tsp salt:** Essential flavor balancer! Don’t skip it.
* **2 ¼ tsp instant yeast (1 packet):** Our magical rising agent. *Key Tip:* Ensure your yeast is fresh! Instant yeast blends right in, no proofing needed (but check expiry dates!).
* **½ cup whole milk, warm (about 105-110°F):** Creates a tender crumb. *Substitution:* Any milk (dairy or unsweetened plant-based like almond or oat) works. Warm it gently – too hot kills yeast!
* **¼ cup water, warm (same temp as milk):** Helps hydrate the dough without making it too rich.
* **3 tbsp unsalted butter, melted:** Adds richness, flavor, and that beautiful soft texture. *Substitution:* Salted butter is fine, just reduce the added salt in the dough by a pinch.
* **1 large egg, room temp:** Binds the dough and adds structure and tenderness.
**For the Filling: The Cinnamon-Sugar Heartbeat**
* **½ cup packed brown sugar:** Dark or light both work! Pack it firmly for that gooey caramel magic. *Chef’s Secret:* Brown sugar adds moisture and deep flavor compared to white.
* **2 tbsp ground cinnamon:** The star of the show! Use fresh, fragrant cinnamon for the best taste. *Fun Twist:* Add ¼ tsp nutmeg or cardamom for extra warmth.
* **¼ cup unsalted butter, softened (not melted!):** Spreads easily and creates that luscious, buttery layer inside. *Crucial Tip:* Softened butter is key! Melted butter makes the filling runny and hard to roll.
**For the Icing & Spooky Decor: The Halloween Glam**
* **1 cup powdered sugar:** The base of our glaze. Sift it for a perfectly smooth drizzle.
* **2–3 tbsp milk:** Start with 2 tbsp and add more gradually for your desired thickness (thicker for piping, thinner for drizzling). Any milk works.
* **Gel Food Coloring (Orange, Purple, Green, Black):** Gel is best! It gives vibrant colors without thinning the icing too much. *Pro Tip:* Start with a tiny drop and build intensity.
* **Candy Eyes or Halloween Sprinkles (optional but HIGHLY encouraged!):** The finishing touch for maximum Halloween fun! Candy eyes bring the rolls to life. Sprinkles add instant festive crunch.
### 🧙♀️ Brewing the Magic: Step-by-Step Spooky Roll Creation
Alright, witches and wizards, let’s get our hands doughy! Follow these steps, and you’ll have rolls worthy of the Great Pumpkin himself. I’ve packed in all my favorite tips and tricks.
1. **
Mix the Dough Incantation:
** In a large bowl (or your stand mixer bowl fitted with the dough hook), whisk together the flour, granulated sugar, salt, and instant yeast. Make a well in the center. Pour in the warm milk, warm water, melted butter, and crack in the egg. *Chef’s Hack:* Using warm liquids (not hot!) wakes up the yeast perfectly. If mixing by hand, use a sturdy wooden spoon until it comes together, then get ready to knead!
2. **
Knead Until Enchanted:
** If using a stand mixer, mix on low speed until combined, then increase to medium speed and knead for 5-7 minutes. The dough should become smooth, elastic, and pull away cleanly from the sides of the bowl. If kneading by hand, turn the shaggy dough out onto a lightly floured surface. Knead firmly, using the heel of your hand to push the dough away, then fold it back over itself. Add only *tiny* bits of extra flour if it’s extremely sticky – we want it slightly tacky but not sticking to your hands like glue! *Key Insight:* Proper kneading develops the gluten, giving your rolls that wonderful soft, pull-apart texture. Aim for smooth and springy!
3. **
First Rise (Let the Dough Ghosts Appear!):
** Shape the dough into a ball. Place it back in the bowl (lightly greased with butter or oil to prevent sticking). Cover the bowl tightly with plastic wrap or a damp kitchen towel. Find a warm, draft-free spot for it to rise. *My Favorite Spot:* Oven with the light on (but OFF!) or near a sunlit window. Let it rise for about 1 hour, or until doubled in size. *Chef’s Tip:* Patience is a virtue here! Don’t rush this rise – it builds flavor and texture.
4. **
Roll Out & Spread the Spooky Filling:
** Lightly punch down the risen dough to release air. Turn it out onto a lightly floured surface. Using a rolling pin, roll it into a roughly 12×16 inch rectangle. Try to keep the thickness even! Spread the **softened** butter evenly over the entire surface, leaving about a ½-inch border along one long edge (this helps seal the roll). *Crucial Hack:* Use an offset spatula or the back of a spoon – it makes spreading the soft butter so much easier and prevents tearing. In a small bowl, mix the brown sugar and cinnamon. Sprinkle this mixture evenly over the buttered dough, again leaving that clean border. Gently press it down with your hands so it adheres.
5. **
Roll It Up Tight (Like a Mummy!):
** Starting with the long edge *opposite* the clean border, tightly roll the dough up into a log, jelly-roll style. Pinch the clean edge firmly against the log to seal it. *Chef’s Tip:* Roll as evenly and tightly as possible for neat, defined swirls. If the ends are messy, you can trim them slightly (baker’s treat!).
6. **
Slice Your Ghoulish Spirals:
** Using a sharp serrated knife or, even better, unflavored dental floss, cut the log into 9-12 equal pieces. *Floss Hack:* Slide a long piece of floss under the log where you want to cut. Cross the ends over the top and pull quickly – it slices cleanly without squishing! Place the rolls cut-side up in a greased 9×13 inch baking dish (or a round cake pan), leaving a little space between them to expand. You should get 9 rolls if you want larger ones, or 12 for slightly smaller portions.
7. **
Second Rise (The Final Haunting):
** Cover the dish loosely with plastic wrap or a damp towel. Let the rolls rise again in a warm spot for about 30 minutes. They should look puffy and be touching each other. *Chef’s Note:* This second rise is shorter but crucial for light, airy rolls. Preheat your oven to 350°F (175°C) during the last 15 minutes of this rise.
8. **
Bake to Golden Perfection:
** Once risen, uncover the rolls. Bake in the preheated oven for 20-25 minutes, or until they are beautifully golden brown on top and sound slightly hollow if tapped gently. *Watch Closely:* Ovens vary! Mine are usually perfect at 22 minutes. The internal temperature should be around 190°F if you have a thermometer.
9. **
Brew the Vibrant Icing Potions:
** While the rolls bake, make the icing. Sift the powdered sugar into a medium bowl. Whisk in 2 tablespoons of milk. Aim for a thick but drizzle-able consistency – like liquid honey. Add the remaining tablespoon of milk gradually *only* if needed. *Pro Decorator Tip:* Divide the icing into smaller bowls if using multiple colors. Add gel food coloring **one tiny drop at a time**, stirring well after each, until you reach your desired spooky shades (deep orange, rich purple, slime green, midnight black!).
10. **
Decorate & Devour!:
** Let the rolls cool in the pan for about 5-10 minutes – just enough so they aren’t scalding, but still wonderfully warm (this is when icing absorption is peak!). Drizzle the colored icings lavishly over the rolls in a fun, haphazard, or artistic spooky fashion. Immediately add candy eyes or Halloween sprinkles so they stick. *The Anna Touch:* Go wild with the colors! Let some icings drip down the sides. The messier, sometimes, the more festive!
### 🎃 Presenting Your Spooky Masterpiece: Serving Suggestions
The beauty of these Halloween Cinnamon Rolls is that they are the showstopper all on their own! Serve them warm right from the pan – that’s when the icing is gloriously melty and the centers are at their ooey-gooey best. Plop the pan right in the center of the table and let everyone dig in family-style. For extra Halloween pizazz, place them on a black serving platter or a wooden board lined with parchment. Scatter a few extra candy eyes or Halloween sprinkles around the base for decoration. Pair them with strong coffee, hot apple cider simmered with cinnamon sticks, or cold milk for the little monsters. They’re perfect for a Halloween morning breakfast in bed surprise, the centerpiece of a boo-tiful brunch spread (think alongside some savory pumpkin soup or scrambled “eyeball” eggs!), or as a sweet finale after a night of trick-or-treating. The vibrant colors and playful decorations make them instant mood-lifters!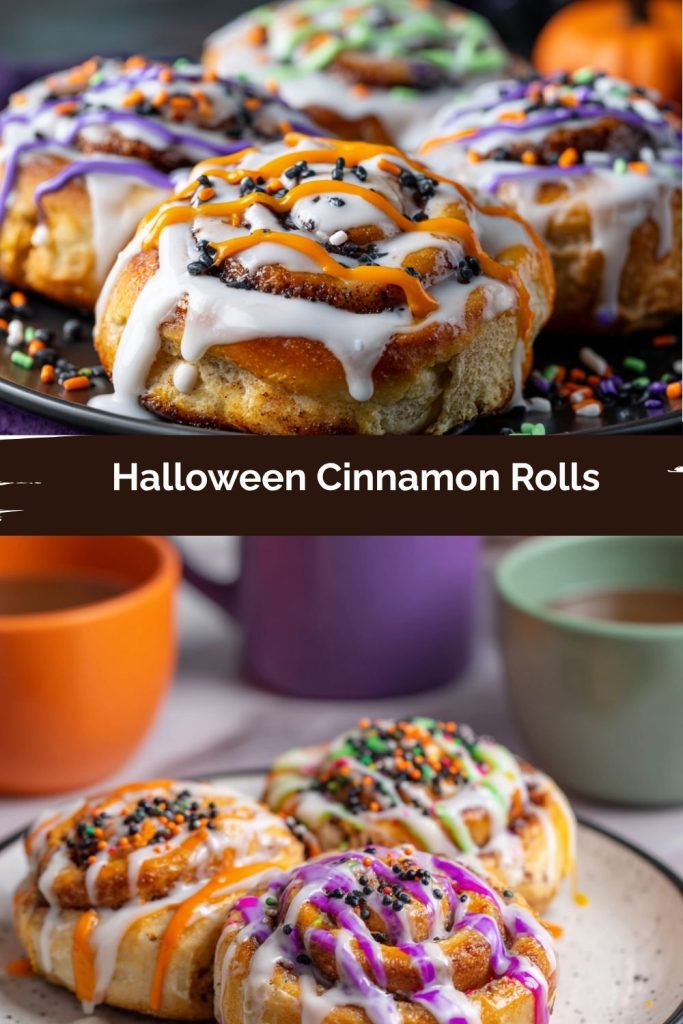
Final Thoughts: A Little Spooky, A Lot of Sweet
There’s something magical about combining the joy of baking with the wonder of the season—and these Halloween Cinnamon Rolls bring it all together in one delicious, icing-drizzled swirl. Whether you’re whipping them up as a surprise for your little goblins, treating your brunch crew, or just adding a sprinkle of whimsy to your own October morning, these rolls turn an ordinary day into a spooky-sweet celebration.
They’re more than just breakfast—they’re memories in the making. So don’t worry if your glaze runs wild or your candy eyes are slightly off-kilter. That’s the charm. The joy is in the mess, the laughter, and the moments shared over something warm from the oven.
Here’s to cinnamon-sugar smiles, brightly colored fingers, and all the cozy kitchen magic this season brings. Happy Halloween, friend!