***
Forget the Oven: Your New Favorite Cheesy Garlic Bread is Stovetop Magic!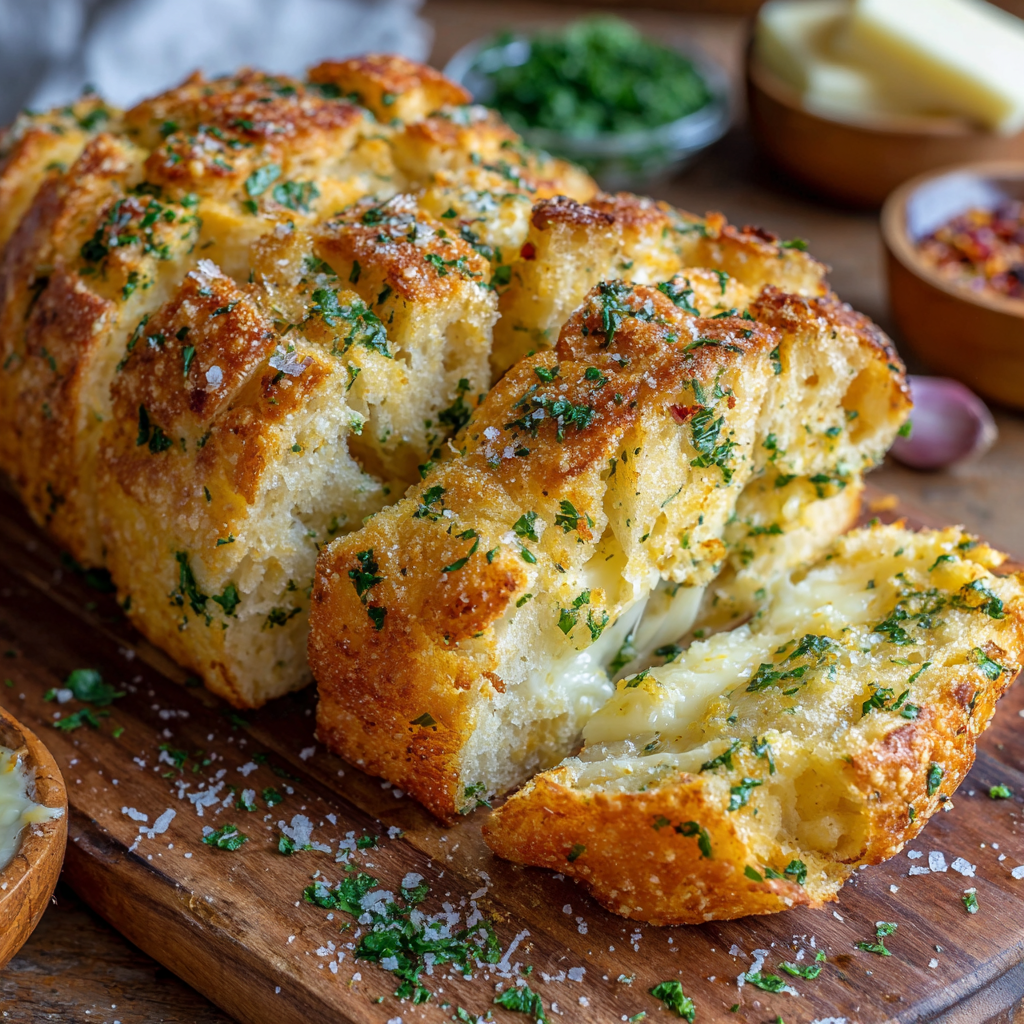
Hey there, friend! Let’s talk about one of life’s greatest, simplest pleasures: warm, cheesy, outrageously garlicky bread. You know the kind. The one that makes you close your eyes and hum with happiness after the first bite. The one that turns a simple bowl of pasta or a cozy soup into a full-blown feast. I’m a firm believer that every meal deserves a little sparkle, and this? This pull-apart, cheesy garlic bread is pure, unadulterated culinary glitter.
But what if I told you that you can achieve this pinnacle of cozy comfort food without ever turning on your oven? That’s right! No heating up the whole kitchen, no waiting for a big appliance to preheat. This recipe is all about using your trusty stovetop and a heavy-bottomed pan to create a golden, fluffy, and melty masterpiece. It’s a game-changer for small kitchens, hot summer days, or those times when a carb-y craving hits and you need satisfaction, stat.
This isn’t just any garlic bread. We’re making our own soft, pillowy dough from scratch (don’t worry, it’s easier than you think!), stuffing it with a vibrant, herby garlic butter and pools of stretchy mozzarella, and then baking it to perfection right on the stove. The result is a beautiful, shareable loaf that’s crisp on the outside, impossibly soft on the inside, and loaded with flavor in every single pull-apart piece. So, tie on your favorite apron, and let’s cook up some stovetop magic together. You’re about to become a garlic bread legend.
The Dorm Room Discovery That Started It All
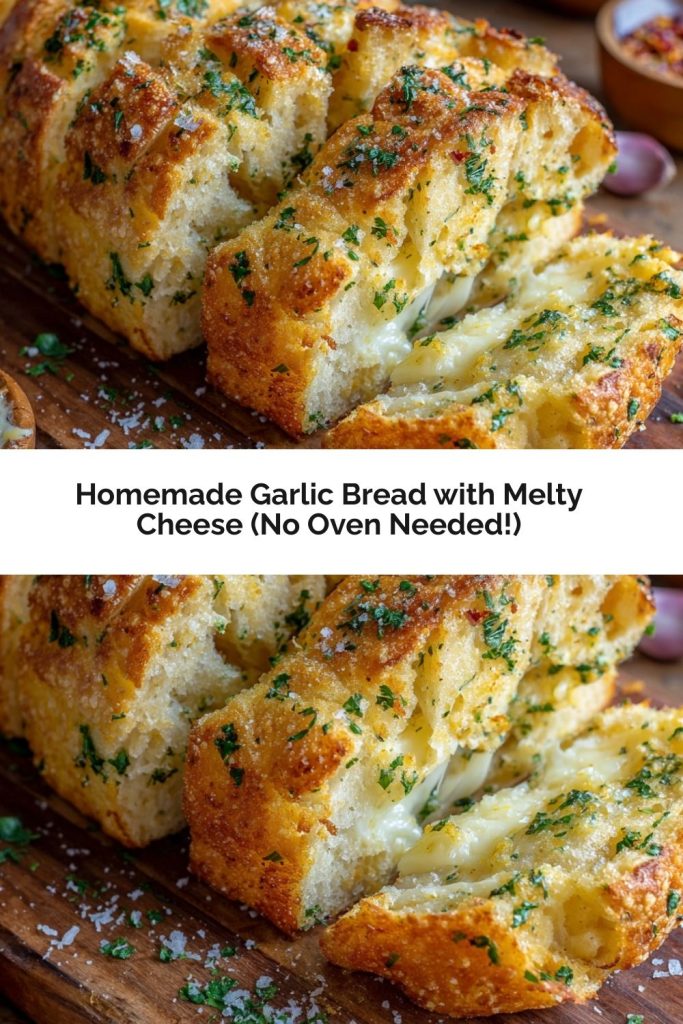
PrintHomemade Garlic Bread with Melty Cheese (No Oven Needed!)

This cheesy garlic bread is loaded with flavor, stuffed with mozzarella, and pan-cooked to golden perfection—no oven required! Fluffy on the inside and crisp on the outside, it’s filled with garlic butter, herbs, and just the right kick from chili flakes. Perfect as a snack, side, or cozy comfort food treat.
- Prep Time: 15 minutes
- rest time: 40 minutes
- Cook Time: 20 minutes
- Total Time: 1 hour 15 minutes
- Yield: 4–6 1x
Ingredients
110 ml warm water
1 tsp sugar
1 tsp yeast
1 cup flour
½ tsp salt
1 tbsp oil
2 tbsp butter
2 tsp chopped garlic
½ tsp red chili flakes
½ tsp pepper powder
½ tsp oregano
¼ tsp salt
1 tbsp coriander leaves, finely chopped
Mozzarella cheese (as needed)
Instructions
1. Activate Yeast
Mix warm water, sugar, and yeast. Let sit for 5 minutes until foamy.
2. Make the Dough
Add flour, ½ tsp salt, and oil to the yeast mixture. Knead into a soft dough. Rub with a little oil and let rest for 40 minutes.
3. Prepare Garlic Butter
In a bowl, mix butter, garlic, chili flakes, pepper, oregano, salt, and coriander. Set aside.
4. Shape the Bread
Roll out the dough. Spread garlic butter mixture, sprinkle mozzarella, fold, and make small cuts on top.
5. Final Touch
Grease a mold with oil and line with baking paper. Place the prepared bread in the mold and spread more garlic butter on top.
6. Cook Without Oven
Preheat a heavy pan with a wire stand inside for 5–7 minutes on medium-low heat.
Nutrition
- Calories: 220
- Fat: 12g
- Carbohydrates: 20g
- Protein: 6g
This recipe has a special place in my heart because it reminds me of my college days. I lived in a tiny dorm with a microscopic kitchenette that boasted a two-burner stove and an oven that was, to put it kindly, wildly unreliable. It had two temperatures: “Ice Box” and “Inferno.” My friends and I were constantly craving late-night snacks that felt more substantial than instant noodles, but our kitchen tools were seriously limited.
One particularly desperate night, fueled by a need for cheesy bread and a distinct lack of a working oven, we got creative. We used a pan, a lid, and a whole lot of hope to try and “bake” a store-bought dough ball we’d slathered with garlic powder and cheap cheese. It was messy, it was lopsided, but oh my goodness, it was a revelation. That slightly crisp, steamy, cheesy creation felt like we’d cracked a secret code. This recipe is the elegant, grown-up, and infinitely more delicious version of that dorm-room experiment. It proves that with a little ingenuity, you can create something truly wonderful, no matter what tools you have on hand.
Gathering Your Garlic Bread Toolkit
Here’s everything you’ll need to create this masterpiece. The beauty of this recipe is in its simplicity, and I’ve included some of my favorite swaps and chef-y insights to make it your own.
- 110 ml Warm Water: This is the key to waking up our yeast. You want it warm to the touch, like a pleasant bath, not hot. If it’s too hot, it will kill the yeast, and our bread won’t rise. A good rule of thumb is around 105-115°F (40-46°C).
- 1 tsp Sugar: Don’t worry, this isn’t for sweetness! The sugar is a little snack for the yeast, helping it get active and foamy, which gives our bread its lovely airy texture.
- 1 tsp Yeast: I use active dry yeast for this. That quick 5-minute foam test in the first step is your best friend—it tells you your yeast is alive and ready to work its rising magic.
- 1 cup All-Purpose Flour: The trusty workhorse of the baking world. I always recommend fluffing your flour with a spoon before scooping and leveling it off with a knife for the most accurate measure. For a slightly heartier texture, you can swap in ¼ cup of whole wheat flour.
- ½ tsp Salt: Essential for balancing and enhancing all the other flavors in our dough.
- 1 tbsp Oil: A neutral oil like avocado or canola works perfectly. This adds a bit of fat to the dough, making it tender and giving it a better crumb. A little extra for coating the bowl keeps the dough from sticking as it rises.
For the Legendary Garlic Butter Filling:
- 2 tbsp Butter, softened: Use the real stuff! Softened butter is crucial for creating a spreadable, mixable paste. If you forget to take it out of the fridge, you can gently soften it in 10-second bursts in the microwave.
- 2 tsp Chopped Garlic: Freshly minced garlic is my go-to for the most vibrant flavor. In a pinch, ½ tsp of good-quality garlic powder can work, but the fresh stuff truly sings here.
- ½ tsp Red Chili Flakes: This is our “kick.” It adds a gentle warmth that plays so nicely with the rich cheese and butter. Feel free to adjust to your spice preference, or leave it out entirely for a mild version.
- ½ tsp Pepper Powder: Freshly cracked black pepper adds a subtle, earthy heat. It’s a small ingredient that makes a big difference.
- ½ tsp Oregano: These dried herbs bring a classic, savory Italian-pizza-parlor vibe. You can use an Italian seasoning blend here if that’s what you have!
- ¼ tsp Salt: A little extra salt in the butter ensures every nook and cranny is seasoned to perfection.
- 1 tbsp Coriander Leaves, finely chopped: (That’s cilantro, for my friends in the US!). This adds a surprising burst of fresh, citrusy flavor that cuts through the richness. If you’re a cilantro-hater, fresh parsley is a fantastic substitute.
- Mozzarella Cheese, as needed: “As needed” means be generous! I like to use low-moisture, pre-shredded mozzarella for convenience, but tearing a block of fresh mozzarella into little pieces will give you those incredible, stretchy, melty pockets. Don’t be shy!
Let’s Make Some Magic: Your Step-by-Step Guide
Ready to see how this all comes together? Follow these steps, and you’ll have a gorgeous, golden loaf in no time. I’ve packed this section with all my favorite tips and tricks to ensure your success.
Step 1: Wake Up the Yeast
In a small bowl, combine your warm water, sugar, and yeast. Give it a quick stir and then walk away for 5 minutes. This is your first checkpoint! You should come back to a foamy, creamy-looking layer on top. If you do, congratulations – your yeast is alive and happy! If not, your water was likely too hot or too cold, or your yeast might be old. It’s best to start over at this point to ensure a good rise.
Step 2: Create the Dough
In a larger mixing bowl, whisk together your flour and salt. Make a well in the center and pour in the foamy yeast mixture and the tablespoon of oil. Now, get your hands in there! Mix everything until it forms a shaggy ball, then turn it out onto a lightly floured surface. Knead for about 5-7 minutes. You’re looking for a soft, smooth, and slightly elastic dough. It shouldn’t be sticky; if it is, add a tiny bit more flour. Chef’s Hack: Instead of timing it, use the “windowpane test.” Stretch a small piece of dough between your fingers. If you can stretch it thin enough to see light through it without it tearing, you’re done kneading! Place the dough ball in a lightly oiled bowl, turn it to coat, cover with a damp cloth, and let it rest in a warm, draft-free spot for 40 minutes, or until doubled in size.
Step 3: Whip Up the Flavor Bomb (The Garlic Butter)
While the dough is rising, let’s make the good stuff. In a small bowl, mash together the softened butter, chopped garlic, chili flakes, pepper, oregano, salt, and fresh coriander (or parsley) until it’s a beautifully speckled, fragrant paste. Set this aside. The smell alone will have you counting down the minutes!
Step 4: Shape and Stuff Your Masterpiece
Once your dough is puffy and doubled, punch it down gently to release the air. Turn it out onto a lightly floured surface and roll it into a rough rectangle, about ¼ to ½ inch thick. Now, take your garlic butter and spread it evenly over the entire surface, leaving just a tiny border around the edges. Next, shower that buttery surface with a glorious amount of mozzarella cheese. Now, carefully roll the dough up from the long side, like a jelly roll. Pinch the seam to seal it. Using a sharp knife or kitchen scissors, make small, shallow cuts across the top of the loaf, about halfway through the dough. This lets the steam escape and creates those beautiful, pull-apart sections.
Step 5: Prep for the “Oven”
Take a small, heatproof bowl or a round cake pan that will fit inside your large pot—this is our “mold.” Grease it lightly with oil and line it with a round of parchment paper for easy removal. Gently place your shaped loaf into the prepared mold. If you have any extra garlic butter, now’s the time to spread it over the top for an extra flavor and color boost!
Step 6: The Stovetop Bake-Off!
This is the cool part! Take a heavy-bottomed pot or Dutch oven with a tight-fitting lid. Place a wire stand or a small, heat-proof ring (like a trivet or even a few metal cookie cutters) in the bottom. Put the lid on and preheat the pot over medium-low heat for a full 5-7 minutes. You’re creating your own mini-oven! Carefully place your mold with the bread inside the preheated pot, on top of the stand. Put the lid back on IMMEDIATELY. Let it “bake” for 15-20 minutes. Do not peek for at least the first 15 minutes, or you’ll let the precious steam escape! Your bread is done when the top is golden brown and it sounds hollow when you tap it.
How to Serve This Golden Glory
The second this bread is out of the pot, let it rest for just a minute or two—the cheese will be like molten lava! Then, turn it out onto a wooden board or platter. I love to serve it right in the middle of the table and let everyone tear off their own steaming piece. It’s the ultimate communal food. It’s a star alongside a big, leafy salad for a light lunch, the perfect partner for your favorite marinara or creamy tomato soup, or a show-stopping side for pasta night. A little extra sprinkle of flaky sea salt and fresh herbs on top right before serving makes it look and taste extra special.
Make It Your Own: Delicious Twists & Swaps
- ‘Nduja & Honey: Swirl in a few teaspoons of spicy ‘nduja paste with the garlic butter and drizzle the finished bread with a tiny bit of honey for a sweet-heat sensation.
- Everything Bagel Style: Before baking, brush the top with an egg wash and sprinkle generously with everything bagel seasoning for a savory, crunchy crust.
- Spinach & Artichoke Dip Bread: Mix a handful of finely chopped thawed spinach and marinated artichoke hearts into the cheese filling. A sprinkle of parmesan on top would be heavenly.
- Pesto Swirl: Swap half the garlic butter for a few tablespoons of your favorite basil pesto for a vibrant, herby twist.
- Dairy-Free Delight: Use your favorite plant-based butter and vegan mozzarella shreds. The method works perfectly!
Anna’s Kitchen Notes & Stories
This recipe has evolved so much from that first lopsided dorm-room attempt! The biggest lesson I’ve learned is the importance of the preheat. Giving that pot a full 5-7 minutes to get properly hot is the secret to a well-risen, perfectly cooked loaf. If the pot isn’t hot enough, you’ll end up with dense bread.
One of my favorite kitchen fails (we all have them!) was the time I got impatient and used hot water instead of warm, effectively sending my yeast to an early grave. The dough didn’t rise at all, and I ended up with a sad, dense, garlicky brick. It was a delicious brick, but a brick nonetheless! It was a powerful reminder that baking, even simple bread like this, is a science that rewards a little patience. Now, I always, always do the foam test. Trust me, it’s a step you don’t want to skip. This recipe is forgiving, but it does ask for that one moment of patience at the beginning.
Your Garlic Bread Questions, Answered!
Q: My dough didn’t rise. What went wrong?
A: This almost always comes down to the yeast. Either the water you used was too hot and killed it, too cold and didn’t activate it, or your yeast was old. That’s why the initial 5-minute foam test is so crucial—it’s your guarantee that the yeast is active. Always check the expiration date on your yeast jar, too!
Q: Can I make the dough ahead of time?
A: Absolutely! After the first rise, you can punch the dough down, wrap it tightly in plastic wrap, and store it in the fridge for up to 24 hours. When you’re ready, let it sit on the counter for about 30 minutes to take the chill off before rolling, filling, and baking.
Q: My bread is browning too quickly on the bottom. How do I fix it?
A: This means your heat is a touch too high. Stovetop baking can be finicky because every burner is different. If you notice it browning too fast, simply reduce the heat to low for the remainder of the cooking time. Using a heavy-bottomed pot (like a Dutch oven) is key here, as it distributes the heat more evenly and prevents hot spots.
Q: I don’t have a wire stand. What can I use instead?
A: No problem! Get creative. A small, heat-proof ramekin flipped upside down works great. So do a few metal cookie cutters, a small coil of aluminum foil, or even a layer of coarse salt spread in the bottom of the pot to create a buffer. The goal is to lift your bread mold off the direct bottom heat of the pot.
Nutritional Information*
*Please note: These are approximate values and can vary based on specific ingredients used.
Per Serving (based on 4 servings):
Calories: ~220 | Carbohydrates: 20g | Protein: 6g | Fat: 12g | Saturated Fat: 6g | Cholesterol: 25mg | Sodium: 450mg | Fiber: 1g | Sugar: 1g
Final Thoughts
If there’s one thing I hope this recipe leaves you with, it’s the reminder that comfort food doesn’t need fancy equipment or perfect conditions — just a little creativity, a warm pan, and a craving worth chasing. This stovetop cheesy garlic bread proves that magic can happen anywhere: in a bustling family kitchen, a tiny dorm, or your quiet weeknight dinner rush.
It’s the kind of recipe that invites you to slow down for just a moment, tear off a soft, steamy piece, and savor something homemade and joyful. Whether you’re pairing it with pasta, dipping it in soup, or enjoying it on its own (absolutely no judgment here), this bread is all about simple pleasure and big flavor.
So next time the garlic bread craving strikes — or you just want to impress someone with a little stovetop wizardry — you’ll know exactly what to do. Here’s to cozy carbs, cheesy middles, and kitchen wins big and small. Happy cooking, friend!