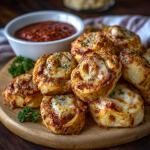
Homemade Pizza Rolls: The Ultimate Grab-and-Go Goodness
Hey there, friend! Anna here. Let’s talk about that magical moment when a snack disappears from the plate faster than you can blink. You know the one. It’s not the fussy canapé or the elegantly plated tart. It’s the humble, hot, incredibly delicious bite that promises—and delivers—pure joy in every gooey, cheesy, flavor-packed mouthful. Today, we’re making that snack: Homemade Pizza Rolls.
Imagine everything you adore about a perfect slice of pepperoni pizza—the stretchy mozzarella, the savory kick of pepperoni, the garlicky, herby crust—all rolled up (literally!) into one irresistible, dippable, golden-brown bundle. These aren’t just a snack; they’re a miniature celebration, perfect for game-day gatherings, after-school treats, family movie nights, or just because it’s Tuesday and you deserve something amazing.
Forget the frozen aisle version. When you make them from scratch (and I use “scratch” in the most fun, stress-free way possible), you control the quality, amp up the flavor, and fill your kitchen with the most incredible aroma. It’s a recipe that’s wonderfully simple but feels special every single time. So, are you ready to create the snack that will have everyone hovering around the oven, asking “Are they done yet?”? Grab your favorite apron, and let’s turn ordinary ingredients into something downright magical.
Why These Rolls Have My Heart (A Kitchen Story)
PrintHomemade Pizza Rolls : Gooey, Cheesy, Grab-and-Go Goodness
Ingredients
For the Rolls:
-
2 tubes refrigerated pizza crust dough
-
2 cups shredded mozzarella cheese
-
1 cup chopped pepperoni slices (or cooked Italian sausage, ham, or veggies)
-
1 cup grated Parmesan cheese
-
1 tbsp Italian seasoning
-
1 tsp garlic salt
-
2 tbsp melted butter
-
Optional: red pepper flakes, chopped fresh basil
For Serving:
-
Marinara sauce, warmed
Instructions
Preheat & Prep:
Preheat oven to 400°F (200°C). Line a large baking sheet with parchment paper.
Roll & Season Dough:
Unroll one tube of dough into a rough 10×12-inch rectangle. Brush with melted butter, sprinkle garlic salt and Italian seasoning.
Layer Filling:
Spread half of the mozzarella, pepperoni, and Parmesan evenly over the dough. Repeat with second dough tube if making a second batch.
Roll & Slice:
Roll dough tightly into a log. Pinch seam to seal. Slice into 1-inch pieces and place cut-side up on the baking sheet.
Top & Bake:
Brush tops with remaining butter, sprinkle remaining Parmesan and optional red pepper flakes. Bake 10–12 minutes until golden brown and cheese is bubbly.
Serve:
Sprinkle with fresh basil if desired. Serve warm with marinara sauce for dipping.
Nutrition
- Calories: 110
- Fat: 6 g
- Carbohydrates: 10 g
- Protein: 5 g
My love for these pizza rolls is deeply tied to one of my favorite sounds: the roar of a high school football crowd on a crisp Friday night. For years, I was the “team mom” in charge of post-game feeds for a ravenous pack of teenage athletes. I’d make massive trays of pasta, pots of chili, and… these pizza rolls.
I’ll never forget the first time I brought them. A sea of hungry, muddy kids descended on the food table, and within minutes, the entire platter was gone. The quiet, satisfied “Oh my gosh, these are SO good” from the toughest linebacker made me grin. From then on, it was a tradition. They became our “good luck” snack, our victory bite, our commiseration-after-a-loss comfort food. They weren’t fancy, but they were made with care, and they represented community, celebration, and the simple pleasure of sharing really good food. That’s the spirit I want you to bring to your kitchen today. Whether you’re feeding a crowd or just your favorite people (or just yourself!), it’s about creating a little moment of delicious, shared happiness.
Your Pizza Roll Toolkit: Simple Ingredients, Big Flavor
Here’s what you’ll need to gather. I’ve added my little chef notes next to each one because knowing the “why” makes you a more confident cook!
- 2 tubes refrigerated pizza crust dough: My favorite kitchen shortcut for this recipe! It’s consistent, easy to work with, and bakes up beautifully. Chef’s Insight: Let it sit at room temp for 10-15 minutes before unrolling—it’s much more pliable and less likely to tear.
- 2 cups shredded mozzarella cheese: The star of our gooey show. I recommend buying a block of low-moisture mozzarella and shredding it yourself. Pre-shredded cheese is coated to prevent clumping, which can also keep it from melting into that perfect, luscious pull. Trust me, the extra minute of shredding is worth it!
- 1 cup chopped pepperoni slices: For that classic, savory, slightly spicy punch. Chopping them ensures every bite gets a piece. Substitution Tip: Not a pepperoni fan? Try chopped cooked Italian sausage, diced ham, or even sautéed mushrooms and bell peppers for a veggie twist.
- 1 cup grated Parmesan cheese: This is our secret flavor booster! It adds a salty, nutty depth that makes the filling incredible. Use the good stuff from the refrigerated section, not the shelf-stable canister.
- 1 tablespoon Italian seasoning: The aromatic soul of our roll. This blend of oregano, basil, thyme, and rosemary makes your kitchen smell like an Italian bistro.
- 1 teaspoon garlic salt: We’re seasoning from the inside out! This gets mixed into the butter brush and sprinkled on the dough for layers of flavor.
- 2 tablespoons melted butter: Our golden-brown, crispy crust maker. It gives the rolls that irresistible, slightly rich, buttery finish.
- Optional: red pepper flakes, chopped fresh basil: The perfect finishers! A pinch of flakes adds a gentle heat, and fresh basil right out of the oven brings a pop of color and bright, fresh flavor.
- Marinara sauce, warmed (for dipping): The essential partner! A good-quality jarred marinara works perfectly. Warm it up while the rolls bake for the ultimate dip.
Let’s Roll! Your Step-by-Step Guide to Perfection
Follow these steps, and you’ll be a pizza roll pro in no time. I’m walking you through every detail!
- Preheat & Prep: Crank your oven to 400°F (200°C). This hot oven is key for a quick, crispy bake. Line a large baking sheet with parchment paper—this prevents sticking and makes cleanup a dream. No parchment? A light coating of non-stick spray works too.
- Roll Out & Flavor the Dough: Unroll your first tube of pizza dough onto a clean surface. If it’s being stubborn, use your fingers to gently press and stretch it into a rough rectangle, about 10×12 inches. Don’t stress about perfect edges! Using a pastry brush, lightly paint the entire surface with some of the melted butter. Now, sprinkle a little of the garlic salt and a generous pinch of Italian seasoning evenly over the butter. This first layer of seasoning bakes right into the dough and is a total game-changer.
- The Cheesy, Meaty Layer: Time for the good stuff! Sprinkle half of the shredded mozzarella evenly over the dough, leaving about a half-inch border around the edges. This border is your “seal” to keep all the goodness inside. Scatter half of the chopped pepperoni over the cheese, followed by a healthy shower of half the Parmesan. Repeat with the second tube of dough!
- The Tight Roll & Slice: Here’s the fun part! Starting from one of the longer sides, tightly roll the dough into a log, like a jelly roll. Gentle but firm pressure helps create a neat spiral. Once it’s rolled, pinch the final seam to seal it. Using a sharp serrated knife, slice the log into 1-inch pieces. Pro Tip: A little sawing motion works better than pushing straight down. Wipe your knife clean between cuts for neater slices. Place each roll cut-side up on your prepared baking sheet.
- Final Gloss & Bake: Brush the tops of the rolls with the remaining melted butter. This gives them that gorgeous, golden color. Sprinkle the tops with the remaining Parmesan and a pinch of red pepper flakes if you like a kick. Pop the tray into your preheated oven and bake for 10-12 minutes. You’re looking for beautifully golden-brown tops and bubbly, melted cheese peeking out the sides.
- The Grand Finale: The moment you’ve been waiting for! Pull the tray from the oven and immediately sprinkle with chopped fresh basil if using. The residual heat will wilt it perfectly. Let them cool for just a minute or two on the sheet (the cheese is molten lava hot!), then transfer to a platter. Serve immediately with warm marinara sauce for dipping.
Serving Up the Fun
Presentation is part of the joy! I love piling these warm, golden rolls onto a big, rustic wooden board or a vibrant platter. Place a bowl of warm marinara sauce right in the center for easy dipping. For a crowd, add little bowls of extra toppings on the side: more red pepper flakes, grated Parmesan, or even a creamy garlic dipping sauce. They’re perfect finger food—no plates needed, just plenty of napkins!
Make Them Your Own: Creative Twists
The beauty of this recipe is its versatility. Here are a few of my favorite spins:
- “Everything Bagel” Pizza Rolls: Swap the Italian seasoning for an “Everything Bagel” seasoning blend on the butter brush. Use a mix of mozzarella and creamy ricotta for the filling.
- BBQ Chicken: Replace the marinara dip with BBQ sauce. Fill with shredded cooked chicken, red onion, cilantro, and a mix of mozzarella and cheddar cheese.
- Veggie Supreme: Sauté a mix of finely chopped bell peppers, onions, mushrooms, and black olives. Use them in place of the pepperoni. A sprinkle of feta cheese adds a lovely tang.
- Breakfast Pizza Rolls: Fill with scrambled eggs, cooked crumbled bacon or sausage, and cheddar cheese. Serve with a side of salsa for dipping!
- Gluten-Free/Dairy-Free: Use your favorite store-bought gluten-free pizza dough. For dairy-free, opt for plant-based mozzarella shreds and Parmesan, and use olive oil instead of butter.
Anna’s Kitchen Notes
This recipe has been a living, evolving staple in my home for years. The first time I made them, I just slapped the toppings on and rolled. Now, I know that seasoning the dough with the butter and herbs first is the non-negotiable step that elevates them from “good” to “can’t-stop-eating-them” great. A funny fail? I once tried to use fresh pizza dough from the deli section, and it was so slack it created a hilarious, albeit delicious, cheese explosion in the oven. Stick with the tube dough for this one—it’s designed to hold its shape perfectly. Over time, I’ve also learned to embrace the imperfect roll. If some cheese pops out, call it “chef’s snack” and enjoy. Cooking is about the joy, not the perfection.
Your Questions, Answered!
Q: Can I make these ahead of time?
A: Absolutely! You can assemble the rolls, slice them, and arrange them on the parchment-lined baking sheet. Cover tightly with plastic wrap and refrigerate for up to 4 hours. Bake straight from the fridge, adding maybe 1-2 extra minutes. You can also freeze the unbaked rolls on the sheet until solid, then transfer to a freezer bag. Bake from frozen, adding 3-5 minutes to the bake time.
Q: My rolls are splitting/unrolling while baking! What happened?
A: This usually means the roll wasn’t quite tight enough, or the filling was piled too close to the edges. Next time, ensure you leave that clean border and roll as snugly as you can. Also, placing them cut-side down (instead of up) on the sheet can help them stay together, though you lose some of the spiral presentation.
Q: The cheese leaked out a lot. How do I prevent that?
A: A little leakage is normal and delicious! But for less mess, make sure your shredded cheese isn’t too finely grated (bigger shreds melt slower) and ensure your log is tightly sealed along the seam. Placing the rolls about an inch apart on the sheet also helps.
Q: Can I use homemade pizza dough?
A: You can, but it needs to be a dough that’s not too wet or slack. A sturdier, bread-like dough works best. The refrigerated tube dough is foolproof for this application, so I highly recommend it for guaranteed success.
Quick Nutrition Info (Per Roll, Approximate)
Calories: 110 | Fat: 6g | Carbs: 10g | Protein: 5g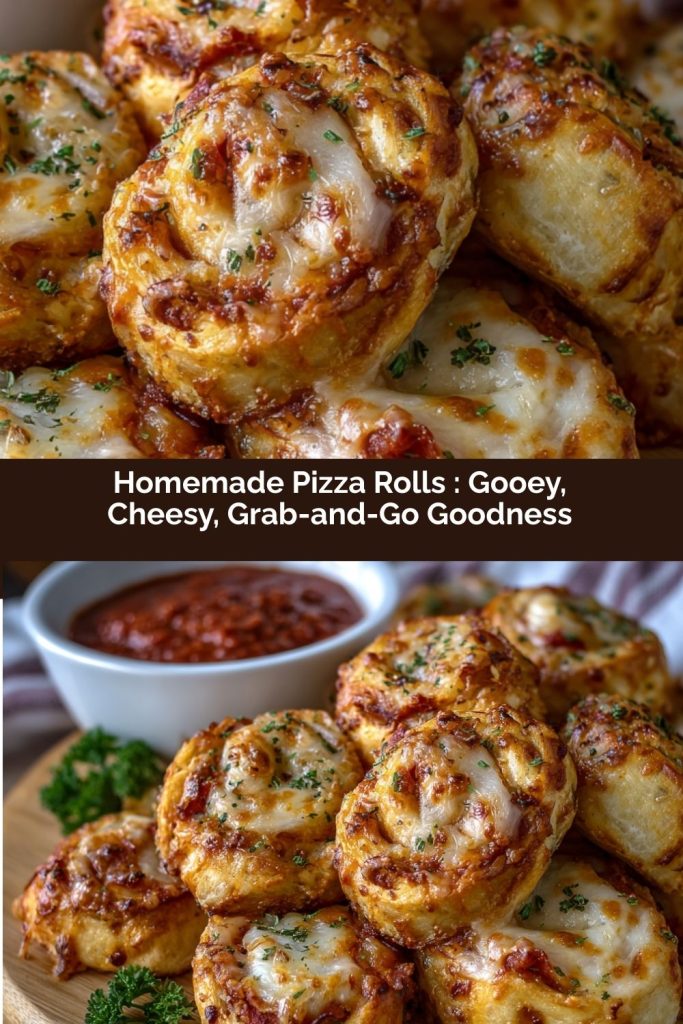
Final Thoughts
Homemade Pizza Rolls are the ultimate snack hack—simple to make, fun to share, and endlessly customizable. From game nights to cozy movie evenings, they bring warmth, flavor, and that irresistible gooey cheese pull everyone loves. They’re proof that sometimes the simplest bites create the biggest smiles. Don’t stress about perfection—embrace a little cheese oozing out and enjoy the process. Your kitchen will smell like happiness, and your friends and family will keep coming back for more.