***
Your New Favorite Cake Is a Blast from the Past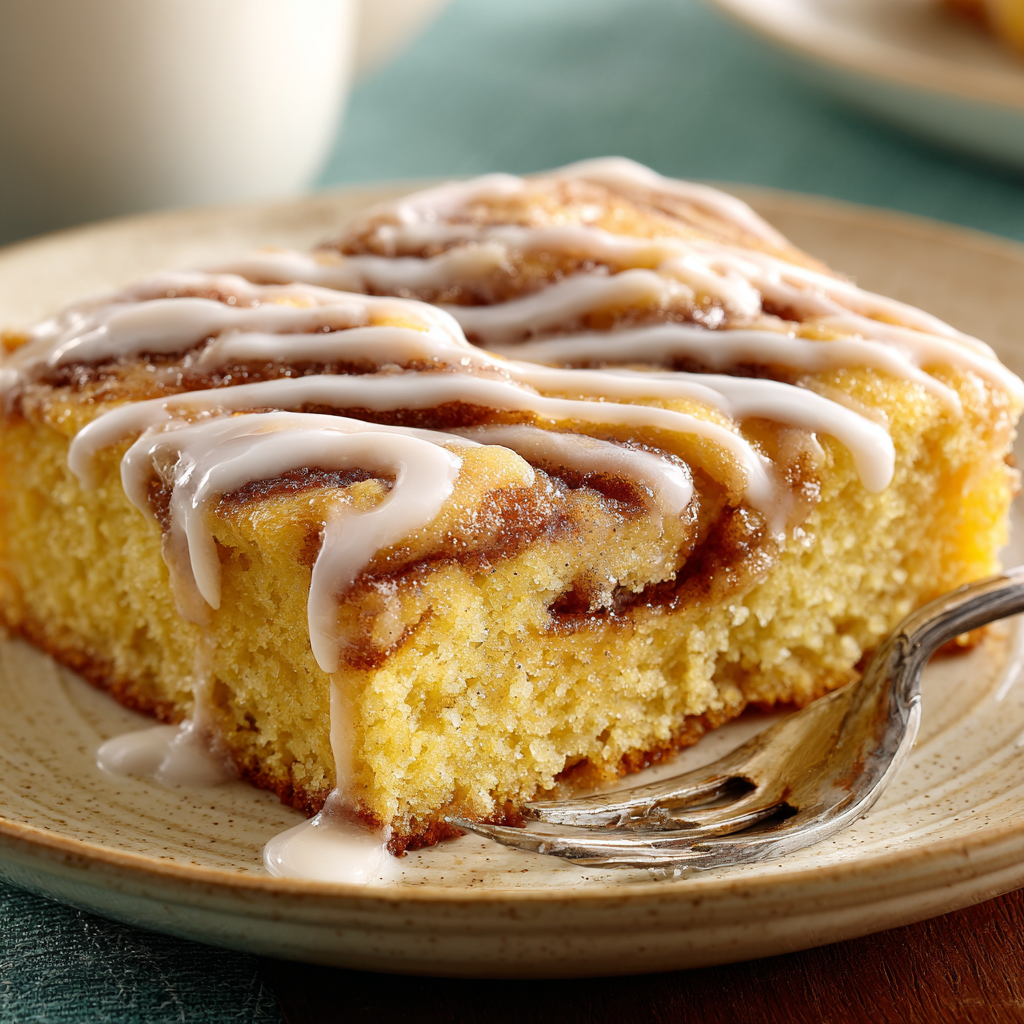
Hey there, friend! Let’s talk about that magical moment when the scent of warm cinnamon and sugar starts to drift from your oven, wrapping your entire home in a hug that smells like pure joy. If you’ve ever torn open the crinkly plastic of a honey bun and dreamed of a whole cake that tastes exactly like that, but about a hundred times better… well, my friend, you are in for the most delightful treat.
This isn’t just any cake. This is a Honey Bun Cake, a vintage recipe that feels like a secret handshake among home bakers. It’s the kind of dessert that sparks instant nostalgia, the one that disappears from the pan before you’ve even had a chance to properly admire your handiwork. We’re talking about an incredibly tender, moist yellow cake, ribboned with a gooey, cinnamon-swirled filling, and finished with a simple vanilla glaze that seeps into every single warm nook and cranny. It’s the stuff of potluck legends and sleepy Saturday morning dreams.
And the best part? It’s unbelievably easy. We’re starting with a simple box mix—a brilliant shortcut that gives us a perfect, reliable base every single time. But we’re not stopping there. We’re going to zhuzh it up, Anna-style, with a few simple additions that transform it from a basic mix into something truly spectacular. This recipe is my love letter to simple, joyful baking. It’s for busy weeknights, last-minute guests, and those days when you just need a little extra sweetness. So, are you ready to bake up a little slice of heaven? Let’s get started!
A Sweet Slice of Memory
PrintHoney Bun Cake
Warm, spiced, and drizzled with a sweet vanilla glaze, this Pumpkin Honey Bun Cake is soft, moist, and layered with brown sugar and nuts. It’s everything cozy and comforting in every bite — perfect for fall gatherings.
- Prep Time: 15 minutes
- Cook Time: 40 minutes
- Total Time: 55 minutes
- Yield: 12–15 1x
Ingredients
Cake:
1 box yellow cake mix
¾ cup oil
4 large eggs
8 oz sour cream
Filling:
1 cup brown sugar
1 tbsp ground cinnamon
Glaze:
2 cups powdered sugar
4 tbsp milk
1 tbsp vanilla extract
Instructions
Preheat oven to 325°F (165°C). Grease a 9×13-inch baking pan.
In a large bowl, mix cake mix, oil, eggs, and sour cream by hand (about 50 strokes).
Pour half the batter into the prepared pan.
In a small bowl, combine brown sugar and cinnamon. Sprinkle over the batter.
Pour remaining batter over the top and gently swirl with a knife.
Bake for about 40 minutes, or until a toothpick inserted in the center comes out clean.
While cake is still warm, mix glaze ingredients and pour evenly over the top. Let set before slicing.
Nutrition
- Calories: 360
- Sugar: 34g
- Fat: 16g
- Carbohydrates: 52g
- Fiber: 0.5g
- Protein: 4g
This cake takes me right back to my grandma’s linoleum-floored kitchen, a place that always smelled like fresh coffee and something baking in the oven. She wasn’t a fancy pastry chef; she was a master of “make-it-work” magic. Her recipe box was filled with brilliant, simple ideas that used pantry staples to create pure comfort.
The first time I had Honey Bun Cake was at one of her legendary church potlucks. I remember elbowing my way through a crowd of aunties to get to the dessert table, my eyes locked on this humble, un-iced sheet cake. It didn’t have towering layers or fancy piping, but it had this mesmerizing swirled pattern and a glossy sheen that promised something incredible. I got a slice, still slightly warm from the car ride over, and took a bite. It was a revelation. It tasted exactly like the honey buns I’d beg for at the gas station, but… homier. Warmer. Made with love. That’s the magic of this cake. It’s not about being complicated; it’s about being soul-deeply good and sparking that wonderful, fuzzy feeling of nostalgia with every single bite.
Gathering Your Sweet Supplies
Here’s everything you’ll need to create this masterpiece. I’ve included my favorite little tips and swaps to make this recipe truly your own!
For the Cake:
- 1 box yellow cake mix: This is our fabulous foundation! Don’t reach for the “butter recipe” or “extra moist” kind—a standard, classic yellow cake mix works perfectly here. It’s our trusty shortcut to success.
- ¾ cup vegetable oil: This is the key to an incredibly moist and tender crumb. I use a neutral oil like canola or vegetable. Melted and cooled butter works too for a richer flavor, but oil guarantees that unbeatable, soft texture.
- 4 large eggs: Make sure they’re at room temperature! This helps them incorporate smoothly into the batter, creating a uniform and beautifully risen cake. A quick pro tip: to bring eggs to room temp fast, place them in a bowl of warm water for 5-10 minutes.
- 8 oz (about 1 cup) sour cream: This is the SECRET WEAPON, friends! The sour cream adds a incredible tanginess and richness that makes this cake taste completely homemade. It also adds fat and moisture, ensuring a dense, pound-cake-like texture that can stand up to the swirls and glaze. No sour cream? Plain Greek yogurt is a fantastic substitute.
For the Cinnamon Swirl Filling:
- 1 cup packed brown sugar: I prefer dark brown sugar for its deeper molasses flavor, but light brown works beautifully too. Pack it firmly into your measuring cup for that perfect, gooey sweetness.
- 1 tablespoon ground cinnamon: Use the good stuff! Fresh, fragrant cinnamon makes all the difference. If you’re feeling adventurous, a pinch of nutmeg or cardamom added to this mix is just divine.
For the Vanilla Glaze:
- 2 cups powdered sugar: Also known as confectioner’s sugar. Sift it if it’s lumpy for a perfectly smooth glaze.
- 4 tablespoons milk: Whole milk is great, but any milk you have on hand works. For an even richer glaze, you can use half-and-half or heavy cream.
- 1 tablespoon vanilla extract: Yes, a full tablespoon! This is where the flavor shines. Use pure vanilla extract for the best taste. This is not the time to be shy with the vanilla.
Let’s Bake Some Magic: Step-by-Step
Ready to create? Follow these steps for a perfect Honey Bun Cake every single time. I’m walking you through it all!
- Preheat and Prep: First things first, preheat your oven to 325°F (165°C). Now, grab your trusty 9×13-inch baking pan. I like to grease mine really well with butter or baking spray. For absolute insurance against sticking, you can line it with parchment paper, leaving a little overhang on the sides for easy lifting later. But a well-greased pan has never failed me with this cake!
- Make the Cake Batter: In a large mixing bowl, combine the yellow cake mix, oil, eggs, and sour cream. Here’s my favorite part: we’re mixing this by hand! Ditch the electric mixer for this one. Grab a sturdy wooden spoon or a spatula and stir until everything is just combined and smooth. It might take a good 50 strokes or so, and the batter will be thick and luscious. Don’t overmix! We just want to incorporate the ingredients—a few small lumps are totally okay.
- First Layer of Batter: Pour half of that beautiful, thick batter into your prepared pan. Use your spatula to spread it into a somewhat even layer. It doesn’t have to be perfect!
- Create the Cinnamon Swirl: In a small bowl, whisk together the brown sugar and cinnamon until it’s well combined and there are no lumps of sugar. Now, sprinkle this mixture evenly over the batter in the pan. Try to get it all the way to the edges for maximum gooeyness in every bite!
- Top it Off and Swirl: Carefully spoon and spread the remaining cake batter over the cinnamon-sugar layer. This can be a little tricky because the batter is thick and you don’t want to disturb the layer below. I like to dollop spoonfuls all over the top and then gently connect them with the back of my spoon. Once it’s mostly covered, take a butter knife or a skinny spatula and gently swirl it through the layers. Make a few figure-eight patterns or zig-zags. Don’t go overboard! You want beautiful marbling, not a muddy mixture.
- Bake to Perfection: Slide the pan into your preheated oven and bake for 38-45 minutes. Ovens vary, so start checking at the 38-minute mark. The cake is done when the top is a beautiful golden brown, the edges are pulling away from the pan slightly, and a toothpick inserted into the center comes out clean or with just a few moist crumbs attached. That smell will be absolutely intoxicating!
- Glaze While Warm: As soon as the cake comes out of the oven, place the pan on a wire cooling rack. Now, immediately whisk together your glaze: combine the powdered sugar, milk, and vanilla in a bowl until it’s smooth and pourable. While the cake is still piping hot, pour the glaze evenly over the entire surface. Watch the magic happen! The warm cake will drink in that glaze, creating an irresistible, shiny, sweet top. Let the cake cool in the pan for at least 30 minutes before slicing. This is the hardest part—waiting!
How to Serve This Beauty
This cake is a dream served slightly warm. I like to cut it into generous squares and serve it right from the pan. It’s sublime all on its own, but a few of my favorite ways to gild the lily: a dollop of freshly whipped cream, a scoop of vanilla bean ice cream that slowly melts into the warm cake, or even a handful of fresh berries on the side to cut through the sweetness. It’s perfect for breakfast with a hot cup of coffee, as a show-stopping dessert after dinner, or as the star of your next brunch spread.
Make It Your Own: Fun Variations
The beauty of this recipe is how adaptable it is! Here are a few of my favorite twists:
- Nutty Delight: Stir ½ cup of chopped pecans or walnuts into the brown sugar and cinnamon filling for a wonderful crunch.
- Apple Cinnamon Twist: Add a layer of very thinly sliced apples (like Honeycrisp or Granny Smith) over the first layer of batter before adding the cinnamon sugar.
- Chocolate Swirl: Swap the cinnamon filling for a mixture of ½ cup brown sugar and ½ cup chocolate chips! A drizzle of chocolate glaze instead of vanilla would be incredible too.
- Gluten-Free Friendly: Use a gluten-free yellow cake mix and ensure all other ingredients are certified gluten-free. The texture works beautifully!
- Orange Zest Zing: Add the zest of one orange to the cake batter and a teaspoon of orange juice to the glaze for a bright, citrusy note.
Anna’s Chef Notes & Kitchen Stories
This recipe has been in my arsenal for years, and it’s one I turn to again and again. I’ve learned a few things along the way! First, the low-and-slow baking temperature of 325°F is crucial. It allows the cake to bake evenly all the way through without the top getting too dark before the center is done.
I also have a funny story about the first time I made this for my book club. I was so excited to share it that I tried to take it out of the pan way too early to put it on a fancy plate. Let’s just say… it was more of a “Honey Bun Cobbler” that night. A delicious, delicious cobbler! So learn from my mistake: serve it right from the pan. It’s rustic, it’s easy, and it’s meant to be enjoyed that way. The recipe has evolved to include sour cream instead of the sometimes-called-for yogurt or pudding mix, because I truly believe it creates the most perfect, decadent texture. Trust the process, and you’ll have a new family favorite!
Your Questions, Answered!
Q: My swirl sunk to the bottom! What did I do wrong?
A: This is a common one! The most likely culprit is that your batter was a bit too thin. Remember, we’re mixing by hand to keep it thick. Using a mixer can sometimes incorporate too much air and change the texture. Also, make sure you’re spooning and spreading the top layer gently, and don’t over-swirl. A few gentle passes with the knife are all you need.
Q: Can I make this cake ahead of time?
A: Absolutely! This cake actually gets more moist and flavorful the next day. You can bake it, let it cool completely, and then cover it tightly with plastic wrap or foil. Store it at room temperature for up to 2 days. I actually prefer it this way! The glaze soaks in even more. You can also warm individual slices in the microwave for 10-15 seconds before serving.
Q: My glaze is too thick/too thin. How can I fix it?
A: Easy fix! If it’s too thick and won’t pour, add more milk, a teaspoon at a time, until it reaches a pourable consistency. If it’s too thin and runny, add more powdered sugar, a tablespoon at a time, until it thickens up. You want it to be the consistency of a thick syrup.
Q: Why did my cake turn out dry?
A: The two most common reasons are overbaking or overmixing. Set a timer and check for doneness a few minutes early. Also, remember to mix the batter by hand just until the ingredients are combined. Overmixing can lead to a tough, dry crumb.
Nutritional Information*
Prep Time: 15 minutes | Bake Time: 40 minutes | Total Time: 55 minutes | Servings: 12-15
*This is an estimate provided for informational purposes only. I am not a certified nutritionist.
Calories per slice (1/12th of cake): ~360 | Fat: 16g | Carbs: 52g | Sugar: 34g | Protein: 4g | Fiber: 0.5g
Final Thoughts
There’s just something about Honey Bun Cake that feels like a hug from the past and a sweet promise for the present. It’s simple, it’s cozy, and it never fails to spark smiles the second that glaze sets and the first forkful disappears.
What I love most is that this isn’t a fussy, intimidating dessert—it’s a bake-you-can-trust, one that will carry you from potlucks to holiday tables to those quiet Saturday mornings when a little extra sweetness feels necessary. Every swirl is a reminder that joy can be simple, and sometimes the best recipes are the ones that don’t try too hard.
So grab your cake mix, swirl in that cinnamon love, and pour yourself a cup of coffee. Because one slice of this beauty? Well, it just might become your new favorite tradition.