***
Loaded Fried Pickles: Your New Favorite Crunchy, Cheesy Obsession
Hey there, friend! Let’s talk about that magical moment when a craving hits. You know the one. It’s not for something sweet, it’s not for a full meal—it’s for something crispy, salty, tangy, and utterly, completely irresistible. For me, that craving has a name, and it’s fried pickles. But we’re not just talking about any old fried pickles today. Oh no. We’re taking that glorious classic and turning it into a full-blown, shareable (or not, no judgment!) feast.
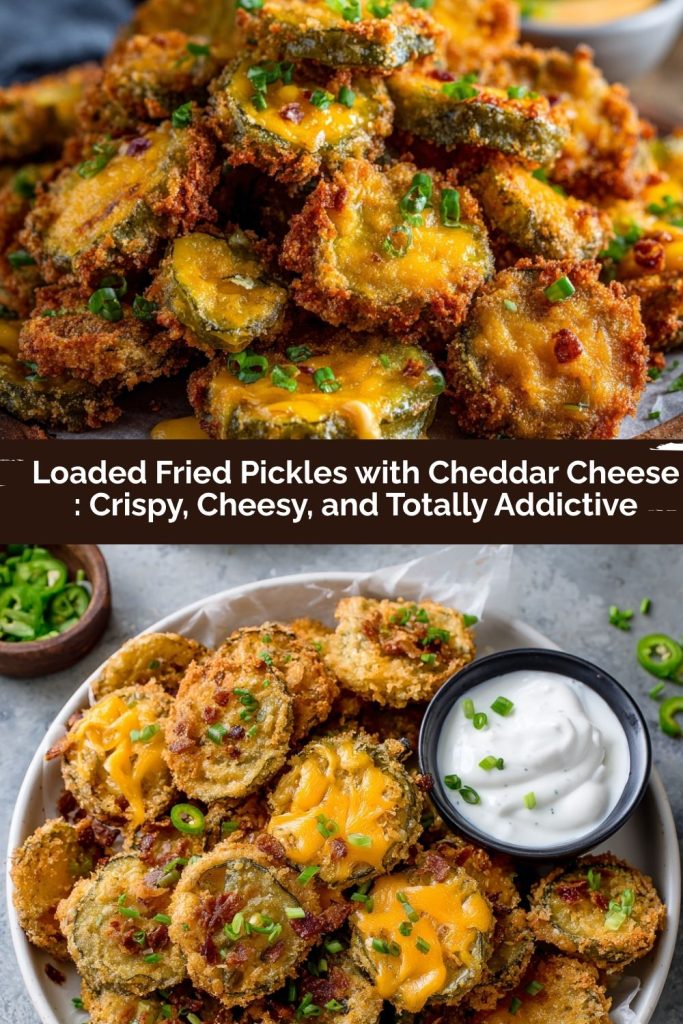
I’m talking about my Loaded Fried Pickles with Cheddar Cheese. Imagine this: a golden-brown, audibly crunchy pickle chip, still juicy and tangy on the inside. Now, picture it smothered in sharp, melted cheddar cheese, dotted with spicy jalapeños, fresh green onions, and maybe a few crispy bacon bits for good measure. It’s like the love child of fried pickles and fully-loaded nachos, and it is here to absolutely dominate your next game day spread, movie night, or “just because” Tuesday.
This recipe is a celebration of texture and flavor. We get crunch from the perfect fry, creaminess from the melted cheese, a kick from the jalapeños, and that cool, herby finish from a generous drizzle of ranch. It’s a symphony in snack form, and I promise, it’s so much easier to make than it looks. So, if you’re ready to turn a simple jar of pickles into the star of the show, grab your favorite skillet and let’s get cooking. This is one of those recipes that’s guaranteed to have everyone asking, “How did you make these?!”
A Fairground Favorite, All Grown Up
PrintLoaded Fried Pickles with Cheddar Cheese : Crispy, Cheesy, and Totally Addictive
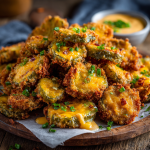
These loaded fried pickles take the classic crispy favorite and crank it up with gooey melted cheddar and your favorite tangy toppings. Crunchy on the outside, juicy on the inside, and topped like nachos—this easy appetizer is built to impress at parties, tailgates, or snack nights.
- Prep Time: 10 minutes
- Cook Time: 10 minutes
- Total Time: 20 minutes
- Yield: 8 1x
Ingredients
1 jar dill pickle chips (drained and patted dry)
1 cup all-purpose flour
2 eggs, beaten
1 cup seasoned breadcrumbs (panko or regular)
1/2 cup shredded cheddar cheese
Optional toppings: diced jalapeños, chopped green onions, ranch drizzle, bacon bits
Instructions
Set Up Breading Station: Place flour, beaten eggs, and breadcrumbs in three separate shallow bowls.
Bread the Pickles: Dredge each pickle chip in flour, dip in egg, then coat in breadcrumbs.
Fry Until Golden: Heat oil in a skillet or deep fryer to 350°F. Fry pickles in batches for 2–3 minutes until crispy. Drain on paper towels.
Load Them Up: Arrange fried pickles on a baking sheet. Sprinkle cheddar cheese and any desired toppings.
Melt & Serve: Broil for 1–2 minutes until cheese melts. Serve immediately with ranch or your favorite dip.
Nutrition
- Calories: ~220
- Fat: 14g
- Carbohydrates: 17g
- Protein: 6g
My love affair with fried pickles started at a dusty, sun-drenched county fair when I was about twelve. I remember the scent of funnel cakes and livestock mingling in the air, the sound of carnival rides whirring, and my dad handing me a small, red-and-white cardboard boat. Inside were these golden, crispy discs I’d never seen before. “Fried pickles,” he announced, as if it were the most normal thing in the world. I was skeptical, but one bite was all it took. The hot, crunchy exterior gave way to a burst of cool, briny juice, and I was instantly, hopelessly hooked. They were the unofficial taste of summer joy.
Over the years, that fairground treat became my go-to appetizer at every diner and pub that offered it. But the true “aha!” moment for this loaded version happened right in my own kitchen during a particularly chaotic (and fun) football Sunday. We had a plate of classic fried pickles, a bowl of nacho cheese sauce, and some leftover toppings from a baked potato bar. In a moment of pure, hungry inspiration, we piled it all together and threw it under the broiler. The result was nothing short of magical. It took a beloved childhood memory and made it even better—more communal, more decadent, and infinitely more fun. It’s a recipe born from joy and a little bit of kitchen chaos, which are always the best kind.
Gathering Your Crunchy, Cheesy Arsenal
This is where the magic begins! The ingredient list is short, sweet, and designed for maximum flavor impact. Here’s everything you’ll need to create this masterpiece.
- 1 jar (16 oz) Dill Pickle Chips: This is our star! I recommend classic dill for that perfect tangy punch. Make sure to drain them thoroughly and then pat them completely dry with paper towels. This is the single most important step for getting a crispy crust instead of a soggy one. The less moisture, the better the crunch!
- 1 cup All-Purpose Flour: Our first line of defense in the breading brigade. The flour creates a dry surface for the egg to cling to, ensuring our breadcrumbs have something to hold onto. For a gluten-free version, a 1:1 GF flour blend works wonderfully here.
- 2 large Eggs, beaten: Think of the egg as the ultimate glue. It’s what binds the flour to the breadcrumbs, creating that seamless, golden jacket for our pickles.
- 1 cup Seasoned Breadcrumbs: This is where the flavor in the crust really starts to build. I love using Panko breadcrumbs for an extra-light and shatteringly crisp texture, but regular seasoned breadcrumbs work beautifully, too. If you only have plain breadcrumbs, just stir in a teaspoon of garlic powder, onion powder, and a pinch of salt.
- 1/2 cup Shredded Cheddar Cheese: Go for a sharp or extra-sharp cheddar here. Its robust flavor stands up beautifully to the bold taste of the pickles. I like to shred my own from a block, as pre-shredded cheese often contains anti-caking agents that can prevent it from melting as smoothly.
- Vegetable or Canola Oil for Frying: You’ll need enough to fill your skillet or pot about 1.5 inches deep. These are pan-fried, not fully submerged, so no need for a giant vat of oil! An oil with a high smoke point is key.
- Optional Toppings for the Grand Finale:
- Diced Jalapeños: For a fresh, spicy kick. Pickled jalapeños also work if you prefer a tangier heat.
- Chopped Green Onions: A pop of color and a fresh, sharp flavor that cuts through the richness.
- Ranch Drizzle: A non-negotiable in my book! Thin out your favorite ranch dressing with a little buttermilk or milk so it drizzles beautifully.
- Bacon Bits: Use the real, crispy-cooked kind! Because everything is better with bacon.
- Sour Cream: A cool, creamy dollop is a fantastic alternative to ranch.
Let’s Build Some Snack Magic: Step-by-Step
Ready to transform these simple ingredients into a legendary snack? Follow these steps, and you’ll be a loaded pickle pro in no time. I’ve packed this section with all my favorite chef hacks to ensure your success!
Step 1: The Dry Patrol
This is your official reminder: dry those pickles! Drain your pickle chips in a colander, then lay them out in a single layer on a big stack of paper towels. Gently pat the tops dry with more paper towels. I like to let them sit for a few minutes while I set up my breading station. A dry pickle is a crispy pickle—say it with me!
Step 2: Create Your Breading Assembly Line
Get three shallow bowls. In the first, place your all-purpose flour. In the second, beat your two eggs until they’re smooth and uniform. In the third, pour your seasoned breadcrumbs. I like to add a tablespoon of the pickle brine to the egg mixture for an extra little punch of dill flavor—it’s a secret weapon! Arrange them in this order: flour, egg, breadcrumbs. This keeps one hand for dry ingredients and one for wet, minimizing mess.
Step 3: The Breading Ballet
Now for the fun, slightly messy part! Working with one pickle chip at a time, dredge it in the flour, shaking off any excess. Next, dunk it completely in the beaten egg, letting the excess drip off. Finally, press it firmly into the breadcrumbs, making sure both sides are fully and evenly coated. I like to use one hand for the flour and breadcrumb steps and the other for the egg step to avoid “club hand.” Place your beautifully breaded pickles on a clean plate or baking sheet as you go.
Step 4: Frying to Golden Perfection
Pour your oil into a heavy-bottomed skillet (cast iron is perfect for this!) until it’s about 1.5 inches deep. Heat it over medium-high heat until it reaches 350°F (175°C). If you don’t have a thermometer, test the oil by dropping in a small breadcrumb—if it sizzles vigorously and turns golden within 30 seconds, you’re good to go. Carefully lower your pickles into the hot oil in batches. Don’t crowd the pan! This will cause the temperature to drop and make them greasy. Fry for 2-3 minutes, flipping once, until they are a deep, golden brown and incredibly crispy. Use a slotted spoon or spider strainer to transfer them to a wire rack set over a baking sheet (this keeps them crispier than paper towels).
Step 5: The Grand “Loading”
Preheat your broiler to high. Arrange your glorious, crispy fried pickles in a single layer on an oven-safe plate or baking sheet. Sprinkle that gorgeous shredded cheddar cheese evenly over the top, making sure to get some on each chip. Now, scatter on your jalapeños and bacon bits if you’re using them. This is where you make it your own!
Step 6: The Melted Cheese Moment
Pop the whole tray under the broiler. WATCH IT CLOSELY! This only takes 1-2 minutes. You’re just looking for the cheese to be completely melted, bubbly, and slightly browned in spots. Broilers are powerful, and things can go from perfect to burnt in seconds. Once it’s beautifully melted, pull it out immediately.
Step 7: The Final Flourish
Right before serving, scatter the chopped green onions over the top for a fresh, colorful finish. Then, take your thinned-out ranch dressing and drizzle it artfully over the entire creation. Get creative! Serve it right away while the pickles are still crunchy and the cheese is gloriously gooey.
How to Serve These Cheesy Wonders
Presentation is part of the fun! I love serving these loaded fried pickles on a large wooden board or a vibrant platter. They’re meant to be shared, so place the platter right in the center of the table and let everyone dig in. Have little dishes of extra ranch, sour cream, and even a spicy chipotle mayo on the side for extra dipping action. They pair perfectly with a cold beer, a crisp glass of rosé, or an ice-cold lemonade. This is casual, hands-on, crowd-pleasing food at its very best.
Make It Your Own! Fun Twists & Swaps
The beauty of this recipe is its versatility. Don’t be afraid to play around with the flavors!
- Spicy Sriracha Lime: Swap the cheddar for pepper jack cheese. After broiling, drizzle with sriracha and a squeeze of fresh lime juice.
- “Everything Bagel” Style: Mix 2 tablespoons of everything bagel seasoning into your breadcrumbs. Top with melty cheddar and a drizzle of dill-infused sour cream.
- Bacon Ranch Explosion: Skip the jalapeños and mix cooked, crumbled bacon right into the breadcrumb mixture. Top with extra cheddar and a heavy-handed ranch drizzle.
- Air Fryer Method: For a lighter version, bread the pickles as directed. Spritz them with oil and air fry at 400°F for 8-10 minutes, flipping halfway. Then load them up and broil as usual.
- Gluten-Free & Keto-Friendly: Use your favorite GF flour and crushed pork rinds or almond flour instead of breadcrumbs for a low-carb, gluten-free delight.
Anna’s Kitchen Confidential
This recipe has seen many iterations in my kitchen! The first time I made them, I got a little overzealous with the toppings and the pickles lost their crunch. Lesson learned: the toppings should be flavorful accents, not a heavy blanket that steams the crispy crust. I also once tried using pickle spears instead of chips—while delicious, they were much harder to eat neatly once loaded! Chips are definitely the way to go for the perfect bite-to-topping ratio.
This has become my signature dish for potlucks because it’s always the first to disappear. I love watching people’s faces when they try it for the first time—that look of surprise and pure delight is everything. It’s a reminder that the best recipes are often the ones that break a few rules and are made with a generous sprinkle of fun.
Your Questions, Answered!
Q: My breading keeps falling off in the oil! What am I doing wrong?
A: This is usually due to one of two things: 1) The pickles weren’t dry enough, causing the flour to get soggy and not adhere. Or 2) The oil wasn’t hot enough. If the oil isn’t at the right temperature, the pickles will sit in it and steam, loosening the breading before it has a chance to set. Always make sure your oil is sizzling hot (350°F) before you start frying!
Q: Can I make these ahead of time?
A: You can bread the pickles ahead of time! Lay them in a single layer on a baking sheet, cover with plastic wrap, and refrigerate for up to 2 hours before frying. I don’t recommend frying them in advance, as they will lose their signature crunch. For the best experience, fry, load, and serve immediately.
Q: Can I bake these instead of frying?
A> You can! For a baked version, arrange the breaded pickle chips on a greased baking sheet, spray them generously with cooking spray, and bake at 425°F (220°C) for 15-20 minutes, flipping halfway, until golden and crisp. Then, load them up with cheese and broil as directed. The crust won’t be *quite* as shatteringly crisp as the fried version, but they’ll still be delicious!
Q: What other dips do you recommend besides ranch?
A> Oh, so many! A creamy comeback sauce, a spicy sriracha aioli, a smoky chipotle mayo, or even a simple garlicky aioli are all fantastic choices. A cool, creamy dip is the perfect partner for the hot, tangy, cheesy pickles.
Quick Nutrition Note
While these are definitely a treat, it’s helpful to know what you’re enjoying! The estimated nutritional information per serving (assuming 8 servings and using the ingredients listed) is approximately: Calories: 220, Fat: 14g, Carbohydrates: 17g, Protein: 6g. Please note this is an estimate and can vary based on specific ingredients used and the amount of oil absorbed during frying.
Final Thoughts
If joy had a crunch, this would be it. These Loaded Fried Pickles are pure fun — bold, crispy, tangy, and just the right kind of over-the-top. They take that classic fairground favorite we all grew up loving and give it a grown-up, game-day twist that no one can resist. Between the golden breading, the gooey cheddar, and that zesty ranch drizzle, every bite feels like a tiny celebration.
What I love most is how they capture the spirit of casual comfort — a little messy, a lot delicious, and totally meant to be shared. Whether you’re serving them at a party or sneaking a few straight from the pan (I’ve been there), they deliver that perfect mix of nostalgia and indulgence.
So go ahead, grab that jar of pickles and make some kitchen magic. Because when something this good hits the table, the only real problem is how fast they disappear. 🥒