***
Fall in Love with These No-Bake Valentine’s Day Cookies
Hey there, friend! Anna here. Can we talk about Valentine’s Day for a second? I have a feeling you might be in one of two camps. Camp One: You live for the hearts, the flowers, and the perfectly planned romantic dinner. Or, you’re firmly in Camp Two: The whole thing feels a little… overwhelming. The pressure! The reservations! The expectation of a grand, complicated gesture!
Well, I’m here to tell you that the most meaningful gestures often come from the simplest, most heartfelt places. And for my money, there’s nothing more heartfelt than something you make with your own two hands. But I hear you – who has the time or energy for fiddly, fussy desserts after a long day?
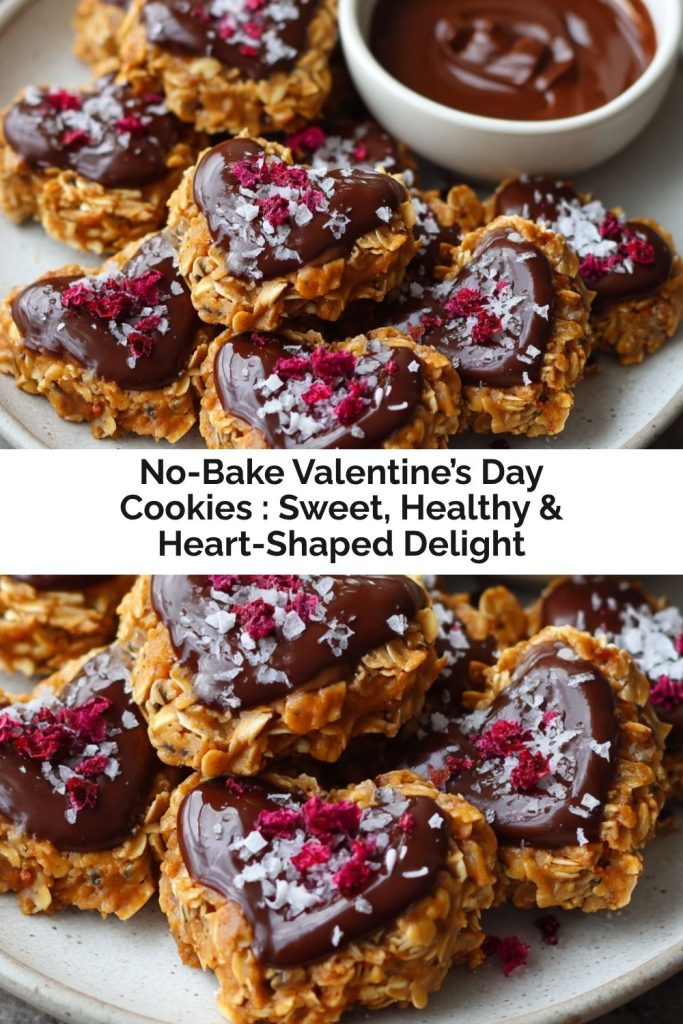
That’s exactly why I’m so head-over-heels for these No-Bake Valentine’s Day Cookies. They are the answer to your sweet, stress-free prayers. Imagine this: chewy oats, rich peanut butter, and melty dark chocolate, all hugged together into a adorable heart shape. They’re sweet, a little bit healthy, and packed with so much love, you can practically taste it. The best part? You don’t even need to turn on your oven. We’re talking about 15 minutes of joyful mixing and shaping, then letting the fridge do the rest of the work. So, whether you’re making them for your sweetheart, your galentines, or just as a sweet treat for yourself (because you deserve it!), let’s grab our aprons and cook up a little bit of magic.
A Sweet Slice of Nostalgia
PrintNo-Bake Valentine’s Day Cookies : Sweet, Healthy & Heart-Shaped Delight
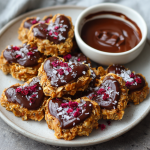
Whip up these heart-shaped No-Bake Valentine’s Day Cookies for a sweet gesture that’s as thoughtful as it is tasty. Made with wholesome ingredients like oats, peanut butter, chia seeds, and a touch of dark chocolate, they strike the perfect balance between indulgent and nourishing. Best of all? No oven needed. Just melt, mix, shape, and chill—ideal for a stress-free dessert that feels special without the fuss.
- Prep Time: 15 minutes
- chill time: 1 hour
- Total Time: 1 hour 15 minutes
- Yield: 18 cookies 1x
Ingredients
1 cup peanut butter
½ cup coconut oil (measured in liquid form)
½ cup coconut sugar
1 cup dark or semi-sweet chocolate chips
2 tsp vanilla extract
1 tsp salt
3½ cups rolled oats
4 tbsp chia seeds
Optional Twists:
Add 2 tbsp shredded coconut for a tropical touch
Stir in freeze-dried raspberries for a romantic burst of berry flavor
Sprinkle with flaky sea salt after shaping for a gourmet finish
Instructions
In a small pot over low heat, combine peanut butter, coconut oil, and coconut sugar. Stir until smooth and fully melted.
Remove from heat and mix in chocolate chips, vanilla, and salt. Stir until the chocolate is melted and mixture is glossy.
Fold in oats, chia seeds, and any optional add-ins until well combined.
Line a baking sheet with parchment paper. Using a heart-shaped cookie cutter, press about 2 tablespoons of mixture into the cutter to shape each cookie.
Repeat until all the mixture is used.
Chill in the refrigerator for at least 1 hour until firm.
Nutrition
- Calories: 180 per cookie
- Sugar: 8g
- Fat: 12g
- Fiber: 3g
- Protein: 5g
This recipe takes me right back to my grandma’s kitchen, a place that always smelled of cinnamon and unconditional love. She wasn’t a fancy pastry chef; she was a wizard of “throwing things together.” Her signature move was a no-bake oat and peanut butter ball she’d whip up for us grandkids. We’d stand on our little step-stools, covered in more oatmeal than was actually in the bowl, “helping” her roll the sticky mixture into lopsided spheres.
She’d always let me sneak a taste from the bowl, and I can still remember the sheer joy of that salty-sweet, chocolatey dough. They weren’t perfect, but they were made with laughter and love, and that made them the best cookies in the world. These heart-shaped delights are my own little twist on her classic. By pressing them into a heart-shaped cutter, I’m honoring that memory and adding a new layer of intention. It’s a small gesture, but it turns a simple no-bake treat into a tangible little token of affection—just like the ones my grandma gave me.
Your Blueprint for Deliciousness: The Ingredients
One of the things I love most about this recipe is its beautiful flexibility. It’s a fantastic pantry-cleaner! Here’s what you’ll need, along with a few of my chef-y insights and easy swaps to make these cookies your own.
- 1 cup Peanut Butter: This is our superstar binder and flavor base! I recommend using a creamy, natural peanut butter for the best texture and to avoid an overly oily cookie. Chef’s Tip: If you’re using a natural peanut butter that separates, give it a really good stir before measuring. For a nut-free version, sunflower seed butter works wonderfully!
- ½ cup Coconut Oil: Make sure this is in its liquid form. If your house is cool and it’s solid, just gently warm the jar in a bowl of hot water. This gives our cookies their melt-in-your-mouth quality and helps them firm up perfectly in the fridge.
- ½ cup Coconut Sugar: I adore the deep, caramel-like flavor of coconut sugar, and it’s a less refined option than white sugar. Chef’s Insight: If you don’t have any, light brown sugar is a perfect 1:1 substitute and will give you a similar rich, molasses note.
- 1 cup Dark or Semi-Sweet Chocolate Chips: Hello, decadence! I’m a dark chocolate gal myself—it balances the sweetness so nicely. But use what you love! Milk chocolate chips will make them sweeter, and for a fun twist, try chopping up a bar of your favorite gourmet chocolate.
- 2 tsp Vanilla Extract: The soul of so many baked goods! A good quality vanilla adds a warm, aromatic depth. Don’t be shy with it.
- 1 tsp Salt: Trust me on this! Salt is the secret weapon that makes all the other flavors pop, especially the chocolate and peanut butter. We’re using fine sea salt in the mix, but hold back a little for a fancy flaky sea salt finish later.
- 3½ cups Rolled Oats: Also known as old-fashioned oats. They give our cookies a wonderful, hearty chew and body. Heads up: Avoid using instant oats, as they can make the texture a bit mushy.
- 4 tbsp Chia Seeds: My little healthy hack! They add a fantastic boost of fiber, protein, and omega-3s, and they give a delightful little crunch. If you don’t have them, ground flaxseed is a great substitute.
Let’s Make Some Magic: Step-by-Step Instructions
Ready to create? This is the fun part. Put on some good music, and let’s get to it. Remember, cooking is a feeling, not just a formula—so don’t stress!
- Create Your Sweet Base: Grab a medium-sized saucepan and place it over low heat. Add your peanut butter, liquid coconut oil, and coconut sugar. Now, this is key: low and slow is our mantra here. We just want to gently melt everything together until it’s smooth and unified, stirring constantly with a spatula. You should see no more streaks of oil or lumps of sugar. This should only take 2-3 minutes. Chef’s Hack: If you’re nervous about burning it, you can also do this in a heatproof bowl set over a pot of simmering water (a double boiler).
- Welcome the Chocolate: Once your mixture is smooth and gorgeous, take the pot off the heat. Immediately stir in the chocolate chips, vanilla extract, and that teaspoon of salt. The residual heat from the mixture is more than enough to melt the chocolate beautifully. Keep stirring until everything is glossy, dark, and smells like heaven. You’ve just made a no-bake fudge sauce—isn’t it amazing?
- Bring It All Together: Now, pour in your rolled oats and chia seeds. If you’re using any of the fun optional add-ins like shredded coconut or crushed freeze-dried raspberries, now’s the time! Fold everything together with a determination and love until every single oat is coated in that luxurious chocolate-peanut butter mixture. You’ll know it’s ready when you have a thick, somewhat sticky dough.
- Shape with Heart: Line a baking sheet or large plate with parchment paper. Grab your heart-shaped cookie cutter and place it on the sheet. Scoop about 2 tablespoons of the mixture into the cutter. Now, use your fingers or the back of a small spoon to press the mixture down firmly and evenly, making sure to get into the curves of the heart. This firm pressing is what ensures your cookies hold their beautiful shape. Gently lift the cutter away, and voilà! Your first cookie. Repeat this with the remaining mixture. Little Chef Tip: If the mixture starts sticking to the cutter, give it a quick rinse and dry, or lightly spritz it with cooking spray.
- The Patience Game: This is the hardest part! Carefully transfer your tray of beautiful heart-shaped cookies to the refrigerator. Let them chill for at least one hour, or until they are completely firm to the touch. This allows the coconut oil to solidify, giving us that perfect cookie texture. I know it’s tempting, but don’t rush this step!
Serving Your Sweet Creations
Once your cookies are firm and ready, the fun really begins! I love arranging a few on a beautiful ceramic plate, maybe with a sprinkle of extra chia seeds or a few fresh raspberries scattered around for a pop of color. For a truly special touch, stack them in a little clear cellophane bag tied with a rustic baker’s twine bow – a perfect, portable gift for your Valentine. They pair wonderfully with a cold glass of milk, a hot cup of coffee, or even a glass of red wine if you’re going for the full romantic experience.
Make It Your Own: Recipe Variations
The beauty of this recipe is its adaptability. Feel free to play and personalize!
- Tropical Escape: Stir in 2 tablespoons of shredded coconut along with the oats for a sunny, tropical vibe.
- Berry Burst: Add ¼ cup of crushed freeze-dried raspberries or strawberries for a beautiful pink hue and a tangy, romantic burst of flavor.
- Salty-Sweet Gourmet: Right after shaping, sprinkle the tops of the cookies with a tiny pinch of flaky sea salt. It elevates them to a whole new level of deliciousness.
- Nutty Crunch: Fold in ¼ cup of finely chopped almonds, pecans, or walnuts for an extra layer of texture.
- Double Chocolate: For the true chocoholic, add 2 tablespoons of cocoa powder to the melted peanut butter mixture along with the chocolate chips.
Anna’s Chef’s Notes
This recipe has been a living, evolving little gem in my kitchen. The first time I made them, I completely forgot the salt and let me tell you, the difference was astounding! It was a powerful reminder that salt isn’t the enemy; it’s the best friend your dessert ever had. I’ve also learned that the type of peanut butter you use is crucial. One time, in a pinch, I used a very oily conventional brand, and my cookies never quite set up properly. It was a delicious, spoonable mess, but a mess nonetheless! Now I’m a staunch advocate for the well-stirred natural kind. These cookies have been my go-to for last-minute school bake sales, impromptu dinner parties, and yes, many a Valentine’s Day. They’ve never let me down.
Your Questions, Answered!
I’ve gotten so many wonderful questions about these cookies over the years. Here are the most common ones to help you out!
Q: My mixture is too dry and crumbly. It won’t hold its shape! What happened?
A: Don’t worry, we can fix this! This usually happens if your peanut butter was particularly thick or your measurements for the dry ingredients were a bit heavy-handed. Simply add another tablespoon of melted coconut oil or peanut butter, one at a time, and mix until it comes together. The mixture should be pliable and hold its shape when pressed.
Q: Can I make these ahead of time? How do I store them?
A: Absolutely! They are the perfect make-ahead treat. Because of the coconut oil, they need to be stored in the refrigerator in an airtight container. They’ll stay perfectly delicious for up to a week. You can also freeze them for up to 3 months! Just separate layers with parchment paper in a freezer-safe bag or container.
Q: My cookies are too soft, even after chilling. Why?
A> This typically points to the fat ratio. It could be the brand of peanut butter (some are just oilier), or your coconut oil measurement might have been a little scant. Pop them in the freezer for 20-30 minutes, and they should firm up nicely. For next time, you can try reducing the peanut butter by a tablespoon or two, or adding an extra ¼ cup of oats.
Q: I don’t have a heart-shaped cookie cutter. Can I still make these?
A: Of course! The shape is just a fun bonus. You can simply roll the mixture into balls (like my grandma did!), or press it into an 8×8 baking dish to make no-bake bars that you can cut into squares or even hearts if you have a stencil.
Quick Nutrition Note
While I’m all about the joy of eating, I know it’s helpful to have a general idea of what’s in your food. Please note, this is just an estimate and can vary based on your specific ingredients and any substitutions you make.
Per Cookie (approx.): Calories: 180 | Protein: 5g | Fiber: 3g | Sugar: 8g | Fat: 12g
Final Thoughts
At the end of the day, these No-Bake Valentine’s Day Cookies are everything I love about homemade sweets — heartfelt, simple, and made to be shared. There’s something special about creating a treat that doesn’t need an oven, just a few pantry staples and a little love. Whether you’re crafting them for someone special, handing them out to friends, or enjoying them solo with a cozy cup of coffee, they’re the kind of dessert that brings joy in every bite.
They remind me that Valentine’s Day isn’t really about fancy gifts or perfect plans — it’s about the quiet, thoughtful gestures that say I care. And honestly, what better way to say it than with a heart-shaped cookie made with your own hands? 💕