Oreo Tiramisu Layer Cake – Coffee-Soaked Dessert with Mascarpone Oreo Cream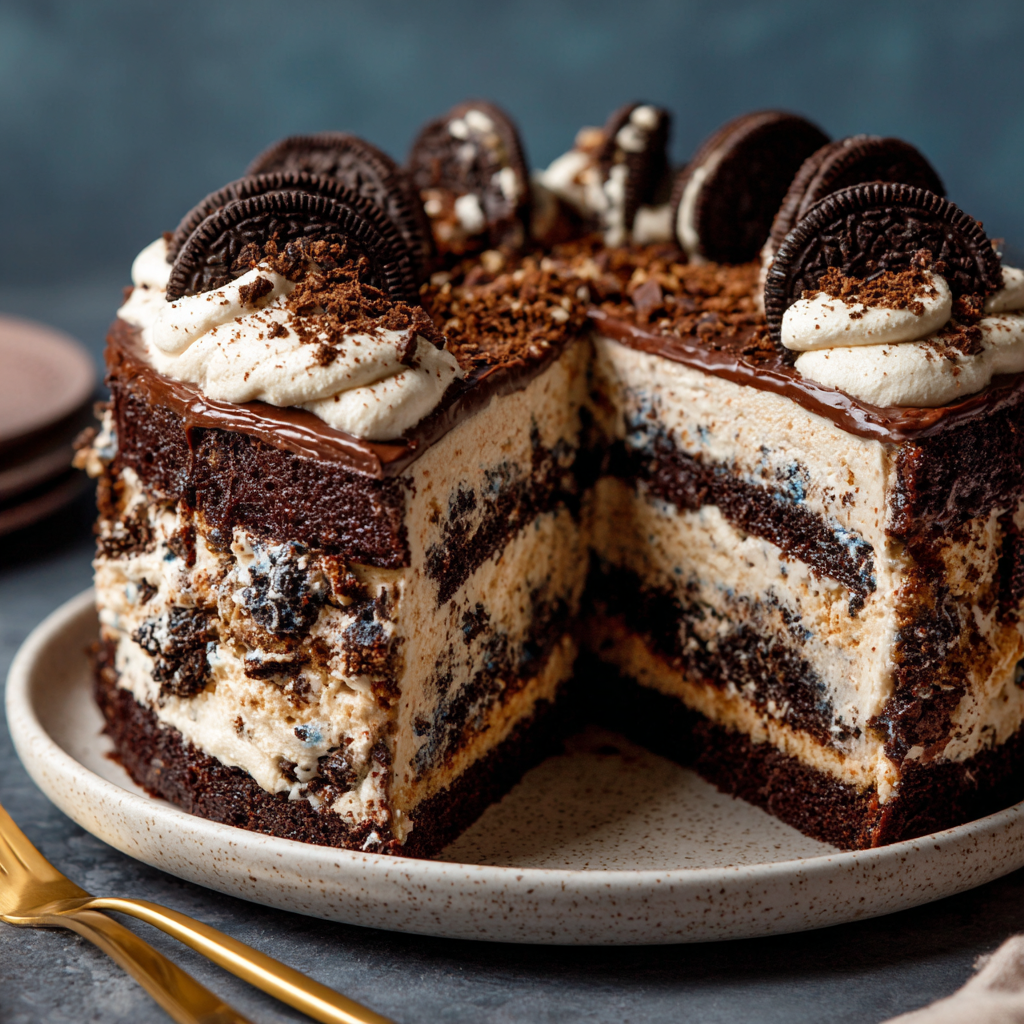
Hey there, friend! Let me ask you a question: have you ever had one of those dessert daydreams? You know, the kind where you’re sipping your afternoon coffee, nibbling on an Oreo, and wishing you could just merge the two into one spectacular, share-worthy creation? Well, pull up a chair, because I’m about to make that delicious daydream a reality.
Today, we’re baking my Oreo Tiramisu Layer Cake. This isn’t just a dessert; it’s an experience. Imagine layers of incredibly soft, dark Oreo cake, each one gently brushed with a rich, aromatic coffee syrup. Between those layers? A cloud of luscious, impossibly creamy mascarpone filling, speckled with crunchy bits of Oreo cookie. It’s crowned with a simple dusting of cocoa powder and a few artfully placed Oreos, looking every bit as elegant as a dessert from a fancy patisserie.
But here’s my favorite part: it’s so much easier to make than it looks. I’ve tested every step to ensure it’s straightforward, joyful, and utterly foolproof. Whether you’re planning a centerpiece for a holiday table, a showstopper for a birthday, or just a magnificent treat to turn an ordinary Tuesday into a celebration, this cake is your answer. So, tie on your favorite apron, put on some good music, and let’s bake something boldly beautiful together.
The Day Two Classics Fell in Love
PrintOreo Tiramisu Layer Cake : Bold, Creamy & Coffee-Kissed

- Prep Time: 35 minutes
- chill time: 2 hours
- Cook Time: 30 minutes
- Total Time: 3 hours 5 minutes
- Yield: 12 slices 1x
Ingredients
Oreo Chocolate Cake Layers
-
1½ cups all-purpose flour
-
½ cup unsweetened cocoa powder
-
1 tsp baking powder
-
½ tsp baking soda
-
¼ tsp salt
-
1 cup granulated sugar
-
½ cup vegetable oil
-
2 large eggs, room temperature
-
1 tsp vanilla extract
-
¾ cup buttermilk
-
½ cup hot brewed coffee
Coffee Syrup
-
½ cup strong brewed coffee or espresso
-
2 tbsp granulated sugar
-
1 tbsp coffee liqueur (optional)
Mascarpone Oreo Cream
-
8 oz mascarpone cheese, cold
-
1 cup heavy whipping cream, cold
-
¼ cup powdered sugar
-
1 tsp vanilla extract
-
10 Oreo cookies, filling removed and crushed
For Garnish
-
Unsweetened cocoa powder, for dusting
-
Whole or halved Oreo cookies
Instructions
Make the Oreo Cake
-
Preheat oven to 350°F (175°C). Grease and line two 8-inch round cake pans with parchment.
-
In a bowl, whisk flour, cocoa powder, baking powder, baking soda, and salt.
-
In a separate bowl, whisk sugar and oil until combined. Add eggs one at a time, then vanilla.
-
Alternate mixing in dry ingredients and buttermilk, beginning and ending with dry.
-
Stir in hot coffee until batter is smooth and thin.
-
Divide batter evenly between pans and bake 25–30 minutes, until a toothpick comes out with moist crumbs.
-
Cool 10 minutes in pans, then transfer to a wire rack to cool completely.
2. Make the Coffee Syrup
-
Heat coffee and sugar in a small saucepan over low heat until sugar dissolves.
-
Remove from heat and stir in coffee liqueur if using. Cool to room temperature.
3. Make the Mascarpone Oreo Cream
-
Beat mascarpone, powdered sugar, and vanilla until smooth.
-
In a separate bowl, whip heavy cream to soft peaks.
-
Gently fold whipped cream into mascarpone mixture.
-
Fold in crushed Oreo cookies.
4. Assemble the Cake
-
Slice each cake layer in half horizontally for 4 layers (optional but recommended).
-
Place first layer on serving plate. Brush generously with coffee syrup.
-
Spread mascarpone Oreo cream evenly over cake.
-
Repeat with remaining layers.
-
Frost top and sides lightly for a semi-naked look.
-
Chill at least 2 hours or overnight for best texture.
5. Garnish & Serve
-
Dust with cocoa powder just before serving.
-
Decorate with Oreos.
-
Slice using a hot, clean knife for neat layers.
Nutrition
- Calories: 420
- Sugar: 28g
- Fat: 26g
- Carbohydrates: 44g
- Protein: 6g
This cake has a little bit of a “meet-cute” story. It was my husband’s birthday a few years back, and I was *determined* to bake him the ultimate cake. The problem? He’s a man of divided loyalties. His favorite dessert of all time is a classic, cocoa-dusted tiramisu. But his favorite cookie? You guessed it—the mighty Oreo. “Why choose?” I thought, standing in my kitchen at probably too late an hour.
I started tinkering. A chocolate cake base felt right, but it needed that distinct Oreo flavor. Then came the “aha!” moment: what if I soaked that cake not just in coffee, but in a coffee syrup that echoed the deep notes of the cookie? And the cream… it had to be mascarpone, the heart of tiramisu, but what if we folded in the very soul of an Oreo? The first test run was… messy. The second was better. The third? Let’s just say when I presented the final version, his eyes went wide. One bite, and he declared it his new favorite birthday tradition. It’s become our family’s signature “celebration cake,” and now, I’m so thrilled to share that tradition with you.
Gathering Your Delicious Building Blocks
Here’s everything you’ll need to build this masterpiece. I’ve grouped them by component to make your shopping and prepping a breeze. Remember, great ingredients make a great cake, but I’ve also included plenty of swaps so you can use what you have!
For the Oreo Cake Layers:
- 1 ½ cups all-purpose flour: The sturdy-but-tender foundation of our cake. For a slightly denser, fudgier crumb, you can swap in cake flour.
- ½ cup unsweetened cocoa powder: Use a good quality one! This is where that deep, chocolatey Oreo vibe comes from. Dutch-processed will give a darker color and milder flavor.
- 1 teaspoon baking powder & ½ teaspoon baking soda: Our dynamic leavening duo. They work together to give the cake a perfect, soft rise.
- ¼ teaspoon salt: A kitchen essential! It balances the sweetness and makes all the other flavors pop.
- 1 cup granulated sugar: Sweetens and tenderizes. I use regular white sugar here for a clean sweetness.
- ½ cup vegetable oil: My secret for an incredibly moist cake that stays soft for days. Canola or a light olive oil work too.
- 2 large eggs: Bring them to room temperature! They’ll incorporate much more smoothly into the batter.
- 1 teaspoon pure vanilla extract: The warm, aromatic backdrop that makes chocolate taste even more chocolatey.
- ¾ cup buttermilk: The tanginess is magical with chocolate and creates a super tender crumb. No buttermilk? Make your own: stir 2 tsp lemon juice or vinegar into ¾ cup regular milk and let it sit for 5 minutes.
- ½ cup hot coffee: This is the magic wand! The hot coffee “blooms” the cocoa powder, intensifying the chocolate flavor without making it taste like coffee. Use instant coffee dissolved in hot water if needed.
For the Coffee Syrup:
- ½ cup brewed espresso or very strong coffee: This is where the “tiramisu” shine! The stronger the brew, the more authentic the flavor.
- 2 tablespoons sugar: Just a touch to balance the bitterness of the coffee.
- 1 tablespoon coffee liqueur (optional but amazing): Like Kahlúa or Tia Maria. It adds a wonderful depth. For an alcohol-free version, just use a tiny extra splash of strong coffee or a ½ teaspoon of vanilla.
For the Mascarpone Oreo Cream:
- 8 oz (about 1 cup) mascarpone cheese: The star of the show! Make sure it’s cold, straight from the fridge. If you’re in a pinch, full-fat cream cheese can work, but the flavor will be tangier.
- 1 cup heavy whipping cream: Also very cold. This whips up to lighten the rich mascarpone into a cloud-like frosting.
- ¼ cup powdered sugar: Sweetens and stabilizes the cream. Sift it if it’s lumpy!
- 1 teaspoon vanilla extract: The perfect complement to the mascarpone.
- 10 Oreo cookies, filling removed, crushed: Chef’s hack! Twist the cookies apart, scrape the filling off with a knife (you can discard it or, you know, snack on it), and crush the cookies into small bits. I put them in a bag and use a rolling pin for satisfying, therapeutic crushing.
For the Garnish:
- Cocoa powder for dusting: The classic tiramisu finish. Use a fine-mesh sieve for a pretty, snow-like dusting.
- Whole or halved Oreos & optional coffee beans: This is your chance to be an artist! Place them however makes your heart happy.
Let’s Build Some Magic: Step-by-Step
Okay, team! Here we go. We’ll tackle this in three easy acts: the cake, the syrup, the cream, and then the grand finale assembly. Read through once, then let’s get started. You’ve got this!
Act 1: Baking the Oreo Cake Layers
- Preheat and Prep: Crank your oven to 350°F (175°C). This is non-negotiable for a good rise. Grease the bottoms and sides of two 8-inch round cake pans, then line the bottoms with a circle of parchment paper. This is your insurance policy for perfect, unmangled cakes.
- Whisk the Dry Team: In a medium bowl, whisk together the flour, cocoa powder, baking powder, baking soda, and salt. Whisk it really well – we want those leaveners evenly distributed for a uniform crumb. Take a deep breath and smell that chocolatey goodness.
- Mix the Wet Team: In a large bowl, whisk together the sugar and vegetable oil until they look like wet sand. Add the eggs, one at a time, whisking well after each. Stir in the vanilla. The mixture should be smooth and slightly thickened.
- The Grand Batter Merge: Here’s the key: add about one-third of the dry ingredients to the wet and gently stir until just combined. Then, pour in half of the buttermilk and mix. Repeat with another third of the dry, the rest of the buttermilk, and finally the last of the dry ingredients. Don’t overmix! A few streaks of flour are okay. Finally, pour in the hot coffee and stir until the batter is smooth, shiny, and thin. It will be runny – that’s perfect! This is what keeps it so moist.
- Bake: Divide the batter evenly between your two prepared pans. Give them a gentle tap on the counter to release air bubbles. Slide them into the oven and bake for 25-30 minutes. They’re done when a toothpick inserted into the center comes out with just a few moist crumbs attached.
- Cool Completely: This is the patience-testing part! Let the cakes cool in their pans for 10 minutes, then run a knife around the edge and invert them onto a wire rack. Peel off the parchment paper and let them cool completely. Pro-Tip: For faster, more even cooling (and to make slicing easier later), I often wrap the cooled cakes in plastic wrap and pop them in the freezer for 30-45 minutes.
Act 2: The Simple Coffee Syrup
- While the cakes are cooling, make the syrup. In a small saucepan, combine the strong coffee and sugar. Warm it over low heat, stirring, just until the sugar dissolves. No need to boil. Remove from heat and stir in the coffee liqueur, if using. Let it cool to room temperature.
Act 3: The Dreamy Mascarpone Oreo Cream
- In a large bowl, beat the cold mascarpone with the powdered sugar and vanilla until smooth and creamy. If you beat it too long, it can start to separate and look grainy, so stop once it’s smooth.
- In a separate, clean bowl (and with clean beaters!), whip the cold heavy cream until it forms soft peaks. That means when you lift the beaters, the peak of cream should curl over gently.
- Now, gently fold the whipped cream into the mascarpone mixture. Use a big spatula and a light hand, scooping from the bottom and folding over, until no white streaks remain.
- Finally, gently fold in your crushed Oreo cookie pieces. Reserve about ¼ cup of the cream for a super light crumb coat on the outside, if you like.
Act 4: The Grand Assembly
- Slice (Optional but Impressive): For a stunning 4-layer cake, use a long serrated knife to carefully slice each cooled cake round in half horizontally. If you’re new to this, use toothpicks as guides! Stick them evenly around the side of the cake at the halfway point and slice using them as your guide.
- Soak and Stack: Place your first cake layer on your serving plate. Brush it generously with the coffee syrup – you should use about ¼ of the syrup for each layer. This is the flavor infusion station!
- Spread: Scoop a generous amount of the mascarpone Oreo cream onto the soaked layer and spread it evenly to the edges.
- Repeat: Place the next cake layer on top, brush with syrup, and spread with cream. Keep going until all layers are stacked. I like to do a very thin “crumb coat” of the reserved plain cream over the whole cake to seal in crumbs, but you can also just pile the remaining cream on top and spread it decoratively over the top and sides. This is a “naked” or “semi-naked” style cake, so it’s meant to look rustic and delicious, not perfectly smooth!
- Chill: This is crucial! Pop the whole beautiful creation into the refrigerator for at least 2 hours, or better yet, overnight. This allows the syrup to meld, the cream to set, and the flavors to become absolute best friends.
Serving Your Masterpiece
Just before serving, take your cake out of the fridge. Using a fine-mesh sieve, dust the top liberally with cocoa powder. Now, get creative! I love stacking a few whole Oreos in the center and scattering some halved ones around. A few real coffee beans add a gorgeous, aromatic touch. Use a sharp knife dipped in hot water and dried to get those picture-perfect, clean slices. Serve it up on a pretty cake stand and get ready for the “oohs” and “aahs.” A little cup of espresso on the side is the ultimate pairing.
Make It Your Own: Fun Twists & Swaps
- Peanut Butter Paradise: Use Peanut Butter Oreos! Add a tablespoon of peanut butter to the mascarpone cream for an unreal peanut butter cup tiramisu vibe.
- Mint Chocolate Chip: Swap in Mint Oreos and add a drop or two of peppermint extract to the cream. It’s refreshing and decadent.
- Decaf/Different Brew: Use decaf coffee in the cake and syrup for caffeine-sensitive guests. Or, try chai tea for a warm-spiced twist!
- Gluten-Free Friendly: Use your favorite gluten-free all-purpose flour blend (1:1 style) and gluten-free chocolate sandwich cookies. The structure works beautifully.
- Individual Servings: Make it in a 9×13 dish! Bake the cake in the pan, poke holes all over with a skewer, brush with syrup, then spread the cream on top. Dessert for a crowd, zero assembly stress.
Anna’s Kitchen Notes & Stories
This cake has seen some things, friend. The first time I made it, I was so excited I tried to slice the cakes while they were still warm. Let’s just say “cake crumbs everywhere” was an understatement. Lesson learned: patience is a virtue, and the freezer is your best friend for neat layers.
Over the years, I’ve learned that the quality of your cocoa powder truly matters here. Splurge on the good stuff if you can. I’ve also had readers tell me they’ve added a layer of chocolate ganache between the cream and cake for the ultimate chocoholic experience – genius!</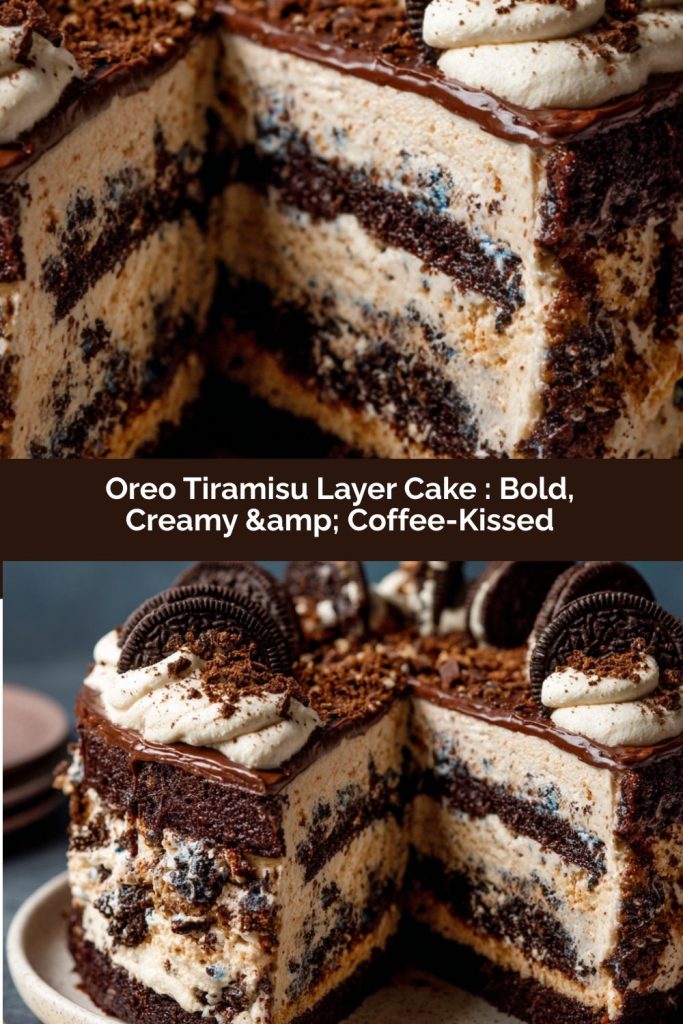
Final Thoughts
This Oreo Tiramisu Layer Cake is what happens when comfort meets celebration. It’s rich without being heavy, elegant without being fussy, and indulgent in the most joyful, share-it-with-people-you-love kind of way. Whether you’re baking it for a birthday, a holiday table, or just because your heart says cake, this dessert delivers big flavor and even bigger smiles. Brew a cup of coffee, slice generously, and savor every layered, dreamy bite.