When Chocolate Calls, We Answer (Sans Oven Drama!)
Hey friend! Anna here, apron dusted with cocoa powder and heart full of chocolate-loving joy. Can we talk about those moments when a chocolate craving hits like a tidal wave? You know the ones – where only something deeply decadent, luxuriously smooth, and maybe even a little bit fancy will do? But then reality whispers: “Do you really want to fuss with flour, butter, baking times, and a sink full of dishes?” Nope. Nuh-uh. Not today. That’s exactly why I’m practically doing a happy dance sharing this **Paleo Chocolate Torte** with you.
Imagine this: A velvety, melt-in-your-mouth chocolate filling so rich it feels like pure indulgence, sitting atop a subtly sweet, nutty-coconutty crust. All held together without a speck of flour, refined sugar, or dairy. And the absolute *best* part? **Zero baking required.** Seriously! This beauty comes together faster than you can preheat an oven and chills into pure magic while you go about your day. It’s the dessert that proves “clean eating” can be downright luxurious and that satisfying your deepest chocolate dreams doesn’t require complicated techniques or hours of effort. It’s the kind of recipe I created for *my* family on busy weeknights when we needed a sweet hug, and for celebrations where we wanted something stunningly delicious without the stress. So, grab your food processor and that can of coconut milk chilling in your fridge – let’s make magic happen together!
That Time Chocolate Saved the Day (Literally!)
PrintPaleo Chocolate Torte
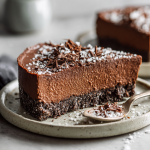
This no-bake paleo chocolate torte is rich, silky, and completely grain-free. With a nutty coconut-pecan crust and a velvety chocolate-almond filling, it’s a luxurious dessert made from clean ingredients—no oven, no flour, no fuss. Perfect for special occasions or whenever chocolate cravings strike hard.
- Prep Time: 15 minutes
- chill time: 3–4 hours
- Total Time: 4 hours
- Yield: 10 slices
Ingredients
Crust:
• 1 cup raw pecan pieces
• 1 cup unsweetened shredded coconut
• ⅛ tsp salt (optional)
Filling:
• 1 cup coconut cream*
• 1 cup dark chocolate chips (60–75% recommended)**
• ½ cup creamy, no-stir almond butter
• ½ tsp vanilla extract (optional)
*Chill a can of full-fat coconut milk overnight and scoop the solid cream from the top.
**Use paleo-friendly chips, or chop a clean dark chocolate bar.
Instructions
In a food processor, pulse pecans, coconut, and salt until fine and sticky. Press evenly into the bottom of an 8-inch springform pan (lined with parchment for easy removal). Place in fridge to chill.
Make the filling:
Heat coconut cream until just steaming (not boiling). Pour over chocolate chips in a bowl. Let sit 1 minute, then stir until smooth and glossy. Stir in almond butter and vanilla (if using) until fully incorporated.
Assemble & chill:
Pour the chocolate filling over the chilled crust. Smooth the top. Refrigerate for at least 3–4 hours, or until set (overnight is ideal).
Serve:
Slice and serve chilled. Optional: Top with flaky salt, berries, or shaved chocolate.
Nutrition
- Calories: 290
- Sugar: 8g
- Sodium: 40mg
- Fat: 24g
- Carbohydrates: 13g
- Fiber: 3g
- Protein: 5g
This torte? It’s my kitchen superhero cape in dessert form. Picture this: It was my daughter’s 10th birthday, and I’d ambitiously planned an elaborate layer cake. Midway through decorating, disaster struck – the layers started leaning like the Tower of Pisa! Panic set in. We had hungry kids arriving in 90 minutes. Then I remembered this no-bake chocolate base I’d been tinkering with. I frantically blitzed pecans and coconut, whipped up the silkiest chocolate filling yet, poured it over the crust, and slid it into the fridge praying to the dessert gods. When I finally unmolded it, it was gleaming and perfect. I topped it with a flurry of fresh raspberries and a sprinkle of sea salt. The kids? They declared it the “best chocolate thing EVER.” My daughter beamed. That torte didn’t just save the party; it became our go-to celebration dessert. It’s proof that sometimes the simplest, most heartfelt creations make the sweetest memories. Every slice still tastes like that little victory!
Your Simple, Stellar Ingredients
Gather these clean, whole-food ingredients! Here’s the breakdown:
For the Nutty-Coconut Crust:
- 1 cup raw pecan pieces: They bring that deep, buttery flavor and hold the crust together beautifully. Chef’s Swap: Walnuts or almonds work great too! Just ensure they’re raw for the right texture.
- 1 cup unsweetened shredded coconut: Adds natural sweetness, chewiness, and binds the crust. Chef’s Tip: Toast it lightly beforehand for an extra nutty aroma (cool before processing!).
- ⅛ tsp salt (optional): Just a tiny pinch makes the flavors sing! I almost always add it.
For the Velvety Chocolate Filling:
- 1 cup coconut cream*: This is the secret to the luscious, creamy texture! Chef’s Insight: *Chill a can of FULL-FAT coconut milk overnight. Scoop ONLY the thick, solid cream from the top – that’s your gold! Discard (or use elsewhere) the watery liquid below.
- 1 cup dark chocolate chips (60-75% cacao recommended)**: Quality matters! Chef’s Must: **Ensure they’re paleo-friendly (check for no dairy, soy lecithin) or chop a clean dark chocolate bar. Higher cacao = deeper flavor, less sweetness.
- ½ cup creamy, no-stir almond butter: Adds richness, body, and a subtle nutty backbone. Chef’s Swap: Cashew butter is dreamy here too! Avoid oily, separated nut butters.
- ½ tsp vanilla extract (optional): A classic enhancer that rounds out the chocolate flavor beautifully. Pure vanilla is my pick!
Let’s Build This Chocolate Dream (Step-by-Step!)
Ready? This is where the fun (and ease!) begins. Follow along:
- Prep is Key: Line the *bottom* of an 8-inch springform pan with parchment paper. Trust me, this makes release day SO much smoother. Give the sides a very light wipe with coconut oil if you’re extra cautious (though usually, the parchment base is enough).
- Crush that Crust: Pop your pecans, shredded coconut, and that tiny pinch of salt into your food processor. Pulse, pulse, pulse! Stop when it looks like coarse sand and starts clumping together when you pinch it. Chef’s Hack: Don’t over-process into nut butter! We want texture, not paste. 8-10 short pulses usually do it.
- Press & Chill: Dump the crust mixture into your prepared pan. Use the bottom of a measuring cup or glass to press it firmly and evenly across the bottom. Get it nice and compact! Slide the pan straight into the fridge to chill and set while you make the filling. Chef’s Tip: A firm press now = no crumbling later!
- Melt the Magic: Place your chocolate chips (or chopped chocolate) into a medium heatproof bowl. Now, gently heat your coconut cream. You can do this in a small saucepan over low heat on the stove (watch it like a hawk – don’t let it boil!) or in a microwave-safe bowl in 20-second bursts until it’s just steaming hot. Chef’s Secret: Steaming, NOT boiling, is crucial! Boiling can cause the chocolate to seize.
- Emulsify to Shine: Pour the hot coconut cream over the chocolate. Let it sit, untouched, for 1 full minute. This softens the chocolate perfectly. Now, grab a whisk or spatula and start stirring gently from the center outwards. Keep stirring until it transforms into a gloriously smooth, shiny ganache. No lumps allowed! Chef’s Whisper: This step is pure therapy. Watch the magic happen!
- Bring in the Butter: Add your creamy almond butter and vanilla extract (if using) to the chocolate ganache. Whisk or stir vigorously until it’s completely smooth and homogenous. You’ll see it thicken slightly – perfect! Taste it (I know you want to!) and marvel.
- Assemble & Dream: Pull your chilled crust out of the fridge. Pour that luscious chocolate filling right over the top. Gently tilt and tap the pan on the counter to level it out and release any air bubbles. Use an offset spatula or the back of a spoon to smooth the top into a perfect, glossy surface. Chef’s Touch: Run a knife dipped in hot water around the very top inner edge for a super clean finish after smoothing.
- The Long Chill: Carefully place the pan back into the fridge. Now, patience, grasshopper! Let it chill for at least 3-4 hours, but honestly? Overnight is IDEAL. This ensures it sets up firm, sliceable, and utterly divine. Cover it lightly with plastic wrap or foil once the top is set to prevent fridge smells.
Making It Pretty: Serving Your Masterpiece
Unmolding time! Run a thin, sharp knife dipped in hot water (and dried) around the *inside edge* of the springform pan. Release the clasp gently. Slide the torte (still on the parchment base) onto a serving plate. Now, the fun part! Garnish simply: A light dusting of cocoa powder, a scattering of fresh raspberries or strawberries, delicate shards of dark chocolate, or a tiny sprinkle of flaky sea salt (my personal favorite – it makes the chocolate POP!). Slice with a sharp knife dipped in hot water for clean cuts. Serve it chilled, and watch eyes light up! This torte is rich, so small slices are perfect.
Play With It! Delicious Variations
Love this base? Try these fun twists!
- Orange Bliss: Add 1 tbsp fresh orange zest + ¼ tsp orange extract to the filling. Garnish with candied orange peel.
- Minty Fresh: Stir ¼ tsp pure peppermint extract (not mint extract!) into the filling. Top with crushed cocoa nibs.
- Berry Swirl: Before chilling, swirl 2-3 tbsp of sugar-free raspberry or cherry jam gently into the top of the filling.
- Nut-Free: Swap the pecan crust for 1 cup sunflower seeds + 1 cup shredded coconut. Use sunflower seed butter instead of almond butter.
- Coconut Lover’s: Toast the shredded coconut for the crust and add 2 tbsp coconut butter to the filling along with the almond butter.
Anna’s Extra Scoop (Because I Can’t Help Myself!)
This torte has seriously evolved in my kitchen! The first version used dates in the crust, which was tasty but sometimes too sticky. Switching to just nuts and coconut? Game-changer for texture and ease. I also learned the hard way about *full-fat* coconut milk – a low-fat version once left me with a sad, soupy mess (lesson learned, friends!). Now I keep a few cans chilling in the fridge at all times, just in case cravings strike. One funny fail involved me trying to unmold it after only 2 hours because, well, *impatient*. Let’s just say it became more of a “chocolate pudding parfait” situation! Still delicious, but not quite the showstopper. The overnight chill is non-negotiable for that perfect, firm-yet-creamy slice. It’s also become my secret potluck weapon – people are always amazed it’s paleo and no-bake!
Your Questions, Answered!
Let’s tackle those common hiccups before they happen:
- “My filling is lumpy/grainy! What went wrong?” Ah, the dreaded seize! This usually happens if the coconut cream was too hot (boiling) or if even a tiny drop of water got into the chocolate. Ensure your cream is just steaming hot, not boiling, and your bowls/tools are completely dry. If it seizes, try whisking in 1 tsp of *warm* coconut cream or almond butter at a time until it smooths back out.
- “Can I use coconut milk instead of coconut cream?” You absolutely need the thick *cream* skimmed from the top of the chilled can for the right texture. Using the thinner liquid will result in a filling that won’t set properly. Save the liquid for smoothies!
- “My crust is crumbling! Help!” Did you press it firmly enough? Give it another good, hard press next time. Also, ensure you processed the nuts/coconut until they were starting to release their natural oils and clump – that’s the binder. If it’s still too dry, a *tiny* drizzle (½ tsp) of melted coconut oil can help bind it.
- “How long does it keep?” Covered tightly in the fridge, this torte is a dream for up to 5 days! The texture actually gets even better after 24 hours. You can also freeze slices wrapped individually for up to 2 months. Thaw overnight in the fridge.
Nutritional Info (Approximate per slice, based on 10 slices)
- Calories: ~290
- Fat: 24g
- Carbs: 13g
- Sugar: ~8g (Naturally occurring)
- Fiber: 3g
- Protein: 5g
- Sodium: ~40mg
Prep Time: 15 minutes | Chill Time: 3-4 hours (Overnight Best!) | Total Time: ~4 hours | Yields: 10 slices
Final Thoughts: Cool, Creamy, and Made for Summer
If summer had a flavor, I’m convinced it’d be this Watermelon Lime Ice Cream—equal parts backyard nostalgia, popsicle stick joy, and barefoot freedom. Whether you’re scooping for a crowd or sneaking spoonfuls straight from the freezer at midnight (guilty), this recipe brings the refreshment without the fuss. No dairy, no drama—just sunshine in every bite. So next time that watermelon stares you down from the counter, you’ll know exactly what to do. Stay cool, scoop bold, and never underestimate the power of fruit and a blender, y’all