Pastel Oreo Truffle Bites: The Dreamy, No-Bake Dessert That Steals Every Table
Hey friend! Have you ever needed a show-stopping dessert that looks like you spent hours in a fancy pastry kitchen, but secretly comes together with almost zero effort? I’m raising my hand so high right now. We all have those moments—a last-minute baby shower invite, a sudden craving for something sweet and pretty, or the desire to make a regular Tuesday feel a little more celebratory.
That’s exactly why I’m so deeply in love with these Pastel Oreo Truffle Bites. They are my not-so-secret weapon for bringing instant joy to any table. Imagine this: a rich, fudgy, melt-in-your-mouth center made from just two magical ingredients, hugged by a crisp shell of softly tinted white chocolate. They look like precious little gems, dusted with edible glitter or a sprinkle of fruity crunch.
The best part? There’s no baking involved. Not a single oven preheat. We’re talking about a recipe that’s all about mixing, rolling, dipping, and decorating. It’s the perfect project to do with friends, with kids, or as a solo kitchen therapy session with your favorite podcast humming in the background. Whether you’re a total beginner or a seasoned cook looking for a stress-free sweet, these truffles are here for you. So, let’s put on some happy music, clear a little counter space, and cook up something amazingly simple and stunning together.
The Pink Box & A Lesson in Simple Magic
PrintPastel Oreo Truffle Bites : No-Bake White Chocolate Party Treats

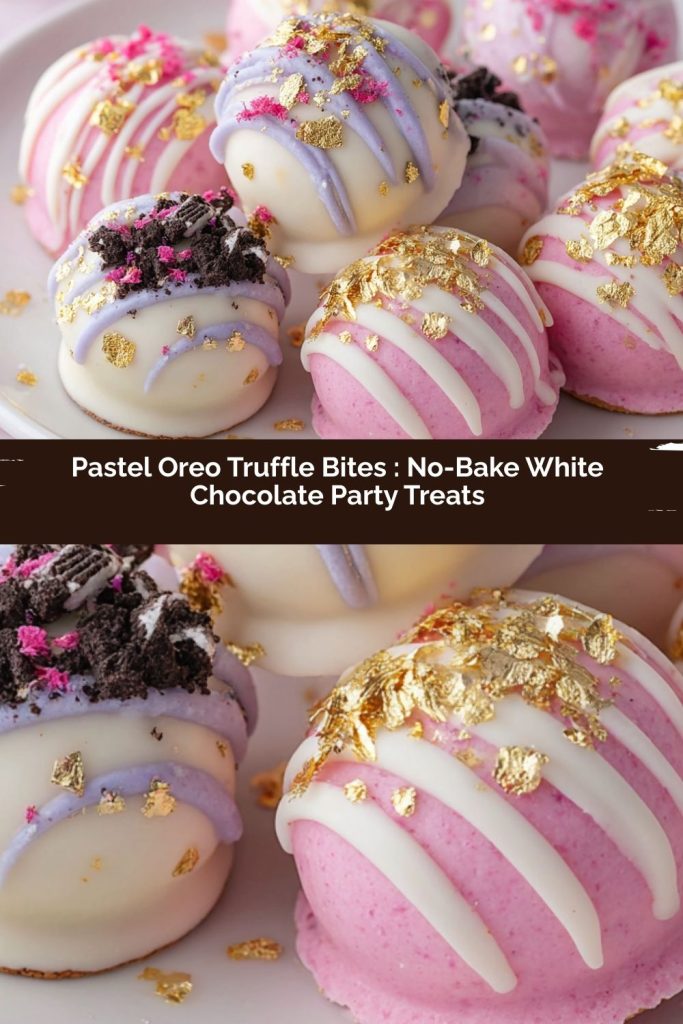
These Pastel Oreo Truffle Bites are creamy, chocolatey, and irresistibly cute. Crushed Oreos blended with cream cheese create a rich, fudgy center that melts in your mouth. Each bite is dipped in tinted white chocolate for soft pastel tones, then decorated with edible glitter, crushed freeze-dried strawberries, or delicate gold leaf for an upscale finish. Perfect for Easter, baby showers, birthdays, or elegant dessert boards, these truffles deliver maximum visual impact with minimal effort.
- Prep Time: 20 minutes
- chill time: 30 minutes
- Total Time: 50 minutes
Ingredients
36 Oreo cookies
8 oz cream cheese, softened
2 cups white chocolate, melted
Gel food coloring (pastel shades)
For decorating (optional):
Edible glitter
Crushed freeze-dried strawberries
Edible gold leaf
Instructions
Crush Oreo cookies into fine crumbs using a food processor.
Mix crumbs with softened cream cheese until fully combined and smooth.
Scoop mixture and roll into 1-inch balls. Place on a parchment-lined tray.
Freeze for 30 minutes until firm.
Divide melted white chocolate into small bowls and tint with gel food coloring.
Dip chilled truffles into tinted chocolate, coating fully. Let excess drip off.
Decorate immediately with glitter, strawberry crumbs, or small touches of gold leaf before the coating sets.
Refrigerate until firm and ready to serve.
Nutrition
- Calories: Approximately 160 per bite
- Protein: 2g
My obsession with these truffles started years ago, at my niece’s “Spring Fling” birthday party. I’d volunteered to bring dessert, envisioning an elaborate layer cake. But, as life goes, a work deadline exploded, and I found myself panicking the night before with zero time for baking. I remembered a basic Oreo ball recipe my mom used to make at Christmas and thought, “What if I just… make them pretty?”
I raided my pantry, grabbed some white chocolate chips and the tiniest drop of pink gel color I had leftover from a cupcake adventure. In a sleep-deprived haze, I rolled, dipped, and sprinkled. The next day, I placed these humble, pastel-pink bites on a platter next to the gorgeous (and I’m sure, time-intensive) cake another guest had brought. You know what happened? The kids and the adults descended on the truffles. The plate was empty in minutes. One friend even asked, “Where did you get these? They look so professional!”
That was the “aha!” moment. It wasn’t about the most complex recipe; it was about the experience—the creamy, familiar flavor, the fun colors, the delightful two-bite size. It was about creating a little moment of edible magic without the stress. Now, I make a version of these for every spring celebration, each time playing with new colors and toppings. They’re my edible love letter to simple, joyful cooking.
Gathering Your Magical Ingredients
Here’s the beautiful part: the ingredient list is wonderfully short. Quality matters here, but there’s also room for easy swaps! Let’s break it down.
- 36 Oreo Cookies: That’s one standard package. We’re using the entire cookie—cream filling and all! It’s the backbone of our truffle flavor. Chef’s Insight: For a different twist, try the Golden Oreos for a vanilla-base truffle, or mint Oreos for a holiday vibe!
- 8 oz (226g) Cream Cheese, softened: This is our magic binder, transforming cookie crumbs into a rollable, decadent dough. Pro Tip: Take it out of the fridge at least 30 minutes before you start. Room-temperature cream cheese mixes seamlessly without lumps. For a dairy-free version, a high-quality vegan cream cheese works wonderfully.
- 2 cups (about 12 oz) White Chocolate Chips or Melting Wafers: This is our canvas for those dreamy pastel hues. Critical Note: I highly recommend using high-quality chocolate melting wafers (like Ghirardelli or Candy Melts). They’re formulated to melt smoothly, set firmly, and hold color beautifully. If using chips, add a teaspoon of coconut oil to help with dipping consistency.
- Gel Food Coloring (Pastel Shades): Gel coloring is a MUST. It tints powerfully without adding liquid, which can cause white chocolate to seize (more on that in troubleshooting!). A tiny dot on a toothpick is all you need for soft shades of pink, lavender, mint, and yellow.
- For Decorating (Optional but So Fun!): This is where your personality shines!
- Edible Glitter or Luster Dust: Adds a magical, sparkling finish.
- Crushed Freeze-Dried Strawberries or Raspberries: Gives a gorgeous pop of color and a hint of natural fruity tartness.
- Edible Gold Leaf Flakes: For the ultimate elegant touch.
- Sprinkles: Tiny pastel jimmies or nonpareils are always a hit.
- Finely Chopped Nuts: Like pistachios for a lovely green crunch.
Let’s Make Some Magic: Step-by-Step
Ready? This process is simple, but I’ve got some key tips in each step to ensure your truffles are absolutely perfect.
- Create the Cookie Crumbs. Place all 36 Oreos in a food processor and pulse until you have fine, even crumbs. No food processor? No problem! Seal the cookies in a sturdy zip-top bag and roll over them with a rolling pin until finely crushed. Chef’s Hack: A few tiny chunks are okay—they add a nice texture—but aim for mostly sand-like crumbs so the truffles roll smoothly.
- Mix in the Cream Cheese. In a large bowl, combine the fine Oreo crumbs with your softened cream cheese. Use a hand mixer, a sturdy spatula, or even your (clean!) hands to mix until fully combined and smooth. It will look like a very thick, chocolatey dough. Pro Tip: Scrape down the sides of the bowl a few times to ensure no dry pockets remain.
- Scoop and Roll. Using a small cookie scoop (about 1 tablespoon) or a measuring spoon, portion the dough. Roll each portion between your palms to form a smooth, 1-inch ball. Place each ball on a baking sheet lined with parchment paper or a silicone mat. Little Secret: If the dough is sticky, lightly dampen your hands with water. It prevents sticking without adding extra moisture to the dough.
- The Chill Time. This step is non-negotiable! Pop the entire tray into the freezer for 30 minutes. Don’t skip this! A firm, cold truffle center is the key to easy, mess-free dipping. It keeps the truffle from falling apart in the warm chocolate.
- Melt and Tint Your Chocolate. While the truffles chill, melt your white chocolate. Do this in a heatproof bowl over a pot of gently simmering water (double boiler) or in the microwave in 20-second bursts, stirring vigorously between each burst. Once smooth, divide it among several small bowls—one for each pastel color you want. Using a toothpick, add a tiny amount of gel food coloring to each and stir until you achieve lovely, even pastel shades.
- The Dip! Remove a few truffles from the freezer at a time (keeping the rest cold). Using a fork or a dipping tool, lower a truffle into the tinted chocolate. Swirl to coat, then lift it out, gently tapping the fork on the side of the bowl to let the excess chocolate drip off. Game-Changer Tip: Slide the bottom of the dipped truffle against the rim of the bowl as you lift it out for a cleaner finish.
- Decorate Immediately. Carefully transfer the dipped truffle back to the parchment-lined tray. Now, in the 10-second window before the chocolate sets, sprinkle on your chosen decorations! This is the fun, creative part. If using gold leaf, use tweezers to gently place a small piece on top.
- Set and Serve. Let the truffles set completely at room temperature, or for faster setting, refrigerate the tray for 15 minutes. Once the chocolate shell is firm, they’re ready to delight everyone!
How to Serve These Little Beauties
Presentation is half the fun! Arrange these pastel truffles on a beautiful platter or a tiered dessert stand for maximum “wow” factor. I love grouping them by color or creating a rainbow gradient. For a party, place each one in a pastel paper candy cup—it looks adorable and makes them easy to pick up. They’re the star of any dessert board, perfectly paired with fresh berries, other small cookies, and a pot of coffee or tea. Honestly, even served straight from the fridge on a simple plate, they’ll disappear in a flash!
Mix It Up! Creative Twists & Swaps
- Chocolate-Dipped: Skip the food coloring and dip in melted dark or milk chocolate for a classic, decadent finish.
- Citrus Zest: Add the zest of one lemon or orange to the Oreo-cream cheese mixture for a bright, zingy center.
- Peanut Butter Paradise: Use Peanut Butter Oreos, and mix a tablespoon of smooth peanut butter into the cream cheese. Dip in chocolate and sprinkle with chopped peanuts.
- Cookie Dough Vibe: Use Golden Oreos. Add a teaspoon of vanilla and a handful of mini chocolate chips to the mixture. Dip in white chocolate.
- “Dirty” Snowball: Roll the finished, chocolate-dipped truffles in a mixture of cocoa powder and powdered sugar for an elegant, dusted look.
A Few Notes from My Kitchen to Yours
This recipe has been my faithful friend for years, and it’s evolved with every batch. I’ve learned that a perfectly round truffle starts with a cold, fast roll—don’t overwork the dough in your hands. I also used to be terrified of dipping until I realized the freezer is my best friend. If a truffle starts to get soft while I’m working, back on the tray it goes for a 5-minute chill.
One of my favorite kitchen stories involves my dog, Biscuit, who is convinced that the sound of the food processor means something is about to hit the floor. He parks himself right at my feet during the crumb-making step with the most hopeful look. (He usually gets one plain Oreo as a bribe to move out of the way!). The point is, your kitchen doesn’t have to be a silent, pristine studio. It can be messy, have a dog underfoot, and still turn out something absolutely gorgeous. That’s the real magic of cooking.
Your Questions, Answered!
Q: Can I make these ahead of time?
A: Absolutely! They are the ultimate make-ahead treat. Store fully set truffles in a single layer in an airtight container in the fridge for up to 1 week. You can also freeze them for up to 2 months. Thaw in the refrigerator before serving.
Q: Help! My white chocolate got thick and lumpy when I tried to color it.
A: This is “seizing,” usually caused by a tiny bit of moisture. Always use gel food coloring, not liquid. If it seizes, try stirring in a teaspoon of vegetable shortening or coconut oil (not butter) to smooth it out. To prevent it, ensure all your tools are completely dry.
Q: My truffle mixture is too soft to roll. What did I do wrong?
A: This usually means the cream cheese was too warm, or the crumbs weren’t fine enough. The fix is easy: just cover the bowl and refrigerate the mixture for 20-30 minutes to firm up. Then scoop and roll.
Q: Can I use reduced-fat cream cheese?
A: I don’t recommend it. Full-fat cream cheese provides the best texture and flavor, and it firms up properly when chilled. The reduced-fat versions have more water and can make the mixture softer.
Nutritional Information
Please note: This is an estimate for informational purposes.
Servings: 24 truffles | Serving Size: 1 truffle
Calories: ~160 | Fat: 9g | Saturated Fat: 5g | Carbohydrates: 18g | Sugar: 14g | Protein: 2g