***
Red Velvet Cinnamon Rolls with Cream Cheese Glaze: A Luxurious Twist on a Classic
Wake Up to a Little Magic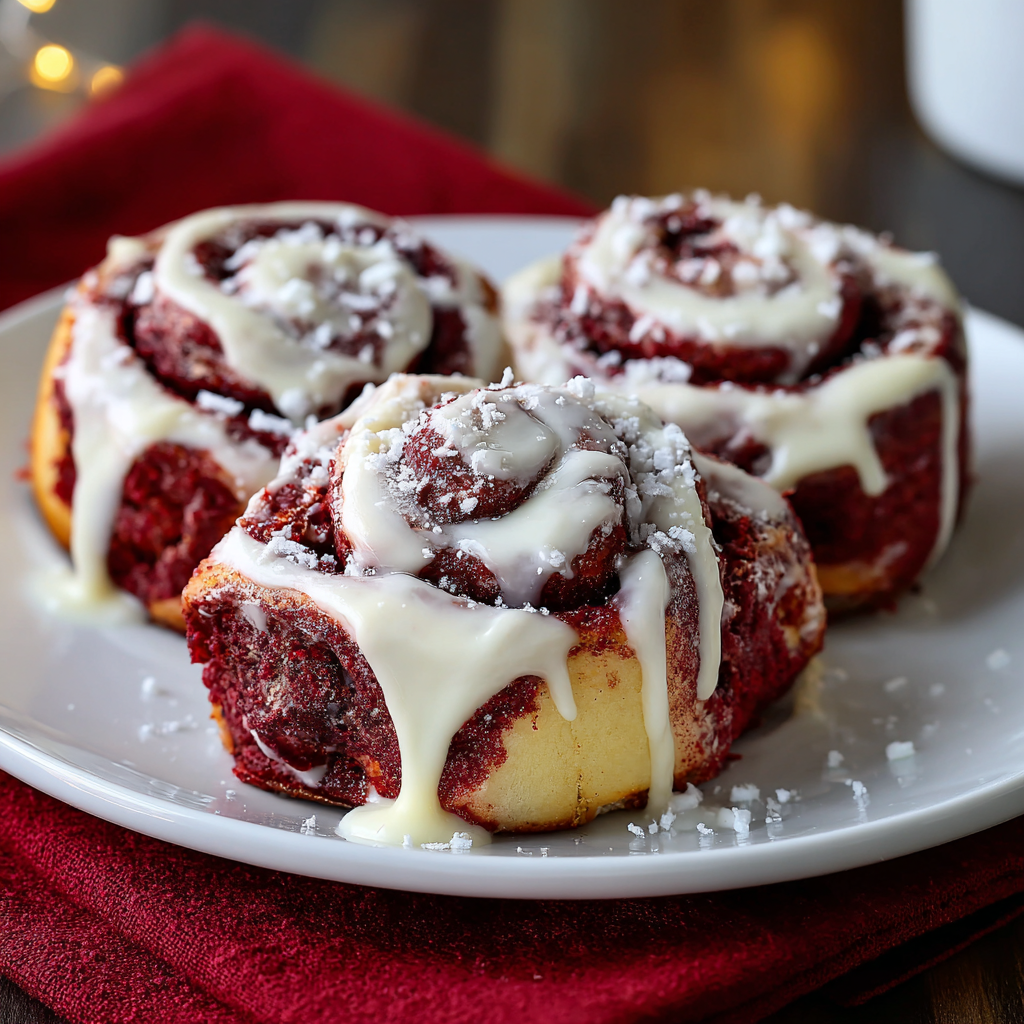
Is there anything better than the smell of warm cinnamon rolls wafting through your kitchen on a slow morning? It’s a universal signal for comfort, for coziness, for a day that’s about to get infinitely better. But what if we took that beloved, feel-good classic and spun it with a little extra sparkle? That, my friend, is exactly what we’re doing today with these show-stopping Red Velvet Cinnamon Rolls.
Imagine the softest, most tender red velvet dough, kissed with just a hint of cocoa and swirled with a rich, buttery cinnamon sugar. Now, picture that warm, beautiful spiral topped with a luscious, tangy cream cheese glaze that melts into every nook and cranny. This isn’t just a breakfast pastry; it’s an experience. It’s the kind of treat that turns a regular Saturday into a celebration and makes holiday mornings feel truly magical.
I know the idea of making cinnamon rolls from scratch can feel a little daunting, but I promise you, it’s a joyful, rewarding process. We’re going to walk through every single step together, with plenty of my favorite chef hacks and encouragement along the way. My goal is to make you feel confident and excited, not stressed. So, tie on your favorite apron, put on some good music, and let’s create something amazing together. Your future self, enjoying a warm roll with a cup of coffee, will thank you.
A Sweet Slice of Nostalgia
PrintRed Velvet Cinnamon Rolls with Cream Cheese Glaze

These Red Velvet Cinnamon Rolls are soft, buttery, and swirled with rich cinnamon sugar—all wrapped in a stunning red cocoa-kissed dough. Finished with a luscious cream cheese glaze, they bring a bakery-style experience right to your kitchen. Perfect for holidays, brunches, or anytime you want to impress without stress.
- Prep Time: 25 minutes
- rise time: 1 hour 15 minutes
- Cook Time: 25 minutes
- Total Time: 1 hour 45 minutes
- Yield: 12
Ingredients
Red Velvet Dough
• 3¾ cups all-purpose flour, plus extra for dusting
• ¼ cup granulated sugar
• 2 Tbsp unsweetened cocoa powder
• 1 tsp salt
• 1 packet (2¼ tsp) active dry yeast
• 1 cup warm milk (110°F)
• ½ cup unsalted butter, melted
• 1 large egg, room temperature
• 1 Tbsp red gel food coloring
• 1 tsp vanilla extract
Cinnamon Filling
• ½ cup unsalted butter, softened
• ¾ cup brown sugar, packed
• 2 tsp ground cinnamon
• ½ tsp vanilla extract
Cream Cheese Glaze
• 4 oz cream cheese, softened
• ¼ cup unsalted butter, softened
• 1½ cups powdered sugar
• ½ tsp vanilla extract
• 1–2 Tbsp milk (as needed for consistency)
Instructions
Make the Dough:
Whisk flour, sugar, cocoa powder, salt, and yeast in a large bowl.
Add warm milk, butter, egg, food coloring, and vanilla. Mix until shaggy dough forms.
Knead on a floured surface (or stand mixer) for 5–7 minutes until smooth and elastic.
Place dough in a greased bowl, cover, and let rise in a warm spot for 1 hour or until doubled.
Prepare the Filling:
Mix softened butter, brown sugar, cinnamon, and vanilla into a spreadable paste.
Assemble & Bake:
Roll dough into a 16×12-inch rectangle. Spread filling evenly.
Roll up tightly from the long edge, seal, and slice into 12 rolls.
Arrange in greased 9×13-inch pan. Cover and rise 30 minutes.
Bake at 350°F for 20–25 minutes until edges are set.
Glaze & Serve:
Beat cream cheese, butter, powdered sugar, and vanilla until smooth. Add milk as needed.
Drizzle over warm rolls and serve immediately.
Nutrition
- Calories: 380
- Sugar: 22g
- Sodium: 260mg
- Fat: 18g
- Saturated Fat: 10g
- Carbohydrates: 48g
- Protein: 5g
- Cholesterol: 55mg
This recipe always takes me right back to my grandma’s kitchen. She was a fabulous baker, and her signature move was a towering, dramatic red velvet cake for every special occasion. The sight of that vibrant red crumb against the stark white frosting felt like pure, edible joy. One particularly snowy Christmas Eve, I decided I wanted to capture that same festive, special feeling, but in a warm, pull-apart form for Christmas morning. I remember tinkering in the kitchen, adding a spoonful of her cocoa blend to my classic cinnamon roll dough and watching it turn the most beautiful shade of mahogany before the food coloring even went in. When I pulled that pan of deep red, cinnamon-scented swirls out of the oven, I knew we had a new family tradition. It’s my way of weaving a little bit of her magic into my own family’s story, one delicious, buttery layer at a time.
Gathering Your Ingredients
Before we begin, let’s get organized! Using quality ingredients and understanding their role is the first secret to baking success. Here’s everything you’ll need.
For the Red Velvet Dough:
- 3¾ cups all-purpose flour, plus extra for dusting: This gives our rolls structure. I like to fluff the flour in the bag before scooping and leveling it off with a knife for the most accurate measure.
- ¼ cup granulated sugar: Just enough to feed the yeast and add a touch of sweetness to the dough itself.
- 2 Tbsp unsweetened cocoa powder: This is the secret weapon! It doesn’t make the rolls taste chocolatey, but it gives that classic, complex red velvet flavor and deepens the color beautifully.
- 1 tsp salt: Crucial for balancing all the sweetness and enhancing the overall flavor.
- 1 packet (2¼ tsp) active dry yeast: Our little miracle worker that makes the dough rise and become soft and fluffy. Make sure your packet is fresh!
- 1 cup warm milk (110°F): The warm liquid activates the yeast. I use whole milk for richness, but 2% works great too. Chef Tip: If you don’t have a thermometer, the milk should feel warm to the touch, not hot.
- ½ cup unsalted butter, melted: For incredible flavor and a tender crumb. Using unsalted lets you control the salt level.
- 1 large egg, room temperature: Adds richness and helps bind the dough. A quick tip: to bring an egg to room temp fast, place it in a bowl of warm water for 5-10 minutes.
- 1 Tbsp red gel food coloring: Gel coloring is my best friend here—it gives a vibrant, deep red color without watering down the dough. Liquid food coloring can be used, but you’ll need more and the color won’t be as intense.
- 1 tsp vanilla extract: The aromatic finishing touch for the dough.
For the Cinnamon Filling:
- ½ cup unsalted butter, softened: Softened is key! It should be spreadable at room temperature. This will make rolling a breeze.
- ¾ cup brown sugar, packed: I love the deep molasses flavor of brown sugar here. Pack it firmly into your measuring cup.
- 2 tsp ground cinnamon: The star of the show! Use a good quality cinnamon for the best aroma.
- ½ tsp vanilla extract: A little extra vanilla in the filling makes it smell and taste incredible.
For the Cream Cheese Glaze:
- 4 oz cream cheese, softened: Again, softening is non-negotiable for a lump-free, silky glaze.
- ¼ cup unsalted butter, softened: Combined with the cream cheese for the perfect creamy base.
- 1½ cups powdered sugar: Sift it if you have time! This prevents any little lumps in your glaze.
- ½ tsp vanilla extract: Because vanilla makes everything better.
- 1–2 Tbsp milk: This is your consistency control. Start with one tablespoon and add more until it’s perfectly drizzle-able.
Let’s Make Some Magic: The Step-by-Step
Ready? This is where the fun begins. Follow these steps, and you’ll be a cinnamon roll pro in no time.
Step 1: Wake Up the Yeast & Make the Dough
In the bowl of your stand mixer (or a large mixing bowl if you’re kneading by hand), whisk together the 3¾ cups of flour, sugar, cocoa powder, salt, and that all-important packet of yeast. This ensures everything is evenly distributed. Now, pour in the warm milk, melted butter, room-temperature egg, red gel food coloring, and vanilla extract. Using the dough hook attachment, mix on low speed until a shaggy, sticky dough comes together. This usually takes about a minute. Chef Hack: Scrape down the sides of the bowl with a spatula to make sure all the flour is incorporated.
Step 2: The Kneading Dance
Now, increase the mixer speed to medium and let it knead the dough for 5-7 minutes. You’re looking for a dough that is smooth, elastic, and slightly tacky but not sticking to the sides of the bowl. If it’s too sticky, add a tablespoon of flour at a time until it pulls away. If you’re kneading by hand, turn the dough out onto a floured surface and knead for 8-10 minutes—it’s a great arm workout! You’ll know it’s ready when you can gently stretch a small piece and see light through it without it tearing (this is the “windowpane test”).
Step 3: The First Rise (Let it Rest!)
Shape your beautiful red dough into a ball. Lightly grease a large bowl with butter or oil, place the dough ball inside, and turn it over to coat it lightly. This prevents a skin from forming. Cover the bowl with a clean kitchen towel or plastic wrap and place it in a warm, draft-free spot. I like to turn my oven on for just one minute, then turn it off and place the bowl inside. Let the dough rise for about 1 hour, or until it has doubled in size. Patience is your friend here!
Step 4: Create the Cinnamon Swirl
While the dough is rising, let’s make the filling. In a small bowl, mix the softened butter, packed brown sugar, cinnamon, and vanilla extract until it forms a spreadable, sandy paste. Set this aside. Now, lightly grease a 9×13-inch baking pan. Once your dough has doubled, punch it down gently to release the air. Turn it out onto a lightly floured surface and roll it into a roughly 16×12-inch rectangle. Chef Hack: Try to roll it as evenly as possible so your rolls are uniform in size.
Step 5: Roll, Roll, Roll Your Dough!
Using an offset spatula or the back of a spoon, spread the cinnamon filling evenly over the entire surface of the dough, leaving about a half-inch border along one of the long edges. Now, starting with the long side opposite the clean border, tightly roll the dough into a log, pinching the clean edge to seal it shut. Chef Hack: For cleaner cuts, pop the log into the freezer for 15-20 minutes to firm up slightly.
Step 6: Slice and Arrange
Using a sharp serrated knife, dental floss, or a bench scraper, carefully slice the log into 12 even rolls. I find dental floss works wonders—just slide a piece under the roll, cross the ends over the top, and pull. It gives you a perfect cut without squishing the dough. Arrange the rolls, cut-side up, in your prepared baking pan. Cover the pan with a towel and let them rise again in a warm place for about 30 minutes. They should look nice and puffy.
Step 7: Bake to Golden Perfection
While the rolls are on their second rise, preheat your oven to 350°F (175°C). Once puffy, bake the rolls for 20-25 minutes. You’re looking for the edges to be set and the tops to be lightly golden. A toothpick inserted into the center of a roll should come out clean. Chef Hack: If the tops are browning too quickly, you can tent the pan loosely with aluminum foil.
Step 8: The Grand Finale: The Glaze!
While the rolls are baking, make the glaze. In a medium bowl, beat the softened cream cheese and butter together until completely smooth and lump-free. Gradually beat in the powdered sugar and vanilla. Start with 1 tablespoon of milk and beat until smooth. Add more milk, a teaspoon at a time, until you reach a thick but pourable consistency. As soon as the rolls come out of the oven, drizzle that glorious glaze all over the top. The heat from the rolls will help it melt into every delicious layer.
How to Serve These Beauties
For the ultimate experience, serve these red velvet cinnamon rolls warm, when the glaze is still a little melty and the swirls are soft and tender. I love placing the whole pan in the middle of the table and letting everyone dig in—it’s the epitome of cozy, shared joy. They’re perfect with a strong cup of black coffee to cut through the sweetness or a tall glass of cold milk. For a truly decadent brunch, pair them with some crispy bacon or savory breakfast sausages to balance out the meal. They are an absolute showstopper on a holiday brunch table or as a special weekend treat.
Get Creative! Recipe Variations
Love the base recipe? Here are a few fun ways to mix it up!
- Chocolate Chip Swirl: Sprinkle ½ cup of semi-sweet chocolate chips over the cinnamon filling before rolling.
- Orange Zest Zing: Add the zest of one orange to the cream cheese glaze for a bright, citrusy twist.
- Pecan Praline: Before the second rise, sprinkle chopped pecans over the rolls in the pan. For extra crunch, you can also mix some into the filling.
- White Chocolate Drizzle: Swap the cream cheese glaze for a simple glaze made with melted white chocolate and a splash of cream.
- Naturally Red: For a natural food coloring option, you can experiment with beet powder mixed into the wet ingredients, though the color will be more muted.
Anna’s Chef Notes & Kitchen Stories
This recipe has been a labor of love, and it’s evolved so much since that first Christmas Eve experiment. I’ve learned that the quality of your cinnamon truly makes a difference—it’s worth splurging on a good one! I also used to be so impatient with the rising times, but I’ve learned that giving the yeast its moment to shine is what creates that incredibly soft, pillowy texture we all dream of.
One of my favorite kitchen bloopers was the time I accidentally used hot milk instead of warm and “killed” my yeast. The dough just would not rise! My husband came into the kitchen to find me having a full-on conversation with a bowl of stubborn red dough. We had a good laugh, I started over, and now I’m religious about checking the milk temperature. It’s all part of the journey! Don’t be afraid of mistakes; they’re just stepping stones to becoming a more confident baker.
Your Questions, Answered!
Here are answers to some common questions to ensure your baking success.
Can I make these rolls the night before?
Absolutely! This is my go-to method for stress-free mornings. After you’ve placed the sliced rolls in the pan, cover them tightly with plastic wrap and pop them in the refrigerator instead of letting them do their second rise on the counter. The next morning, take the pan out of the fridge, remove the plastic wrap, and let them sit on the counter for about an hour to come to room temperature and finish rising. Then, bake as directed. You may need to add a couple of minutes to the baking time since you’re starting with a cold pan.
My dough didn’t rise. What went wrong?
This is usually one of two things: old yeast or liquid that was too hot. Yeast is a living organism, and if it’s past its expiration date, it won’t work. Always check the date! Secondly, if your milk was too hot (above 130°F), it can kill the yeast. The liquid should feel warm, like bathwater, not scalding. If you suspect either of these happened, it’s best to start fresh.
Why is my filling leaking out everywhere while baking?
A little bubbling is normal, but a major leak usually means the rolls weren’t rolled tightly enough, or the sealing edge wasn’t pinched shut securely. Also, make sure you’re using softened, not melted, butter for the filling. Melted butter is more likely to seep out during baking.
Can I freeze these cinnamon rolls?
Yes, you can! The best way is to freeze them after the second rise, before baking. Arrange the risen rolls on a parchment-lined baking sheet and freeze until solid, then transfer them to a freezer bag. When you’re ready to bake, place the frozen rolls in the greased pan, cover, and let them thaw and rise for 3-4 hours (or overnight in the fridge), then bake. You can also freeze baked rolls; just warm them up in the oven before glazing and serving.
Nutritional Information (Per Roll)
Please note: This is an estimated nutritional breakdown.
- Calories: 380
- Protein: 5g
- Carbohydrates: 48g
- Sugar: 22g
- Fat: 18g
 Saturated Fat: 10g
Final Thoughts
At the end of the day, these Red Velvet Cinnamon Rolls are more than just a pretty swirl on your holiday table—they’re a little moment of magic. The kind that fills your kitchen with warm, cozy aromas and brings everyone wandering in, asking, “Are they ready yet?” Whether you’re serving them on Christmas morning, saving one for a late-night treat, or sharing a pan with people you love, these rolls deliver that perfect mix of comfort, joy, and celebration.Here’s to soft dough, extra glaze, and making traditions that taste as sweet as they feel. Enjoy every bite, friend—you absolutely earned it.